Needing ideas for increasing grain mill hopper size.

Homebrew Talk - Beer, Wine, Mead, & Cider Brewing Discussion Forum

Help Support Homebrew Talk - Beer, Wine, Mead, & Cider Brewing Discussion Forum:

This site may earn a commission from merchant affiliate links, including eBay, Amazon, and others.

slayer021175666

Well-Known Member
Joined
Sep 24, 2020
Messages
561
Reaction score
254
I have the "crop duster" roller mill. They claim it will hold 7 lbs which is about 1/2 the size I need. Anyone got any ideas for increasing the hopper size? A carboad box would be a quick way to make one but, I want something nicer looking and sturdier, of course. Tell me what you think, please and post up some pics if you have any.
Thanks
 
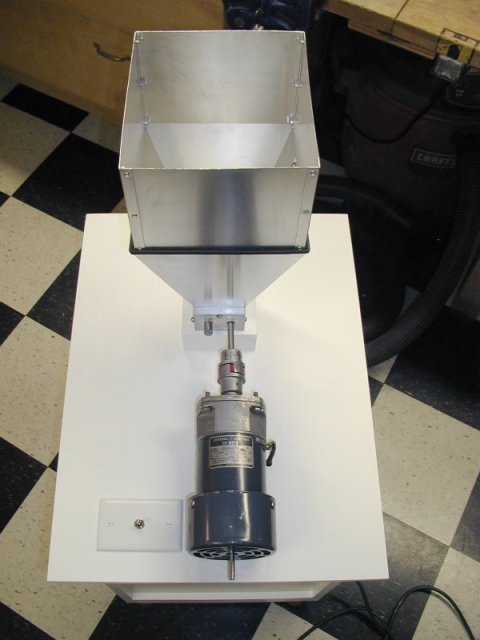
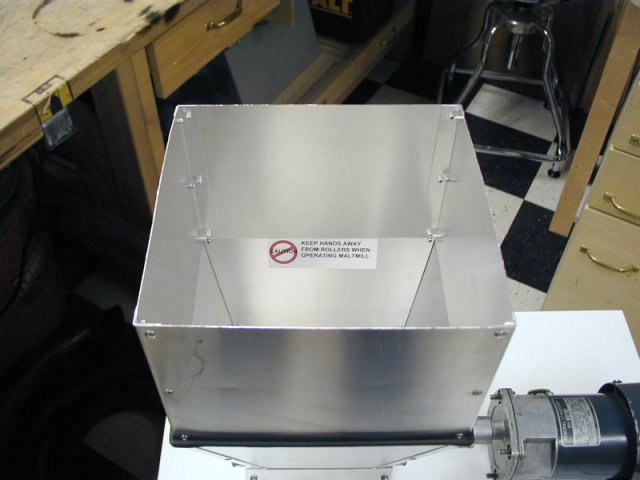
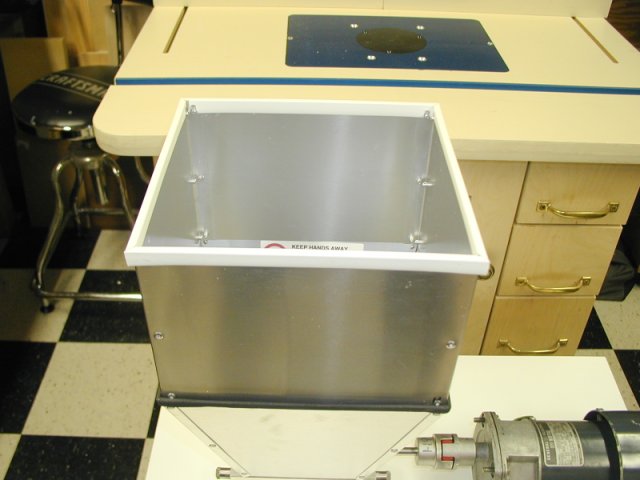
The Barley Crusher I bought ~14 years ago came with a "7 pound" hopper, which definitely isn't big enough for even a five gallon batch.
I fabricated an extension using aluminum sheet and pop-rivets, then trimmed the cut edge on top with slip-on plastic report binders.

grain_mill_station_01_sm.jpg
grain_mill_station_03_sm.jpg


grain_mill_station_07_sm.jpg
grain_mill_station_08_sm.jpg


hopper.jpg


I used the shortest aluminum pop rivets with backing washers which worked out well. You can see where the rivet lines are holding the panels together.
The extension simply presses into the top of the original hopper which has its own edge guards that work to hold the extension in place. Never had it fall out.

The Barley Crusher eventually wore out the rollers in one direction, so after picking up a Cereal Killer (with its own 7 pound hopper) for barley milling duty, I reversed the BC rollers and now use that mill (which works great again) strictly for small grains like wheat, oats and rye. The hopper extension fits the Cereal Killer's same as the BC, so I can use the extension with either mill.

hth!

Cheers!
 
I use a 5 gallon water jug with the bottom cut off but after googling what your mill is I don’t think that will work.
 
it wouldn't be pretty but, i just drilled a 2.5" or so hole in the bottom of a 5 gallon bucket and sit ontop my tiny JSP hopper. with some short two by fours, to keep it steady on the sides...hold about 23 lb's of grain...

Where can a guy buy the aluminum sheet, locally?


ACE or True Value, lowe's, home depot? i know i bought a sheet of galvenized at ACE before.
 
I do commend those with the ingenuity and fabrication skill to accomplish this-however I need to just ask one question to those who deem it necessary...

What is wrong with just filling the hopper 2(or more times) and just grinding in batches? If one cannot carry everything necessary from point A to B, just make a second trip. Rome wasn’t built in a day, etc., etc.

I think I had to refill mine twice for a 13lb grain bill recently. (I’ve only used it twice) I was kind of grateful for the break as my hand was cramping from holding the drill to ensure it wasn’t going full speed....and the motor was getting pretty dang hot. I’d hate to kill my damn drill.
 
The Barley Crusher I bought ~14 years ago came with a "7 pound" hopper, which definitely isn't big enough for even a five gallon batch.
I fabricated an extension using aluminum sheet and pop-rivets, then trimmed the cut edge on top with slip-on plastic report binders.

View attachment 708109View attachment 708110

View attachment 708111View attachment 708112

View attachment 708113

I used the shortest aluminum pop rivets with backing washers which worked out well. You can see where the rivet lines are holding the panels together.
The extension simply presses into the top of the original hopper which has its own edge guards that work to hold the extension in place. Never had it fall out.

The Barley Crusher eventually wore out the rollers in one direction, so after picking up a Cereal Killer (with its own 7 pound hopper) for barley milling duty, I reversed the BC rollers and now use that mill (which works great again) strictly for small grains like wheat, oats and rye. The hopper extension fits the Cereal Killer's same as the BC, so I can use the extension with either mill.

hth!

Cheers!
Nice! Looks professional.
 
My mill is A corona mill and the hopper it comes with holds like 3 lbs so I had to add something bigger. I also motorized it so all I do is fill the hopper turn it on and walk away and do other brewing things. So if I can fill the hopper with all the grain I won’t have to worry about it till it’s done.
 
[...]What is wrong with just filling the hopper 2(or more times) and just grinding in batches? [...]

[shrug] Fabricating a hopper extension is an inexpensive, rather low-skill task, and provides a payback in convenience.

I mill on brew day mornings literally minutes before doughing-in, and I use the unattended grinding intervals to do other things in preparation.
I already have to fill the ~15 pound hopper twice as it is...

Cheers!
 
I mill the day before brewing due to the dust created by milling. I even mill in a different room, but still mill the day before brewing. Milled grains are stored in a food grade air tight bucket awaiting use on brew day.
But, what about LODO? do you purge the bucket before filling it? :bigmug:
 
I would like to hear more about the wet milling. Is there a good write up or something on it? Internet is vague on the subject.
 
First, I don't know if "conditioning" = "wet milling", so I'm referring to the former.
Basically you dampen the barley malt using 1-2% water by weight then mill. I stick towards the 1% side.

I'll run through the way I do it:
- I always use three buckets for milling as it takes two buckets to hold the bill and a third under the mill.

- I use that third bucket, putting around 4 pounds of malt in, rest it on the bench top at a ~45° angle, then mist the malt as I rotate the bucket along the bench top. This exposes the grain well down into the bucket as well as that above so misting coverage is favorable.

- After a few sprays I put the sprayer down and mix the malt by hand until it feels evenly dampened. Then I dump in another 4 pounds and repeat until the first grain bucket is empty, pour the dampened malt in the mill, and repeat for the second grain bucket.

Tips:

- Imo, it's important not to over-wet the malt, and do not tarry getting the malt in the mill. This is because all the process is trying to accomplish is to make the husks flexible enough to pass through the mill without fragmenting, and that does not take much moisture or time. You definitely do not want to let the moisture get into the endosperm as that can make a mess out of a mill and actually slow the milling.

- Reserve a full pound of base malt prior to the misting process. Run that pound through the mill after all of the conditioned malt. This will help knock out any caking and dry out the rollers.

As I mentioned, the difference in the dust produced is profound - there's very little if done right. The inside of my mill cabinet used to be thickly coated with grain dust - worst was during the static-producing dry days of deep winter here - that required a lot of vacuuming to clean up. Since I started conditioning there have been times I didn't need to use the shop vac at all.

Finally, the other, perhaps more important benefits: it produces amazingly fluffy husks, and you can gap your mill tighter to up efficiency as a result. I went from an .038" gap on my CK 2-roller to .032" for the base malts I use the most (GP, Weyermann, and Briess 2-row) with conditioning and my mlt recirculation rate and lautering speed were maintained...

Cheers!
I havn't conditioned my grain but I have a mill cabinet as well. It doesn't take long for me to vacuum out the mill cabinet, I'm guessing that it takes me less time to vacuum out my mill cabinet then it would take to condition my grain. But then again I may try conditioning my grain for comparison.
 
Will it take up a lot more space in the tun? I only have a 10 gallon tun and I do 10 gal batches. Sometimes, the mash right up to the top, already.
 
It shouldn't, it's the same amount of material and once soaked and incorporated in the mash it should occupy the same space.

On the dust thing...it's not the most important benefit, but without conditioning when I dumped 20-something pounds of dry crushed malt in my hlt there was always an unavoidable mushroom cloud of grain dust that settled everywhere...

Cheers!
 
Thank you.
Did you see my post about harvested mason jar stored yeast and how to tell if its gone bad? I'd like to know what you think.
 
As a bonus.. it makes milling way faster if you have old worn out rollers. Half a cup of water roughly stirred through a 6kg malt bill for a few minutes before milling means I can still use my old second-hand mill with worn knurling; it barely grabs for more than a few seconds at a time and threatens to burn out my drill without it. Even half a kilo of conditioned grain mixed in with dry stuff keeps the rollers moving with that satisfyingly crunchy milling sound.
 
So what do you do when your buddy decides to upgrade his grain mill, and give you his Cereal Killer? You do a search on this site and find this thread.

Took everything apart, cleaned the bearings, greased everything up, and put it back together. Then I was obligated to follow along on another @day_trippr mod.

E0023354-34A0-4193-86AD-DE6DDEB7C68A.jpeg
 

Latest posts

Back
Top