Native ESP8266 BrewPi Firmware - WiFi BrewPi, no Arduino needed!

Homebrew Talk - Beer, Wine, Mead, & Cider Brewing Discussion Forum

Help Support Homebrew Talk - Beer, Wine, Mead, & Cider Brewing Discussion Forum:

This site may earn a commission from merchant affiliate links, including eBay, Amazon, and others.
That was all Davespeak for they definitely get hot when switching (like in a PWM,) they can get a little hot when turned on just from internal resistance, and it's all about the specs.

I also agree that all SSRs are not created equal. Chinese parts are a "you get what you pay for" thing in most cases. THAT said, I have used this one from our friends at Inkbird, and have been happy. I was using it for a PWM application, and while it got warm and needed the heatskink, I didn't melt it. They don't provide specs any more than the rest of the Chinese sellers, but they have been good to this community and seem to source a good product. You could always email Inkbird for the specs, I have in the past and someone has always answered.

For a little more surety on the cooling, make sure to use some thermal paste between the heatskink and the plate to which it mounts.
 
I just pushed v15-beta5 to BrewFlasher. This release adds the following vs. Beta 4:
  • Automatic reset if the Bluetooth scanner stops responding
  • Converts from active to passive scanning mode (see note below)
  • Adds ability to configure minimum delays for heating/cooling
A major bug was discovered in Beta 4 where due to issues with Espressif's Bluetooth stack the Bluetooth scanner could stop detecting devices. If Inkbird or Tilt sensors were used as a beer/fridge sensor, this could lead to temperature control ceasing to function. Beta 5 adds a check for this condition which will then reset the controller -- but this appears to be triggered about once every 3-4 hours on average (which is far more frequently than I would like).

To prevent this, I have temporarily switched from "active" to "passive" scanning mode which should reduce the frequency of this occurring -- but will also prevent the use of Inkbird sensors with this version of the firmware. This will remain necessary until v3.x of the Arduino framework is released, incorporating the library changes from v5.x of esp-idf -- assuming that the chatter in the esp-idf issues are correct, and v5.x actually resolves the problem. I am not expecting this to be released for several months, however, so Inkbird support appears to now be a v16+ feature.
 
I just pushed v15-beta6 to BrewFlasher. This release may fix a bug that might be present in beta 5 which prevents heating/cooling from shutting off at the designated time. The problem with the bug is that it shouldn't exist, and therefore may be hardware-related rather than software -- but this change has no effect at worst, and makes things a bit more explicit at best, and thus makes sense to be included in v15.
 
v15 - ESP32, Bluetooth, and HTTP Interface Support

I just officially released v15 of the BrewPi-ESP firmware. For those who have read my beta announcements, you know what this contains, but for those who have not followed this firmware contains a number of significant changes and enhancements, as compared to the previous wide release (v11):
  • File system initialization enhancements
  • Substantial refactoring and upgrades (e.g. JSON handling)
  • Unified handling of Serial and WiFi output
  • Add ability to add human-readable names to probes (Thanks @speshak)
  • Swap SPIFFS for LittleFS for ESP8266 Builds
  • Fix message displayed with temperature control is set to “OFF” (rather than IDLE)
  • Added WiFi information command to get signal strength
  • Add support for ESP32 and ESP32-S2 modules
  • Add Bluetooth scanning support
  • Add support for using Tilt Hydrometers as a temperature sensor
  • Add support for using TPLink Kasa WiFi switches
  • Add mandatory confirmation to firmware to prevent accidental EEPROM resets (“network scanner” bug)
  • Add support for TFT LCD Displays on ESP32
  • Add support for "extended settings" not traditionally part of the BrewPi firmware
  • Added a new HTTP interface for quick sensor assignment & settings updates
  • Adds ability to configure minimum delays for heating/cooling

Note about future support

v15 will likely be the final official release of this firmware for the ESP8266 microcontroller. Although there may be future releases, it is highly recommended that the ESP32 be used for new builds, and existing users that want to use new, upcoming features should explore migrating to the ESP32-S2 which - in builds using Lolin's D1 Mini - has a pin-equivalent board available that may be a direct, drop-in replacement. For discussion as to why, please see this post.

Note about the project name

As a result of the migration away from the ESP8266, the project is also going to undergo a name change from BrewPi-ESP8266 to BrewPi-ESP. This shouldn't really matter, but if you ever see me refer to "BrewPi-ESP", thats the same thing as "BrewPi-ESP8266".


As always, feedback, bug reports, and feature requests are always welcome - both here and on GitHub.
 
If anyone is interested, I've recently been changing out some equipment around here, and happen to have an extra (older) BrewPi-ESP8266 build available for free* over here. Shoot me a PM if interested!
 
I'm having an odd issue where BrewPi isn't kicking on cooling, but goes straight to idling. I have them it up properly, but this is the first time actually using them to ferment a beer. I say properly, I tested heating and cooling using a light, and the light turned on appropriately when heating and cooling was called for.

I brewed a beer today and racked out at 59F. I hooked my glycol lines up the coils in the fermenter, and plugged in the light to heat to 66F. To my surprise, it heated up to 76F, and then won't cool. If I change the temp to 82F, it'll turn on heating quickly, but if I then turn the temp back to 66F, I'll get a message about "time left to heat", then when that timer clicks off, it'll go straight back to idling.

It's not an issue with the glycol chiller. The setup is a reservoir in a mini-fridge with two pumps. The other BrewPi doesn't appear to have an issue cooling using the glycol, and when I plug the pump directly in to power, it turns on and starts working.

Any help would be greatly appreciated.
Since you mention glycol, just for the avoidance of all doubt - how do you have your fridge sensor hooked up? (And to where?)
 
Assume you've looked at the post just above number 3763 that mentions possible bug re cooling heating?
That was an interesting one. I wish I had taken better notes as to what exactly I saw in the logic — here’s the pull request. I just remember seeing something weird happen in testing and tracing it back to the change that became this PR. Very weird all around.
 
Since you mention glycol, just for the avoidance of all doubt - how do you have your fridge sensor hooked up? (And to where?)
Fair question. The mini-fridge is cooled via an Inkbird ITC-308, with the probe placed in the glycol/water mix, and the fridge power cord hooked up to the cooling side of the Inkbird. Verified temperature using a separate thermometer, so it's cooling properly, and the pumps run. Based on this build thread: Metzen's Mini Fridge Glycol Chiller Conversion
 
Fair question. The mini-fridge is cooled via an Inkbird ITC-308, with the probe placed in the glycol/water mix, and the fridge power cord hooked up to the cooling side of the Inkbird. Verified temperature using a separate thermometer, so it's cooling properly, and the pumps run. Based on this build thread: Metzen's Mini Fridge Glycol Chiller Conversion
HUH! That's an interesting thread -- I'm hoping to be in the market for a Glycol system at some point -- I'll have to take a look to see if that might work!

How are the probes hooked up to your BrewPi? Do you have both a beer and a fridge probe? Where is the fridge probe?
 
I just upgraded my build to v15. It appeared to flash ok and boots up but when it boots the letters come across the screen slowly like an old typewriter. I can log into the web interface but it is extremely slow. Pages take 2-3 min to open. Under about controller it show the following screen. I am using safari on Mac.

Thanks for all the hard work. I love building these!
 

Attachments

  • Screenshot 2023-05-08 at 6.01.21 PM.png
    Screenshot 2023-05-08 at 6.01.21 PM.png
    104.4 KB · Views: 0
I just upgraded my build to v15. It appeared to flash ok and boots up but when it boots the letters come across the screen slowly like an old typewriter. I can log into the web interface but it is extremely slow. Pages take 2-3 min to open. Under about controller it show the following screen. I am using safari on Mac.

Thanks for all the hard work. I love building these!
What board?
 
I just upgraded my build to v15. It appeared to flash ok and boots up but when it boots the letters come across the screen slowly like an old typewriter. I can log into the web interface but it is extremely slow. Pages take 2-3 min to open. Under about controller it show the following screen. I am using safari on Mac.

Thanks for all the hard work. I love building these!

One of mine does the same thing, it's really wierd. One of mine loads super quick and the other is extremely slow. They are both ESP32-S2 mini builds . They were flashed a couple weeks apart (I believe the quick one was beta 4 and the other was beta 5 version, but I won't swear to it. I thought one processor was just slow for some reason. Same difference when I direct access them via the wifi web page, the latest one is WAY slower to load. As always, Thanks for all you do @Thorrak !
 
Since I am having the slowness issue I decided the flash the other 2 esp32-s2 boards I had (i bought a 3 pack) . Should these be able to flash right out of the package witohut installing headers and putting in the PCB? I try to flash the 2 new ones with brewflasher and cant get past 1200 baud touch, which says ..done and then it trys to connect and flash but says cant flash. Maybe the other 2 boards are bad ? Not sure how to check (I don't see a LED on these boards, not even sure if they have one). Now I cant even flash the original esp32-s2 which was flashing fine a few days ago. I tried the reset method with the 2 side buttons and still wont flash.

Thorrak, I am trying to clean out all the old controller boards I have and I remember you saying there is a problem with the Lolin D1 mini v 4.0. Is this still the case. If they are of no use I will get rid of them.

Thanks again! I am still learning and appreciate the help and hard work you put in.
 
Last edited:
HUH! That's an interesting thread -- I'm hoping to be in the market for a Glycol system at some point -- I'll have to take a look to see if that might work!

How are the probes hooked up to your BrewPi? Do you have both a beer and a fridge probe? Where is the fridge probe?
So an update on this. Not surprisingly, the issue was that I'm bad at wiring. I had the NO and COM wires switched in the relay. Takeaway is don't try to troubleshoot things when you're frustrated. I swear I looked at it a million times when I couldn't get the cooling to kick on. Didn't brew for a couple of weeks, decided to take a look, and saw it right away.

But strong recommend on that mini-fridge glycol project. It works great! I probably need to run a fan over the compressor, but I can keep 2 lagers going at the same time, or cold crash 1 beer and keep another at ale temps.
 
Since I am having the slowness issue I decided the flash the other 2 esp32-s2 boards I had (i bought a 3 pack) . Should these be able to flash right out of the package witohut installing headers and putting in the PCB? I try to flash the 2 new ones with brewflasher and cant get past 1200 baud touch, which says ..done and then it trys to connect and flash but says cant flash.

I swear that I wrote documentation on this, but of course I'm struggling to find it now. For the S2 boards, the “1200 bps hack” is a function of the Arduino boot loader — not a function of the device itself. As a result, for the first flash of a “fresh out of the box” controller, you will need to hold down the “boot”, “flash”, or “0” button as you plug the device in to the computer being used to flash it to force it into the mode where it is flashable.

Try that and let me know if you still have any issues!

Thorrak, I am trying to clean out all the old controller boards I have and I remember you saying there is a problem with the Lolin D1 mini v 4.0. Is this still the case. If they are of no use I will get rid of them.

Thanks again! I am still learning and appreciate the help and hard work you put in.

Great question. I don’t test against the v4.0 boards as a result of the issues we were experiencing, but I’m assuming there hasn’t been movement towards a fix. I’ll try to test it tonight and see if it can flash now.
 
Nope can't any of the 3 esp32-s2 to flash. Maybe I messed them up trying so many times. The one that is in my current controller build still works and brings up data on the LCD screen it is just very slow.
 
I've had the best luck flashing the ESP32-S2 mini's with the Brewflasher App. The only way I've gotten these to flash is to hold both the buttons to put it flash mode before selecting the port. I select the erase flash, and then hold the "Boot", or "0" button while selecting the "download firmware and flash controller" button. Keep the button held until you see it erasing the flash before letting go. It has always given me an error message at the end saying that it failed, but it still works. If you cycle power or press the reset button it should show up as a wifi AP after a minute or two.
 
I finally was able to flash all 3. Like you said RocketBrewer, had to try combinations of button presses on the chip to get it into flash mode. Still runs very slow though. Web interface very slow and even the temp probes update very slowly. I am going to do a build with the ESP32 pro and see how that goes.
 
Thorrak, I am trying to clean out all the old controller boards I have and I remember you saying there is a problem with the Lolin D1 mini v 4.0. Is this still the case. If they are of no use I will get rid of them.

Took a bit longer to test than I thought as I had some ESP8266-incompatible changes in the v16 branch, but after bringing the ESP8266 support up to date, unfortunately, still no luck with the v4.0.0 hardware. :(

I'd say hang on to it a bit longer -- I'm waiting on the esp-idf v5.1 update for ESP32, and I'm hoping that it will also come with some improvements on the ESP8266 side of things, but if you need to reclaim the space I would go ahead and sell/toss the v4.0.0 chips.
 
I just released Beta 3, which adds an HTTP interface to the controller:

View attachment 813958


From this interface, you can:
  • See the current status (including the virtual LCD)
  • Configure/assign pins, Tilts, Inkbird sensors, and OneWire temp sensors
  • Change the temperature control mode & set point
In other words: This provides an emergency fallback in case your local install of BrewPi Remix or Fermentrack is on the fritz on brew day.

For obvious reasons, this has only been added to WiFi controllers. Just like the "telnet" interface, anyone that can connect to the interface can change your settings, so you will want this behind a firewall (and not accessible to the open internet). This has been added to the ESP32-S2, ESP8266, and ESP32 WiFi binaries, but will not work with the "no spiffs init" versions.
 
Excuse my ignorance but how do I update this? Its been awhile since I first built mine? Its not part of the firmware updates you can do in fermentrack is it?

And then how would I acccess the HTTP interface? What IP address as the one I use now takes me to fermentrack?
 
Excuse my ignorance but how do I update this? Its been awhile since I first built mine? Its not part of the firmware updates you can do in fermentrack is it?

And then how would I acccess the HTTP interface? What IP address as the one I use now takes me to fermentrack?
To update, you would re-flash your controller using the newly released firmware. You can do this using Fermentrack's built-in firmware flasher, using BrewFlasher Desktop, or using BrewFlasher Web. What you want are the "v15" firmware versions (not the "experimental" or "beta" versions)

If you're using Fermentrack then the HTTP interface is more of a backup than anything. You would need to get the IP address of your controller (which should be displayed on the controller's screen at startup) and enter it into a web browser connected to the same network. Again, however - this is not necessary if you've got a running version of Fermentrack, as Fermentrack provides all of the functionality that the on-controller HTTP interface provides.
 
I realized this past week that with the v15 release, the user interface is now internationalizable. That said, I, unfortunately, am a monoglot.

This is a request for help -- If anyone out there happens to be bilingual and is fluent in a language that you'd like to see the BrewPi-ESP8266 interface translated to, please reach out! I can't guarantee that I can get all the strings in the hardware translated (ie. the LCD) but the Web UI can be translated, for sure.
 
Just an FYI to anyone out there who uses the ESP32-S2 —with @RocketBrewer ’s assistance I was able to track down some bugs in the v15 release of BrewPi-ESP which were causing this platform to be extremely slow. The fix has been released as v15a - available now on GitHub and in BrewFlasher.
 
For brand new users, my recommendation is to either use the ESP32 (preferably with a TFT!) or an ESP32-S2. The LoLin S2 Mini is a pin compatible replacement for the D1 Mini, meaning that both new and existing builds using my PCB designs should be able to directly replace the controller with a LoLin S2 Mini without other hardware changes.

If you have any questions or concerns, please do not hesitate to either post here or reach out directly. I'll post another reminder about this when v15 is released.
Hi guys, Im going to build a new controller using the ESP32, but was wondering if someone could advise what TFT screen I should buy? Also is there a wiring diagram available or is it all the same as the esp8266? I have some PCB boards left over from my original esp8266 builds but Im not sure of they are from @Thorrak or not.
 
Hi guys, Im going to build a new controller using the ESP32, but was wondering if someone could advise what TFT screen I should buy? Also is there a wiring diagram available or is it all the same as the esp8266? I have some PCB boards left over from my original esp8266 builds but Im not sure of they are from @Thorrak or not.
I don’t have a schematic saved, but one can be pulled from the Eagle files here:

https://github.com/thorrak/thorrak_hardware/tree/master/ESP32 BrewPi Boards
The Lolin D32 Pro + matched TFT work great, as do most generic 320x240 SPI LCDs. I haven’t tested this so I can’t guarantee it will work, but I would expect this one to work, for example: https://a.aliexpress.com/_msqUvqk

For SPI LCDs like that one you will need a way to connect the LCD to the PCB - either a breakout PCB + cable or DuPont cables. These connect to the box header on the PCB. The pinout is the exact same as that of the D32 Pro’s LCD.
Thanks Thorrak for the reply. When you say "The Lolin D32 Pro + matched TFT" work great, which one is the matched TFT? Is it this one? https://www.aliexpress.com/item/32919729730.html?gatewayAdapt=4itemAdapt Or should I just get the other one you linked from Ali express?
 
Is there anyway to get the temp to show in F instead of C on brewpi esp? I'm running a d32 pro with the 20x2 LCD screen. I tried going to /testcmd.htm and /testcmd.html and couldn't access anything to send JSON commands. I was hoping to apply j{"tempFormat":"F"}

Do I have to worry about the LCD screen burning in long term? Not a big deal can replace it but curious.

Thanks
 
Last edited:
Thanks mate, so should I order your board from Tindie or OSHpark? Do they both ship to Oz?

I just did a d32 pro build and it's cheaper to order one board from Tindie than 5? boards from OSHpark. Not sure about shipping to au. Also if you order from Tindie you get the surface mount components pre-soldered, with OSHpark you would have to source the components and solder them yourself.

I ordered the other components from digikey, I also needed a IEC power socket. I used a 5v 1a usb wall adaptor (from an amazon fire tv stick) for my dc power supply. You could use an old iphone usb-a charger, just get a cheap micro usb cable and cut off the micro connector and solder the wires directly to your PCB. It's also safer this way to use a off the shelf sealed power supply vs. that sketchy one from China.

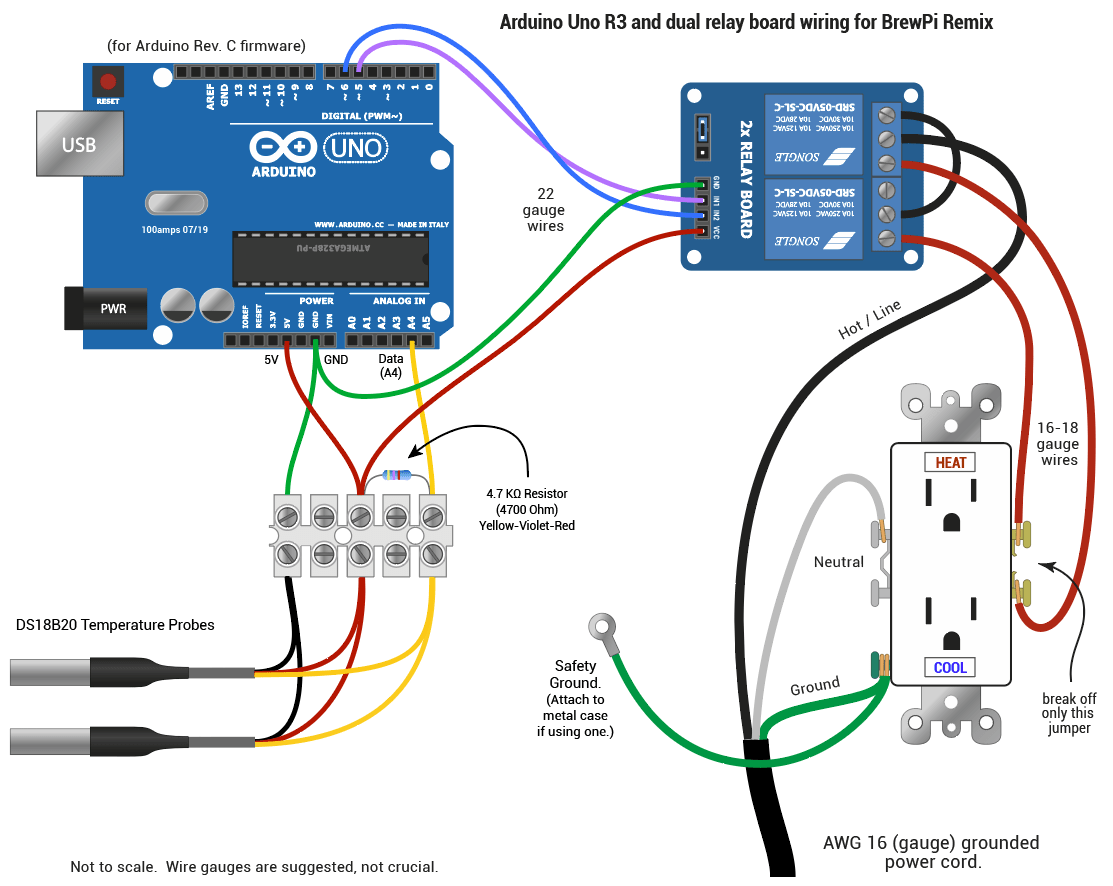
I used a wago style push connector for my hot side power bus, it's hard to find the documentation of there's a trick you can do with your 2ch relay to make sure only hot or cold is on at the same time. You can connect the relay closed side to the COM of the other channel. It's hard to explain but you see the diagram it makes sense.

BrewPi-Remix-v2.png
 
Last edited:
I just did a d32 pro build and it's cheaper to order one board from Tindie than 5? boards from OSHpark. Not sure about shipping to au. Also if you order from Tindie you get the surface mount components pre-soldered, with OSHpark you would have to source the components and solder them yourself.

I ordered the other components from digikey, I also needed a IEC power socket. I used a 5v 1a usb wall adaptor (from an amazon fire tv stick) for my dc power supply. You could use an old iphone usb-a charger, just get a cheap micro usb cable and cut off the micro connector and solder the wires directly to your PCB. It's also safer this way to use a off the shelf sealed power supply vs. that sketchy one from China.

I used a wago style push connector for my hot side power bus, it's hard to find the documentation of there's a trick you can do with your 2ch relay to make sure only hot or cold is on at the same time. You can connect the relay closed side to the COM of the other channel. It's hard to explain but you see the diagram it makes sense.

BrewPi-Remix-v2.png
Thanks for the tips Shane. Ive buiilt to ESP8266 controllers that Ive been running for years so Im assuming the ESp32 build will be similar.

Ive already got some 5v 2a power supplies to use as well..
 
Back
Top