I've had the best luck flashing the ESP32-S2 mini's with the Brewflasher App. The only way I've gotten these to flash is to hold both the buttons to put it flash mode before selecting the port. I select the erase flash, and then hold the "Boot", or "0" button while selecting the "download firmware and flash controller" button. Keep the button held until you see it erasing the flash before letting go. It has always given me an error message at the end saying that it failed, but it still works. If you cycle power or press the reset button it should show up as a wifi AP after a minute or two.
You are using an out of date browser. It may not display this or other websites correctly.
You should upgrade or use an alternative browser.
You should upgrade or use an alternative browser.
Native ESP8266 BrewPi Firmware - WiFi BrewPi, no Arduino needed!
- Thread starter Thorrak
- Start date

Help Support Homebrew Talk:
This site may earn a commission from merchant affiliate
links, including eBay, Amazon, and others.
I finally was able to flash all 3. Like you said RocketBrewer, had to try combinations of button presses on the chip to get it into flash mode. Still runs very slow though. Web interface very slow and even the temp probes update very slowly. I am going to do a build with the ESP32 pro and see how that goes.
Thorrak, I am trying to clean out all the old controller boards I have and I remember you saying there is a problem with the Lolin D1 mini v 4.0. Is this still the case. If they are of no use I will get rid of them.
Took a bit longer to test than I thought as I had some ESP8266-incompatible changes in the v16 branch, but after bringing the ESP8266 support up to date, unfortunately, still no luck with the v4.0.0 hardware.

I'd say hang on to it a bit longer -- I'm waiting on the esp-idf v5.1 update for ESP32, and I'm hoping that it will also come with some improvements on the ESP8266 side of things, but if you need to reclaim the space I would go ahead and sell/toss the v4.0.0 chips.
I just released Beta 3, which adds an HTTP interface to the controller:
View attachment 813958
From this interface, you can:
In other words: This provides an emergency fallback in case your local install of BrewPi Remix or Fermentrack is on the fritz on brew day.
- See the current status (including the virtual LCD)
- Configure/assign pins, Tilts, Inkbird sensors, and OneWire temp sensors
- Change the temperature control mode & set point
For obvious reasons, this has only been added to WiFi controllers. Just like the "telnet" interface, anyone that can connect to the interface can change your settings, so you will want this behind a firewall (and not accessible to the open internet). This has been added to the ESP32-S2, ESP8266, and ESP32 WiFi binaries, but will not work with the "no spiffs init" versions.
Excuse my ignorance but how do I update this? Its been awhile since I first built mine? Its not part of the firmware updates you can do in fermentrack is it?
And then how would I acccess the HTTP interface? What IP address as the one I use now takes me to fermentrack?
And then how would I acccess the HTTP interface? What IP address as the one I use now takes me to fermentrack?
To update, you would re-flash your controller using the newly released firmware. You can do this using Fermentrack's built-in firmware flasher, using BrewFlasher Desktop, or using BrewFlasher Web. What you want are the "v15" firmware versions (not the "experimental" or "beta" versions)Excuse my ignorance but how do I update this? Its been awhile since I first built mine? Its not part of the firmware updates you can do in fermentrack is it?
And then how would I acccess the HTTP interface? What IP address as the one I use now takes me to fermentrack?
If you're using Fermentrack then the HTTP interface is more of a backup than anything. You would need to get the IP address of your controller (which should be displayed on the controller's screen at startup) and enter it into a web browser connected to the same network. Again, however - this is not necessary if you've got a running version of Fermentrack, as Fermentrack provides all of the functionality that the on-controller HTTP interface provides.


$176.97
1pc Commercial Keg Manifold 2" Tri Clamp,Ball Lock Tapping Head,Pressure Gauge/Adjustable PRV for Kegging,Fermentation Control
hanhanbaihuoxiaoshoudian


$33.99 ($17.00 / Count)
$41.99 ($21.00 / Count)
2 Pack 1 Gallon Large Fermentation Jars with 3 Airlocks and 2 SCREW Lids(100% Airtight Heavy Duty Lid w Silicone) - Wide Mouth Glass Jars w Scale Mark - Pickle Jars for Sauerkraut, Sourdough Starter
Qianfenie Direct


$44.99
$49.95
Craft A Brew - Mead Making Kit – Reusable Make Your Own Mead Kit – Yields 1 Gallon of Mead
Craft a Brew


$10.99 ($31.16 / Ounce)
Hornindal Kveik Yeast for Homebrewing - Mead, Cider, Wine, Beer - 10g Packet - Saccharomyces Cerevisiae - Sold by Shadowhive.com
Shadowhive

$53.24
1pc Hose Barb/MFL 1.5" Tri Clamp to Ball Lock Post Liquid Gas Homebrew Kegging Fermentation Parts Brewer Hardware SUS304(Liquid Hose Barb)
Guangshui Weilu You Trading Co., Ltd

$20.94
$29.99
The Brew Your Own Big Book of Clone Recipes: Featuring 300 Homebrew Recipes from Your Favorite Breweries
Amazon.com

![Craft A Brew - Safale S-04 Dry Yeast - Fermentis - English Ale Dry Yeast - For English and American Ales and Hard Apple Ciders - Ingredients for Home Brewing - Beer Making Supplies - [1 Pack]](https://m.media-amazon.com/images/I/41fVGNh6JfL._SL500_.jpg)
$6.95 ($17.38 / Ounce)
$7.47 ($18.68 / Ounce)
Craft A Brew - Safale S-04 Dry Yeast - Fermentis - English Ale Dry Yeast - For English and American Ales and Hard Apple Ciders - Ingredients for Home Brewing - Beer Making Supplies - [1 Pack]
Hobby Homebrew

$58.16
HUIZHUGS Brewing Equipment Keg Ball Lock Faucet 30cm Reinforced Silicone Hose Secondary Fermentation Homebrew Kegging Brewing Equipment
xiangshuizhenzhanglingfengshop

$53.24
1pc Hose Barb/MFL 1.5" Tri Clamp to Ball Lock Post Liquid Gas Homebrew Kegging Fermentation Parts Brewer Hardware SUS304(Liquid Hose Barb)
yunchengshiyanhuqucuichendianzishangwuyouxiangongsi

$7.79 ($7.79 / Count)
Craft A Brew - LalBrew Voss™ - Kveik Ale Yeast - For Craft Lagers - Ingredients for Home Brewing - Beer Making Supplies - (1 Pack)
Craft a Brew


$22.00 ($623.23 / Ounce)
AMZLMPKNTW Ball Lock Sample Faucet 30cm Reinforced Silicone Hose Secondary Fermentation Homebrew Kegging joyful
无为中南商贸有限公司
I realized this past week that with the v15 release, the user interface is now internationalizable. That said, I, unfortunately, am a monoglot.
This is a request for help -- If anyone out there happens to be bilingual and is fluent in a language that you'd like to see the BrewPi-ESP8266 interface translated to, please reach out! I can't guarantee that I can get all the strings in the hardware translated (ie. the LCD) but the Web UI can be translated, for sure.
This is a request for help -- If anyone out there happens to be bilingual and is fluent in a language that you'd like to see the BrewPi-ESP8266 interface translated to, please reach out! I can't guarantee that I can get all the strings in the hardware translated (ie. the LCD) but the Web UI can be translated, for sure.
Just an FYI to anyone out there who uses the ESP32-S2 —with @RocketBrewer ’s assistance I was able to track down some bugs in the v15 release of BrewPi-ESP which were causing this platform to be extremely slow. The fix has been released as v15a - available now on GitHub and in BrewFlasher.
Can I translate it to Pirate?This is a request for help -- If anyone out there happens to be bilingual and is fluent in a language that you'd like to see the BrewPi-ESP8266 interface translated to, please reach out!
Arrrrrrhhhh!Can I translate it to Pirate?
Can I translate it to Pirate?

Hi guys, Im going to build a new controller using the ESP32, but was wondering if someone could advise what TFT screen I should buy? Also is there a wiring diagram available or is it all the same as the esp8266? I have some PCB boards left over from my original esp8266 builds but Im not sure of they are from @Thorrak or not.For brand new users, my recommendation is to either use the ESP32 (preferably with a TFT!) or an ESP32-S2. The LoLin S2 Mini is a pin compatible replacement for the D1 Mini, meaning that both new and existing builds using my PCB designs should be able to directly replace the controller with a LoLin S2 Mini without other hardware changes.
If you have any questions or concerns, please do not hesitate to either post here or reach out directly. I'll post another reminder about this when v15 is released.
I don’t have a schematic saved, but one can be pulled from the Eagle files here:Hi guys, Im going to build a new controller using the ESP32, but was wondering if someone could advise what TFT screen I should buy? Also is there a wiring diagram available or is it all the same as the esp8266? I have some PCB boards left over from my original esp8266 builds but Im not sure of they are from @Thorrak or not.
https://github.com/thorrak/thorrak_hardware/tree/master/ESP32 BrewPi Boards
The Lolin D32 Pro + matched TFT work great, as do most generic 320x240 SPI LCDs. I haven’t tested this so I can’t guarantee it will work, but I would expect this one to work, for example: https://a.aliexpress.com/_msqUvqk
For SPI LCDs like that one you will need a way to connect the LCD to the PCB - either a breakout PCB + cable or DuPont cables. These connect to the box header on the PCB. The pinout is the exact same as that of the D32 Pro’s LCD.
Thanks Thorrak for the reply. When you say "The Lolin D32 Pro + matched TFT" work great, which one is the matched TFT? Is it this one? https://www.aliexpress.com/item/32919729730.html?gatewayAdapt=4itemAdapt Or should I just get the other one you linked from Ali express?I don’t have a schematic saved, but one can be pulled from the Eagle files here:
https://github.com/thorrak/thorrak_hardware/tree/master/ESP32 BrewPi Boards
The Lolin D32 Pro + matched TFT work great, as do most generic 320x240 SPI LCDs. I haven’t tested this so I can’t guarantee it will work, but I would expect this one to work, for example: https://a.aliexpress.com/_msqUvqk
For SPI LCDs like that one you will need a way to connect the LCD to the PCB - either a breakout PCB + cable or DuPont cables. These connect to the box header on the PCB. The pinout is the exact same as that of the D32 Pro’s LCD.
Yep, exactly -- that + the cable that goes with it + the LoLin D32 Pro. Pick up two of each if you think you ever want a TiltBridge -- it's the same recommended hardware.Thanks Thorrak for the reply. When you say "The Lolin D32 Pro + matched TFT" work great, which one is the matched TFT? Is it this one? https://www.aliexpress.com/item/32919729730.html?gatewayAdapt=4itemAdapt Or should I just get the other one you linked from Ali express?
Thanks mate, so should I order your board from Tindie or OSHpark? Do they both ship to Oz?Yep, exactly -- that + the cable that goes with it + the LoLin D32 Pro. Pick up two of each if you think you ever want a TiltBridge -- it's the same recommended hardware.
ShaneB
Well-Known Member
Is there anyway to get the temp to show in F instead of C on brewpi esp? I'm running a d32 pro with the 20x2 LCD screen. I tried going to /testcmd.htm and /testcmd.html and couldn't access anything to send JSON commands. I was hoping to apply j{"tempFormat":"F"}
Do I have to worry about the LCD screen burning in long term? Not a big deal can replace it but curious.
Thanks
Do I have to worry about the LCD screen burning in long term? Not a big deal can replace it but curious.
Thanks
Last edited:
ShaneB
Well-Known Member
Thanks mate, so should I order your board from Tindie or OSHpark? Do they both ship to Oz?
I just did a d32 pro build and it's cheaper to order one board from Tindie than 5? boards from OSHpark. Not sure about shipping to au. Also if you order from Tindie you get the surface mount components pre-soldered, with OSHpark you would have to source the components and solder them yourself.
I ordered the other components from digikey, I also needed a IEC power socket. I used a 5v 1a usb wall adaptor (from an amazon fire tv stick) for my dc power supply. You could use an old iphone usb-a charger, just get a cheap micro usb cable and cut off the micro connector and solder the wires directly to your PCB. It's also safer this way to use a off the shelf sealed power supply vs. that sketchy one from China.
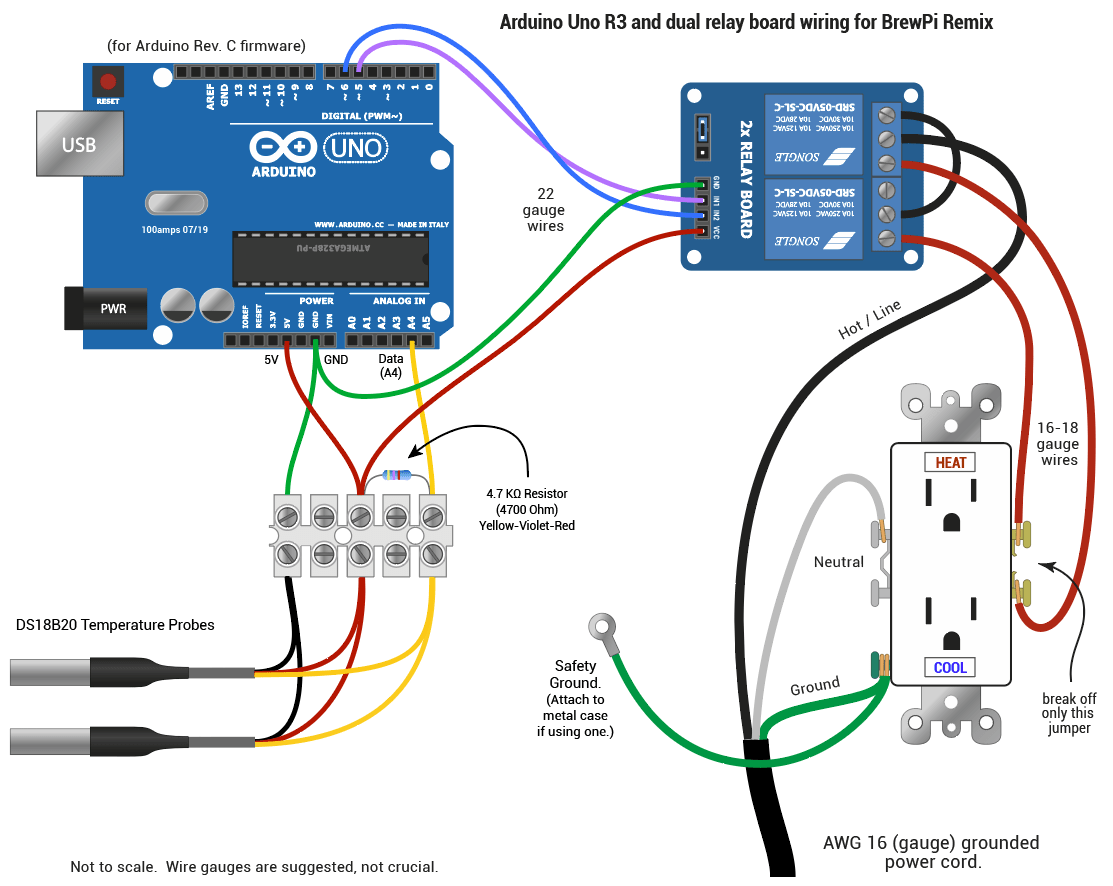
I used a wago style push connector for my hot side power bus, it's hard to find the documentation of there's a trick you can do with your 2ch relay to make sure only hot or cold is on at the same time. You can connect the relay closed side to the COM of the other channel. It's hard to explain but you see the diagram it makes sense.
Last edited:
Let me shoot you a PM. Possibly neither.Thanks mate, so should I order your board from Tindie or OSHpark? Do they both ship to Oz?
Thanks for the tips Shane. Ive buiilt to ESP8266 controllers that Ive been running for years so Im assuming the ESp32 build will be similar.I just did a d32 pro build and it's cheaper to order one board from Tindie than 5? boards from OSHpark. Not sure about shipping to au. Also if you order from Tindie you get the surface mount components pre-soldered, with OSHpark you would have to source the components and solder them yourself.
I ordered the other components from digikey, I also needed a IEC power socket. I used a 5v 1a usb wall adaptor (from an amazon fire tv stick) for my dc power supply. You could use an old iphone usb-a charger, just get a cheap micro usb cable and cut off the micro connector and solder the wires directly to your PCB. It's also safer this way to use a off the shelf sealed power supply vs. that sketchy one from China.
I used a wago style push connector for my hot side power bus, it's hard to find the documentation of there's a trick you can do with your 2ch relay to make sure only hot or cold is on at the same time. You can connect the relay closed side to the COM of the other channel. It's hard to explain but you see the diagram it makes sense.
Ive already got some 5v 2a power supplies to use as well..
In getting things updated on my end I realized that even though v15 went live, I never made the repo that contains the user interface public. Although this shouldn't matter to most people, if you're interested in helping develop BrewPi-ESP and need to make changes to the user interface, the code is available here.
Wobbly74
Member
Is there any configuration required to get the controller's http interface to work? I've just reflashed to the v15 firmware and it's all working happily with fermentrack, however if I try going directly to the ip address of the controller I just get a ERR_EMPTY_RESPONSE error from the browser.I just released Beta 3, which adds an HTTP interface to the controller:
View attachment 813958
From this interface, you can:
In other words: This provides an emergency fallback in case your local install of BrewPi Remix or Fermentrack is on the fritz on brew day.
- See the current status (including the virtual LCD)
- Configure/assign pins, Tilts, Inkbird sensors, and OneWire temp sensors
- Change the temperature control mode & set point
For obvious reasons, this has only been added to WiFi controllers. Just like the "telnet" interface, anyone that can connect to the interface can change your settings, so you will want this behind a firewall (and not accessible to the open internet). This has been added to the ESP32-S2, ESP8266, and ESP32 WiFi binaries, but will not work with the "no spiffs init" versions.
Is there any configuration required to get the controller's http interface to work? I've just reflashed to the v15 firmware and it's all working happily with fermentrack, however if I try going directly to the ip address of the controller I just get a ERR_EMPTY_RESPONSE error from the browser.
Nope - shouldn't be. Which firmware specifically did you flash? (And for which controller?)
Wobbly74
Member
I used the v15 wifi flash on an ESP8266

Wobbly74
Member

Wobbly74
Member
Now I just need to work out why I can't get fermentrack to connect to my tilt 
Is there a good troubleshooting guide? Worked on my prior install but not after having to do a full reinstall on a new sd card. I'm kind of stuck after doing a full apt-get update and upgrade, checking that I can scan bluetooth devices via bluetoothctl and hcitool (though they only show device IDs and not names), adding experimental to the bluetooth service execstart and adding pi to the bluetooth group. I can see the tilt fine using the standard Tilt2 app, so there's something amiss somewhere...
Is there a good troubleshooting guide? Worked on my prior install but not after having to do a full reinstall on a new sd card. I'm kind of stuck after doing a full apt-get update and upgrade, checking that I can scan bluetooth devices via bluetoothctl and hcitool (though they only show device IDs and not names), adding experimental to the bluetooth service execstart and adding pi to the bluetooth group. I can see the tilt fine using the standard Tilt2 app, so there's something amiss somewhere...
Are you using the latest release (with Docker/TiltBridge Junior)?Now I just need to work out why I can't get fermentrack to connect to my tilt
Is there a good troubleshooting guide? Worked on my prior install but not after having to do a full reinstall on a new sd card. I'm kind of stuck after doing a full apt-get update and upgrade, checking that I can scan bluetooth devices via bluetoothctl and hcitool (though they only show device IDs and not names), adding experimental to the bluetooth service execstart and adding pi to the bluetooth group. I can see the tilt fine using the standard Tilt2 app, so there's something amiss somewhere...
Wobbly74
Member
Yes, just installed a couple of weeks ago and updated today to the latest update on the master branch. The tiltbridge jr error log is also empty.
Similar threads
- Replies
- 10
- Views
- 2K
- Replies
- 3
- Views
- 2K
- Replies
- 7
- Views
- 2K
