Stealthcruiser
Well-Known Member
The powder coating is nice, but it will burn off near your burners, and will smell like a$$ until it burns back to a cool enough spot.

i'm not sure that having the pot completely seal all gaps is such a good thing. you are potentially limiting oxygen flow to the flame. if heat (and oxygen-free air) can't rise, it need to go around... keeping the oxygen-free air closer (or right on top of) to the flame. heat rising up = fresh, oxygen-rich air being replenished from below.In fact I now use a 20 gal Megapot for my BK and it overhangs a good bit. The benefit is that is almost blocks the triangular gap at the four corners where lots of heat comes out and heats up things like a sight glass, thermometer, ball valves, etc. Having that totally blocked off is nice.
The powder coating is nice, but it will burn off near your burners, and will smell like a$$ until it burns back to a cool enough spot.
Anyone have any idea how I would go about mounting an edelmetall burner from Norther Brewer? Just bolting together my single tier strut stand but haven't thought through the burner mounting. I'd like to keep the windshield in tact.


Anyone have any idea how I would go about mounting an edelmetall burner from Norther Brewer? Just bolting together my single tier strut stand but haven't thought through the burner mounting. I'd like to keep the windshield in tact.


I used the brackets from strutstands.com to mount my blichmann burner. Fit perfectly and super easy. I was able to use the holes from where I took the legs off but you can just use the screws that attach the burner to the wind screen. Here are a few pics.
I would just drill new holes in the windscreen at the 4 quadrants where you need them to mount up with the brackets. Pretty simple job to drill a few small holes then you have a solid mounting solution.
Sent from my iPhone using Home Brew

Rynolee, lemme know how the build goes for you. I'm about to embark on the same style stand, I've already got the struts/hardware just need to tighten up the plans and do the cuts. I picked up two 89qt kettles (MT/HLT) that are 18.75" dia and already had a morebeer 26gal BK that is ~20" so I was wondering what dimensions you went with. What height did you ultimately decide on?


I just put my order in at G-P LLC and used the coupon code SAVE and got 10% off my order. I wasn't sure if the code would still work or not, but it did. Will start building my single tier brew stand once all the parts come in. Can't wait.


")
We finally completed the brew stand this afternoon. We did a wet run and found zero leaks (liquid or gas) and everything flowed from one kettle to the next very seamlessly.
We will be adding an additional pickup tube in the MLT (and maybe HLT) as the system currently leaves behind 1.5 gallons, too much for my liking. I guess it was an oversight as we planned for it in the BK but nothing else. BK leaves behind about 3/4 gallons with the pickup tube FYI. We will also be notching the MLT lid so the sparge arm can be used with the lid in place. Finally, we might add a recirculation bulkhead to the top of the BK if we decide to drill the hole, but that's currently just an idea. We really need to start brewing a few batches and then make these modifications :cross:.
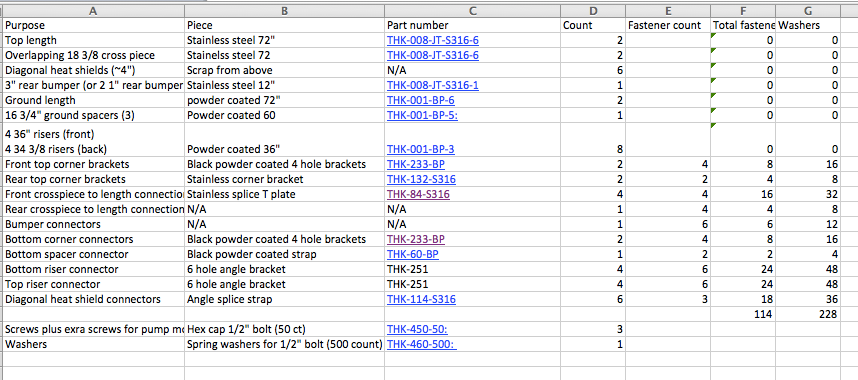
I've included my parts list, which came to $584 for the stand including burner mounts, $449 for the burners, and $99 for the manifold. Here's some photos as well!
The other new feature allows you to "unfold" the top 2" X 180º of the back half of the ring. One of the issues I've run into in R&D for stands and burner mounts is getting the exhaust gas to vent rather than collect under the kettle and choke the flame. It's a particular problem with these large burners. Mounting the heat shield lower or standing the kettle higher is one way to fix the issue, but then a lot of heat wash comes forward towards your valves, hoses and sensor wires. If you design your stand so the rear longitudinal support is 2" lower than the cross/kettle supports, the exhaust gas will naturally vent to the rear, allowing the burner to breathe better and keep the front cooler.


Sure thing! I'll get
you more pics and specifications in the next two weeks or so. Have a wedding to go to and drink beers


