• Please visit and share your knowledge at our sister communities:
  • If you have not, please join our official Homebrewing Facebook Group!

    Homebrewing Facebook Group

My brewery controller: iBrew

Homebrew Talk

Help Support Homebrew Talk:

This site may earn a commission from merchant affiliate links, including eBay, Amazon, and others.
Go to the Arduino - HomePage website, they have a compiler and a ton of libraries all for free. I'm also using XP. I'll compile a list of part numbers and post them, but the relays are from Electronic Goldmine. They're 5V and only cost like $1.25 each. The Arduino can only source or sink 40mA so you have to use a transistor. There are several tutorials on the website about using transistors to drive relays.

I have done that before using 2n2222 transistors so that is not a problem.
I have the PCB Express board patterns, but I don't have a good schematic. I'll try and put one together.
That will help.

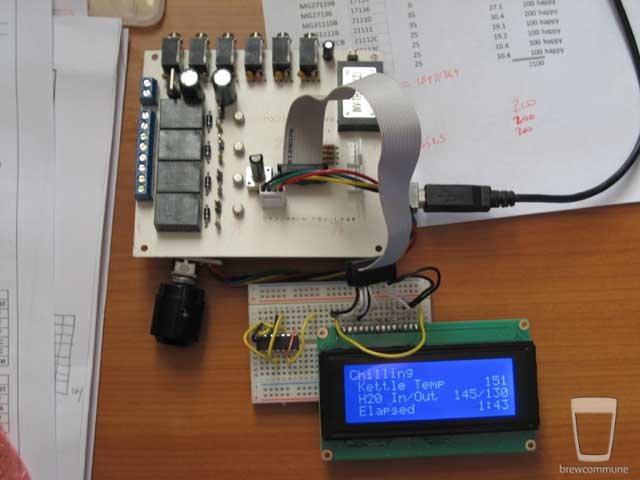
I like the BCS 460, I think it's pretty cool, but the real purpose of this project was to get my feet wet coding and have a project I could actually apply something I knew too. Just like building my entire brewery was an exercise in learning to TIG. I do what I do for control over the process and to learn something. The "iBrew" will probably never actually be done. The board in these photos is the 3rd I etched and built for this project and I already have ideas for the next one!

I know what you mean. After you build something you get new ideas and have to satisfy yourself and build another.:) I have no idea how much you can do with the BCS460 (Programing and control?)
 
I got my Arduino clone over the weekend. Very slick little system, and the little Java IDE makes it really easy to program and test. I wrote version 0.1 (heh) of my brewing controller in about 15 minutes last night. OK, calling it a brewing controller is a little glorified, since I'm doing electric extract brews. It's more like something to log the potentiometer setting that controls the heating element as I do my boil.

Now to prototype some hardware...

This free PCB CAD software is awesome: ExpressPCB - Free PCB layout and schematic software They etch prototype boards but they're not cheap. They give you the software to use their service, although you don't HAVE to use their service. Anyway, it really helped me with the prototyping of my boards.
 
I was under the impression you had to use their PCB service. Did some research a few years back when I was finding "my" PCB software. IIRC this was the feature that deterred me from Express PCB. If this has changed, like you say, that would be awesome and I may have to reevaluate my choice. Which was btw Eagle mostly due to the widespread use within the avrfreaks.net community. So are there any plans to setup a space for an open brewing controller?
 
I was under the impression you had to use their PCB service. Did some research a few years back when I was finding "my" PCB software. IIRC this was the feature that deterred me from Express PCB. If this has changed, like you say, that would be awesome and I may have to reevaluate my choice. Which was btw Eagle mostly due to the widespread use within the avrfreaks.net community. So are there any plans to setup a space for an open brewing controller?


I like his because it's free. Don't you have to pay for Eagle? I am making my own boards with the iron-on Press N Peel or what ever it's called. But I can print the copper layer out on to a laser printer with no problems at all.
 
Another alternative to consider is the Sanguino. It is based on the atmega644P vs the atmega168 on the Arduino and has 4 times the memory and 32 general purpose IO pins vs 20. It is intended to be programmed from the same Arduino environment so there is very little modifications needed.
 
Another alternative to consider is the Sanguino. It is based on the atmega644P vs the atmega168 on the Arduino and has 4 times the memory and 32 general purpose IO pins vs 20. It is intended to be programmed from the same Arduino environment so there is very little modifications needed.


I had heard about the Sanguino but never took the time to look further into it. That is one awesome little platform!!

Anyone want to buy an iBrew ??
 
I like his because it's free. Don't you have to pay for Eagle? I am making my own boards with the iron-on Press N Peel or what ever it's called. But I can print the copper layer out on to a laser printer with no problems at all.
You can get a free version, the restriction are that you can only make boards that are 10x8 cm or smaller. Also you only get 2 layers. This has been sufficient for me for the past 2 years. But I must agree with you that the Express PCB package is a lot of power for free! If you don't mind being stuck with one board supplier.
 
You can get a free version, the restriction are that you can only make boards that are 10x8 cm or smaller. Also you only get 2 layers. This has been sufficient for me for the past 2 years. But I must agree with you that the Express PCB package is a lot of power for free! If you don't mind being stuck with one board supplier.

Oh yeah, that was the problem, on the stir plate circuits I etch 9 to a 4X6 board and I couldn't print a 4X6 board with the free Eagle. I remember now.

Anyway, I just print them and etch myself so it has worked great. I have a library of custom components in it and it is very easy to use.
 
Welp....

Looks like some more engineering is in order.... When the Direct Spark Ignition module sparks, it scrambles the Arduino. I haven't grounded the frame which might help, but I think I might have to go with a pilot light system instead of the DSI modules.... The Arduino has to be about 6' from the DSI module. I disconnected the DSI and directly controlled the valve and there was no problem.

Hopefully the pump doesn't do the same thing. It's isolated with a relay but so is the DSI.

:x
 
Welp....

Looks like some more engineering is in order.... When the Direct Spark Ignition module sparks, it scrambles the Arduino. I haven't grounded the frame which might help, but I think I might have to go with a pilot light system instead of the DSI modules.... The Arduino has to be about 6' from the DSI module. I disconnected the DSI and directly controlled the valve and there was no problem.

Hopefully the pump doesn't do the same thing. It's isolated with a relay but so is the DSI.
Maybe the relay requires too much current? You could try sticking an op-amp in there on the signal line headed to the relay. That could let you supply the current from your +5V power source rather than from the data pin. Hook it up like so:

Opamp_voltage_follower.gif
 
The Arduino notebook has another suggestion - to use a MOSFET transistor to drive the relay. Hook the relay to your power supply, then to the "D" pin on the transistor. Hook the "G" pin to your Arduino pin, and then hook the "S" pin to ground. You could drive something really big with that; I don't know the current draw of the kinds of relays we would use, but I would think the op-amp would be able to get the job done.
 
Darrin, If you care to post your wiring diagram maybe I could help. Sometimes you need to optocouple to relays to keep voltage from going into digital controls. This effectively isolates the circuits. Any time radio frequency or high voltage is involved you need more isolation for reliable operation and to protect the digital circuit.
 
I'll draw a schematic and post it. It might need some more isolation, but I don't think so. It will drive the relays no problem at all and if I attach the relay to the gas valve directly, bypassing the spark generator it's fine. I have a diode to dissipate the voltage collapse on the relay coil, that's all working. I had the same circuit driving a pneumatic valve body solenoid for a Halloween prop and it worked flawlessly for hours. It's just if that sparker sparks, it's all done for.

If I have the manual over-ride engaged, the spark scrambles the Arduino. Unplugging the Arduino and plugging it back in clears the problem and the burner will re-lite faster than the Arduino booting, so the Arduino will function fine with the relay driving the gas valve and the flame on. As soon as I shut it off and try to restart it with the sparker: scrambled Arduino.

I'm going to try grounding the frame and gas system and putting the DSI module in a metal box to see if that works.

I'll test a pump today.
 
Darrin, You need the Arduino to work without problems from the igniter. If you have to reset the Arduino then it is not automatic any more. This is is not something that can not be fixed. I am an amateur radio operator and I have seen much worse. The "high voltage" is like a radio signal and so it needs the same isolation and shielding as when strong RF signals are nearby. Your circuit should be in a metal box so it is shielded too. All connections to the circuits in the box need to be isolated. The only other answer would be to switch to a standing gas pilot which would be easier.
 
I'll draw a schematic and post it. It might need some more isolation, but I don't think so. It will drive the relays no problem at all and if I attach the relay to the gas valve directly, bypassing the spark generator it's fine. I have a diode to dissipate the voltage collapse on the relay coil, that's all working. I had the same circuit driving a pneumatic valve body solenoid for a Halloween prop and it worked flawlessly for hours. It's just if that sparker sparks, it's all done for.
Well, it clearly appears to not be a problem with current draw from the relay on the data pin. Curious. And puzzling. WBC's speculation about RF probably has some merit.
 
Well, it clearly appears to not be a problem with current draw from the relay on the data pin. Curious. And puzzling. WBC's speculation about RF probably has some merit.

I'm confident that's the problem as proximity is a factor and that 'safe distance' changes if the relay cable to the DSI unit is connected or not. Plus it's only when the unit is sparking, not when it's just running.

We'll see. I ran out of time to try and keep working on it before brewing today so I'll have to use a Ranco to control the HLT temp today. With the gas valve in position, I have to use something.
 
Stick it in a metal box. You'll effectively create a Faraday cage to reduce the effects of the interference. That's one reason (among others) that the BCS-460 is in an aluminum enclosure, as opposed to more affordable plastic.

At the very least, its an easy experiment to test your hypothesis. Even a small metal can would work.


Good idea. I'll give that a shot just to see. Before I give up I'll:

enclose the DSI module in a metal case
enclose the iBrew in a metal case
ground the stand and gas system (which needs to be done no matter what)

If none of those work, I'll try playing with a hot surface ignitor to see how that works. I could probably control that with the Arduino and not need a control module like I do with the DSI which would be nice.
 
Impressive controller. I just ordered the 2009 board:) I have electronics and programming knowledge so I'm really looking forward to messing with it although I am just moving to AG so it'll be a while before I actually us it for brewing. Thanks for sharing!
 
Impressive controller...


Thanks! Even though I don't have it working in production, I'm coding v 3.0 right now. I moved some redundant code to a function and I'm adding a whole timer routine with stop watch functions so I can time Mash, Sparge and Boil.

I received the hot surface control module and an ignitor today. I tested it just as an ignition control and it works great. There are a couple issues I'll need to accept and/or overcome. First I have to figure out how to mount the ignitor and protect it as much as possible. This is difficult because it needs to live in the flame in order to sense the flame presence. It looks more rugged than I thought it would, but they are supposed to be very fragile and crack easy.

The other issue that I'd like to overcome is the timing. The control module has a timed sequence that is preset. When it receives a signal it sends current to the ignitor but then waits about a full minute before it opens the gas valve. This is designed to give the ignitor plenty of time to get glowing hot before sending in the gas. As soon as it detects flame it cuts the current to the ignitor and continues to burn until the voltage is cut to it. The minute really seems like a long time. It could be just because I'm sitting there staring at it (it gets rather bright BTW).

I scored 3 identical control modules of eBay for only $5 each. I'll test one for a while and if all goes well, I plan on having all three burners controlled. The boil kettle won't have any logic, but it'll be nice having a burner on/off switch.

I haven't tried it with the Arduino but there is no reason it shouldn't work.
 
On the breadboard they worked flawlessly, once at the end of a 6'ish shielded cable they were useless. After turning to the spec sheet I should have read initially, I added a 1uF cap and 82ohm resistor in series from signal to ground which stabalized the output perfectly.

So you essentially turned the LM34's into a long temperature probe? What type of wire did you use? Any possibility you could post pics?
 
Another alternative to consider is the Sanguino. It is based on the atmega644P vs the atmega168 on the Arduino and has 4 times the memory and 32 general purpose IO pins vs 20. It is intended to be programmed from the same Arduino environment so there is very little modifications needed.

Just ran across another arduino alternative (just announced yesterday) that appears to be half way between the arduino and sanguino in regards to memory but a whopping 42 IO pins.

the illuminato uses a atmega645.
 
I was thinking about doing something like this as a final project for my electronics technology diploma.

The arduino is a really good platform to use for this type of application due to its simplicity and massive amount of free source code. I have been too busy with school to make mine do anything more than blink a few LEDs, but I may have to follow in your footsteps.

Good work.
 
The project has changed a lot The original version displayed information based on sensor, ie MLT, HLT, Boil, Chiller in/out... Now it displays info based on process, ie: mashing, sparging, boiling, chilling. I also added 4 independent timers and I'm working on adding a hop schedule to the boil timer. I also converted it to the digital DS18B20 temperature sensors.
iBrew_3_5.jpg


Check out the "Brew troller" group here on HBT. A few guys are taking the idea a lot further with more automation and more setup control.
 
Back
Top