• Please visit and share your knowledge at our sister communities:
  • If you have not, please join our official Homebrewing Facebook Group!

    Homebrewing Facebook Group

Mineral Creek Brewery - Start to Finish e-HERMS basement electric brewery build

Homebrew Talk

Help Support Homebrew Talk:

This site may earn a commission from merchant affiliate links, including eBay, Amazon, and others.
I really like how you have your pumps mounted. very clever. I'm assuming quite flexible because you can slide your pumps. Would you mind telling me what those rail pieces are called and where you got them? Thanks!

Thanks M25,
The rails are Superstrut from Lowes and available in different sizes.

http://www.lowes.com/pd_20281-53911-ZB1400HS+10___?productId=3128119&pl=1&Ntt=unistruct

Also known as Unistrut and available at electrical supply houses. They make all kinds of fittings for it and you can make just about anything out of it.
 
That's a very sexy set up. Love the control box .Good job on taking pictures .
 
Thanks woo_pig,
Just finished batch #11 and the brewery has been running as expected. A 10 gallon batch of a Deschutes Fresh Squeezed IPA clone and we also have a 10 gallon batch of Yooper's Oatmeal Stout in a fermentor. Thanks to forum member @Yooper for a terrific recipe. It's been really hard to keep up with the demand of drinking and sharing. We love the brewery!
 
Awesome build... maybe I missed this in the thread somewhere, but where did you get the protective "butcher block" mats that you have under your kettles? Those look great - I have nasty cork mats that are a royal pain to keep clean so would love to replace them with something like this.
 
Awesome build... maybe I missed this in the thread somewhere, but where did you get the protective "butcher block" mats that you have under your kettles? Those look great - I have nasty cork mats that are a royal pain to keep clean so would love to replace them with something like this.

Thanks jmark,
The mats come in 3' x 3' sections and can be interlocked together. They are thick black rubber and feel nice on the feet during a long brew day. They can easily be cut to fit with a sharp knife. Take them outside and hose them off when needed.

Available at Lowes: http://www.lowes.com/pd_155419-20787-919115-LGS___?productId=3377248&pl=1&Ntt=floor+mat
 
Those are usually referred to as "pine rounds". You can find them in your big box hardware store near where they have all the wooden staircase stuff. In my experience the quality can be hit or miss and you may need to visit a few locations to get enough that will lay flat.
 
KennyM I'm currently planning/building my own 3V HERMS system and I'm getting a bit confused with the best locations for my temp probes. Reading different opinions every where!!!
Where do you have yours mounted and are you happy with?
Would you change anything now that you have been running the system for some time now?
Cheers mate
 
double smile.jpg


Seriously.. Beautiful build. That's one hell of a setup.
 
KennyM I'm currently planning/building my own 3V HERMS system and I'm getting a bit confused with the best locations for my temp probes. Reading different opinions every where!!!
Where do you have yours mounted and are you happy with?
Would you change anything now that you have been running the system for some time now?
Cheers mate

bradleybiscuits,
My setup is pretty much as described at the www.theelectricbrewery.com website. I have the HLT probe in the piping leaving the HLT. I recirculate the HLT water back into the HLT and this keeps the water temperature exactly where I have it set on the PID controller.

I have the mash probe also in the piping leaving the mash tun. I recirculate through the HLT HERMS coil back into the mash tun during the mash cycle. I have no trouble keeping the wort temperature exactly as set. I know some people like having the mash probe on the exit of the HERMS coil. I have my system setup to control the HLT heating element from either the HLT temp probe or the mash temp probe. Not really necessary but it gives me control options and I can have different PID tuning values setup between the two controllers.

Typically in process control engineering, you want to monitor your process variable at the exit point of what you are trying to maintain whether it's temperature, pressure, level, etc.

The boil temperature probe is located in the side of the boil kettle close to the bottom.

I also have a temperature probe at the exit of the CFC chiller that displays on its own controller. Again not really necessary but it gives me a backup PID controller in the panel if I ever need it. I also could control the wort flow through the CFC someday for temperature controlled cooling if I every decide to by adding a variable electric valve to the CFC chiller wort inlet.

Overall I am happy with how the system turned out and I wouldn't change anything if doing it again.

Good luck with your build,
KennyM
 
Amazing! One of the most elegant setups I've seen anywhere! Where can we get a blank stainless steel enclosure just like yours that hasn't been cut?
 
Amazing! One of the most elegant setups I've seen anywhere! Where can we get a blank stainless steel enclosure just like yours that hasn't been cut?

Thanks @WhatsBrewing. I got my blank enclosure from ebrewsupply.com but I was unable to find one now on their new website.
 
Very nice setup and finally the HLT/MASH switch I have wanted to use. I'm working on my own 30amp, 4500W HERMS panel plans and will use the same switch setup for Strike water and Mash control. Problem is I have no schematics to pull from and am not an electrical engineer. Is your switch controlling the control voltage directly or via a relay. Can't get my head wrapped around how to keep the HLT PID from bumping heads with the MASH PID with out a cutout.

Prost!

Yes Istrowge, the PID select switch switches the SSR control voltage from the HLT heating element PID's directly. The switch I use has 6 poles, 2 are for the indicator LED's and 4 are for switching the + and - control leads. No relays are used for this function. You can see a wiring diagram of the PTD selectors in post #4.

https://www.homebrewtalk.com/showpost.php?p=6936215&postcount=4

Kenny
 
Thanks KennyM. If I was not going to use LED indicator lights then the Auber SW3 should work right (Selector Switch, 3-Position Maintained 2 NO, 22mm)? Trying to save space on the enclosure so the indicators have to go. Just going to use tags and locate the switch as you have in your diagram.
 
Thanks KennyM. If I was not going to use LED indicator lights then the Auber SW3 should work right (Selector Switch, 3-Position Maintained 2 NO, 22mm)? Trying to save space on the enclosure so the indicators have to go. Just going to use tags and locate the switch as you have in your diagram.

My switch is a 2-position (HLT/MASH) but a 3-position could be used too. I used 2 NO and 2 NC switch blocks as I recommend switching both the + and - control leads from each of the two PID controllers. You could connect the - control leads together and save a set of switches but when I checked my PID controllers, the - control leads were not common with the power supply ground so I kept them separated. You can see all four of the switch blocks I used in the 2nd wiring diagram just above the HLT SSR relay in the thread I linked above.

Kenny
 
Sorry John, no manufacture name, model or any other identifying marks. It's a generic imported 16x16x8 stainless steel enclosure.

A few I found with a Google search are below:
https://store.solutionsdirectonline.com/16x16x8-stainless-steel-enclosure--en4sd16168ss-p2028.aspx

https://www.onlinecomponents.com/bu...fferal&utm_campaign=octopart&ref=OctopartFeed


Ok thanks for looking, I just order this one. It bigger than I need but for the price I will deal with the size.

https://www.amazon.com/gp/product/B00T3NRBMK/ref=oh_aui_detailpage_o00_s00?ie=UTF8&psc=1
 
Last edited by a moderator:
Great job on all this. Was thinking of getting a rasp pints rolling and was sourcing materials. Do you have a model number for the SEA flow meters you are using?
 
Hi Antic,
I used SEA YF-S402 flow meters from eBay. They have 1/4" compression fittings so I adapted these to John Guest fittings to fit my Bev-Seal Ultra tubing.

Kenny
 
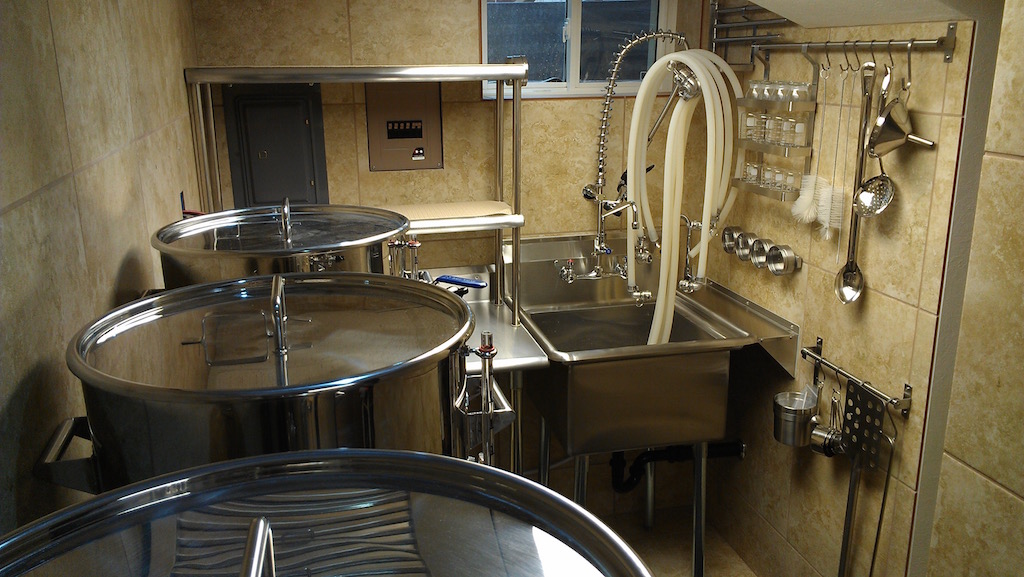
What a great build KennyM. Really nice job man. Hey I know it's been 3 years since the original post but it looks like you're still responding. Do you have any information on the make/manufacture of the little stainless bar rack system to the right of the sink in this pic:
IMAG1731.jpg

I'd love to find something exactly like this - particularly that the shelf bracket thing you have hanging from the bar. Same question about the magnetic containers under that. Any info you have on that stuff would be appreciated.

Again, killer job - hope you've been enjoying that space.
 
Thanks for the comments Nate. The stainless steel shelf just to the right of the sink is from eBay. Search “stainless steel shelf” and they have all sizes available.

The rack system, hooks and containers are from IKEA. Just do a Google search for IKEA Grundtal. I think I got mine from Amazon.

We’re due to brew again soon, it’s been too long.

Kenny
 

Latest posts

Back
Top