You are using an out of date browser. It may not display this or other websites correctly.
You should upgrade or use an alternative browser.
You should upgrade or use an alternative browser.
Mash Lauter Tun from Coleman Xtreme 70 Quart Cooler
- Thread starter alien
- Start date

Help Support Homebrew Talk:
This site may earn a commission from merchant affiliate
links, including eBay, Amazon, and others.
GrogNerd
mean old man
Just heat up your strike water, dump it in, close the cooler for 5 minutes, that will pre-heat it just fine, while you are grabbing your grains. Then open it up and mash in.
this. why waste the water plus the time to heat it just to throw it out? use it for strike
I scoop some out of the heating water prior to it actually reaching strike temp, the add the rest to strike
stewart194
Well-Known Member
Thanks!! Should I heat the strike water to 164 if my desired mash temp is 154?? Is that a good place to start at least? I will have a gallon of 190 degree water and a gallon of cold water in the fridge to adjust with. (This is what I've done on my partial mashes and it seems to work pretty well)
Also, how long should I mash at 154?
Thanks again!
Also, how long should I mash at 154?
Thanks again!
GrogNerd
mean old man
Thanks!! Should I heat the strike water to 164 if my desired mash temp is 154?? Is that a good place to start at least? I will have a gallon of 190 degree water and a gallon of cold water in the fridge to adjust with. (This is what I've done on my partial mashes and it seems to work pretty well)
Also, how long should I mash at 154?
Thanks again!
164 should be good place to start
how long to mash? most of the conversion is done in 30 minutes, but 60 minutes are the norm
you had a question also about "mash thickness" is the "grist ratio" means how many quarts of water per pound of grain to use for strike water.
12 pounds of grain at 1.25 quarts/lb = 15 quarts, or 3.75 gallons of strike water for your mash
this. why waste the water plus the time to heat it just to throw it out? use it for strike
I scoop some out of the heating water prior to it actually reaching strike temp, the add the rest to strike
I never said throw it out.
GrogNerd
mean old man
Just heat up your strike water, dump it in, close the cooler for 5 minutes, that will pre-heat it just fine, while you are grabbing your grains. Then open it up and mash in.
this. why waste the water plus the time to heat it just to throw it out? use it for strike
I scoop some out of the heating water prior to it actually reaching strike temp, the add the rest to strike
I never said throw it out.
sorry if I didn't make it clear, I was saying that you had it exactly right, use the water to heat the tun AND for strike.


$176.97
1pc Commercial Keg Manifold 2" Tri Clamp,Ball Lock Tapping Head,Pressure Gauge/Adjustable PRV for Kegging,Fermentation Control
hanhanbaihuoxiaoshoudian


$22.00 ($623.23 / Ounce)
AMZLMPKNTW Ball Lock Sample Faucet 30cm Reinforced Silicone Hose Secondary Fermentation Homebrew Kegging joyful
无为中南商贸有限公司


$33.95
Five Star - 6022b_ - Star San - 32 Ounce - High Foaming Sanitizer
Bridgeview Beer and Wine Supply


$10.99 ($31.16 / Ounce)
Hornindal Kveik Yeast for Homebrewing - Mead, Cider, Wine, Beer - 10g Packet - Saccharomyces Cerevisiae - Sold by Shadowhive.com
Shadowhive


$33.99 ($17.00 / Count)
$41.99 ($21.00 / Count)
2 Pack 1 Gallon Large Fermentation Jars with 3 Airlocks and 2 SCREW Lids(100% Airtight Heavy Duty Lid w Silicone) - Wide Mouth Glass Jars w Scale Mark - Pickle Jars for Sauerkraut, Sourdough Starter
Qianfenie Direct


$39.22 ($39.22 / Count)
Brewer's Best Home Brew Beer Ingredient Kit - 5 Gallon (Mexican Cerveza)
Amazon.com


$53.24
1pc Hose Barb/MFL 1.5" Tri Clamp to Ball Lock Post Liquid Gas Homebrew Kegging Fermentation Parts Brewer Hardware SUS304(Liquid Hose Barb)
yunchengshiyanhuqucuichendianzishangwuyouxiangongsi


![Craft A Brew - Safale S-04 Dry Yeast - Fermentis - English Ale Dry Yeast - For English and American Ales and Hard Apple Ciders - Ingredients for Home Brewing - Beer Making Supplies - [1 Pack]](https://m.media-amazon.com/images/I/41fVGNh6JfL._SL500_.jpg)
$6.95 ($17.38 / Ounce)
$7.47 ($18.68 / Ounce)
Craft A Brew - Safale S-04 Dry Yeast - Fermentis - English Ale Dry Yeast - For English and American Ales and Hard Apple Ciders - Ingredients for Home Brewing - Beer Making Supplies - [1 Pack]
Hobby Homebrew


$58.16
HUIZHUGS Brewing Equipment Keg Ball Lock Faucet 30cm Reinforced Silicone Hose Secondary Fermentation Homebrew Kegging Brewing Equipment
xiangshuizhenzhanglingfengshop


$53.24
1pc Hose Barb/MFL 1.5" Tri Clamp to Ball Lock Post Liquid Gas Homebrew Kegging Fermentation Parts Brewer Hardware SUS304(Gas MFL)
Guangshui Weilu You Trading Co., Ltd

$7.79 ($7.79 / Count)
Craft A Brew - LalBrew Voss™ - Kveik Ale Yeast - For Craft Lagers - Ingredients for Home Brewing - Beer Making Supplies - (1 Pack)
Craft a Brew


$172.35
2 Inch Tri Clamp Keg Manifold With Ball Lock Posts, Pressure Gauge, PRV (0-30 PSI) – Homebrew, Fermentation, Kegging System
wuhanshijiayangzhiyimaoyiyouxiangongsi

stewart194
Well-Known Member
Gotcha. Thanks! That makes sense. I thought they meant that the water / grain combination in the water should be 1.5 inches thick or something, and I was just wondering how I was going to pull that off.
Thanks again!!
Thanks again!!
I don't preheat. I use BeerSmith, so I set my Light, Medium and Heavy bodied Single Infusion mash profiles to reflect 68F mash tun and grain temp. Then set the Thermal Mass in your equipment profile. I selected 22# of 0.3 ratio because cooler and manifold Iis 18# plus losses to steam when dumping it in. Lastly, build a recipe, select your equipment and mash profiles, then on the Mash tab of the recipe check "Adjust Water Temperatures for Profile" (or somesuch, I'm on my phone).
Usually it tells me around 166-168 for most brews so far. With 22# of 0.3 and 68F set, it gets me within half a degree every time. Just remember to close the lid when walking back to the stove for the second bucket of water or over to pick up the grain to keep the heat in.
Smallest batch so far was 12# 2-row, 4# flaked corn, 1# minute rice for 10 gals of cream ale. Biggest was 41# of grain for 10 gals of double IPA.
Ignore grain bed depth. It only applies to batch sparging as long as you account for tun deadspace.
I use beer alchemy, assume it is similar to beersmith but Thad's numbers make me wonder. Anyway I add 1 gal hot tap water while the strike water heats and set my thermal mass for the tun at 2 pounds even. I dump the tap water before adding strike water. Add water, hen grain. Stir like crazy. Checking temp about 15 min later I'm hitting target just about perfect.
2 pounds sounds really, really low. Unless it has no material factor, maybe?
My cooler weighs 16# alone on my postal scale, plus 2# more in copper manifold. Copper has a different specific heat than plastic (0.3 vs 0.092 in BeerSmith), so I added a little bit to be sure to compensate for the steam losses from pouring in the strike water.
If you're stirring like crazy, you not be using a panel or coming in a little hot and try to cool it back down a degree or two?
thadius856 said:2 pounds sounds really, really low. Unless it has no material factor, maybe?
My cooler weighs 16# alone on my postal scale, plus 2# more in copper manifold. Copper has a different specific heat than plastic (0.3 vs 0.092 in BeerSmith), so I added a little bit to be sure to compensate for the steam losses from pouring in the strike water.
If you're stirring like crazy, you not be using a panel or coming in a little hot and try to cool it back down a degree or two?
I think it must be difference in software. Googling I find beer alchemy users in my range and lower, about #1 while beersmith users have numbers as high as #40 to get it dialed in.
Best practice appears to be to actually measure your own thermal mass by adding a full charge of strike water without grain, letting temp settle, and measuring that number. Then you run your calculator without grain, known strike temp, adjusting thermal mass to "solve for" actual strike temp. I am going to go ahead and do this on my next few batches since I always add the strike water to the cooler before the grain anyway. Just will let the strike water settle temp wise before adding the grain.
Be sure to simulate mashing in for a realistic result.
Have fun stirring in and breaking up imaginary dough balls.

thadius856 said:Be sure to simulate mashing in for a realistic result.
Have fun stirring in and breaking up imaginary dough balls.
Hmmm first thought you were messing with me. But actually a good stir is important to get right number.
JUST_BREW_IT
Well-Known Member
tag
AVLbrewing
Well-Known Member
- Joined
- Jan 16, 2013
- Messages
- 173
- Reaction score
- 19
What's all this talk of filing? I didn't have to do any of that with my copper T's, and even in the same cooler. Just picked up plain solder T's from Lowe's.
It breaks down and rinses in under 5 minutes. Assembles in less than 5 minutes. No solder, no welds, no putty. 85%+ mash efficiency each time so far (single infusion).
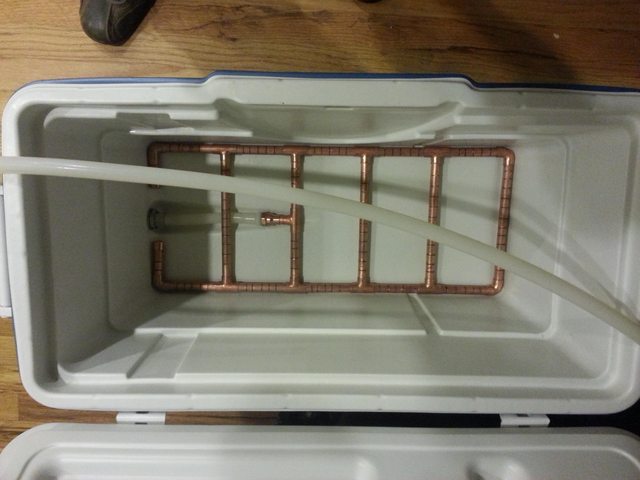
Thad - I like the design of your manifold, very clean and professional looking. I think I'm going to use the same setup once I pick up my cooler sometime this week.
One quick question, what are the two fittings you used to connect the silicone tubing inside of the MLT? It looks like you have some sort of plastic fitting connecting to a 1/2"x1/2" Copper Threaded Adapter Fitting (Lowes: http://www.lowes.com/pd_22627-137-CL603-2_4294822005__?productId=3505168&Ns=p_product_avg_rating|1). and then it looks like you are using something other than the standard cooler bulk head fitting on the other end. Any insight would be greatly appreciated.
Thanks!
Thats a nylon barb and a copper theaded thing... yeah...
Lowe's had them both on the pegboards in plumbing.
The bulkhead is the standard one from Bargain Fittings.
Lowe's had them both on the pegboards in plumbing.
The bulkhead is the standard one from Bargain Fittings.
OP
OP
alien
Well-Known Member
I'm sure the nylon fitting is absolutely fine but generally nylon stuff is rated for cold water only. You probably want polyethylene or polypropylene for preference.
Dynalab says nylon is good up to 210F (99C), melts at 420F (216C).
http://www.dynalabcorp.com/technical_info_nylon.asp
http://www.dynalabcorp.com/technical_info_nylon.asp
OP
OP
alien
Well-Known Member
It's not that the stuff melts. It is susceptible to hydrolysis. Especially in the presence of dilute acids. 
At least, that is true for nylon-6,6 which is the most common type. There are other grades of nylon that resist hot water better.
I mean, it's not like nylon stocking immediately go into holes when you wash them, but there is a gradual degradation which means that nylon parts are not used in hot water plumbing for example.
OP
OP
alien
Well-Known Member
If you're near a Menard's, the 70 qt coolers are currently on sale for $28.
http://www.menards.com/main/outdoor...-cooler-70-quart-100-can/p-1953070-c-7839.htm
http://www.menards.com/main/outdoor...-cooler-70-quart-100-can/p-1953070-c-7839.htm
lakedawgs
Well-Known Member
My store, for some reason, offers a $3.08 rebate to go with it bringing the price down to $24.91.
Already have one setup for a mash tun, looks like I need a new camping cooler!
Already have one setup for a mash tun, looks like I need a new camping cooler!
If you're near a Menard's, the 70 qt coolers are currently on sale for $28.
http://www.menards.com/main/outdoor...-cooler-70-quart-100-can/p-1953070-c-7839.htm
OP
OP
alien
Well-Known Member
Yes and yes. But I wouldn't recommend the step bit because when I did it I drilled out a bit of the inner hole too, which I didn't mean to do. If I did it all over, I would probably just snip the hole out with nail scissors.
OP
OP
alien
Well-Known Member
My store, for some reason, offers a $3.08 rebate to go with it bringing the price down to $24.91.
Already have one setup for a mash tun, looks like I need a new camping cooler!
Very tempting - wish I had a Menard's closer!
OP
OP
alien
Well-Known Member
The 70 qt cooler is back in Walmart for under $40.
http://www.walmart.com/ip/Coleman-7...9368205-2&adid=1500000000000029469730&veh=cse
http://www.walmart.com/ip/Coleman-7...9368205-2&adid=1500000000000029469730&veh=cse
stewart194
Well-Known Member
Edit - see post below
stewart194
Well-Known Member
Thanks again to Alien and GrogNerd. I finally put all of my equipment together and did my first All Grain batch last weekend. Everything went really well! I ended up buying the hardware and putty that GrogNerd recommended. I took out all of the stock Coleman stuff and just used the putty to seal it. I stuffed a little bit of it up into the cooler walls and then completely covered both sides of the fitting. The cooler wall feels super strong and best of all no leaks!
Here are some photos.
https://www.homebrewtalk.com/photo/brewing-equipment-60044.html
https://www.homebrewtalk.com/photo/brewing-equipment-60045.html
https://www.homebrewtalk.com/photo/brewing-equipment-60046.html
Here are some photos.
https://www.homebrewtalk.com/photo/brewing-equipment-60044.html
https://www.homebrewtalk.com/photo/brewing-equipment-60045.html
https://www.homebrewtalk.com/photo/brewing-equipment-60046.html
GrogNerd
mean old man
awesome! glad i could be of some assistance
OP
OP
alien
Well-Known Member
Hope it lasts you many a good brewday!
Similar threads
- Replies
- 12
- Views
- 2K
- Replies
- 4
- Views
- 1K
- Replies
- 5
- Views
- 3K
