• Please visit and share your knowledge at our sister communities:
  • If you have not, please join our official Homebrewing Facebook Group!

    Homebrewing Facebook Group

Mash Lauter Tun from Coleman Xtreme 70 Quart Cooler

Homebrew Talk

Help Support Homebrew Talk:

This site may earn a commission from merchant affiliate links, including eBay, Amazon, and others.
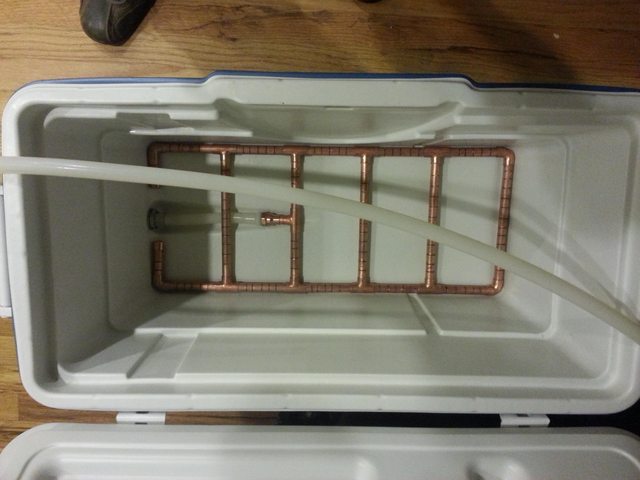
I also have this cooler with a ss braid and batch sparge. It's a good cooler for batch sparging but I don't think it's a good design for fly sparging. It's very long and I expect you will get a lot of flow near the drain and no flow at the far end. With the fly sparge it's important to have even flow through the grains so they all get rinsed equally. Just my 2 cents.

I plan on batch sparging pretty much all the time. I have seen some people make pretty cool manifold looking fly sparge devices out of cpvc that sit above the grain bed and act like a sprinkler.
 
first time I used this MLT it lost maybe 2 or 3 degrees over an hour. today I rolled out some aluminum foil over the top of the mash and didn't lose any temp.

pre-boil volume was a little more than calculated but gravity was dead on

need to finish the boil and chill to see what OG will be.

EDIT: measured OG - 1.066 = 72.5% efficiency. I can live with that
 
The top is insulated but not as thick as the sides, so putting extra layers on top doesn't hurt.
 
I plan on batch sparging pretty much all the time. I have seen some people make pretty cool manifold looking fly sparge devices out of cpvc that sit above the grain bed and act like a sprinkler.

You can sprinkle any which way to Sunday. If all the flow is at one end of the cooler your not going to have a very efficient sparge. I'm not saying it won't work. I haven't tried it with this cooler so I don't really know. I'm just saying this cooler is not the ideal shape for fly sparge.
 
What's all this talk of filing? I didn't have to do any of that with my copper T's, and even in the same cooler. Just picked up plain solder T's from Lowe's.


It breaks down and rinses in under 5 minutes. Assembles in less than 5 minutes. No solder, no welds, no putty. 85%+ mash efficiency each time so far (single infusion).
 
Looks pretty good Thad. :D

I considered the silicone thang, but was too cheap to spring for the hose barbs. By the way no need to file with slip tee's.

The slot spacing looks similar to mine. I have since heard that for HERMS you want to maximize surface area versus flow rate so I might end up cutting more slots.
 
Slot spacing wasn't planned. I came home from the third consecutive 12-hour graveyard shift, and it happened to be a holiday Monday morning.

My brew buddy (father, in fact) was off that day and looking bored, so I asked him to cut the slots. I printed him a picture of somebody else's manifold and went the hell to sleep.

I woke up and had these slots. I think he tried a sawzall with a couple different blades, a hacksaw, and a jeweler's saw. They're all different widths, spacings and depths. At first I was worried I'd get bad efficiency, but when the first batch come out at 86%, I realized it doesn't really matter how ugly your manifold slots are. The wort doesn't give a **** either way.

However, this layout was chosen because I thought maybe some day I'd like to fly sparge with it. In that case, I could just replace the edge pieces with solid pipe and not have to re-make the whole darn thing. It worked out nicely that the two short pieces leading to the barb T ended up being within 1/16" of the rest of the short pieces, so it's all interchangeable.
 
Good job. I'll take 86% any time. I guess you can over think these things. I marked 1/4" spaces originally, but cut every 1/2" because it was taking a long time with a hacksaw.
 
Like everybody else does, I took the lid off the hinges.

I also put a hole in the lid for a sparge/recirc line. I drilled a hole and glued in a 1/2" PVC coupler with silicone sealant. I intend to poke 1/2" silicone tube through the hole. If I can find my camera I'll post a pic.
 
My sparge water is coming through the lid. Hinges would make that a bit awkward, I want to lift the lid off rather than push it back.

If the sparge water is coming in through the side wall, different story. I did consider that option (bulkhead + loc-line) but it seemed more trouble than it was worth. I suppose if I get fed up with having a silicone hose flopping through the lid I could retrofit that.
 
You can sprinkle any which way to Sunday. If all the flow is at one end of the cooler your not going to have a very efficient sparge. I'm not saying it won't work. I haven't tried it with this cooler so I don't really know. I'm just saying this cooler is not the ideal shape for fly sparge.

Why do you say this? Is it because it has the "trough" for the drain?

Cheers.
 
Why do you say this? Is it because it has the "trough" for the drain?

Cheers.

because the cooler is long and the drain is at one end. In theory you will have more flow at the end when the drain is and less or maybe no flow at the opposite end. So you rinse the crap out of the grain near the drain and the opposite end doesn't get rinsed at all. This the theory behind a false bottom or a pipe manifold. They encourage more even flow. The ideal mash tun for fly sparge is round, has a fairly deep grain bed, has a false bottom and has the drain in the center.
 
So, to be clear, folks that unhinge the lid are fly sparging and those of us that batch sparge leave the lid hinged?
 
I have used this cooler with a copper pipe manifold for over a year and I fly sparge with the lid hinged. My average efficiency is around 75%. If the manifold is properly set up, then you won't get channeling. I think that is the whole point of a manifold, not just a drain hole at one end. Just my two cents worth.
 
I thought about going with a manifold but I decided on a stainless braid. Batch sparging I get a solid 80%+ on 1.065 beers and less. On beers in the 1.090 range I am getting 75%+.
 
because the cooler is long and the drain is at one end. In theory you will have more flow at the end when the drain is and less or maybe no flow at the opposite end. So you rinse the crap out of the grain near the drain and the opposite end doesn't get rinsed at all. This the theory behind a false bottom or a pipe manifold. They encourage more even flow. The ideal mash tun for fly sparge is round, has a fairly deep grain bed, has a false bottom and has the drain in the center.

If you have a manifold, why does it even matter what shape it is? Once the wort enters the manifold, the distance it travels inside is a moot point.
 
If you have a manifold, why does it even matter what shape it is? Once the wort enters the manifold, the distance it travels inside is a moot point.

From what I've read round coolers are better for fly sparging mainly because they are tall, so the grain bed is deeper, and because it is easier to install a false bottom.

With the good old sliding tee arrangement you could test whether it makes a any difference having the drain connected to the middle of the manifold or one end. It might make a tiny improvement. Fly sparging is a black art so who knows.
 
I have used this cooler with a copper pipe manifold for over a year and I fly sparge with the lid hinged. My average efficiency is around 75%. If the manifold is properly set up, then you won't get channeling. I think that is the whole point of a manifold, not just a drain hole at one end. Just my two cents worth.

COOL :mug:
 
I spaced the slots on the manifold every 1/2". Is there any downside to having the slots spaced more closely? I have heard that closer is better if you are recirculating, to improve flow rates.

Any thoughts on this? I have a fresh hacksaw blade but I need a little bit of motivation to go into a cold garage and cut a couple of hundred slots.
 
Yeah for a fly sparging manifold, as long as you don't have slots right along the cooler walls I think you'll be fine.

Give it a try as-is. If your flow rate sucks, go back and add more.
 
I purchased this cooler and ordered the hardware. This will be my first All Grain batch.

Do you guys pre-heat this cooler with hot water, then dump it out before mashing in? If so do you then heat your strike water to your desired mash temp? The recipe I'm trying first calls for a mash temp of 154. I'm wondering if I should pre-heat this cooler or if I should just heat the water to 164 or something like that and not pre-heat the cooler.

Also, this recipe has 12 pounds of grain. I'm going to keep doing 5 gallon batches for a while until I have my process dialed on this new system. It calls for a "mash thickness" of 1.5. I assume that is inches?? Do I need to worry about this? I'm batch sparging, and since this cooler is pretty large for 5 gallon batches, I don't know how I would go about this.

Thanks!!
 
Back
Top