Love Temp Controller Series TS wiring diagram (2008+)

Homebrew Talk - Beer, Wine, Mead, & Cider Brewing Discussion Forum

Help Support Homebrew Talk - Beer, Wine, Mead, & Cider Brewing Discussion Forum:

This site may earn a commission from merchant affiliate links, including eBay, Amazon, and others.

-TH-

Well-Known Member
Joined
Oct 22, 2008
Messages
913
Reaction score
110
Location
Zeeland, Michigan
The instructions that came with my TS-13010 Love temp controller weren't real clear in terms of wiring and I had to do some searching here and elsewhere. What I found helped but I thought I would make up a diagram that was real clear and post it:
LoveWiring2.jpg


And for the PRE-2008 models (thanks to Rick500):
tsx-10140_older.png


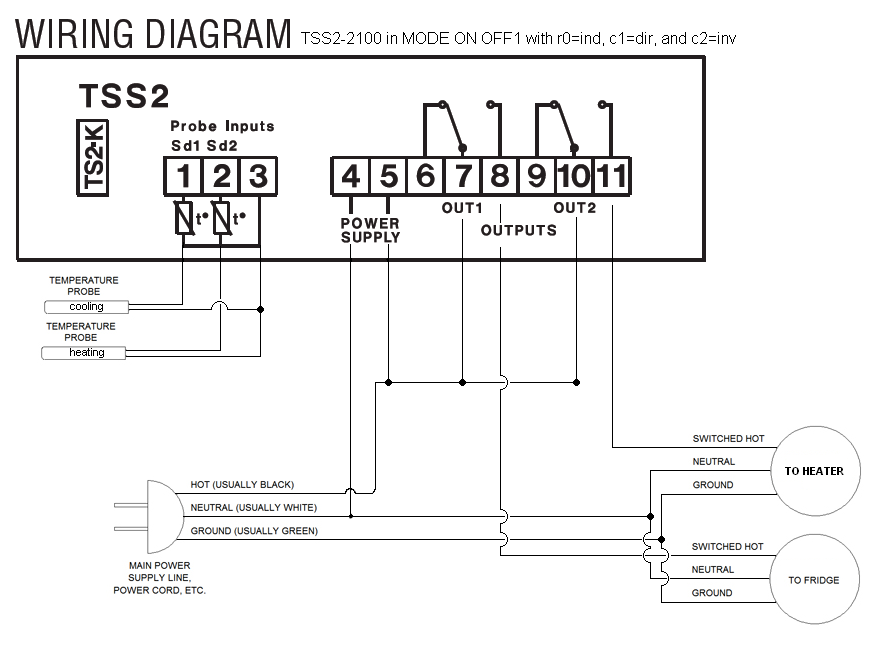
Here's the diagram for the LOVE TSS2-2100 (thanks to Boerderij_Kabouter):
Wiring_diagram_fro_Love_TSS2-21003.bmp


And the LOVE TSS2-2100 again but with only one temp probe (thanks to Boerderij_Kabouter):
Wiring_diagram_fro_Love_TSS2-210021.bmp
 
I've got a quick question about wiring the love controller.

The thermostat in my mini fridge is toast so I would like to wire up a love controller. Instead of wiring it using the extension cord method I would like to use the existing thermostat wires and mount the love controller in the door.

My question is how should I wire the controller? The wires I have to work with in the fridge are:

Black (hot)

Yellow (Neutral)

Green (ground)

I've tried to figure it out using THs wiring diagram but I'm not to electrically gifted. Any help will be greatly appreciated.

Thanks, Jamie


Maybe this will clear things for you...

#7 neutral - could be the neutral line of the old thermostat , or anywhere else you can get neutral from. [EDIT: Your old thermostat probably doesn't have a neutral line going to it. Probably just hot in, switch hot out, and ground.]

#8 needs a wire that is always hot.

#9 nothing

#10 needs a wire that is always hot. can get by running a short wire from #8.

#11 this is the line that becomes hot when the controller determines the fridge should run (aka "switched hot"). Therefore you could use the wire that the old thermostat used to provide power to the compressor.

Hope that helps!
 
Thanks for this, I am getting ready to wire mine up in the next day or two. Why can't they just put this in the box with the controller, it is so much easier to follow.
 
Thanks for the response. Thats what I thought but was scared I might fu*& something up.

No chance of that now...Thanks Again.:mug:
 
IMG_0232.JPG


I wouldn't recommend using a jumper. I believe those terminals are for one wire only. You might be better to splice and run a pigtail to terminal 10.

Hope you can see the picture ok.
 
This is a great thread! Here is the diagram for a dual stage LOVE TSS2-2100

Wiring_diagram_fro_Love_TSS2-2100.bmp


For standard heating and cooling application such as in a fermentation chamber with cooling and heating capacity, you want to select MODE ON OFF1 with r0=ind., c1=dir., and c2=inv. such that when the temp drops below your first set point the cooling will kick on, and when it rises above your second set point the heater will kick on.

Here is the spec sheet for this controller, and the cheapest supplier I have found.
 
A jumper will work but is not recommended. If you can, use a terminal block, next I would suggest splicing and soldering the joints. My last choice would be a jumper. These connections just aren't designed for multiple wires. It will work fine (the electricity doesn't now the difference), it just looks nicer and is safer the other way (i.e., less chance for arcing, short circuit, crossing wires, shocking yourself, etc.).

I used a jumper when wiring my Ranco, because it was just easier...
 
This is a great thread! Here is the diagram for a dual stage LOVE TSS2-2100

Wiring_diagram_fro_Love_TSS2-2100.bmp


For standard heating and cooling application such as in a fermentation chamber with cooling and heating capacity, you want to select MODE ON OFF1 with r0=ind., c1=dir., and c2=inv. such that when the temp drops below your first set point the cooling will kick on, and when it rises above your second set point the heater will kick on.

Here is the spec sheet for this controller, and the cheapest supplier I have found.

Thanks You! My controller should be here next week, going to hook up a fermentation chamber. I second that on the supplier, it is were I got mine from.
 
A jumper will work but is not recommended. If you can, use a terminal block, next I would suggest splicing and soldering the joints. My last choice would be a jumper. These connections just aren't designed for multiple wires. It will work fine (the electricity doesn't now the difference), it just looks nicer and is safer the other way (i.e., less chance for arcing, short circuit, crossing wires, shocking yourself, etc.).

I used a jumper when wiring my Ranco, because it was just easier...

Any good source for terminal blocks?
 
I have used the modular terminal blocks from Mcmaster-Carr and like those very much. You buy a mounting rail and then whatever terminals you need. These are nice because they are easily expandable if you find you would like to add more connections. That may be a bit over-kill though for this app.... If you look under the electrical sub-section, they have a terminal block section.

Also, I think that if you want to use one probe (which I do), you can just splice the probe wire and send it to both terminals 1 and 2.
 
Thanks. Newark and Grainger have them as well. Just wanted to know if some one had a deal. Seems kind of pricey. I feel a flame coming on, but what about using boxes and wire nuts? $80 for terminal blocks compared to $20 for boxes and wire nuts. What do you guys think?
 
If I didn't have some terminal blocks lying around, I would use a box. I would house the connections in the box, solder the connections, and shrink wrap them. Or just use wire nuts. They will work just as well. These aren't industrial conditions we're talking about.
 
If I didn't have some terminal blocks lying around, I would use a box. I would house the connections in the box, solder the connections, and shrink wrap them. Or just use wire nuts. They will work just as well. These aren't industrial conditions we're talking about.

Thanks, Thats what I was thinking as well. Thanks again for all the help and diagrams!
 
BTW if you're going to all that trouble just to avoid using a jumper wire, I wouldn't bother. I had no problem using one in mine. The products we manufacture at my work also use them all the time (and our products are UL approved).
 
Sorry, not meant to hijack, but maybe add more value to this thread by asking a question... Is the thermometer probe capable of electricution if the wire frays and you touch it, or submerge it in wort? Or is it converted to DC? I haven't been able to figure this out.
 
I use the jumper wire on the TS model and it works fine I have it set to heat now and when it gets warm out I will set it to cool. It also turns on the fans I have installed.
 
Sorry, not meant to hijack, but maybe add more value to this thread by asking a question... Is the thermometer probe capable of electricution if the wire frays and you touch it, or submerge it in wort? Or is it converted to DC? I haven't been able to figure this out.

I would assume it is very low voltage but I don't know for sure. I did read somewhere though (instructions maybe?) that they weren't meant to be submerged in liquid.
 
anybody have a link to where they bought there love controller. I'm looking for the ts 13010
 
I just got mine from cole parmer. Super fast shipping. I use mine for heating now. Turns on/off a 40w bulb in the garage fridge to keep temps above freezing. It's been a few beers ago now but I think in testing I found that switching the #11 (switched hot) wire to #9 turned the light on as the temp dropped to the range I set. Something wrong with my logic?
 
...Also, I think that if you want to use one probe (which I do), you can just splice the probe wire and send it to both terminals 1 and 2.

Has anyone else tried this? i wired my probe the same way, to both terminals, and i get really strange temps, like 200 degrees high, when i remove the splice the probe works correctly again.
 
posted by robstu
Has anyone else tried this? i wired my probe the same way, to both terminals, and i get really strange temps, like 200 degrees high, when i remove the splice the probe works correctly again.
If you are using your TSS2 for automatic cooling and heating use one probe only.
Set the parameter to one probe (P5) and connect the probe to input one only.
Channel 2 is now dependent on channel one temp.

Cheers,
ClaudiusB
 
OK here is the updated schematic for a LOVE TSS2-2100 controller with a single probe

Wiring_diagram_fro_Love_TSS2-21002.bmp


When you first plug the controller in and fire it up a buzzer will sound and ErP will flash on the screen. Here is how to enter your controller into single probe mode:

1. Press and hold the "SET" button for 8 seconds or until "0" flashes on the screen.
2. "0" is the code to grant access to the controllers programming and can be changed to any digit 0-999 to selectively allow access tot he controller.
3. Press "SET" again to tell the controller "0" is the correct code ("0" is the default).
4. Now a parameter will be flashing on the screen. Cycle through the parameters using the "up arrow" until you reach "P5".
5. Press "SET" to enter "P5" programming.
6. Press the down arrow sot hat "1" is displayed on the screen. This indicates single probe operation.
7. Press "SET" again to select single probe operation and return to the parameter screen.
8. Press "SET" and the "down arrow" simultaneously to exit the parameter screen.

You are now operating normally in single probe operation.

To program the controller to work properly with heating and cooling as we have discussed above... follow the same programming steps (now that the beeping has stopped :D) to enter parameters "r0", "c1", and "c2" as indicated on the schematic.

"SP1" and "SP2" are set by pressing the set button. The current SP1 temp will flash. Use up/down arrows to pick desired temp, and hit set again. Do the same for SP2.

Thanks again ClaudiusB for the tip!
 
I can't find what is included with the controller anywhere on the web.

I am looking at getting the TS-13010 and wondering if it comes with the temperature probe?
 
I can't find what is included with the controller anywhere on the web.

I am looking at getting the TS-13010 and wondering if it comes with the temperature probe?

Yes my TS-13010 came with a temp probe. It did not come with any wires (other than the temp probe wires).
 
Back
Top