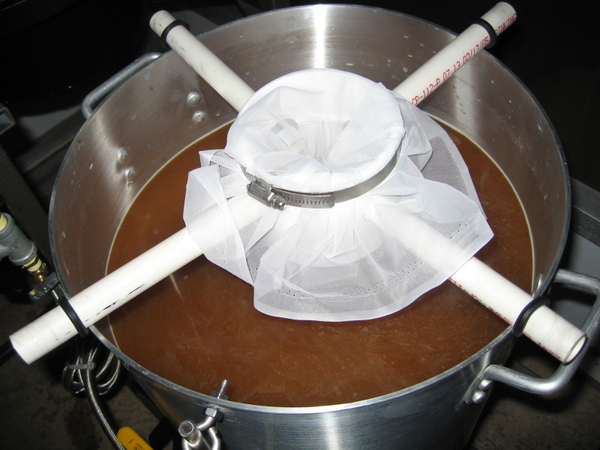
Lil' Sparky is tha Man!

Homebrew Talk - Beer, Wine, Mead, & Cider Brewing Discussion Forum

Help Support Homebrew Talk - Beer, Wine, Mead, & Cider Brewing Discussion Forum:

This site may earn a commission from merchant affiliate links, including eBay, Amazon, and others.

ScubaSteve

Well-Known Member
Joined
May 21, 2007
Messages
3,673
Reaction score
91
I know he didn't invent this, but as far as this forum goes (the ONLY forum, as far as I'm concerned)......he's the Thomas Edison of Hop Strainers.

I used it to strain during the vorlauf ( I highly reccomend it.....separates husks). You can see how clear the wort was against my lilly white hand....and also how clear it was in the hydrometer cylinder....

http://s165.photobucket.com/albums/u76/hawkie333/HOMEBREWING/LIL%20SPARKY%20HOP%20HANGER/
 
This method is awesome, IMHO, because you can manipulate it easily, and you can even filter your vorlauf thru it....If you use an IC (like I do) you can pull it out and replace it right in the middle of the coil......adding hops/spices whenever you want. I like to use the whirlpool method post boil, and my wort came out clearer than applejuice!
 
I built one of those.

1. 3" collar
1 pack of paint strainers (5 gallon)
2 metal dowels
1 big hose clamp

Probably $10 all day
 
I've also seen people use 1/2" CPVC run through holes in the middle coupling for the supports instead of metal rod. Could cut the cost down and no worries about rust (sure wouldn't want to spring for all stainless hardware.)
 
It's a hop bag. But unlike a hop bag you don't have to fish it out of the pot and open it up to add aroma or flavor hops or any other adjuncts. Also it's big enough to let hops get good movement in the boil.

It looks like ScubaSteve also used it to capture the floaties when he vorlaufed.
 
No, I can't take credit at all. I got the idea from someone else on here, but it has worked so well for me that I show it when someone asks about straining hops. I haven't used during the vorlauf. I need to give that a try.
 
Along the same lines, but slightly different, I believe BierMuncher recommended using a paint strainer in combination with an immersion chiller.

With this method, you can let the hops float freely during the boil, but when you place the chiller in the wort, with the strainer on the outside, you can siphon the beautifully strained hops from the inside of the coil. No muss, no fuss.

I haven't tried it yet, but probably will tomorrow. My only question is whether or not you need to boil the strainer with the chiller during the last 15-20 minutes of the boil, of if it can be placed on the chiller just before cooling the wort. I'm guessing boil it with the chiller...
 
Yeah, I saw how BM did it....that's also a great method. I just take the whole bag out after everything is cooled using my IC, and use the whirpool method. I'm trying to use the ball valve in my keggle if at all possible, but I keep an autosiphon sanitized and on standby in case the valve clogs.

Roqk- Here's a rough list:

1 Black 4" PVC "coupler" with external threading on bottom (keeps bag in place) -$5
1 hose clamp that will fit around coupler- $1
1 5 gal paint strainer bag (2pack) $3
4 1/2"x 8" carriage bolts ~$6 (Try 6", you'll get a tighter fit)
8 1/2" fender washers $2
8 1/2" hex nuts $1

These are estimates. Total is ~18...In hindsight, I would buy 6" carriage bolts for a tighter fit along the rim of the keg, to keep it in place. You could probably buy 3/8" hardware as well. This will also save some $$$.
 
Seems like it may be a little pricey. But if it helps keep those hops out then I'll try and make one. May hafta try and do a Roqk-modi on it. I like the idea of making it with wooden dowels or 1/2" pvc pipe. Thanks for the time of making the list.
 
Roqk-There's a lot of flexibility in price. Lil' Sparky said he used threaded rod and just cut it to sections. That would have been cheaper than buying the long bolts. I just bought what I wanted. IMO, this is CHEAP when you see how clear the wort runs! It pulled a LOT of husks out of my vorlauf, and again when I finally collected my runnings into the BK. People spend a LOT on hopstoppers, etc....I use an IC, so that's not an option. I'm totally happy with it.
 
I bought a 3" PVC collar (bigger on one end than the other), a hose clamp, 2 pieces of threaded rod, some nuts and washers I had lying around, and the paint strainer. Haven't used it yet, but will on my next brew. Pretty cheap and easy to make.
 
Another tip for anyone thinking of building this. When I first tried this, the hose clamp alone didn't have enough bite on the bag and the bag slipped out. I fixed this by putting a big rubber band (think trash can rubber band) on the coupler, and then the hose clamp had something sticky to clamp the bag to. It hasn't slipped off since.
 
this is such a great idea i just picked up my parts to do this, trying in all pvc first.

1x 4" pvc coupler - 1.98
4x 12" 1/2" pvc - already had
8x 1/2" id rubber grommets - 1.97/4 pack
1x 4" hose clamp - 1.54
1x hop bag - already had

i plan on using the rubber grommets similar to the way the phils sparge arm uses them to secure it to the kettle.
 
kladue said:
Any body consider the effects of leaching the toxic cadmium plating from the bolts into the wort.

Nope. The bolts don't even get close to the wort. Steam might touch them, but I doubt there's any real leeching going on.
 
surfbrewer said:
Pretty nice, I like the design. No problems with using pellets or with hop utilization? Thanks for the idea and parts list.

Nope! My beers are hoppy as ever, and IMHO this setup works best with pellet hops. The bag allows hop oils out, while keeping hop sludge in.:mug:
 
jbreiding said:
this is such a great idea i just picked up my parts to do this, trying in all pvc first.

1x 4" pvc coupler - 1.98
4x 12" 1/2" pvc - already had
8x 1/2" id rubber grommets - 1.97/4 pack
1x 4" hose clamp - 1.54
1x hop bag - already had

i plan on using the rubber grommets similar to the way the phils sparge arm uses them to secure it to the kettle.

I like this parts list. How'd you connect the 1/2" PVC to the coupler?
 
I have this same setup and it works great. I also used the 3\8" treaded rod and I bent it so that it hold the PVC up and out of my pot plus the rods are bend down on the ends to lock in on the pot. No worries about it falling off or in.
 
For anybody that wants to do this on the cheap, you can use 1/2" wooden dowels instead of caraige bolts or threaded rod. Simplywhittle the end down with a razor blade, drill 7/16" holes in the Drain waste and vent adapter, and with a deft hand with the knife, the dowels wedge in with amazing rigidity. The whole thong also comes apart very easily for storage/cleaning

BTW, I figured this out by accident, because like some kinda moron I purchased nuts with the wrong thread pitch and only discovered my mistake when trying to construct during my mash this morning.

Cheers!
 
BrianP said:
Along the same lines, but slightly different, I believe BierMuncher recommended using a paint strainer in combination with an immersion chiller.

With this method, you can let the hops float freely during the boil, but when you place the chiller in the wort, with the strainer on the outside, you can siphon the beautifully strained hops from the inside of the coil. No muss, no fuss.

I haven't tried it yet, but probably will tomorrow. My only question is whether or not you need to boil the strainer with the chiller during the last 15-20 minutes of the boil, of if it can be placed on the chiller just before cooling the wort. I'm guessing boil it with the chiller...

No need to boil. I simply keep the strainer in sanitizer solution until it's time.

I like this other method and the idea of not having to fish out the hops after the drain.

My problem is logistics. I use an immersion chiller, and a lot of my recipes require a flameout hops addition. Thisrecipe addition assumes the hops will steep for 15-30 minutes while the beer is chilled.

To use this set up, I'd need to remove this hops rig immediatley to get my chiller in there to start chilling and I don't know how the hops utilization would be affected.

I'll have to investigate...because as well as the chiller-filter works, I'd sure like to not have to scoop and strain my hops at the end of the siphon process.
 
BierMuncher said:
No need to boil. I simply keep the strainer in sanitizer solution until it's time.

I like this other method and the idea of not having to fish out the hops after the drain.

My problem is logistics. I use an immersion chiller, and a lot of my recipes require a flameout hops addition. Thisrecipe addition assumes the hops will steep for 15-30 minutes while the beer is chilled.

To use this set up, I'd need to remove this hops rig immediatley to get my chiller in there to start chilling and I don't know how the hops utilization would be affected.

I'll have to investigate...because as well as the chiller-filter works, I'd sure like to not have to scoop and strain my hops at the end of the siphon process.

BM it's not a problem. My CFC has failed me three out of the 4 times I have used it so I have had to go to my IC at the last minute. I just move the hop bag rig off to the side and drop in the chiller. Still works great and no problem with the bag or the chiller.
 
You guys are all making this too complicated. You don't need 4 legs to support it. Two work just fine. I drilled two holes bigger than the rod I used (I now have an aluminum rod) and just slip it through. It's easy to take apart for cleaning and it fits much more easily in my brewday toolbox.

inkeg.jpg

addinghops.jpg
 
In line with BierMuncher's idea, what about just zip-tying a hops bag around the end of your racking cane or autosiphon? Then you can easily do flameout hops additions, can still whirlpool too, if you're of a mind, get full hops utilization (although I use a hops bag to contain my pellets now, so that's not really a concern for me, I guess), and don't have an additional piece of eqiupment to deal with when placing your IC in the kettle. I suppose you'd still have to deal with the hop sludge left on the bottom of your kettle, though.
 
e lo said:
In line with BierMuncher's idea, what about just zip-tying a hops bag around the end of your racking cane or autosiphon? Then you can easily do flameout hops additions, can still whirlpool too, if you're of a mind, get full hops utilization (although I use a hops bag to contain my pellets now, so that's not really a concern for me, I guess), and don't have an additional piece of eqiupment to deal with when placing your IC in the kettle. I suppose you'd still have to deal with the hop sludge left on the bottom of your kettle, though.

I’ll use the racking cane/hop bag going from primary to secondary, or secondary to keg…but not kettle to primary. At that point, there’s just too much stuff in the kettle that will clog the mesh…
 
Sorry for being dense, but the idea here is to be able add the hops at any time right? The hops will sit in the bag and not circulate freely in the wort?
 
Yes, they're added to the bag through the PVC coupling at any time, but since the bag is so large, it rolls around in the boil. I haven't noticed any drop in bitterness.

You can see in this picture how big the bag is. It reaches almost to the bottom of the keggle.

DSCN2508.JPG
 
BTW - you guys have come up with some great mods on this idea! I'm thinking about cutting my rods where the whole thing will sit down inside the lip of the keg. That way the bag will have even more freedom to move around.
 
Lil' Sparky said:
BTW - you guys have come up with some great mods on this idea! I'm thinking about cutting my rods where the whole thing will sit down inside the lip of the keg. That way the bag will have even more freedom to move around.

I had considered doing the same, if even just for safety reasons. I'll probably keep it as is, though....it works so well!
 
Hmm... that makes sense, BM. Maybe I'll make myself one of these. It's been, oh, a month or so since I've bought or made a new piece of brewing equipment. I guess it's time. :)

So where do you guys get the material to make these? (Apologies if this was already answered and I missed it.)

Edit for clarification: Where do you get he nylon mesh, specifically?
 
Lil' Sparky said:
BTW - you guys have come up with some great mods on this idea! I'm thinking about cutting my rods where the whole thing will sit down inside the lip of the keg. That way the bag will have even more freedom to move around.
If mine was not being held up and out like it is mine would be down in the pot. I did not want this because when I do 10gal and I have to start with a 14-15 gal boil the pvc would be in the wort. Not something I would want.

You can get the stuff for this at any hardwear store or home depot like store.
 
bluelou6 said:
Sorry for being dense, but the idea here is to be able add the hops at any time right? The hops will sit in the bag and not circulate freely in the wort?

Don't worry, you'll get what you need out of them. The cohumulones melt off fairly quickly so the vegetable matter doesn't really need to a long time to do it's thing. The bitterness comes from the yellow "wax" on the cones, the rest of the hop has lesser effects on the beer. That wax is powerful stuff.
 
This is a very cool idea. I think I might try this.

How many times do you find that you can reuse the strainer before having to ditch it for a new one? And are those strainers made of nylon or cloth? I'd be afraid of nylon melting under boiling temps.
 
Rhoobarb said:
This is a very cool idea. I think I might try this.

How many times do you find that you can reuse the strainer before having to ditch it for a new one? And are those strainers made of nylon or cloth? I'd be afraid of nylon melting under boiling temps.
They are nylon, but they wont melt unless it's sitting on the bottom of the pot. I have used mine 4 times now and the bag is still good.
 
Back
Top