• Please visit and share your knowledge at our sister communities:
  • If you have not, please join our official Homebrewing Facebook Group!

    Homebrewing Facebook Group

Knotty Pine and Cedar Log Keezer Build

Homebrew Talk

Help Support Homebrew Talk:

This site may earn a commission from merchant affiliate links, including eBay, Amazon, and others.
LOL...the antlers that I will use for the tap handles are from scrubby little bucks that I have shot over the years. The smaller ones end up in a box for my "projects" and the decent ones end up as plaque mounts, European mounts, etc. No need to buy antlers with my upbringing. Grew up in rural lower MI and have been hunting my entire life. I'll hunt down some pics when I get a chance. Smart a$$! ;)

Pics of deer or you bought the antlers. :p
 
I'm puchasing hap handle inserts and am going to try to drill out deer antlers to use as tap handles. I have a feeling that it's going to be much easier said than done. I've seen a couple of other guys try it on here in the past, so I thought that it would be fitting with my decor. I have to be really careful, because the overhang on the coffin top is a wee-bit more than it should have been. With the cheap black handles....the Perlicks shut off fine, but if I go with anyting much thicker I may have to modify the top. :(

first of all, i REALLY like your build. one suggestion i was going to make before you go and modify that beautiful top to accomodate custom tap handles is to just build a spacer to go behind the where the faucet mounts. i had the same problem on kegerator when i installed the faucets on the side of my full size fridge. i wanted custom tap handles but the length of them wouldnt let me close the tap when i pushed them all the way back against the fridge. i bought a stainless steel 1 inch box flange (toilet part) at hope depot, ran the shank through it then screwed the faucet it on. it looks and works great and gives me the extra clearance for the 10" tap handles i have.

as good as you are with working wood, i would think you could build a spacer out of wood then just drill holes in it big enough for the shanks to go through and you are golden.
 
Thanks for the advice puckjer. I haven't drilled out the antlers yet, but I'll keep your suggestions in mind if I need more clearance. Like the rest of this build....I'll cross that bridge when I get there. Your right...I really don't want to modify the top or try to remove it and rip it down at this point. Good suggestions! Cheers. :mug:
 
4 will fit in mine, but not easily. You have to literally jam the 4th one in and it's a very tight fit. That's the main reason why I went with 3 taps instead of 4. It leaves 3 on the floor + the CO2 tank and then a primary can fit on the hump if I want to try lagering at some point. Regardless, I'm happy with the set up and like having the extra gas supply line just in case I want to cram a 4th "on deck" keg in for carbing, have a wheat bear at a higher CO2 volume, or if I need to simply purge a newly racked kegs and pressurize before conditioning at room temp. Good luck with your build! :mug:

Great build I thought I could fit 4 in mine but I think I'm going to have to double check.
 
I'm trying to figure out what materials I want to use, and how I want to cover the bottom. For the top I'm going to use glass and stone mosaic tile. I'm going to probably use pine too since I don't like oak furniture.
 
Sounds like a great plan....I like the stone + glass mosaic idea! If you don't like the look of oak, which I absolutely hate, then pine will be fine. However, remember that pine is a softer wood and you need to consider that. I went with the knotty pine + cedar logs to fit my entire basement decor. I'm the only one that will be using the keezer in my household and my friends/ neighbors are all fairly responsible people, so mine won't be subjected to a lot of bumps and bruises. If I were going to build this thing to match the decor. of the rest of my house I would have went with a more contemporary design and used hardwoods like maple and cherry. They are much harder and less prone to dings, gouging, etc. You just need to consider the environment that it's in. For example....if it's going to be subject to a lot of hard use like wild parties with many people using it, setting drinks on it, bumping into it, etc. then I would use a harder wood. On the other hand, if it's going to be in a tame environment where people are going to respect your keezer then softer woods will be fine.

I'm not sure if you have checked out my basement bar build, but my bar top is a 12ft. long, 4" thick slab of redwood with raw edges. Redwood is also considered a softer wood and eventhough I have 5 coats of conversion varnish on it, it already has some small dents/dings from putting tools on it. Thankfully, my basement is a rustic decor and I will be making people use coasters, but over time it is going to get dings/dents. I have reserved to the fact that it's "building character" in the piece and it's not going to stay pristine forever. My 2 cents. :mug:

I'm trying to figure out what materials I want to use, and how I want to cover the bottom. For the top I'm going to use glass and stone mosaic tile. I'm going to probably use pine too since I don't like oak furniture.
 
But wait....there's more! :D I was also able to get the cabinet covered with the T&G knotty pine and installed all of the vents. The GE has the compressor in the lower right side of the unit with a large vent for cooling. I have also heard that heat build-up dissipates through the skin of the unit on all sides. I decided to put a 6" x 10" vent in the right side of the unit at the bottom, so that heat can escape and not get trapped in the cabinet. I then put a 3" x 10" vent on both the right and left side of the unit, but higher on the cabinet to allow any rising heat from the skin of the unit to escape from the cabinet. For these three vents, I used cheap white wall vents from HD ($15 for all 3). I decided to place a 3" x 12" vent in the front of the cabinet as well to allow heat to escape. For the front vent, I used a brushed nickel vent ($12), so it will match the SS drip pan and faucets when complete. I probably went waaaaay overboard with the venting, but what the hell. Better to be safe than sorry. Here are some pics. :mug: Is it possible for this thing to overheat? Any feedback would be great. I really don't want to install fans if I don't have to.

Nice build! I'm sorta all thumbs when it comes to doing anything handy but I will be attempting a build like this in the near future. I just had a few questions -

1) What kind of screws did you use to assemble the base and frame?
2) What did you use to attach the pine to the the frame? (Post #6 in this thread)? What size are those pine planks?
3) Looking at the last picture in post #5, did you construct the frame so that the top of the frame would be level with the top of the lid of the freezer? Or so that the lid sticks out above the frame a few inches?
4) What did you use to attach the vertical trim logs to the frame?

Thanks for the time!
 
Thanks for the compliment. Here are a few answers to your questions:

1) What kind of screws did you use to assemble the base and frame?

I used 2 1/2" wood screws

2) What did you use to attach the pine to the the frame? (Post #6 in this thread)? What size are those pine planks?

I used liquid nails on the back and 1 1/2" finish nails on the edges, which are hidden by the corner log trims. I used a much smaller profile and thinner knotty pine for this project compared to the rest of the basement. I purchased the knotty pine at Home Depot and I believe it is 3" wide T&G and 3/16" thick. It comes in 8 ft. long pieces and is packaged with a total of 6 pieces per package. It's around $16 per package. It certainly doesn't have as much character as the 6" wide 3/4" thick knotty pine that I used for my bar and walls, but I wanted something much lighter and thinner for this appliation.

3) Looking at the last picture in post #5, did you construct the frame so that the top of the frame would be level with the top of the lid of the freezer? Or so that the lid sticks out above the frame a few inches?

I made the frame height fall about 1" below the height of the freezer lid and then, obviously, the horizontal trims on the lid hide the gap.

4) What did you use to attach the vertical trim logs to the frame?

I used 3 1/2" wood screws through the 2x4's from behind to secure the logs to the corners. I did this so that there wouldn't be any screws or nails through the face of the logs. I believe that I used liquid nails on the 2x4 corners as well for extra hold.

Thanks for the time![/QUOTE]

No Problem, if you have ANY questions along the way...I would be more than happy to help. I can't wait to see your build, so make sure you chronicle it on a thread. Good luck!

:mug:
 
I thought about covering the sides with Formica but that was just too much of a granite look. It would look alright on the top but not so much the sides. I would use maple but it's bucks. I'm not to worried about it. I'm 33 and my friend are pretty reasonable, although the last time we all got together I ended up getting 8 stitches in my left index finger from a broken beer bottle. :rockin:
 
OK...I did manage to place my order with kegconnection.com yesterday afternoon, but the process was not nearly as smooth as most of you guys experienced. They were exceptionally helpful with coming up with a customized system for me the day prior. :rockin: However, actually initiating the order was an all day affair. I left a couple of messages in the morning for the sales guy and then when I finally got ahold of him in the late morning after several attempts, he wasn't in the office by his computer, so he couldn't place the order. He asked that I call back later after his lunch to place the order. I called several times and then left a message.

I really wanted to get the order in process, so late in the day I called kegconnections directly and spoke with the shipping manager. I asked him if anyone else could initiate the order, since I was already emailed an invoice the day prior and I just wanted to pay for the items. He said that he could not run the transaction, but would be happy to start getting the components around for my system right away. He said that if I could finalize the order, there was a chance that he could get it shipped immediately. I was very pleased with his customer service :ban: and he said that either he or the owner would contact the sales guy, so that we could finalize the sale. I finally received a the call right at the end of the day and we reviewed the order and I gave him my CC and address. He said that his computer was still booting, but he would send me an updated invoice for review and a receipt to verify the order within 5-10 minutes. It's 6:00 a.m. the next morning and still no email! :(

Needless to say, I don't think that my order shipped yesterday and at this point I'm not even sure that the order was placed. Hopefully I receive some sort of correspondence today. I still have faith and if everything in the order comes without a hitch, I won't hold it against them.

Addendum: It's now 5:25 p.m. and still no email for order confirmation? I'm hoping that they have processed the order, but still not sure.

Addendum: Never got an email or verification of the order processing. I called today (2 days after placing the order) and spoke with the warehouse manager Josh. He found in their computer that I had an account opened, but could not find an updated invoice and said that my order was never processed and my CC was not charged. He re-did the entire order, but what a PITA!!! Not sure why they dropped the ball so bad with me, but I should be all set now....at least I hope.


that experience Sounds just about right for Kegconnection.

We have placed 4 orders with them for well over 1k$. All but our first order was incredibly painfull. Their communication is horrible. needless to say we will not be doing any future business with them.

just wanted to say you're not alone and I would NOT recommend them.


that aside your build is awesome and I really like what you have done. I am curious what kind of cost is involved with getting the wood?

Great work :mug:
 
Thanks ChadS99SVT. I just think that kegconnections is a little too busy at this point with their rise in popularity on HBT. It sounds like they have one customer service rep., one shipping manager, the owner, and a couple of guys putting together orders. Like I said in subsequent posts, Todd their shipping manager, really went the extra mile making things right for me. He knew that the sales rep. really dropped the ball on my order, so at least he cared enough to process my order and make sure that everything was accurate. He also threw in free shipping and a few extras for my troubles. I would certainly use them again for future orders, but I would remind them of my first experience and hope that they would follow through a little better the next time around. All in all, my order was 100% correct and I got everything that I ordered in a timely manner once the order finally got processed. I know that kegconnections has a very loyal following on HBT and I'm not going to hold this one ordering snaffu against them. Sorry you have had multiple problems thought.

To answer your question....besides about $80 in 2x4's, t&g knotty pine, and additional pine boards, the red cedar logs were free. My dad has a cedar swamp on his property and all of the logs used for this build and in my basement build were harvested from his property.
 
OK....so I got the keezer top grouted and am waiting for the grout to dry for a couple of days. I will then do multipe coats of stone/grout sealer to waterproof it and then I'm gonna hook this b*tch up! :ban:

If you have followed my basement build thread you can see that I used a combination of dark slate and tumbled travertine throughout my build. My entire bar floor, bar foot rest face, fireplace hearth, walk out pad, etc. are slate and I used tumbled travertine for my bar back splash, the top of the bar foot rest, and as accent trim bordering. I used the same tumbled travertine for my keezer build to tie everything together. I sort of felt like the travertine was a little too light in color and clean looking for my rustic build, so I decided to go with a taupe grout color for ALL of the tiling applications to tie everything together and darken the appearance of the travertine. The taupe grout is a medium shade grout with almost a clay (between a tan and grey) appearance on paper, so we went with it.

Holy sh*t.....the grout is waaaaaay darker than I anticipated. I know that grout typically lightens up dramatically when it dries, but when I started grouting the fireplace mantle and the keezer, the grout was really dark....almost a deep slate color. As it is drying, it is lightening up quite a bit, but the grout was supposed to be tauple and it is drying very grey. :confused: I'm definitely second guessing our choice of grout color, but there's no turning back now. I'll snap a couple of pics. once it is completely dry and you guys can tell me what you think.
 
OK, so the grout is dry on the keezer top and coffin. One big problem....we hate the color! :confused: It turned out darker and a lot more on the grey side than it was supposed to. It looks really good with the dark slate, but since the tumbled travertine is very porous and the grout tends to fill all of the porous voids in the tile, it just makes the tile look dirty. Bascially, my wife and I are both in agreement that we are not keeping it. I have an entire wall backsplash behind my bar that has to match the keezer, since it is sitting right next to it. I don't think that filling an entire wall with this tile/grout combination would do any favors for the bar area. I took a few pictures of the tile grouted, but I am also going to be removing the tile/grout on the keezer tonight and re-tiling and grouting in a more neutral "bone" color. What a pain in the A$$!!!! :(

IMG_2148.jpg


IMG_2149.jpg


IMG_2150.jpg


IMG_2151.jpg
 
i see what you mean. man that is frustrating. honestly it doesnt look that bad but you are the one that has to look at it every day and as much time as you have spent on the project you will probably enjoy it more if you just replace it. thats what i would do
 
I personally think that the grout looks good on the tile. beauty is in the eye of the beholder, and as suggested you have to look at it and not me... so if you don't like it you would be best of replacing it. I know you put a lot of work into this masterpiece but if you don't like 1 thing about it you should change it... otherwise it will always bother you.
 
Totally with you on changing it. If it was in a room on its own I think it'd look fine. But a whole wall that looked like that? No thanks. Would look exactly like you say, muddy. Good luck with the next color. Maybe do a quick 4x4 test on a piece of scrap to make sure its the look you want?
 
Thanks for the feeback guys. I already removed the tile/grout when I got home from work and stopped by the HD for new tile and "bone" colored grout, which is much more subtle and doesn't contrast with the tile like the other stuff. We used tumbled travertine for the backsplashes in our kitchen above the granite and used the "bone" colored grout, which is much more neutral and we know that we like it, hence my new choice to go with it. I planned on re-tiling tonight, but I forgot about a funcion at my son's school tonight, so it's too late. Working 14 hrs. tomorrow, so it looks like I won't be tiling until Thursday. :(

On the plus side....I am going to rack a DFH Indian Brown Ale clone into a keg tonight, so I will now have 3 kegs conditioning and ready to go when I finish the tiling/grouting/sealing.

My line up:

Tap 1: Centennial IPA
Tap 2: Blood Orange Hefeweizen
Tap 3: DFH Indian Brown Ale Clone
On Deck: Amarillo Wheat (for my extra keg)

I also finally figured out my TSS2 Love Controller with the help a couple of HBT members.....thanks guys for your help! :mug:
 
Normally if i'm that deep into a project, my mentality turns to "F-it, it's good enough", but i'm glad you took the time to re-do that grout. I'm sure it'll look much better!
 
Yeah, me too. I am tiling tomorrow and grouting on Friday night. I'll re-post pics. this weekend. I'm really tired of working on this thing and my wife has had enough of it as well. Our plan was to have the rest of our basement done before summer, but this keezer project sort of got in the way. :D If I don't get moving on the drop ceiling ASAP we won't make out deadline.

Normally if i'm that deep into a project, my mentality turns to "F-it, it's good enough", but i'm glad you took the time to re-do that grout. I'm sure it'll look much better!
 
Too late now....you already planted the seed for the "cool new upgrade" for all of your loyal thread followers to see. You are now morally obligated to carry through with the upgrade and share with the rest of us! ;) I'm almost done at work for today and am heading straight home to re-set the "new" tile on the keezer. I'll grout it tomorrow night after work and hopefully seal it over the weekend. What did you think of the grout color in my latest pics?

Maybe I should hold off on my upgrade, so that you don't add something else to the Keezer to-do list ;)
 
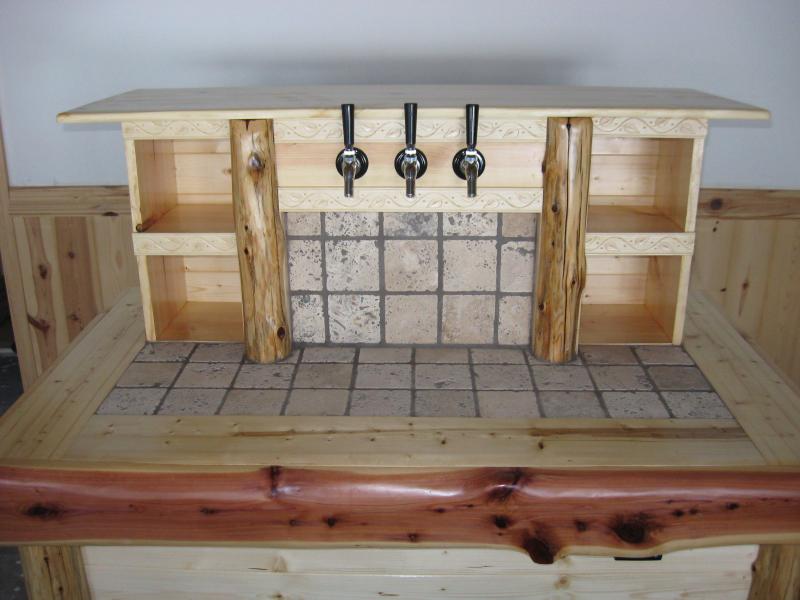
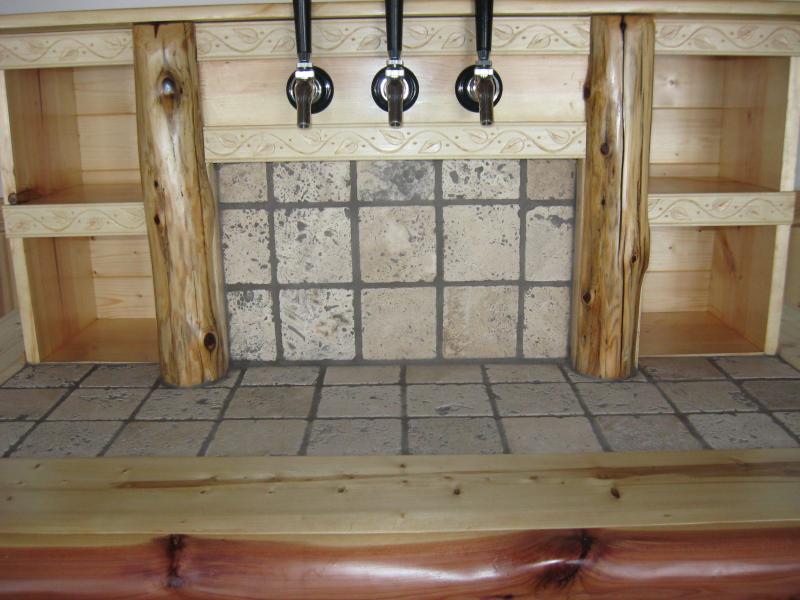
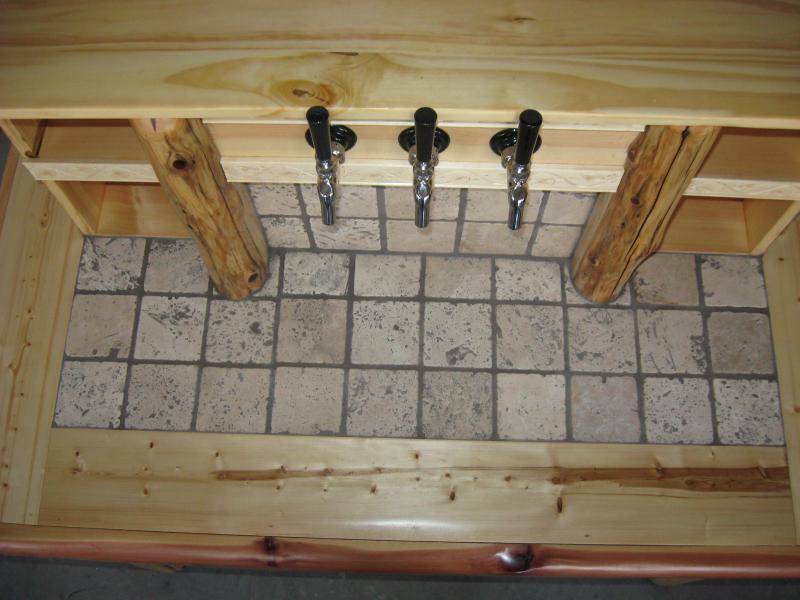
Well it was a royal pain in the a$$ busting out all of the old tile with the sh*tty looking grout, but I got the keezer re-tiled today! :tank: I have to wait for the mortar to dry, so I plan on grouting it tomorrow. I'm glad that I re-did the tile work and by the feeback on my thread, I think that most agreed with the decision. Here are a couple of pics of the re-do. Thanks guys! :mug:
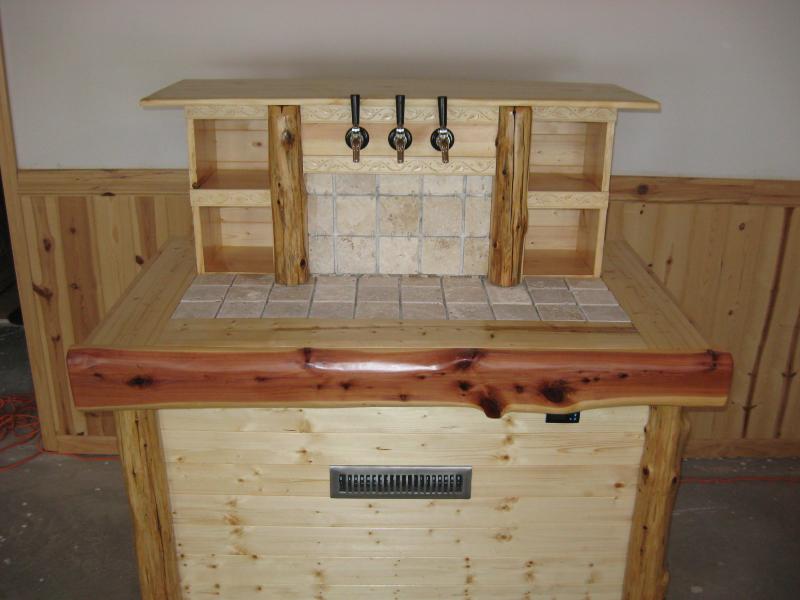
IMG_2153.jpg


IMG_2155.jpg
 
it looks great as it is... i'm sure the light grout will complete the look.

To be honest - i'm getting sick of this thread! I want this thing to be pouring beers within the next 2 pictures!!!!!!!! :D :mug:
 
Regardless of the grout and sealer....3 kegs are going in this thing this weekend....I promise. :eek:

it looks great as it is... i'm sure the light grout will complete the look.

To be honest - i'm getting sick of this thread! I want this thing to be pouring beers within the next 2 pictures!!!!!!!! :D :mug:
 
Thanks Gitana....sometimes mistakes work out for the best! It was supposed to be a log like the vertical trim pieces, but the only log that I had left to span across the front was punky and rotting on the interior when I ripped it down. I was pi$$ed at first, but remembered that I had the 2" red cedar "heart wood" slab left over from the log used for my liquor shelf. It was a lot of work knifing it into a log shape, but overall I'm happy with the way it turned out. Thanks again....:mug:

The whole thing is awesome, but I love, love, LOVE that cedar piece on the front.
 
I agree, that became one of the most prominent and interesting features of the design--Much more eye-catching (in a good way) than another log would have been. (Also makes it look wider, which 'feels' more heavy/permanent/worthwhile)
 
Thanks guys. I grouted it yesterday and it looks 1,000,000x better with the more neutral "bone" grout. My wife and I also grouted the backsplash behind the bar and the wine cellar countertop and floor. Just have the bar and pantry floors to grout this weekend. I'm sealing the tile and grout on the keezer when I get home tonight. I have 3 kegs carbing as we speak. I put them in at 30 psi for 24hrs. and now have them at 12 psi until they are fully carbed (probably a week). Almost there. My next set of pics should be of the final product and with the first pours of my first 3 kegged batches. I have been accused of dragging this thread out too long, so I won't post any more pics until this thing is pouring beers. :mug:
 
Back
Top