Kill-A-Watt Brewery Build Compilation

Homebrew Talk - Beer, Wine, Mead, & Cider Brewing Discussion Forum

Help Support Homebrew Talk - Beer, Wine, Mead, & Cider Brewing Discussion Forum:

This site may earn a commission from merchant affiliate links, including eBay, Amazon, and others.
That's all so clean, you need to get rid of the wall worts... split off one leg of the 240V and get a couple internal outlets...

C'mon... I've gotta find something to pick on...

Like this one? ;)

P1030788.JPG


Pick away :D
 
Jeez... with all the time I spent drooling over the pics, you'd think that I'd have remembered that...

So are you going to have multiple 240W drops installed so that you can brew in multiple locations?
 
Jeez... with all the time I spent drooling over the pics, you'd think that I'd have remembered that...

So are you going to have multiple 240W drops installed so that you can brew in multiple locations?

My garage is 20 x 20

My power cord is 10'

That is about as far as I need to go :D
 
Pol, I'm really interested in your wireless bridge. I have my BCS built onto a panel, and the rig is in my detached shop. I have wireless in the shop but no wired connection to the house so I have to be in the shop to connect to the BCS. That is not a problem on brew days, but it would be more comfortable to setup pids, processes, etc, in the house, then go to the shop for testing.

I started some wet tests last night, I'll be interested in your feedback when you get to that point. I'm gonna brew Saturday... will most likely be in the Manual Mode. I'm not expecting great results (I think the BCS will do fine, but I don't have all the info for the calculations... losses, etc.).

I found that in manual mode, after you make a change, you have to hit the "apply" button... so to turn off a pump, you hit direct off, then apply, then there is a slight delay, then the pump goes off.

Also, looks like the manual mode "fights" with the Output buttons on the top of the Main screen... So, if you are in manual mode with a pump (or heater) on, and you hit the Lighted Output button, you get a slight delay, then the pump goes off, then a delay and the pump comes back on! This is kinda obvious with a pump because you can hear it, not so clear with an element.

I'm certainly no expert, so maybe I missed something... Oh well, guess I'll go re-read the manual... wait a minute there is no manual ;) Guess I'll go bouncing around the wiki.

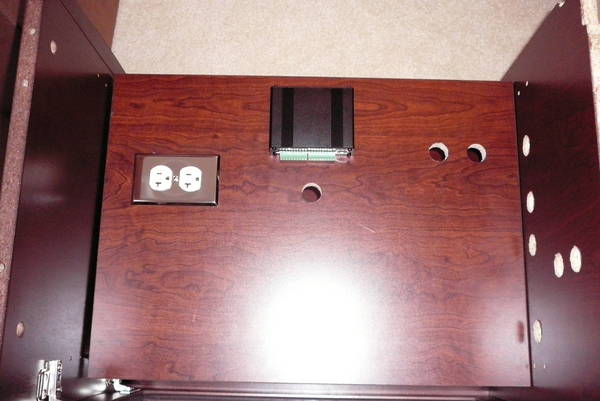
BTW... Congrats on a beautiful build... can hardly wait to hear about it in action.

I have set up alot of wireless bridges, the easiest is to use DD-WRT. Buy a compatible router, flash it with dd-wrt, change the wireless mode to client bridge and select your wireless network. The BCS will then grab all its information from the main router.
 
I am using my BCS from my bed, while my brewery sits on the first floor :)

Ha ha ha, too cool
 
I am using my BCS from my bed, while my brewery sits on the first floor :)

Ha ha ha, too cool

OK, there's at least half a dozen jokes that can be had with that statement. But all I'm gonna say is congratulations, it looks great, good luck on the first brew.
 
First off....I hate you Pol

Second off...just get a $30 Wireless Game System Adapter. I use them for all my A/V things that need the Internet to look up junk or get firmware upgrades and don't come pre-wireless. Like my x360 or my Sony 400 disc Bluray players :) I love saying that.
 
That not only looks good, it's sexy! So when you gonna do your first web cast on it? I bet there are some that would like to see her in action.
 
That not only looks good, it's sexy! So when you gonna do your first web cast on it? I bet there are some that would like to see her in action.

I have a lot of testing and data to gather first, may be a month or so depending on work. Finally got to post it in the "Rigs" thread.... glad it is complete.
 
OK, there's at least half a dozen jokes that can be had with that statement. But all I'm gonna say is congratulations, it looks great, good luck on the first brew.

Thanks, no blood or tears on this build, but a few curse words for sure. Glad it is assembled. 6 weeks from start to finish:rockin:
 
Pol, where did you source that SS piping for the RIMS?

Was looking in my HD this afternoon and they only have Galvanized and Black.

Murray Equipment, right up north in Ft Wayne, IN. Sending the parts list for the heater to a guy later, PM me if you want it too.
 
Just an update... since getting my static IP assigned to the BCS, I have had it logged on all day with NO problems with continuity. The painters have been downstairs most of the day, so I am taking refuge upstairs and the signal is unstoppable :)
 
Next time you brewcast could you could have someone man the camera so we can see in and around the rig when it's in use?
Congrats on the completion!
 
Murray Equipment, right up north in Ft Wayne, IN. Sending the parts list for the heater to a guy later, PM me if you want it too.

Yeah I had to repost what I said in the PM as it is still making me laugh.

JayInJersey from PM to Pol said:
Can't find SS pipe anywhere...asked a guy at Ace and he said "Why on earth would you want SS pipe?"

I love people in SJ

I really really do...
 
Something's missing... you need a cool neon backlight for behind the glass! :D

I am trying to go contemporary... not "Pink Pony Gentlemens Club"

Ha ha... dont give me ideas, it is done... done... I incorporated everything I valued in the past 4 years, so it is done ;)
 
How about you load it up and bring it to DarkLord Day? It can be like Sturgis for Brew Geeks. Everyone brings their rig. I'd imagine a severe lack of bikini clad brew babes though.
 
How about you load it up and bring it to DarkLord Day? It can be like Sturgis for Brew Geeks. Everyone brings their rig. I'd imagine a severe lack of bikini clad brew babes though.

You going to provide enough high-watt generators?

Pol's rig is going to need a ton of amps/watts, mine would need 50amps and at least 9000watts as well.
 
You going to provide enough high-watt generators?

Pol's rig is going to need a ton of amps/watts, mine would need 50amps and at least 9000watts as well.

20040615_giga_e.jpg


Actually, maybe a faux flux capacitor would be kinda cool in Pol's cabinet.
 
yah you got 9000 watts in the BK and another 9000 available for the RIMS.
That's sufficient to require a 50 amp sub panel.
50 amps x 240 VAC = 12000 watts

However - - - is there any possibility that you'll be running the RIMS and the BK at the same time?
And running both flat out?
I don't see it.

Unless it's in a cleaning cycle.
Do you see yourself running it all flat out for cleaning?


As an aside Pol, what are you fermenting in? Is the fermenter part of this party or do you do that elsewhere?
I believe you said you don't use conicals.
 
I am going to be modifying some cornies for Burton Blowoff fermenting.

Umm, I will never be running the system all out.

The bottom line is that the BK only NEEDS 4500W and the RIMS needs less than 4500W. But, having 9000W in each is #1 cool and #2 allows for faster heating.

The max I will run at any time is 9000W.

I can run the RIMS at 9000W for strike heating and run the BK at 9000W to reach a boil in 13 gallons in like 9 minutes :D
 
I will take it to Dark Lord Days if someone brings me a 10kW generator. :D
 
Well, the rig is still powered up, and the BCS has not dropped offline during 2.5 days of continuous monitoring. Static IP was the key.

If anyone else decides to set this thing up wireless, get the WGPS606 from NetGear and I can help you configure everything in probably 30 minutes over the phone. I am going to post a little "how to" built on my own experience in getting the BCS up and running for anyone else looking to go the same direction.
 
Pol, I gotta say, I'm a brand new brewer, extract only at this point, have no idea what about 75% of the stuff you are talking about means, but I can recognize great planning, craftsmanship, and quality, and my hat is off to you sir.

It's builds like this and people like you who have really inspired me to get out there and go nuts.

Thanks... You should stop in sometime, you aren't but 30 minutes away.
 
Hey Pol (or others):

Lets say you have a 60 amp gfci breaker and you want to run 2 different circuits from the same breaker, one with 2 3800w elements (7600w) and one with 2 4500w elements (9000w), but at a lower duty cycle, say 70% on each circuit using PIDs.

Will it work out? Here's the math (if this is how it works):

7600/240=31.67*.70=21.17

9000/240=37.5*.7=26.5

26.5+21.17=47.67

So, is this how it works, and can this be done? I found a nice spa gfci panel at HD that is on clearance and has room for another circuit I can use for my pump. As I stated on page 6 of this build, I'm building a similar system, just not as "bling" and using 2 3800 watt elements for my rims tube, and 2 4500 watt elements for my kettle.
 
I am saying no.

Why?

70% duty cycle is still 100% ON when it is on. You arent limiting the current flow, you are just reducing the ON time. But, when it is ON, it is 100% on.

Why would you use your RIMS heater at FULL power AND your kettle at FULL power too?

Mine is set up so that my RIMS will run at 4500W and my kettle will run at 4500W when I am not ramping up temps. 4500W is overkill for a RIMS, so I dont need 9000W in there when I am brewing. 9000W is overkill for a kettle too, so I will use 4500W in there for the boil.

Really, you will only be running 1 element in your RIMS most of the time and 1 in your kettle most of the time, right? All of my elements are on separate SSRs and BCS outputs
 
I plan on running both manifold elements on one PID and 2 SSRs, so they will be both on or off.

The reason I might have both running at near capacity, I will be running my sparge water from the tap, through the rims heater, so it needs to heat from about 38* winter tap water to 170*+ in a single pass to fly sparge, all the while, I'd like to be heating my kettle as the sparge runnings come up in there. Not that I have to heat the kettle at the same time, but I'd like to. I definitely could use a single 4500w or 5500w element instead of two, then it really would not be a problem, even if all 3 are running at 100% at the same time.

I see, I get it now. Yeah, you have to consider them as pulling 100% current, since that is exactly what they will be doing during that 70% ON time. If your circuit can handle that, then you are good to go!
 
Here is the parts list for the RIMS heater that some have requested. I purchased the SS parts from www.murrayequipment.com and www.buyfittingsonline.com


(2) CAMCO 4500W LWD elements $12.00 $24.00
(1) 1/2” SS Street Elbows (RIMS INLET) $2.38 $2.38
(2) 6' x 1-1/2 SS Nipple (RIMS Chamber) $10.96 $21.92
(1) 1-1/2” SS Coupling (RIMS Chamber) $4.10 $4.10
(1) 1/2” SS Close Nipple (RIMS Outlet) $1.28 $1.28
(1) 1/2” SS Tee (RIMS Outlet)) $2.10 $2.10
(1) 1-1/2” Tee (RIMS Outlet) $10.55 $10.55
(1) 1-1/2” Cross (RIMS Inlet-Drain) $15.00 $15.00
(2) 1-1/2” Street Elbows (RIMS Corners) $9.80 $19.60
(3) 1-1/2” x 1/2” Bushings (RIMS Inlets-Outlets-Drain) $4.60 $13.80
(2) 1-1/2” x 1” Bushings (RIMS Heating Element Insertion) $4.60 $9.20
(1) 1/2” x 1/4” Bushings (Temp. Probe Insertion Point) $1.07 $1.07
(3) 1/2" Threaded NPT Hose Nipple (RIMS inlet, Outlet, Drain.) $6.25 $18.75
(2) 1” PVC Conduit Couplings (Element end caps) $0.40 $0.80
(4) 25ml Tubes of Devcon 5 minute Epoxy (Pot electrical connections) $4.00 $16.00
TOTAL $160.55

Sorry about the formatting!!
 
Back
Top