• Please visit and share your knowledge at our sister communities:
  • If you have not, please join our official Homebrewing Facebook Group!

    Homebrewing Facebook Group

Kegging under pressure from Anvil 7.5 SS bucket fermenter to 5 gallon corny

Homebrew Talk

Help Support Homebrew Talk:

This site may earn a commission from merchant affiliate links, including eBay, Amazon, and others.

sixstring

Supporting Member
HBT Supporter
Joined
Apr 17, 2024
Messages
204
Reaction score
215
Location
AZ
Not sure if anyone's tried this, but in my quest for fun ways to brew beer better, I came across a little method that I'm going to try out. Will it make my beer better? Who knows, but it'll be fun to try :)

Here's the video at the right spot:


Just need to figure out how to not overfill the keg
 
Go ahead and do that with confidence, your beer will be improved by a pressure transfer.

I use the older, less evolved, SS Brewtech Brewbucket for pressure transfers and it works fine. I don't bother with the carboy cap, I instead have a dedicated pressure tank and regulator and I simply go in with a stopper and an elbow on my lager rig and a classically homebrew bodge job that interfaces with my ale fermenter's stainless 1" blow off elbow.

The key thing that you'll want to do on your first go around is make certain that your regulator's dial is all the way off. Next, open the gas on your tank, then slowly turn the ball valve on your regulator to introduce CO2 into the regulator. If you start hearing hissing from your regulator or thunking noises from your fermenter, turn the ball valve off and back off your regulator. Once you can open your regulator's ball valve and nothing happens, gradually increase the gas on your regulator's valve until the needle just barely moves up. The slightest movement of the needle should get the job done. I typically get ~3 years out of my pressure transfer rig's #5lb CO2 tank. It doesn't take much and if you're hearing any kinda noises from your regulator or your fermenter, you're using too much gas. This is one of those times where less is more.

Hope you found this useful.
 
well that was simple, but extremely helpful from both of you. Thanks guys :)
I've actually got a little 2.5LB C02 tank that still has gas in it. I'll use that to try this out.
Looking forward to trying this now. I've got a batch of EPA that's ready to keg in a couple of days. Just need to find the rubber stopper before Saturday
 
Put a qas QD on the keg with a hose dangling into a bucket. If it overfills, it just hits the bucket.
This! It took me way too long to figure this out. I use an old 2ltr erlenmyer flask with a bit of water in the bottom. If you hear bubbles the transfer is working. When you stop hearing bubbles your keg is full and the flask is filling with overflow beer.
 
If you fill the keg all the way, I recommend drawing a pint before leaving gas connected to keg. This drops the liquid level below the gas dip tube, reducing chance of backflow into the gas tubing. If it's not already pressurized, you might need to put the gas on to pull a pint.

(You likely have check valves in gas lines, but splitters, gas leaks, etc can still cause headaches.)
 
I'll add to the video that for a low/no oxygen you'd want to not change fittings (the stoppers) if possible, and purging the filling tube prior to connecting to the keg. Also probably better to use a slightly oversized PVC hose and clamps instead of having a silicone adapter.
 
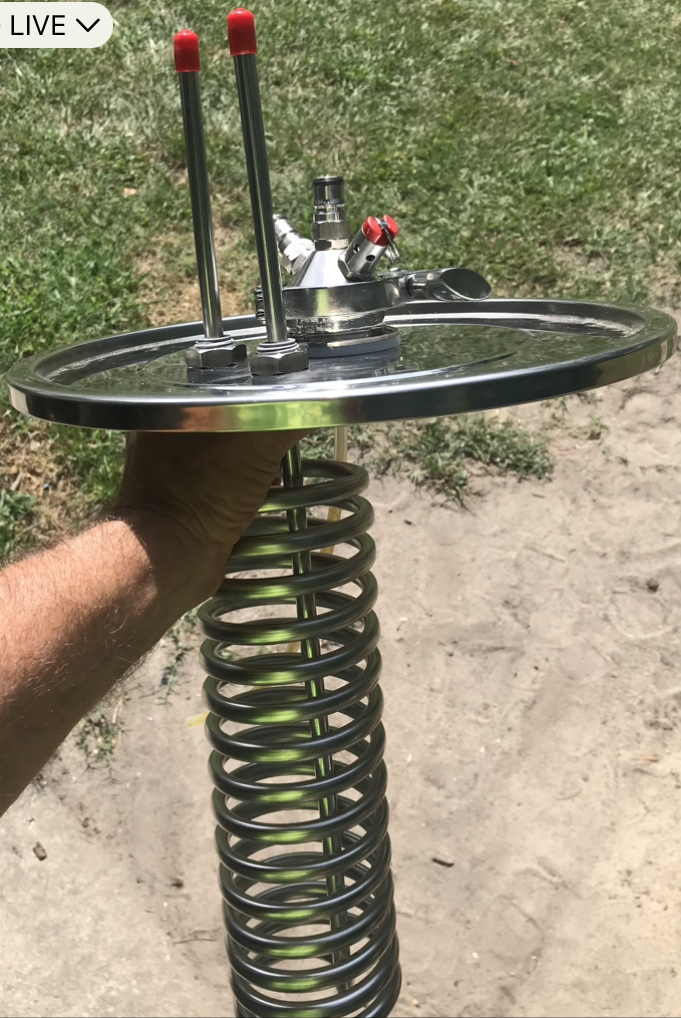
I have one of the Chapman fermenters without a spigot. Since it has a wide, flat lid, I was able to work with it a bit. It already had a fairly large bung hole up top, so it only took a little work with a fine round chainsaw file to enlarge the hole enough to accommodate a 2” triclamp adapter. On the adapter, I added a sanke-to-ball lock tapping head. When fermenting, I just use a blowoff on the gas post. I have a floating dip tube on the liquid out post for transferring. Like the Anvil, it is not going to hold a lot of pressure, but you’re not going to blow the plug out; just hear a little his around the lid if you over pressure it. Having both the posts allows me to use pressure to start the flow, then just use a gravity closed transfer.

I also added a chiller coil. I admit having a few problems with the floating dip tube getting hung up on the coils. I think I have fixed that by adding a large stainless steel ring on the float that keeps it captured on the thermal well and away from the coils. I have a batch in there now for the first test.

This picture doesn’t show the thermal well, nor the diptube, but it will give you the idea.
IMG_5696.jpeg
 
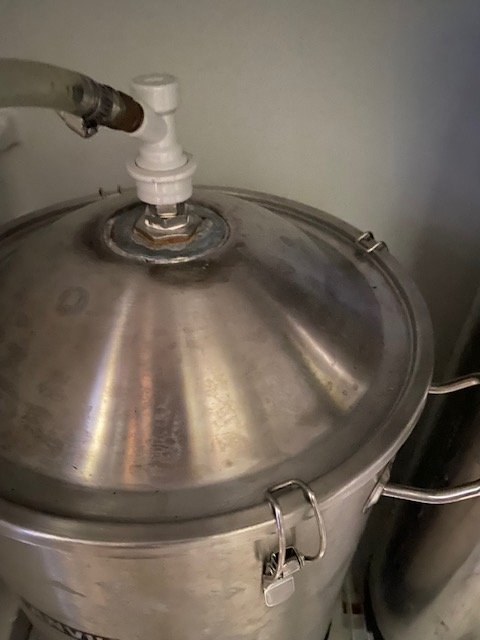
I got the idea from this video to add a bulkhead to the lid of the Anvil but I soldered it on, just need the correct flux and some lead free solder.

I had to add a large washer to get a proper fit and it's all leak proof. I'm able to do closed transfers to the serving keg as well as use the fermentation co2 to purge the keg during fermentation. I send the gas to the keg out post and put a blowoff on the gas post. I have a beer fermenting now and the picture below shows the connection that goes to the keg to be purged.


1744388916636.jpeg


So if you have the ball lock on the top of the Anvil permanently like that, maybe this is a silly question, but how do you set up an airlock? Do you just connect the QD there and have it go to a bucket of water?
 
So if you have the ball lock on the top of the Anvil permanently like that, maybe this is a silly question, but how do you set up an airlock? Do you just connect the QD there and have it go to a bucket of water?
I have the sanke- ball lock adapter mounted on my lid. I usually do just as you say using a disconnect, hose, and wine bottle blow off. However, it’s not difficult to attach a short piece of hose to a disconnect and attach an airlock. You also have to use a bit of wire to hold the hose vertical since the fitting usually comes off at an angle.
The real advantage is that with the post on top, you can connect up your intended serving keg and purge it with the CO2 generated by the fermentation.
 
I don't think I want to weld something on the top of my anvil FV's but it's pretty neat. I'm going to stick to using the #7 stopper and drilling out a hole in that for a carbonation cap to fit in.
 
I don't think I want to weld something on the top of my anvil FV's but it's pretty neat. I'm going to stick to using the #7 stopper and drilling out a hole in that for a carbonation cap to fit in.
No need to do any welding...Just punch or drill a 1-7/8" hole and bolt in a 2" TC bulkhead; https://www.brewhardware.com/product_p/tc2wlf.htm and you can attach the same sanke cap https://www.brewhardware.com/product_p/sankeball.htm that @Closet Fermenter has. This also gives you a floating diptube and opens the potential to add a dry-hopper.
:mug:
Yep! Exactly what I used. It actually took very little effort since the hole in the fermenter lid was only slightly smaller than it needed to be to accept the weldless adapter. I only used a small, fine, round chainsaw file to enlarge the hole a bit. The good news is that it is an entirely reversible operation since I can remove the adapter and go back to the tapered plug.
 
ok after watching the youtube video that Mudbug posted, I'm going to order the parts to do that with my anvil, as it doesn't require any modification of the lid at all. Does the purchasing ever end??? :D
 
A drilled rubber stopper is plenty of tech for a fermenter lid that can only handle 3psi without leaking. It's not going to jump out of position at that pressure.
Can’t argue with that. I just wanted to have both; a gas and liquid out post so I wouldn’t have to add a spigot. I liked the idea of pulling off the top with a floating dip tube, and I didn’t want to have to disassemble, sanitize, and seal a spigot after each batch. The spigot also makes it more difficult to place in a refrigerator/cooler/fermentation chamber.
 
Don't forget about gravity. I often see closed transfers being associated with pressure. But that is not the case. If you have the fermenter elevated for the ferment you can basically "runoff" the beer into the keg below. The key to closed transfers is to have a way to purge the lines. I run a little beer into a kegland "T" on a 1 liter bottle, rip the QD of during flow and put it directly on the keg. Basically filling the line with beer and pushing out any oxygen. The keg has a return gas line going to the fermenter which gets hooked up last. From there it is just letting it flow.

For optimal results, use the fermentation gas to purge your keg. Also use the same line so it is purged. I made a video of my cold side setup. This can be used in a pressure or non-pressure situation. -
 
For optimal results, use the fermentation gas to purge your keg. Also use the same line so it is purged.
I set my keg purging up so that both the gas and liquid jumpers get purged during the process. Mounting a couple of these babies from Bobby on the collar of my ferm fridge made that a piece of cake (they also come with gas or liquid posts if you don't already have some spares lying around).
 
That is a good idea. The gas line gets purged with the fermentation gas flow as I use the same line. I just ran the EVA tubing through the small fridge. The liquid kind of does not matter since I run the first bits through which also served as a sediment blow out since I have a dip tube instead of floater. But it never hurts. Both lines get sanitized on brew day as I recreate the same setup outside with sanitizer. Makes it very convenient to just hook it up on transfer day.

Smart and easy is the best of both worlds!
 
I use a 1.6 gallon Torpedo keg for line purging, clearing out a party tap, even Tapit. I keep it filled with Starsan and pressurized with CO₂

For purging transfer lines, I put the gas-gas and the liquid-liquid lines on the keg with it upright. First, I depress the pin inside the liquid connector on the L-L line. This fills it with Starsan. Next I invert the keg. With keg upside down, the liquid pickup is above the liquid level. By depressing the pin again on liquid connector, the Starsan is blown out by the CO₂ in the keg. Also, while upside down, the gas inlet is under the liquid level, so I depress the gas pin and the G-G line is filled with Starsan. I turn the keg right side up, depress the gas pin again and the Starsan is blown out and replaced with CO₂. Disconnect both lines and they have been rinsed with starsan and purged with CO₂. It only takes seconds to do this.

I usually do a gravity, closed transfer into a fermentation purged keg after this, only using a short burst of CO₂ to start the flow.
Do you take steps to deoxygenate your star san?
 
Do you take steps to deoxygenate your star san?
I do not. I fill the little keg up to the brim when I refill it with starsan and only use CO₂ to push it out until it is empty. I do use ascorbic acid in my beer and wine to try to scavenge up what gets by me. I can definitely tell the difference between doing it this way and when I just opened the fermenter and siphoned into an open keg; worlds of difference. I will do a couple headspace purges with tank gas after the transfer. I’m sure there are other things that I am missing, but this seems adequate for me. Cheers! 🍻
 
Good news:
The first attempt was a great success. The Anvil held up with about 3psi and the keg handled the transfer flawlessly. I was thrilled to see it all working the way it was described to me.

Bad news:
I ended up needing to open the keg and let oxygen in after all. My beer had ice on the top and my floating dip tube sucked all the ice up and clogged it, stopping the beer moving down the line. See my other post about this :D

But I'm well chuffed it worked out initially. Looking forward to more of the same without icing up my beer anymore :D
Cheers all.
 
Last edited:

Latest posts

Back
Top