• Please visit and share your knowledge at our sister communities:
  • If you have not, please join our official Homebrewing Facebook Group!

    Homebrewing Facebook Group

Keezer Collar the Coastarine Way

Homebrew Talk

Help Support Homebrew Talk:

This site may earn a commission from merchant affiliate links, including eBay, Amazon, and others.
I really really wish I would have read this before drilling a hole through my chest freezer wall... haha, I guess this was something I just had to learn the hard way. :eek:
 
FWIW, now that it's the dog days of summer I'm glad I insulated my collar. The Perlicks sweat as it is and I'm pretty sure the collar would be sweating had I not insulated it. In the morning the Perlicks are covered with beads of water.

I'm actually thinking of insulating the Perlicks on the outside of the collar...so they both stay colder and sweat less.
 
Hey Coastarine, I've got a question for you. What type of temperature control are you using?
 
I'm using a johnson analog temperature controller like this one: http://www.brewmasterswarehouse.com/product/0101527/refrigerator-thermostat

It is analog and the temp on the dial isn't always the temp in the fridge, but it does a good job of holding it constant so I just had to measure the temp and adjust until I got it right. The upside to these is a) it is inexpensive and b) you just plug the fridge into it and plug it into the wall. Super easy, no wiring to do.

Awesome, I've been looking at that one, but it almost looks too easy to be true. So it works good? Also, have you noticed any change to your energy bill due to your keezer? I know that we have an old upright freezer (not frost free,) but we stopped running it and our energy bill literally went down $40. But that temp controller works good eh?
 
Awesome, I've been looking at that one, but it almost looks too easy to be true. So it works good? Also, have you noticed any change to your energy bill due to your keezer? I know that we have an old upright freezer (not frost free,) but we stopped running it and our energy bill literally went down $40. But that temp controller works good eh?

Many people choose to get digital temp controller because they tend to be more accurate and easier to use. I don't have any experience with the analog versions but I was able to get digital controller for $50 from http://www.climatedoctors.com/items/item.aspx?itemid=429705. It works awesome. You do have to wire it with a regular 3 prong extension cord which really is not difficult at all. You can easily do it by following the last picture on this link http://www.brewboard.com/index.php?showtopic=40898.

Regardless of which you get both are very well known around here and you will have success with either. Just thought I would give you a choice.


Awesome man. Yeah, I've been debating on making a keezer or kegerator, but I'm torn between the two b/c I want something that's energy efficient and affordable. I'm thinking I'm going to go with a mini fridge just because I think they will use less energy, but I really don't know which one to buy. I think it would initially be cheaper to buy an old freezer off of CL and make a keezer, but in the long run it would be harder on the wallet due to energy consumption. What do you think? Also, if I made a keezer I think three taps would be all I'd want. So a huge space consuming freezer would be a nuissance when I could get a mini fridge that could have two taps and take up minimal space.
 
I don't think a mini fridge would be more energy efficient. I'd bet a chest freezer has better insulation and the cold air doesn't pour out onto the floor when the door is opened.
 
+1 on a freezer probably being more efficient than a minifridge.

Also a collar on a freezer is probably easier than adding a tower on a minifridge, maybe cheaper in parts too.

I'd look for a newish freezer on CL or consider buying new, maybe a scratch and dent. Personally I got a 4yo upright fridge from a relative for almost nothing, so good efficiency, cheap, and has an icemaker as a bonus.
 
I also agree that a chest freezer is probably more efficient than a mini fridge. They do make smaller chest freezers that would be appropriate for your needs of 3 kegs.
 
Alright, I think making a collar would be easier and less stressful than cutting the top of a mini-fridge for a tower also. I also think that having the extra space in a keezer would be cool if I wanted to cold crash or lager a carboy. Well thanks for the advice guys. I guess I'll start pricing them on CL.
 
Alright, I think making a collar would be easier and less stressful than cutting the top of a mini-fridge for a tower also. I also think that having the extra space in a keezer would be cool if I wanted to cold crash or lager a carboy. Well thanks for the advice guys. I guess I'll start pricing them on CL.

A little food (or drink) for thought: corny kegs are cheaper than carboys and have a smaller footprint in the keezer. If you want to cold age a beer in the keezer it is the way to go. Anything that settles out just gets flushed away in the first pint and the way I see it, that wastes less than racking a second time.
 
A little food (or drink) for thought: corny kegs are cheaper than carboys and have a smaller footprint in the keezer. If you want to cold age a beer in the keezer it is the way to go. Anything that settles out just gets flushed away in the first pint and the way I see it, that wastes less than racking a second time.

Cool, so you just rack after a few weeks of fermenting straight to the keg?
 
...and then I realized the collar was part of the lid...

Yeah, I REALLY like the idea of attaching the collar to the lid. I was planning to do it the other way, but would have been a hassle to move the hinges on the bottom. This way makes a lot more sense. Do you find the weight of the collar and taps causes any problems with the lid staying open?

Already have my perlick faucets... Looks like a fun project for my next day off :)
 
No, having the collar on the lid makes it stay open better. Picture it opened: the center of gravity of the lid is moved further back, behind the hinge. As long as your keezer opens to vertical or past, you're good.
 
Finished my collar and installed the taps tonight. All I need to do is touch up the paint and hook up the plumbing. Very happy with the way it turned out! :ban:

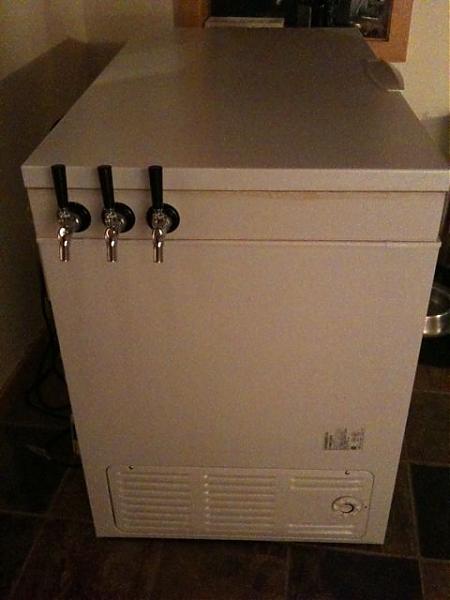
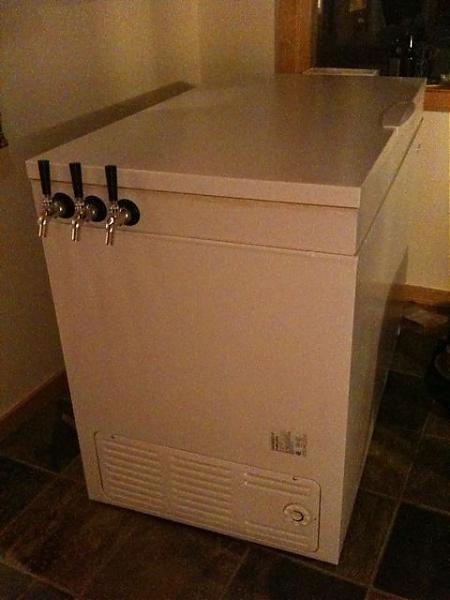
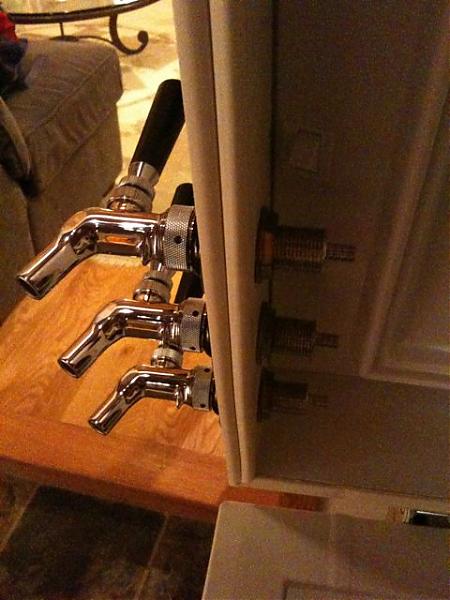
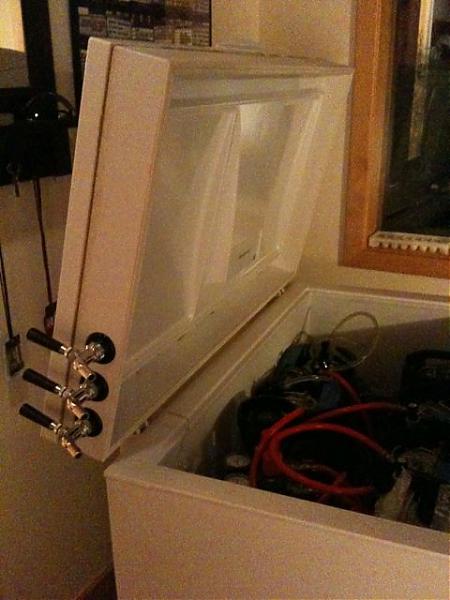
I mounted my taps on the side instead of the front. I also was able to remove the liner from the lid, trim the edges down by about 1/2 inch, then was able to lay the liner into the collar and glued it in place. So the inside of the lid isn't just bare insulation. I also got some 1" rigid foam insulation that I'm going to trim down to size and glue inside the collar. Probably don't need it... but home it will control moisture a bit.

Pics attached.

Thanks Coastarine for the instructions!

IMG_2213.jpg


IMG_2214.jpg


IMG_2215.jpg


IMG_2216.jpg


IMG_2217.jpg
 
Last edited by a moderator:
I was asked recently if there was anything I'd do differently on this now that I've had it for most of a year. I am still tossing around the idea of insulating the wood collar, I know it probably uses a little more power than it has to but I live on base so I don't pay an elec bill unless it is way over the neighborhood avg. The bigger issue is that we moved since I built this and the movers had this loaded in the truck with a lot of weight on top (I wasn't there when they loaded it and SWMBO doesn't know any better). Then it got to the new house one of the liquid nails joints had broken a bit. All pieces were still attached to the lid though, so I just squirted some more in there and it was all good, but it occurred to me that it wouldn't be difficult to reinforce them with some wood screws. I could even use the 90* clamp to help secure them during drilling.
 
paradoc, interesting you put the faucets on the end. i wouldnt think that would be legal.

Legal? I kinda doubt there is a law regulating where you put your faucets on a homebrew keezer...

Yes, I put the faucets on the side because my wife wanted to use the top for a laundry table. SWMBO is happy, so I'm happy! Works great, and now have the tubes all neatly routed inside the lid so they don't get in the way when you raise the lid. Only problem was when I grabbed my coat from the top the other day and pulled one of the taps open. House smelled like a frat house for a while :) Need to get slightly shorter handles for the faucets.
genius!!!!
 
Coastarine, where did you find the information that chest freezer coils go through the walls? I was doing some research trying to figure out where my freezer's coils are and the parts diagrams make it appear they only run along the back wall, but they weren't perfectly clear. It's a massive 20 cu. ft. frigidaire model, so maybe since its so large they only use the back?
 
Coastarine, where did you find the information that chest freezer coils go through the walls? I was doing some research trying to figure out where my freezer's coils are and the parts diagrams make it appear they only run along the back wall, but they weren't perfectly clear. It's a massive 20 cu. ft. frigidaire model, so maybe since its so large they only use the back?

One way to know for sure is to let it run for a few minutes and feel where it is putting off heat on the outside. If all four sides get warm, there's your answer. I know that on mine at least the front and sides get warm.
 
When you liquid nailed your collar to the lid, did you clamp it down or just put the lid down on the collar (or vice versa) while it dried?
 
Thanks for the instructions. I think I'm going to do mine this way. Simple and gets the job done!

I do have one question: can anyone think of a reason this wouldn't work with 1x6's? I could use the extra couple inches for a fermentation chamber on top of the hump in the freezer.

EDIT: nevermind; I think I found my answer in other threads.
 
My keezer was sweating a lot on the inside and mold was starting to form around the bottom corners. Cleaned it out, bleached it, sanitized it, and put a dehumidifier in it and all's been dry inside since. This is what I put in, fairly cheap and effective. http://www.amazon.com/Eva-dry-EDV-E-500-Renewable-Wireless-Dehumidifer/dp/B000H0XFD2/ref=sr_1_21?ie=UTF8&s=electronics&qid=1256433618&sr=8-21

How did you run power for this into your keezer?

Never mind. I just saw that it doesn't need any power
 
Last edited by a moderator:
My glue is drying on my collar now. I got some 9" wide solid cherry boards that are just beautiful. They're 1" thick - and all together it makes for a pretty heavy piece of furniture. To add to it, I'm not putting the original freerzer door back on. I've made what is essentially a solid cherry bar top. I'd like the whole piece to lift to avoid lifting keps over the collar, but I'm guessing this is about 75 pounds of solid cherry.

Anyone have hinging suggestions? I originally planned on bolting through the collar and the original hinges, and supporting the lid with additional braces when open. I'm just not sure how much weight those hinges can bear.
 

Latest posts

Back
Top