• Please visit and share your knowledge at our sister communities:
  • If you have not, please join our official Homebrewing Facebook Group!

    Homebrewing Facebook Group

Just need to vent, batch ruined

Homebrew Talk

Help Support Homebrew Talk:

This site may earn a commission from merchant affiliate links, including eBay, Amazon, and others.

GreenEnvy22

Well-Known Member
Joined
Sep 17, 2015
Messages
183
Reaction score
183
Just want to vent. I haven't brewed in months as winter has less people over so my kegs have held up. However a couple kicked recently so I got everything all set yesterday, then spent hours today brewing a nice amber ale.
Everything went great up until I started to cool the wort after the boil.
I have a homemade counterflow chiller, I've made maybe a dozen batches with it. Well today I turn off the heat, turn on the recirculation pump for the chiller, and walk away for 10 minutes.
I come back to check on it and think, "that's odd, I had 5.5 gallons when the boil finished, but now I have 8."

Apparently the copper tube inside cracked and mixed in gallons of almost frozen pool water.

At least it wasn't the more expensive RyePA I was going to brew next.

So now I need to see if I can repair this (I'm guessing it cracked at a spot that had a kink in it a about 8 inches from the end), or replace.

Has anyone ever built one permanently mounted on a wall? I brew in my greenhouse and there is 10ft of empty wall. Instead of a portable spiral, I could just make 2 long sections of sloping pipe with an angled connection in the middle, flush with the wall. Or maybe since I have the pool there I just toss an immersion chiller in the pool, though the wort would need to go through a lot more silicon hose to get there...
 
... Has anyone ever built one permanently mounted on a wall? I brew in my greenhouse and there is 10ft of empty wall. Instead of a portable spiral, I could just make 2 long sections of sloping pipe with an angled connection in the middle, flush with the wall. Or maybe since I have the pool there I just toss an immersion chiller in the pool, though the wort would need to go through a lot more silicon hose to get there...

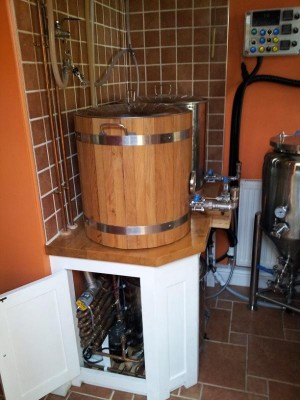
Like this you mean?

1742804431135.png


Old piccie now, but brewery hasn't changed that much. The heat-exchanger / HERMS-coil is that mass of copper tubes through the cupboard door on the wall (it's behind the HLT). There is no "HERMS-coil" in the HLT, the HLT feeds (pumped) its water about the outer jacket of the heat-exchanger. The cold water feed into the HLT also feeds through the heat-exchanger turning it into a cooler.

The heat-exchanger is topped with an electric element forming a RIMS tube. But it's under-powered and hardly ever used (has been used to accelerate temperature steps).

Switching beteen potable HLT-water and "pond water" (instead of mains water) would make an interesting project!!!
 
Just want to vent. I haven't brewed in months as winter has less people over so my kegs have held up. However a couple kicked recently so I got everything all set yesterday, then spent hours today brewing a nice amber ale.
Everything went great up until I started to cool the wort after the boil.
I have a homemade counterflow chiller, I've made maybe a dozen batches with it. Well today I turn off the heat, turn on the recirculation pump for the chiller, and walk away for 10 minutes.
I come back to check on it and think, "that's odd, I had 5.5 gallons when the boil finished, but now I have 8."

Apparently the copper tube inside cracked and mixed in gallons of almost frozen pool water.

At least it wasn't the more expensive RyePA I was going to brew next.

So now I need to see if I can repair this (I'm guessing it cracked at a spot that had a kink in it a about 8 inches from the end), or replace.

Has anyone ever built one permanently mounted on a wall? I brew in my greenhouse and there is 10ft of empty wall. Instead of a portable spiral, I could just make 2 long sections of sloping pipe with an angled connection in the middle, flush with the wall. Or maybe since I have the pool there I just toss an immersion chiller in the pool, though the wort would need to go through a lot more silicon hose to get there...
You might look up the Jaded Cyclone, it’s a straight tube style copper cfc that you could easily mount on a wall. There are also instructions out there on how to make your own version of it if you’re handy with solder.
 
The same thing happened to my commercially available counterflow chiller. I now hate them because you can never know the condition of the copper tubing inside. I bought a Jaded Hydra immersion chiller and after using it I will never go back to a counterflow or plate chiller.
 
Just want to vent. I haven't brewed in months as winter has less people over so my kegs have held up. However a couple kicked recently so I got everything all set yesterday, then spent hours today brewing a nice amber ale.
Everything went great up until I started to cool the wort after the boil.
I have a homemade counterflow chiller, I've made maybe a dozen batches with it. Well today I turn off the heat, turn on the recirculation pump for the chiller, and walk away for 10 minutes.
I come back to check on it and think, "that's odd, I had 5.5 gallons when the boil finished, but now I have 8."

Apparently the copper tube inside cracked and mixed in gallons of almost frozen pool water.

At least it wasn't the more expensive RyePA I was going to brew next.

So now I need to see if I can repair this (I'm guessing it cracked at a spot that had a kink in it a about 8 inches from the end), or replace.

Has anyone ever built one permanently mounted on a wall? I brew in my greenhouse and there is 10ft of empty wall. Instead of a portable spiral, I could just make 2 long sections of sloping pipe with an angled connection in the middle, flush with the wall. Or maybe since I have the pool there I just toss an immersion chiller in the pool, though the wort would need to go through a lot more silicon hose to get there...
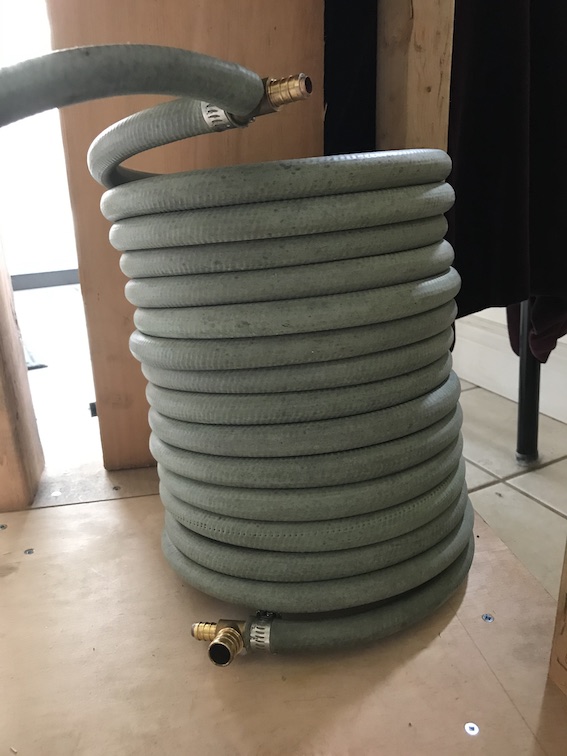
Since you're a DIY'er anyway: Don't toss the split chiller! Just unspiral it, cut off the split part and solder a coupler on then; grab a garden hose, cut off the ends and shove it in, get a pair of 3/4"x1/2"x3/4" pex tees, bore the 1/2" side out with a 3/8" drill, shove them over the ends and (squeezing the hose back and wrapped in a wet rag with cool water running over it so it doesn't melt) solder the tube into the 1/2" side...cool it and shove the garden hose over the 3/4" side:
quickcfc.jpeg

I had a homemade IC for my stovetop, but once I built my keggle it wouldn't fit so on a night with pain-induced insomnia I unspiraled it in the far corner of my basement till it curved up the stairs and just made it into my kitchen, then I went outside at about 3:30am, grabbed a grden hose and went to work stuffing it, wrapped the assembly around a corny keg and saved the soldering for the next day.... In retrospect; I should have left a few inches of tube protruding and used compression>NPT fittings, but hey: It works, it mounted nicely under my keggle and I could drop from a boil to pitching temp in one pass.
Just a thought.
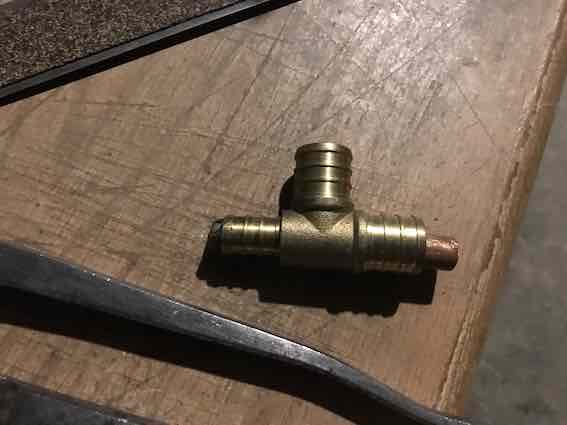
Oh..incase it's not entirely evident in the finished image, here's a reject part I had to cut off and try again on:
IMG_1731.jpg

:mug:
 
Just want to vent. I haven't brewed in months as winter has less people over so my kegs have held up. However a couple kicked recently so I got everything all set yesterday, then spent hours today brewing a nice amber ale.
Everything went great up until I started to cool the wort after the boil.
I have a homemade counterflow chiller, I've made maybe a dozen batches with it. Well today I turn off the heat, turn on the recirculation pump for the chiller, and walk away for 10 minutes.
I come back to check on it and think, "that's odd, I had 5.5 gallons when the boil finished, but now I have 8."

Apparently the copper tube inside cracked and mixed in gallons of almost frozen pool water.

At least it wasn't the more expensive RyePA I was going to brew next.

So now I need to see if I can repair this (I'm guessing it cracked at a spot that had a kink in it a about 8 inches from the end), or replace.

Has anyone ever built one permanently mounted on a wall? I brew in my greenhouse and there is 10ft of empty wall. Instead of a portable spiral, I could just make 2 long sections of sloping pipe with an angled connection in the middle, flush with the wall. Or maybe since I have the pool there I just toss an immersion chiller in the pool, though the wort would need to go through a lot more silicon hose to get there...
As someone who has been the victim of a couple equipment-based batch dumps in the past, I feel your pain. Always frustrating. Hope you ended the night with a few brews and woke up with renewed excitement to try again - the trials and tribulations make the successes in this hobby feel/taste even better. Cheers to your next batch.
 
You might look up the Jaded Cyclone, it’s a straight tube style copper cfc that you could easily mount on a wall. There are also instructions out there on how to make your own version of it if you’re handy with solder.
I made something like this. I like that I can look down the pipe to verify that it is clean.
 
Apparently the copper tube inside cracked and mixed in gallons of almost frozen pool water.
Is it possible there was some water left in the coil that froze up, thus busting the tubing?

Those coils are almost impossible to drain completely, and best stored in an area that is frost free year-round.
Similar for immersion coils!

Or maybe since I have the pool there I just toss an immersion chiller in the pool, though the wort would need to go through a lot more silicon hose to get there...
Maybe easier to pump your pool water through the IC?
I would have no issues carrying a few buckets of pool water tot my nearby brewing area, and return the warm water in buckets back to said pool, if rolling out hoses is more cumbersome or takes more time.
 
Is it possible there was some water left in the coil that froze up, thus busting the tubing?

Those coils are almost impossible to drain completely, and best stored in an area that is frost free year-round.
Similar for immersion coils!
I have quick connects on my CFC. I bought a quick connect fitting and screwed it onto a PVC pipe adapter that fits onto the hose of a wet/dry vac. After cleaning and rinsing, I connect the vacuum to the lower connector on the CFC and let it run for several minutes. It seems to do a pretty good job of getting the remaining rinse water out. Whatever is left shouldn't be enough to burst the line if it did freeze.
 
I have quick connects on my CFC. I bought a quick connect fitting and screwed it onto a PVC pipe adapter that fits onto the hose of a wet/dry vac. After cleaning and rinsing, I connect the vacuum to the lower connector on the CFC and let it run for several minutes. It seems to do a pretty good job of getting the remaining rinse water out.
That sucks out the (narrow) inner coil, yes?
I think the inner coil is where most freeze-related bustings occur. Not so much in the outer coil, although it's also possible if enough water is present.

Do you think sucking up the leftover water is more effective than blowing it out?

Whatever is left shouldn't be enough to burst the line if it did freeze.
I hope so!

Also, storing the CFC with the coils placed more or less in the horizontal plane (vs. vertically) should reduce the risk of enough liquid pooling in one area to create a busting. Yes/No?
 
That sucks out the (narrow) inner coil, yes?
I built the fitting for the inner coil, yes. However, I also have quick connects for my garden hoses and they're so close to the brew system fittings that I can actually use it for both the inner and outer coils. So I do vacuum both lines.

Do you think sucking up the leftover water is more effective than blowing it out?
I believe vacuuming is more effective, although I haven't actually conducted tests.

The air compressor I have will let me blow a small stream of high velocity, compressed air, which is very effective near the nozzle. However, after it expands, there's not a great deal of velocity by the opposite end of the coil. The vacuum is lower pressure but seems to move more air. I can say that it seems to suck out the water pretty well.

Also, storing the CFC with the coils placed more or less in the horizontal plane (vs. vertically) should reduce the risk of enough liquid pooling in one area to create a busting. Yes/No?
Yes. I maintain my CFC in a horizontal position. I just can't imagine that it would be easy to remove the water that collects at the bottom of a vertically oriented loop. That's also why I attach the vacuum to the lower end of the coil... why work against gravity?
 
Since you're a DIY'er anyway: Don't toss the split chiller! Just unspiral it, cut off the split part and solder a coupler on then; grab a garden hose, cut off the ends and shove it in, get a pair of 3/4"x1/2"x3/4" pex tees, bore the 1/2" side out with a 3/8" drill, shove them over the ends and (squeezing the hose back and wrapped in a wet rag with cool water running over it so it doesn't melt) solder the tube into the 1/2" side...cool it and shove the garden hose over the 3/4" side:
View attachment 871694
I had a homemade IC for my stovetop, but once I built my keggle it wouldn't fit so on a night with pain-induced insomnia I unspiraled it in the far corner of my basement till it curved up the stairs and just made it into my kitchen, then I went outside at about 3:30am, grabbed a grden hose and went to work stuffing it, wrapped the assembly around a corny keg and saved the soldering for the next day.... In retrospect; I should have left a few inches of tube protruding and used compression>NPT fittings, but hey: It works, it mounted nicely under my keggle and I could drop from a boil to pitching temp in one pass.
Just a thought.
Oh..incase it's not entirely evident in the finished image, here's a reject part I had to cut off and try again on:
View attachment 871696
:mug:

My homemade counterflow looks similar to that, but green garden hose, and not as nicely wound. I think that's the biggest issue, it was more loosely wound and thus more prone to getting snagged on things and bending.

Mine is a 3/8 inner tube, jacketed with a 1/2-in outer. I built a takeoff piece very similar to that last photo of yours, with a 1/2-in t junction, going into a half inch to 3/8 reducer.
I will cut off the broken section, desolder that existing and adapter, and then slide it back over.

Is it possible there was some water left in the coil that froze up, thus busting the tubing?

Those coils are almost impossible to drain completely, and best stored in an area that is frost free year-round.
Similar for immersion coils!


Maybe easier to pump your pool water through the IC?
I would have no issues carrying a few buckets of pool water tot my nearby brewing area, and return the warm water in buckets back to said pool, if rolling out hoses is more cumbersome or takes more time.
I keep all my brewing equipment in my heated greenhouse, it gets cold but never actually too freezing (insulated and has a space Heater, plus the two fridges supply some basically free heat as well from there discharge). I have some hot pepper plants that I overwinter in it, plus my keg fridge, and our overflow fridge.

And this is right beside my pool, which is why it's so convenient to use the pool water. I get essentially free heating of the pool water every time I brew.

I do like the idea of a linear style counterflow, it's similar to the Liebig condenser I use for... Other hobbies.
 
I cut it open today and it was broken wide open at that kink. I bent it back and forth 3 times and it totally fell off. Now evaluating if I will simply shorten it and repair or make something new. I think I want to inspect the rest of the tubing to see if I have any other problems developing.
 
Has anyone ever built one permanently mounted on a wall? I brew in my greenhouse and there is 10ft of empty wall. Instead of a portable spiral, I could just make 2 long sections of sloping pipe with an angled connection in the middle, flush with the wall. Or maybe since I have the pool there I just toss an immersion chiller in the pool, though the wort would need to go through a lot more silicon hose to get there...
You could always try the horizontal style and mount it on the wall or your brew-stand:
https://www.instructables.com/Heavy-Duty-Counter-Flow-Wort-Chiller/
...Sorry for misreading first time around.
:mug:
 
Last edited by a moderator:
That "Instructables" is much like what I did (piccie above), but my individual "elements" are soldered to each other, and at an angle to each other so it all stacks in a neat vertical wall mounted arrangement.

But the "Instructables" arrangement with the element linked with silicone tubing would have been much cleverer: The copper tubes are subject to beerstone (a classic place for beerstone formation apparently; proper beerstone ... comes out in eggshell-like flakes, isn't just a "brown stain" and plays havoc with the cooler's efficiency). The silicone tubing would have been a boon 'cos it is removable and the straight tubes then easy to rodd out.
 
Back
Top