You are using an out of date browser. It may not display this or other websites correctly.
You should upgrade or use an alternative browser.
You should upgrade or use an alternative browser.
inr brewing - basement brewery build
- Thread starter itsnotrequired
- Start date

Help Support Homebrew Talk:
This site may earn a commission from merchant affiliate
links, including eBay, Amazon, and others.
OP
OP
Looks good. I would think considering what goes on the table you can't be too safe with reinforcement. I bet an advantage of wood is it's easier to add on since all you do get some bolts of nails.
and it was still pretty cheap. total bill came to $103 and that included the wood, hardware, stain, brushes, the whole nine yards. i even bought two new auger bits so i got those for future use.
Excellent job! The whole project is top notch. I really enjoy the step by step photos. Keep up the good work!
John
John
OP
OP
09/21/2015 update
came home at lunch time to throw a second coat of stain on the brew stand. i must not have stirred the can enough on the first coat, this one was much darker. still really light though. it also highlighted some scratches in the wood surface. i used to aggressive of a sand paper before i started staining. so the table looks 'used' already. not a bad thing, it is after all a working table, not some type of fine woodworking showpiece. and i threw the first coat of poly on last night:

a little sanding tonight with a second poly coat and this thing should be good to go!
i also ordered up a herms coil from stainless brewing. went with the 25', 1/2" tubing on a 10" radius. my hlt will be a ten gallon kettle so i didn't need a big one. i would have liked a longer length but the coil would have gotten so tall that a decent amount of it would be above the water level during mash recirc. given the relatively small temperature differential between the hlt and mlt, i should be fine.
came home at lunch time to throw a second coat of stain on the brew stand. i must not have stirred the can enough on the first coat, this one was much darker. still really light though. it also highlighted some scratches in the wood surface. i used to aggressive of a sand paper before i started staining. so the table looks 'used' already. not a bad thing, it is after all a working table, not some type of fine woodworking showpiece. and i threw the first coat of poly on last night:
a little sanding tonight with a second poly coat and this thing should be good to go!
i also ordered up a herms coil from stainless brewing. went with the 25', 1/2" tubing on a 10" radius. my hlt will be a ten gallon kettle so i didn't need a big one. i would have liked a longer length but the coil would have gotten so tall that a decent amount of it would be above the water level during mash recirc. given the relatively small temperature differential between the hlt and mlt, i should be fine.
OP
OP
09/22/2015 update
sanded the table and threw on another coat of poly. i could post a photo but there isn't much else to say. my kitchen scale showed up today which isn't necessarily brewery related but i was able to weigh out the hops i recently picked, get them labeled and get them in the freezer. it will eventually be used in the brewery quite a bit but for now, it will be a kitchen tool. got a calibration set with it, scale is spot on. so much better than the crappy analog scale we had before. might as well weighed stuff on a bathroom scale.
i also got an e-mail from stainless brewing that my herms coil has shipped. 'real' brewery parts are on the way!


$33.99 ($17.00 / Count)
$41.99 ($21.00 / Count)
2 Pack 1 Gallon Large Fermentation Jars with 3 Airlocks and 2 SCREW Lids(100% Airtight Heavy Duty Lid w Silicone) - Wide Mouth Glass Jars w Scale Mark - Pickle Jars for Sauerkraut, Sourdough Starter
Qianfenie Direct


$53.24
1pc Hose Barb/MFL 1.5" Tri Clamp to Ball Lock Post Liquid Gas Homebrew Kegging Fermentation Parts Brewer Hardware SUS304(Liquid Hose Barb)
Guangshui Weilu You Trading Co., Ltd


$479.00
$559.00
EdgeStar KC1000SS Craft Brew Kegerator for 1/6 Barrel and Cornelius Kegs
Amazon.com


$7.79 ($7.79 / Count)
Craft A Brew - LalBrew Voss™ - Kveik Ale Yeast - For Craft Lagers - Ingredients for Home Brewing - Beer Making Supplies - (1 Pack)
Craft a Brew


$172.35
2 Inch Tri Clamp Keg Manifold With Ball Lock Posts, Pressure Gauge, PRV (0-30 PSI) – Homebrew, Fermentation, Kegging System
wuhanshijiayangzhiyimaoyiyouxiangongsi


$53.24
1pc Hose Barb/MFL 1.5" Tri Clamp to Ball Lock Post Liquid Gas Homebrew Kegging Fermentation Parts Brewer Hardware SUS304(Liquid Hose Barb)
yunchengshiyanhuqucuichendianzishangwuyouxiangongsi


$20.94
$29.99
The Brew Your Own Big Book of Clone Recipes: Featuring 300 Homebrew Recipes from Your Favorite Breweries
Amazon.com


$176.97
1pc Commercial Keg Manifold 2" Tri Clamp,Ball Lock Tapping Head,Pressure Gauge/Adjustable PRV for Kegging,Fermentation Control
hanhanbaihuoxiaoshoudian


$44.99
$49.95
Craft A Brew - Mead Making Kit – Reusable Make Your Own Mead Kit – Yields 1 Gallon of Mead
Craft a Brew


$10.99 ($31.16 / Ounce)
Hornindal Kveik Yeast for Homebrewing - Mead, Cider, Wine, Beer - 10g Packet - Saccharomyces Cerevisiae - Sold by Shadowhive.com
Shadowhive


![Craft A Brew - Safale BE-256 Yeast - Fermentis - Belgian Ale Dry Yeast - For Belgian & Strong Ales - Ingredients for Home Brewing - Beer Making Supplies - [3 Pack]](https://m.media-amazon.com/images/I/51bcKEwQmWL._SL500_.jpg)


$22.00 ($623.23 / Ounce)
AMZLMPKNTW Ball Lock Sample Faucet 30cm Reinforced Silicone Hose Secondary Fermentation Homebrew Kegging joyful
无为中南商贸有限公司


$58.16
HUIZHUGS Brewing Equipment Keg Ball Lock Faucet 30cm Reinforced Silicone Hose Secondary Fermentation Homebrew Kegging Brewing Equipment
xiangshuizhenzhanglingfengshop


Calfj60
Well-Known Member
Great build! Looking forward to new updates
OP
OP
09/28/2015 update
not a lot of action the last couple weeks but my herms coil showed up yesterday
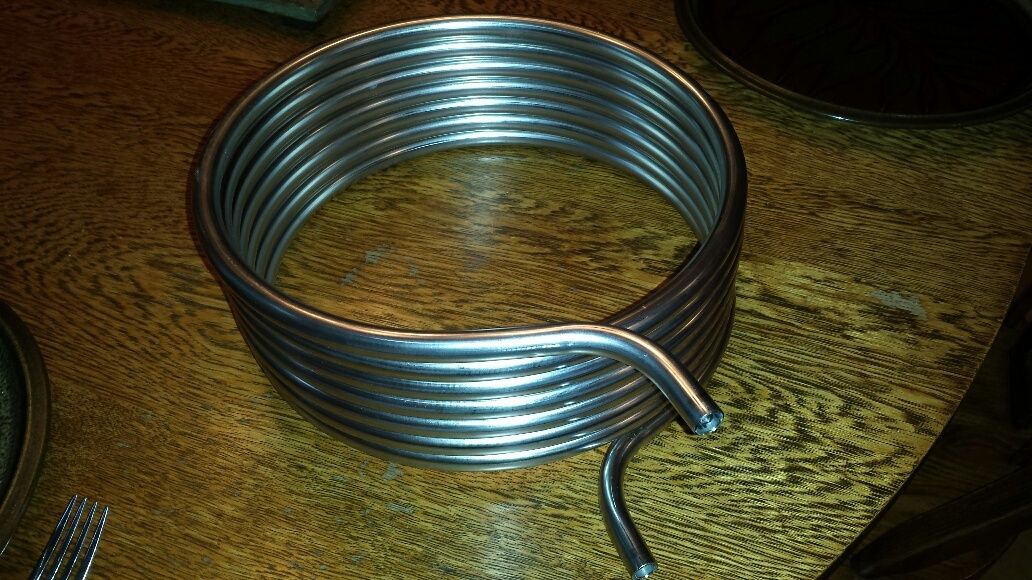
not a lot of action the last couple weeks but my herms coil showed up yesterday
OP
OP
I think a lot of the fun is setting everything up ! Drinking the finish product is up there, but the anticipation of what the product will be is awesome!
i don't have a photo but i took the coil and set it on my brew stand, the only thing on it right now.

OP
OP
10/04/2015 update
awoke this morning and checked my phone to discover the infamous 'menards 11% off sale' was a go for this week. finally! i've been holding off on a bunch of building stuff to save the 11%. one big item i had been holding off on is the 30 amp gfci breaker to serve the control panel. this would normally be $108.67 (with tax) but i got it for $97.34 after the rebate. this isn't available at the store so i had to order it. still cheaper than what i was finding online.
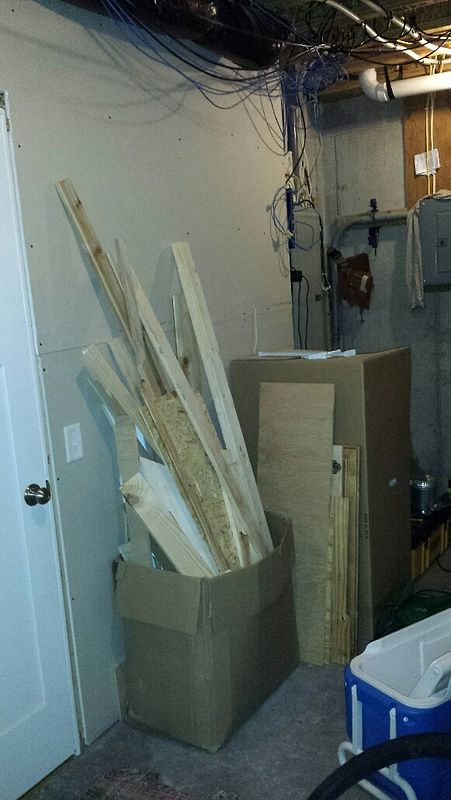
ran to the store and grabbed electrical parts for stuff 'upstream' of the control panel, as well as some ductwork pieces for my makeup air system as well as parts to finish off my vent hood. i have some scrap frp and plywood lying around so decided to steal deprecated's design:
https://www.homebrewtalk.com/showthread.php?t=371453
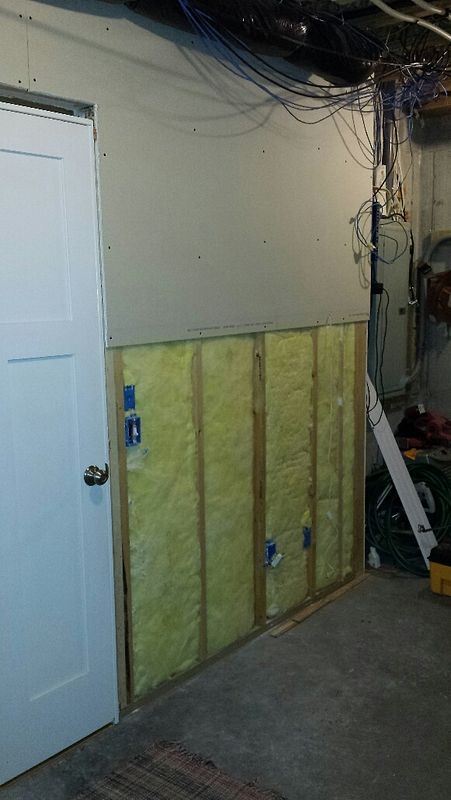
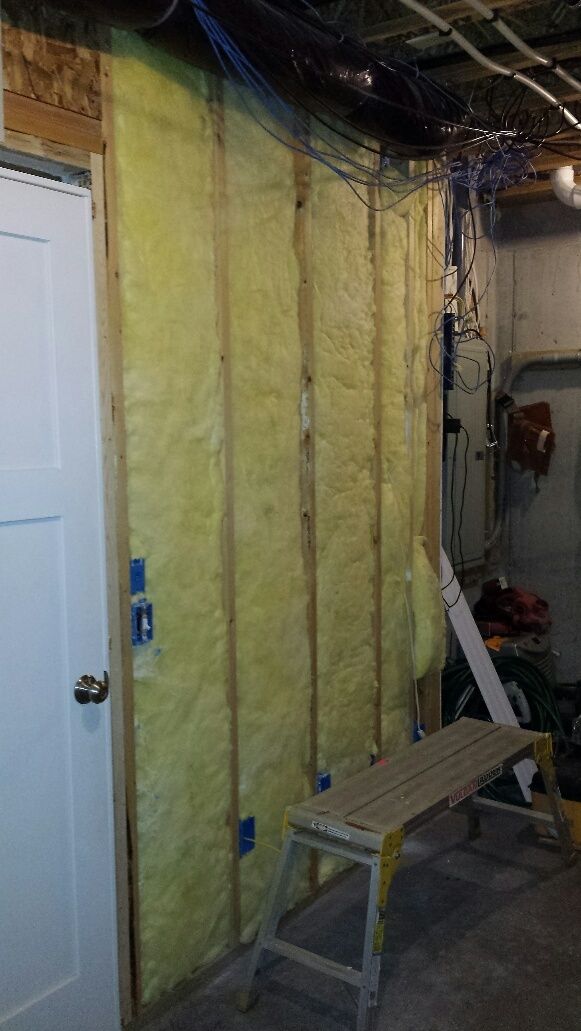
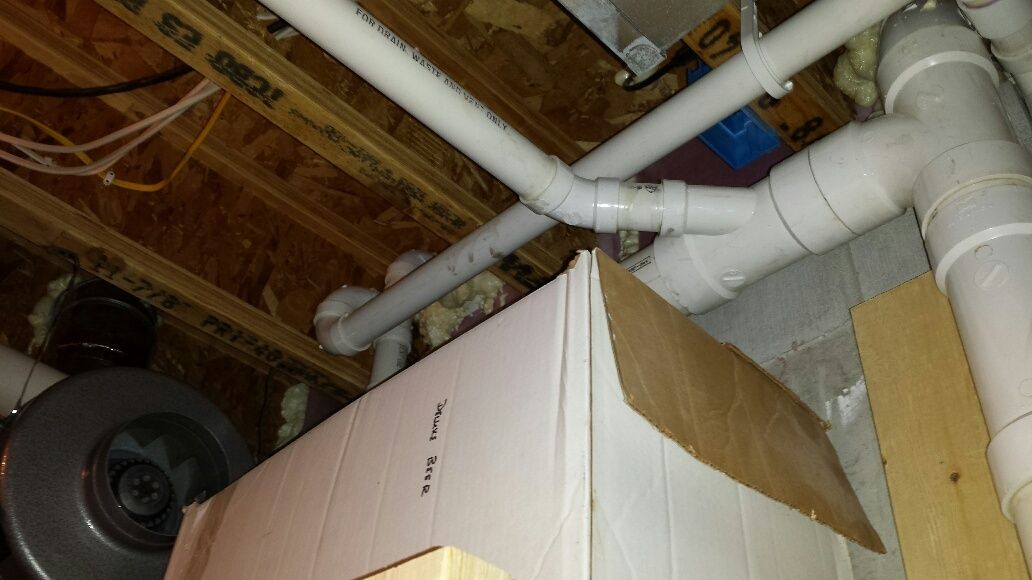
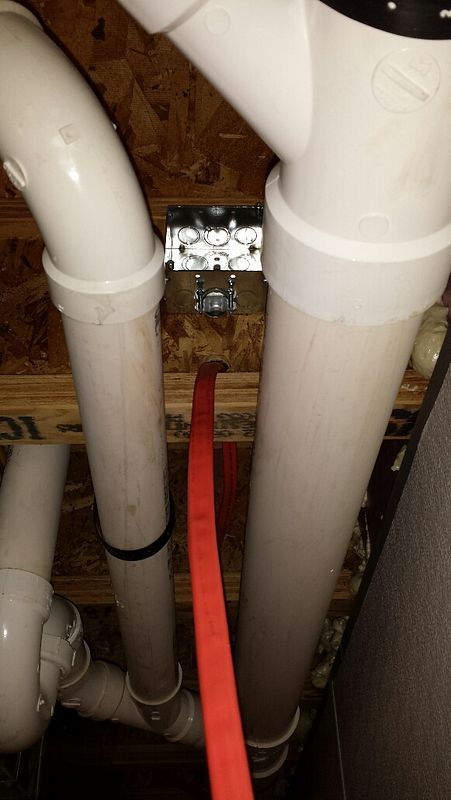
i eventually plan on having a keezer and fermentation chamber so i wanted to get some additional receptacles in the brewery area. like everything else i seem to do, first step was to get stuff out of the way. you can see the subpanel for my circuits in the background. before:
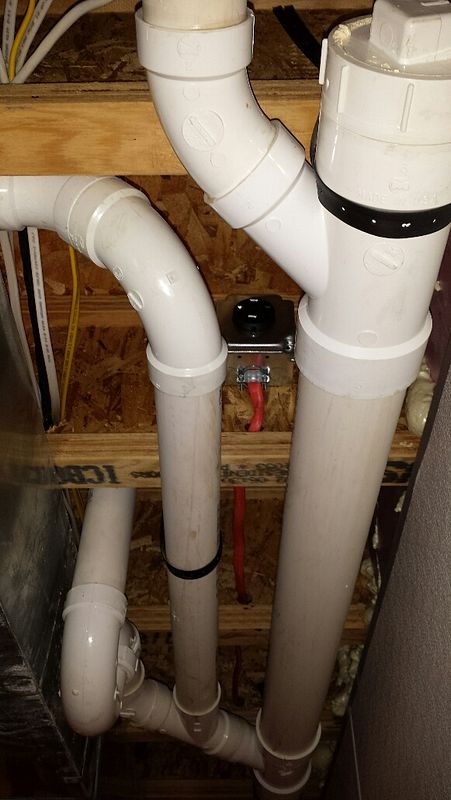
and after:

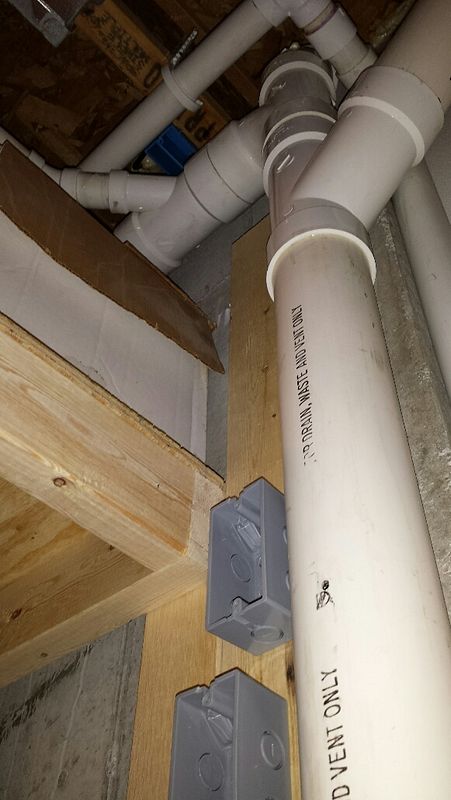
the cleaned up area would be the perfect spot for a keezer, with a fermentation chamber to the side. there is already a receptacle on the wall but it is part of the general basement utility area circuit which serves lights, the water heater (gas) and a chest freezer. i wanted a dedicated circuit for brewery stuff. rather than hack the drywall up and fish wires, i decided to simply take the drywall down. it is only two panels and they aren't even full size. first panel removed:
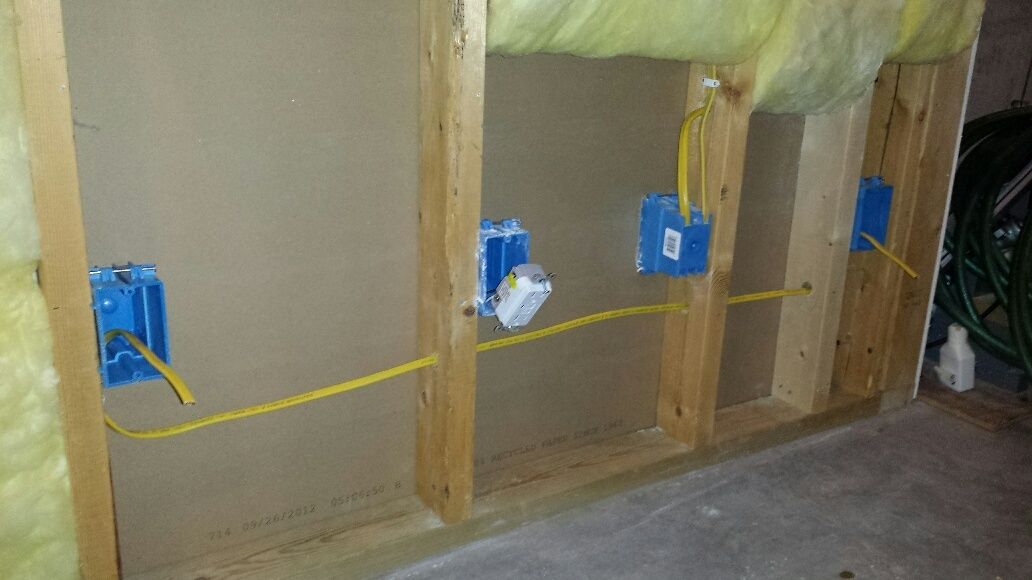
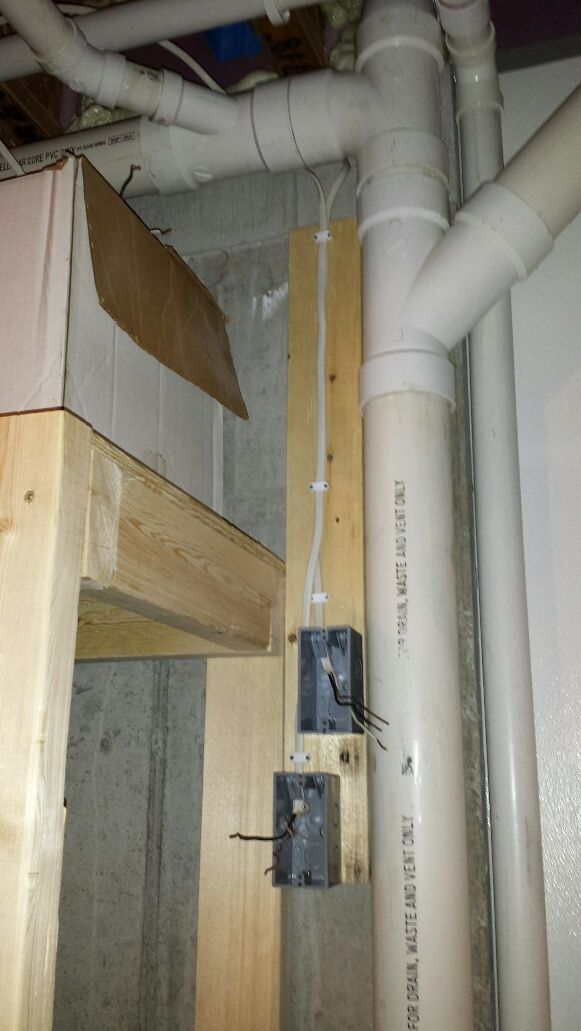
two new boxes installed, with wiring between them. a 20 amp circuit might be overkill but with the effort i was putting in, might as well get the extra capacity for a minimal additional cost:
upper piece of drywall removed:
openings for the receptacles cut into the lower drywall piece:

and the lower piece of drywall reinstalled. i don't have a drywall gun so simply cranked back the torque on the drill to prevent overdriving the screws:
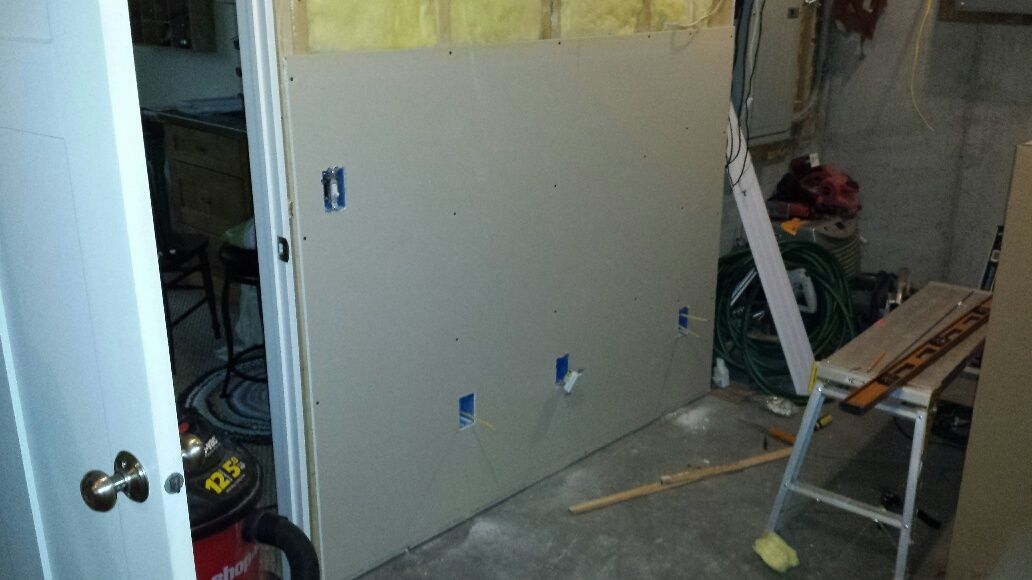
receptacles wired up, installed and wall plates added. i purposely chose a wonky color to help distinguish them from the old receptacle. they will likely be covered with equipment anyway:
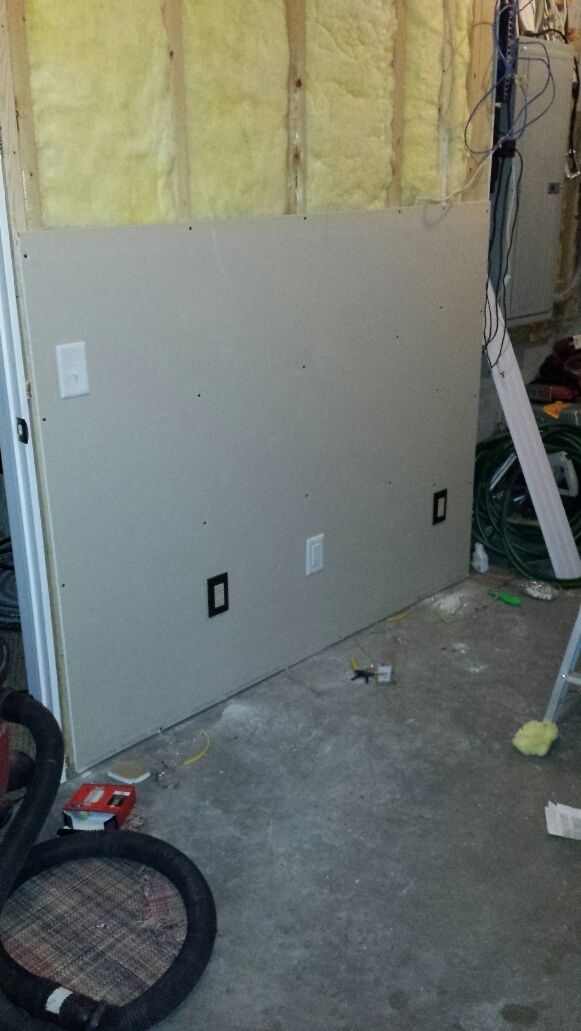
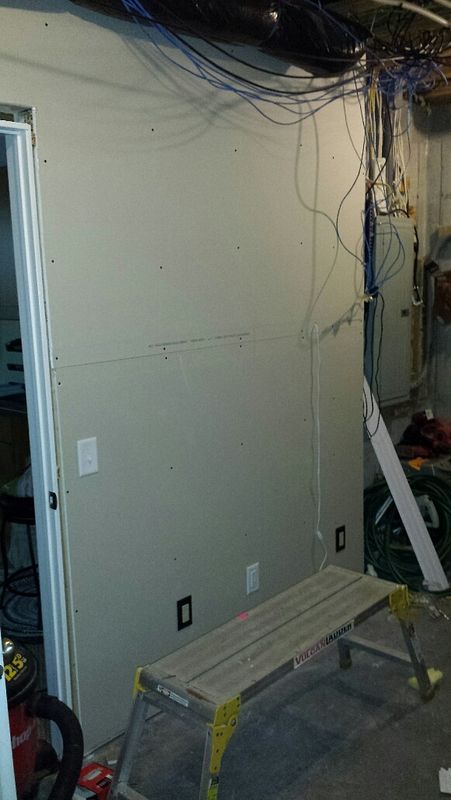
and the upper piece of drywall re-attached:
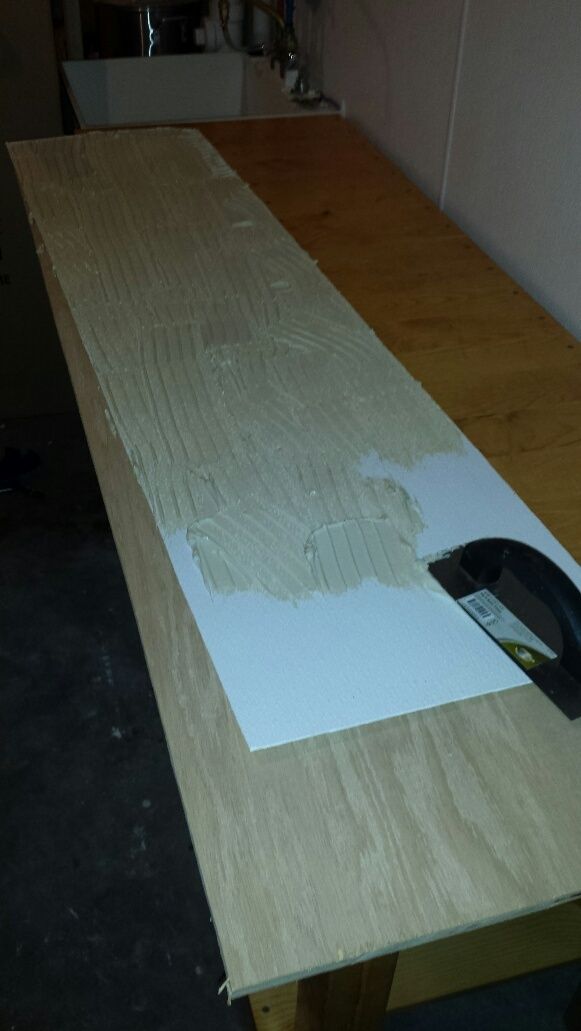
took a 'break' to get the frp attached to my plywood. the plywood is actually a nice piece of oak plywood leftover from my bar build. i've held onto it for a couple years thinking i would eventually find a use and lo, here we are! the piece is only 15" wide though so when i go to install the main frp on the half circles, i'll have to trim about an inch off of the 4' side of the frp sheet. shouldn't be a problem:
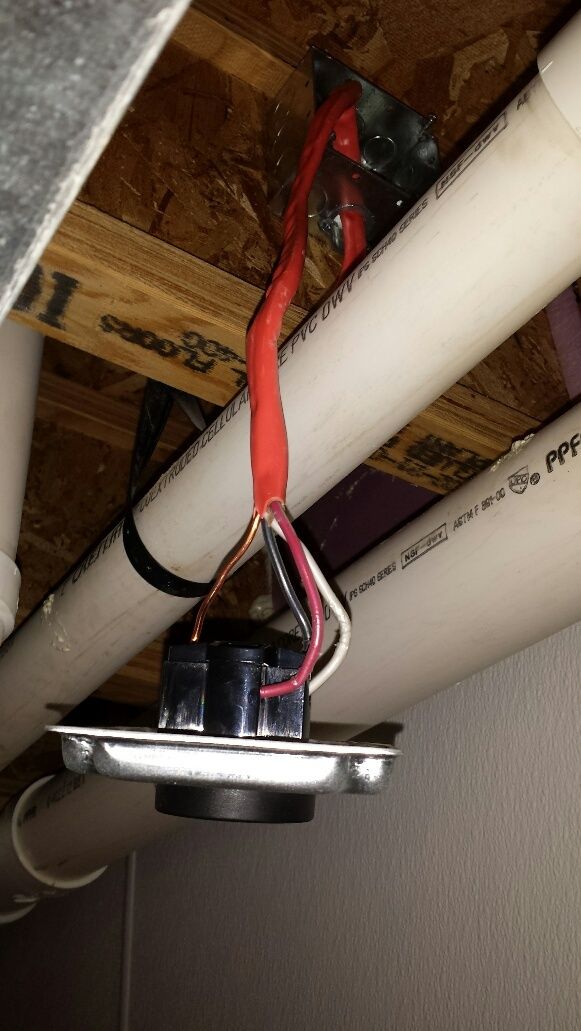
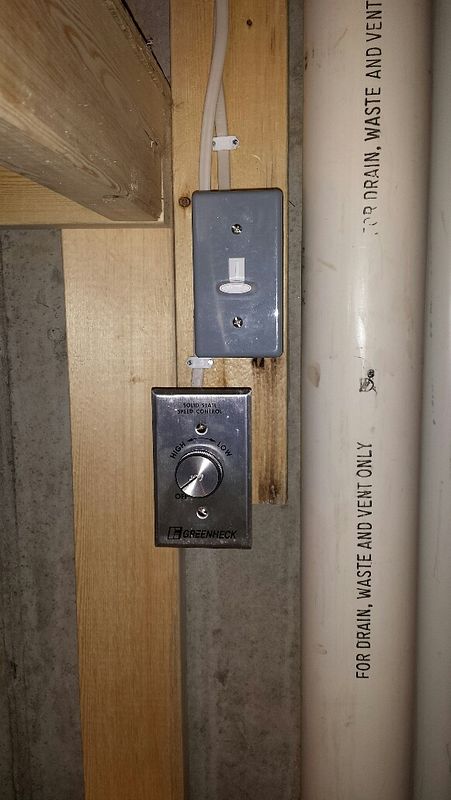
next step was the receptacle for the vent fan cord as well as the control switch. single gang box mounted up in the joists, you can see the distance to the fan:
and a shot of the box fro the control switch. i added a second box to control some future lighting. not sure what the scheme will be but i'm getting the switch in there now. the switches are mounted to a 2x4 which is glued to the concrete wall. it was the perfect size gap between the vent stack piping and the adjacent shelf:
and with the wires installed from the switch boxes up to the receptacle. there is also a dedicated 15 amp circuit wired back to my subpanel:
by this time, the packer game was on so i called it a day. my fan controller should show up today so i can get that all finalized. looking at the photos, i'm debating rotating the fan 90 degrees or so such that the fan junction box is on the back side, will make for a cleaner look.
awoke this morning and checked my phone to discover the infamous 'menards 11% off sale' was a go for this week. finally! i've been holding off on a bunch of building stuff to save the 11%. one big item i had been holding off on is the 30 amp gfci breaker to serve the control panel. this would normally be $108.67 (with tax) but i got it for $97.34 after the rebate. this isn't available at the store so i had to order it. still cheaper than what i was finding online.
ran to the store and grabbed electrical parts for stuff 'upstream' of the control panel, as well as some ductwork pieces for my makeup air system as well as parts to finish off my vent hood. i have some scrap frp and plywood lying around so decided to steal deprecated's design:
https://www.homebrewtalk.com/showthread.php?t=371453
i eventually plan on having a keezer and fermentation chamber so i wanted to get some additional receptacles in the brewery area. like everything else i seem to do, first step was to get stuff out of the way. you can see the subpanel for my circuits in the background. before:
and after:
the cleaned up area would be the perfect spot for a keezer, with a fermentation chamber to the side. there is already a receptacle on the wall but it is part of the general basement utility area circuit which serves lights, the water heater (gas) and a chest freezer. i wanted a dedicated circuit for brewery stuff. rather than hack the drywall up and fish wires, i decided to simply take the drywall down. it is only two panels and they aren't even full size. first panel removed:
two new boxes installed, with wiring between them. a 20 amp circuit might be overkill but with the effort i was putting in, might as well get the extra capacity for a minimal additional cost:
upper piece of drywall removed:
openings for the receptacles cut into the lower drywall piece:
and the lower piece of drywall reinstalled. i don't have a drywall gun so simply cranked back the torque on the drill to prevent overdriving the screws:
receptacles wired up, installed and wall plates added. i purposely chose a wonky color to help distinguish them from the old receptacle. they will likely be covered with equipment anyway:
and the upper piece of drywall re-attached:
took a 'break' to get the frp attached to my plywood. the plywood is actually a nice piece of oak plywood leftover from my bar build. i've held onto it for a couple years thinking i would eventually find a use and lo, here we are! the piece is only 15" wide though so when i go to install the main frp on the half circles, i'll have to trim about an inch off of the 4' side of the frp sheet. shouldn't be a problem:
next step was the receptacle for the vent fan cord as well as the control switch. single gang box mounted up in the joists, you can see the distance to the fan:
and a shot of the box fro the control switch. i added a second box to control some future lighting. not sure what the scheme will be but i'm getting the switch in there now. the switches are mounted to a 2x4 which is glued to the concrete wall. it was the perfect size gap between the vent stack piping and the adjacent shelf:
and with the wires installed from the switch boxes up to the receptacle. there is also a dedicated 15 amp circuit wired back to my subpanel:
by this time, the packer game was on so i called it a day. my fan controller should show up today so i can get that all finalized. looking at the photos, i'm debating rotating the fan 90 degrees or so such that the fan junction box is on the back side, will make for a cleaner look.
Calfj60
Well-Known Member
Keep up th great work!
OP
OP
10/06/2015 update
my variable controller for the exhaust fan showed up today. on a business trip right now so won't be able to get it installed until friday at the earliest.
my variable controller for the exhaust fan showed up today. on a business trip right now so won't be able to get it installed until friday at the earliest.
OP
OP
10/10/2015 update
menards 11% off sale is still on so i grabbed some more supplies. picked up some track lighting and associated parts. i don't want to install it until i get my hood up but might as well get it on sale! today was a day to work on some more premise wiring. mounting the box for the 30 amp receptacle:
coming in the bottom of the box works best for wiring up the receptacle but i need to come in from the 'back' to avoid the 10/3 cable from getting in th eway of the cord to the control panel. so i mounted the box high up on a joist. my joists are engineered wood i-beams so they are a little thin for mounting a box. i put a small piece of scrap 2x6 on the 'other' side of the joist, to get some meat for the mounting screws. then i wired up the receptacle:
i hadn't stapled down the cable yet so i pulled some slack through the receptacle box to give some space to work. all kinds of pipes in the way and working at heights. ugh. wired up and installed in the box:
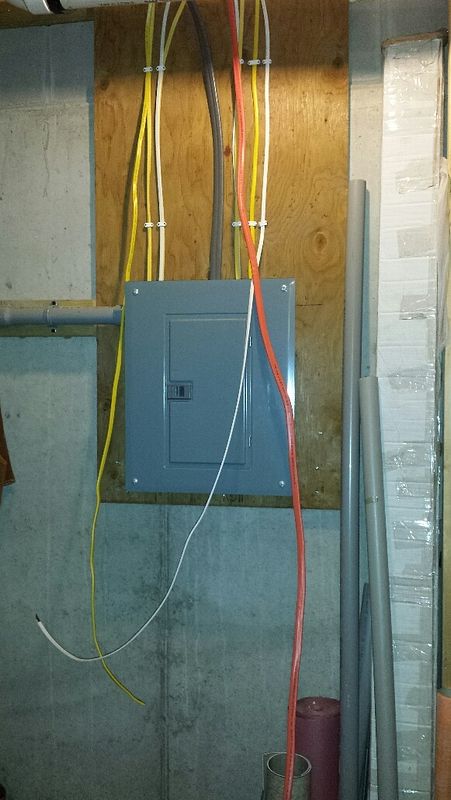
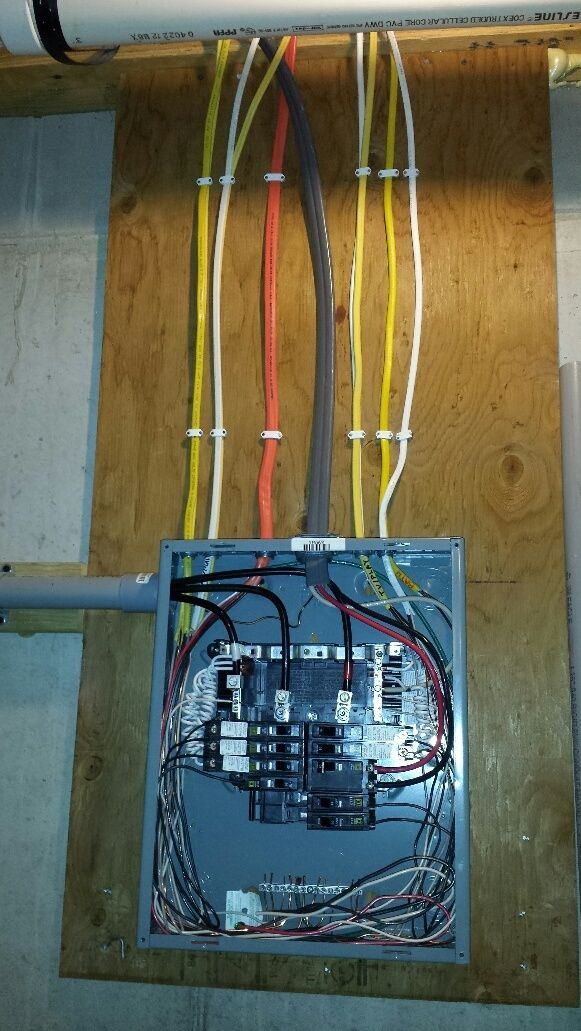
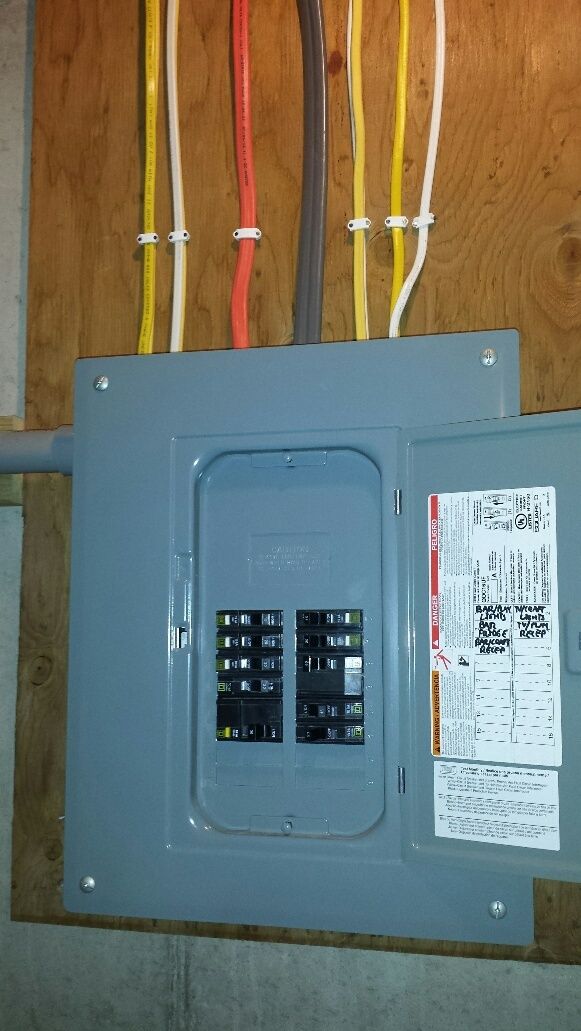
next up was landing the cables in my sub-panel. cables draped and ready for termination. the yellow cable is a 20 amp circuit for my keezer/fermentation/whatever receptacles, the white is a 15 amp circuit for lights/vent fan and the orange is the 30 amp circuit for the control panel:
panel face removed with the 20 amp breaker and circuit terminated. the 15 amp circuit is dressed:
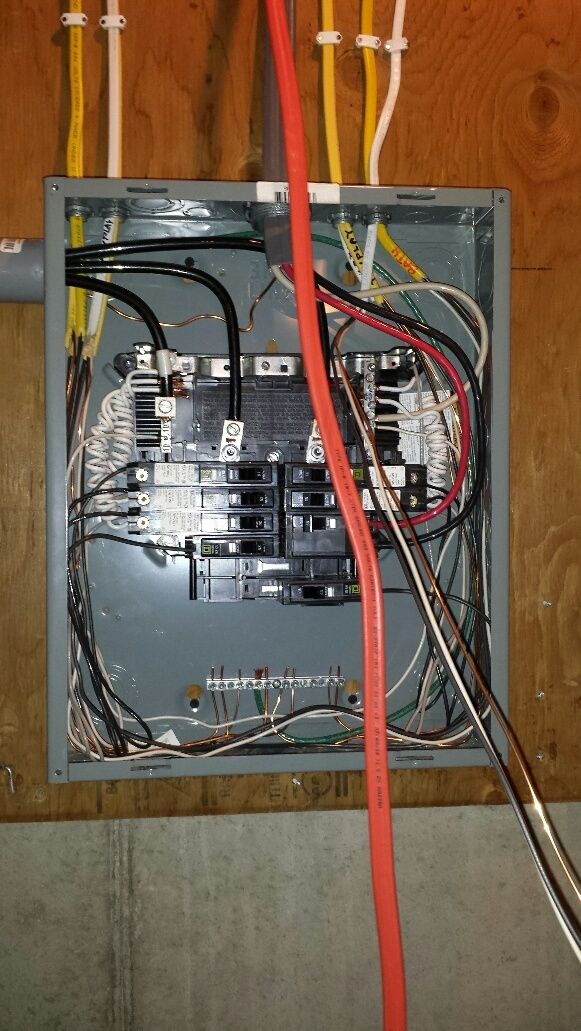
everything wired up. i don't have the 30 amp gfci breaker yet but the conductors are all trimmed and ready for landing:
and with the cover back on. the 30 amp breaker will go in the lower left:
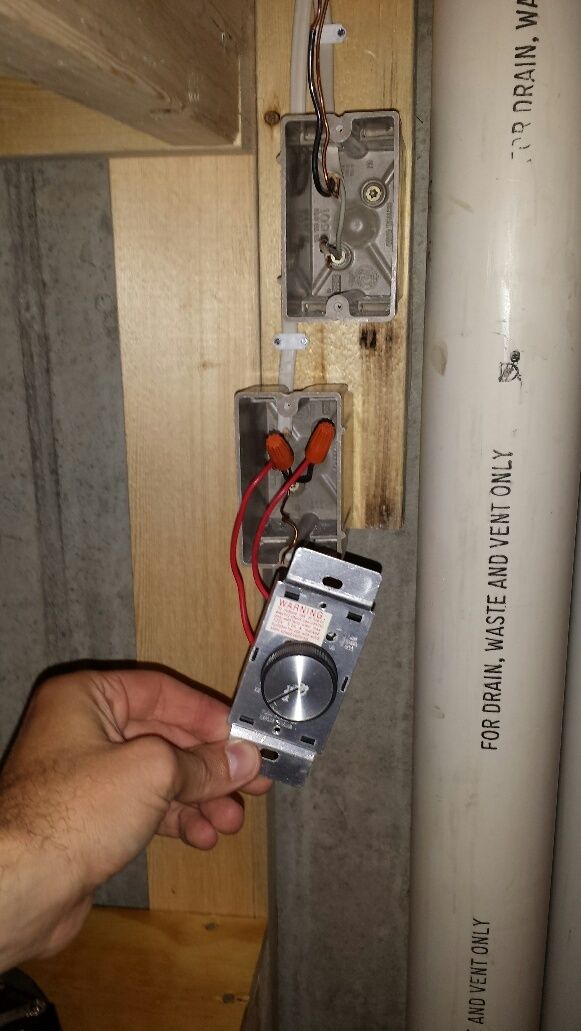
the pvc handy boxes i installed previously were way too small for the fan controller and lighting dimmer switch. so i swapped them out with larger boxes and wired up the controller:
and both switches installed:
this is the wad of wires i have in the fan receptacle box up in the ceiling. sort of a mess, taped switch legs galore. and of course, pipes everywhere:
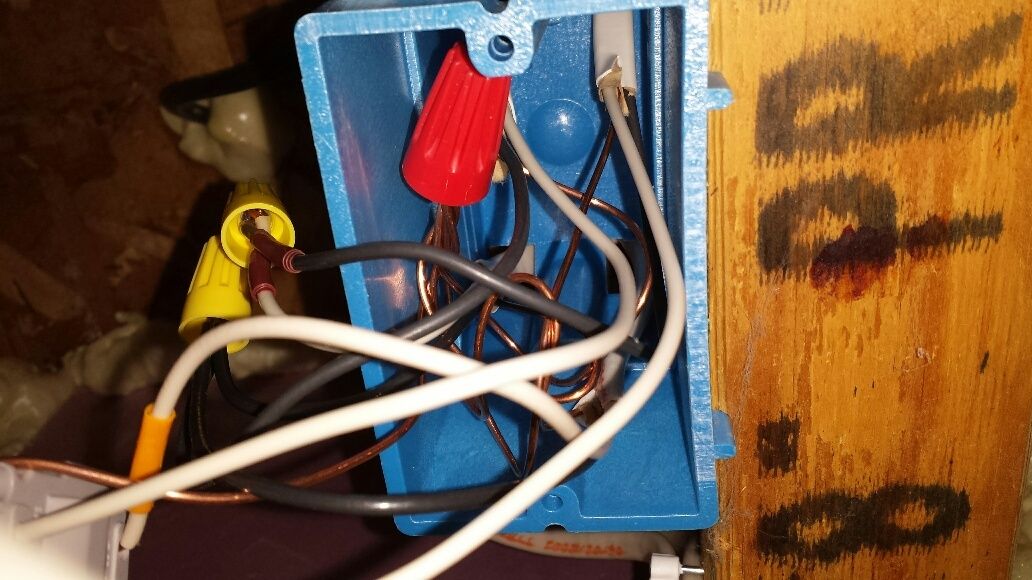
but it turned out just fine. i used a gfci for plugging in the vent fan, figured it wasn't a bad idea with all the moisture passing through there. sorry for the crappy photo, damn pipes!:
menards 11% off sale is still on so i grabbed some more supplies. picked up some track lighting and associated parts. i don't want to install it until i get my hood up but might as well get it on sale! today was a day to work on some more premise wiring. mounting the box for the 30 amp receptacle:
coming in the bottom of the box works best for wiring up the receptacle but i need to come in from the 'back' to avoid the 10/3 cable from getting in th eway of the cord to the control panel. so i mounted the box high up on a joist. my joists are engineered wood i-beams so they are a little thin for mounting a box. i put a small piece of scrap 2x6 on the 'other' side of the joist, to get some meat for the mounting screws. then i wired up the receptacle:
i hadn't stapled down the cable yet so i pulled some slack through the receptacle box to give some space to work. all kinds of pipes in the way and working at heights. ugh. wired up and installed in the box:
next up was landing the cables in my sub-panel. cables draped and ready for termination. the yellow cable is a 20 amp circuit for my keezer/fermentation/whatever receptacles, the white is a 15 amp circuit for lights/vent fan and the orange is the 30 amp circuit for the control panel:
panel face removed with the 20 amp breaker and circuit terminated. the 15 amp circuit is dressed:
everything wired up. i don't have the 30 amp gfci breaker yet but the conductors are all trimmed and ready for landing:
and with the cover back on. the 30 amp breaker will go in the lower left:
the pvc handy boxes i installed previously were way too small for the fan controller and lighting dimmer switch. so i swapped them out with larger boxes and wired up the controller:
and both switches installed:
this is the wad of wires i have in the fan receptacle box up in the ceiling. sort of a mess, taped switch legs galore. and of course, pipes everywhere:
but it turned out just fine. i used a gfci for plugging in the vent fan, figured it wasn't a bad idea with all the moisture passing through there. sorry for the crappy photo, damn pipes!:
OP
OP
10/11/2015 update
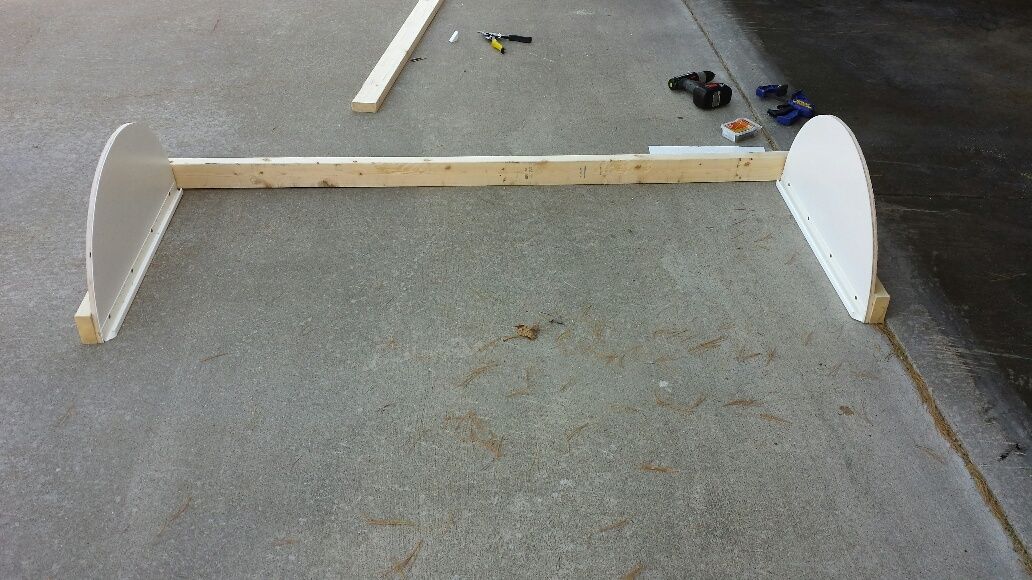
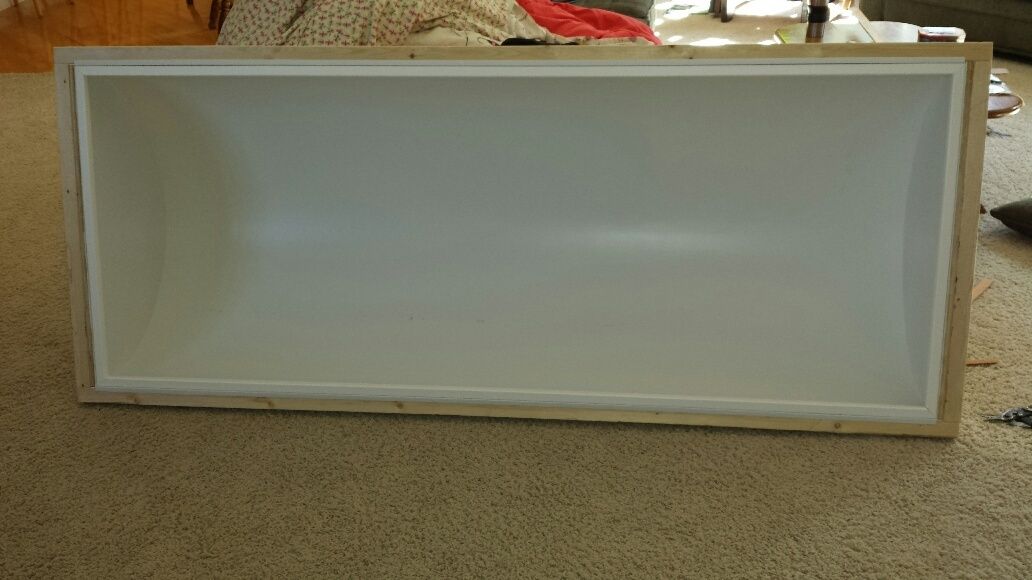
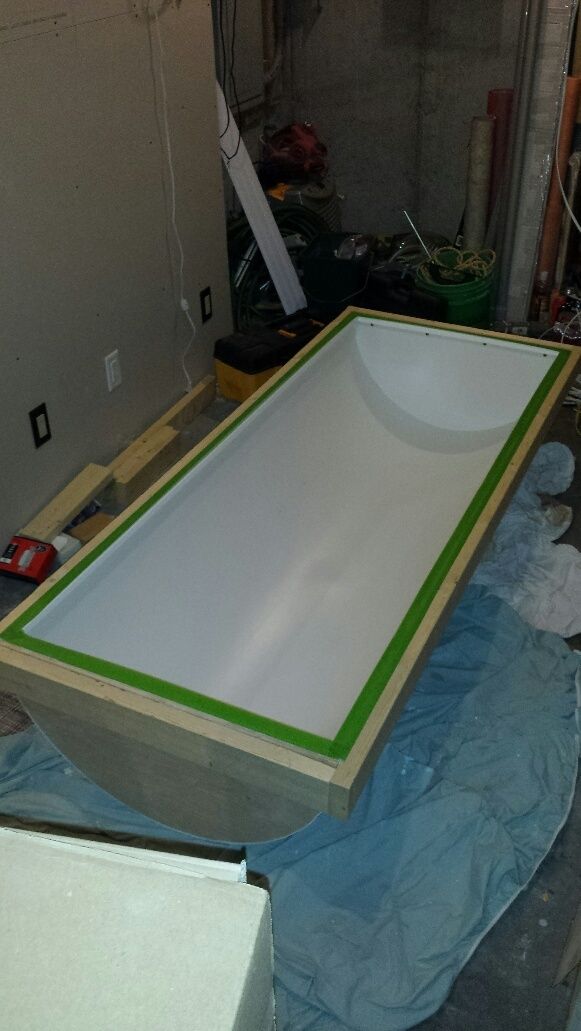
great weather today so the perfect time to tackle all the cutting for the vent hood. as mentioned previously, i am stealing deprecated's design. i'd glued some scrap frp onto some 'scrap' oak plywood earlier in the week. time to bust out the jigsaw and cut out the half-circles for the ends of the hood:
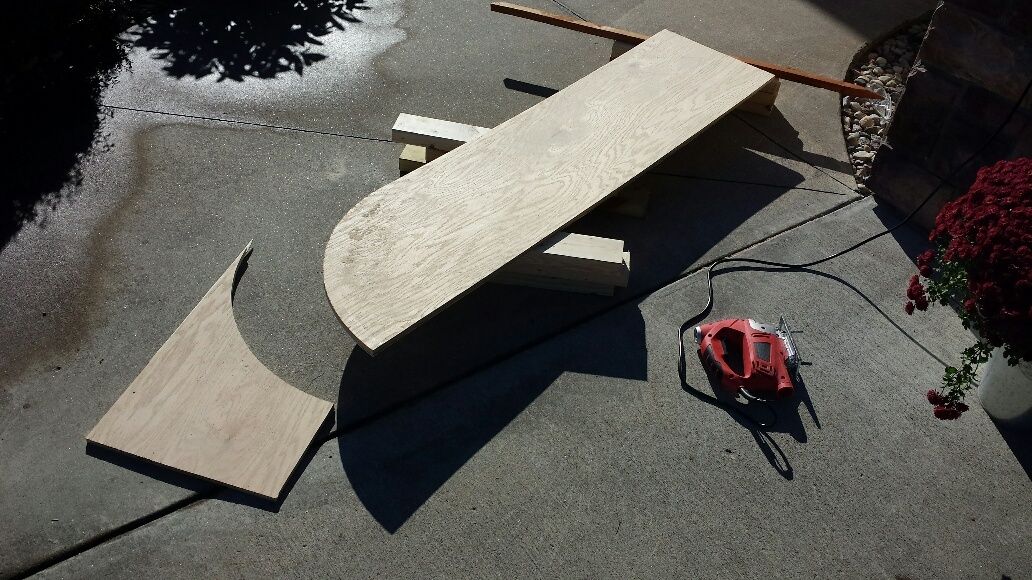
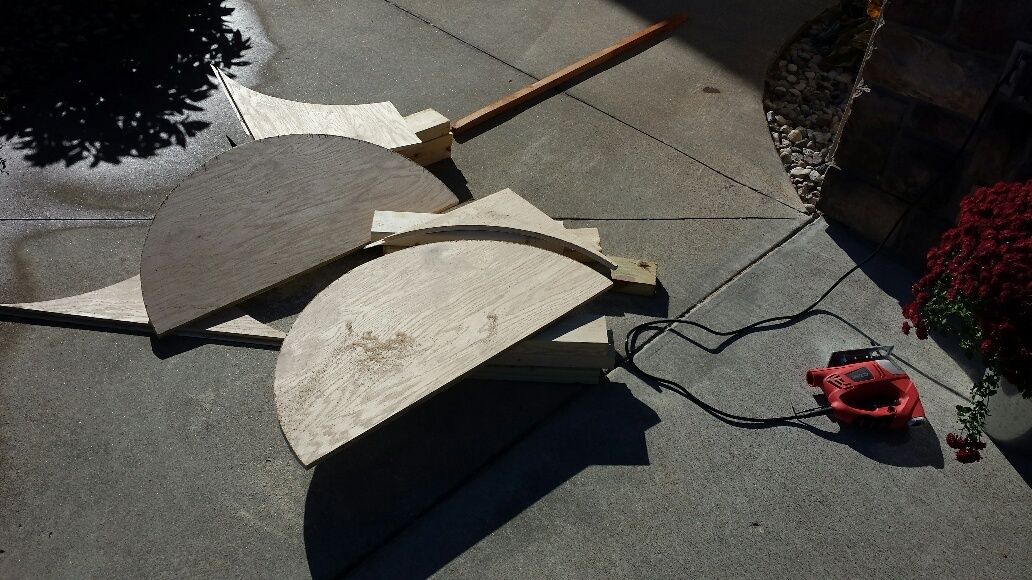
the cuts weren't perfect and i had some overhang on the frp anyway so i busted out the belt sander to smooth them up a bit:
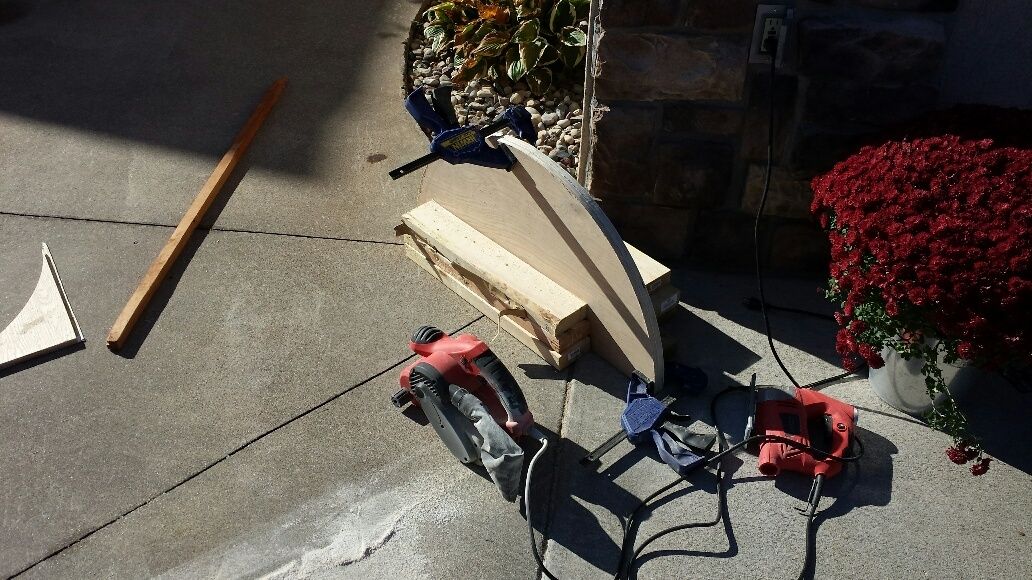
vinyl j-channel mitered up for the end pieces. you can see part of the 2x4 frame in the background:
j-channel attached to end piece and screwed into the 2x4 support frame behind it. i used lath screws so the screw heads would sit flat. more j-channel to cut up in the background:
both end pieces attached to the 2x4 frame. i've left one long side of the frame not attached, to facilitate mounting the frp:
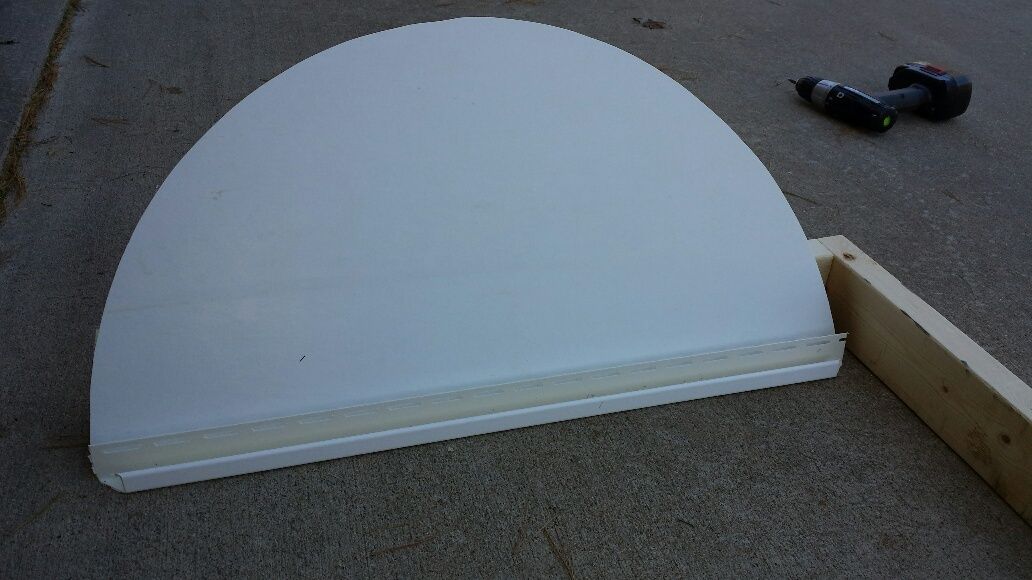
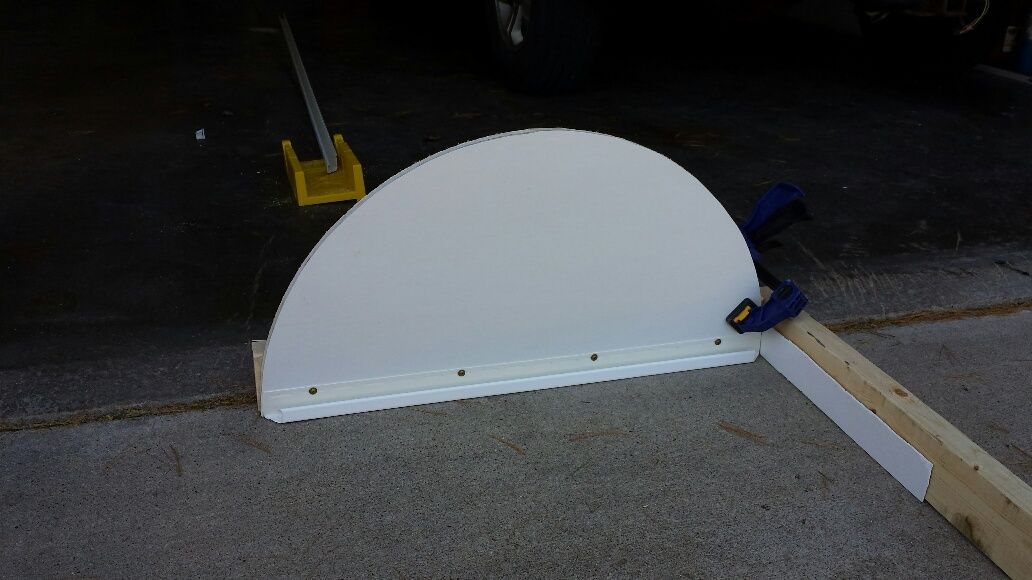
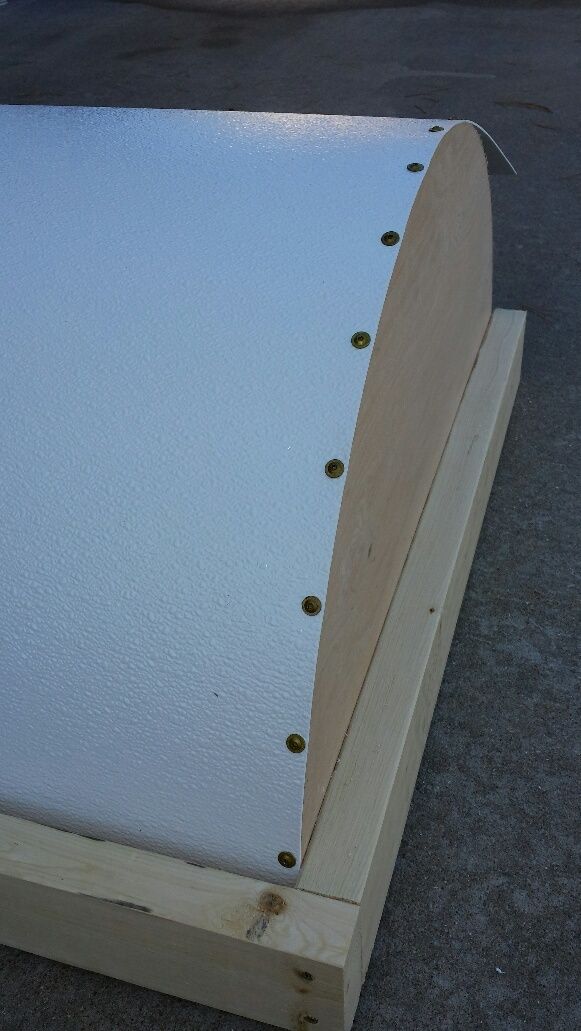
frp sheet rolled over the top of the half-circle end pieces. i'm using a flexible tape to mark the locations for the lath screws, to attach the frp sheet to the half-circle end pieces:
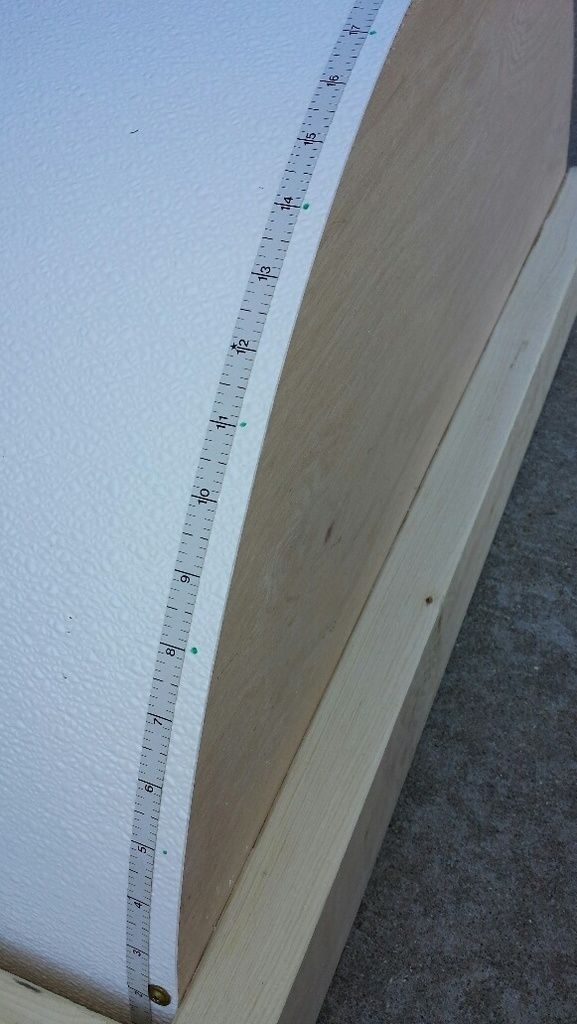
and driving in the screws. before driving each screw, i made sure the end piece lined up with the edge of the frp panel:
once both ends were complete, i measured and cut the remaining pice of the frame:
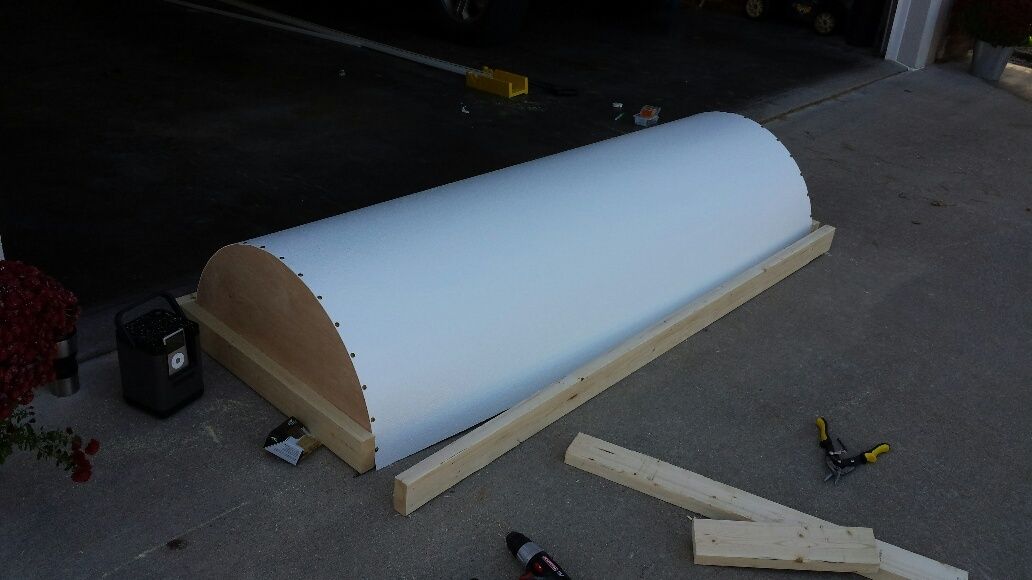
turns out one end piece had a slightly smaller radius than the other. i was left with a little frp overhang on one end, which tapered from one end to the other. a little pull saw work to clean it up (i'm inside now, with the packer game on):
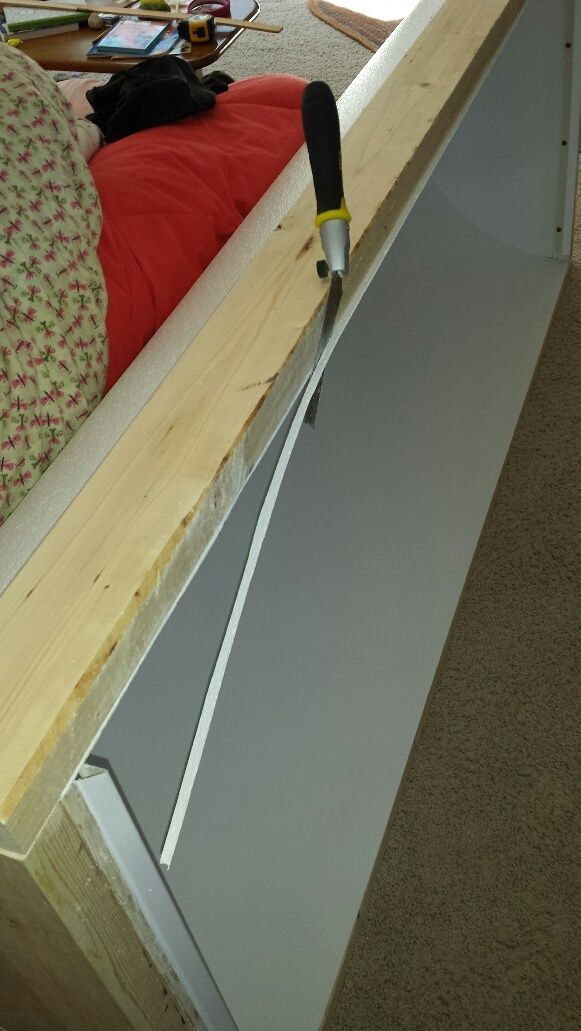
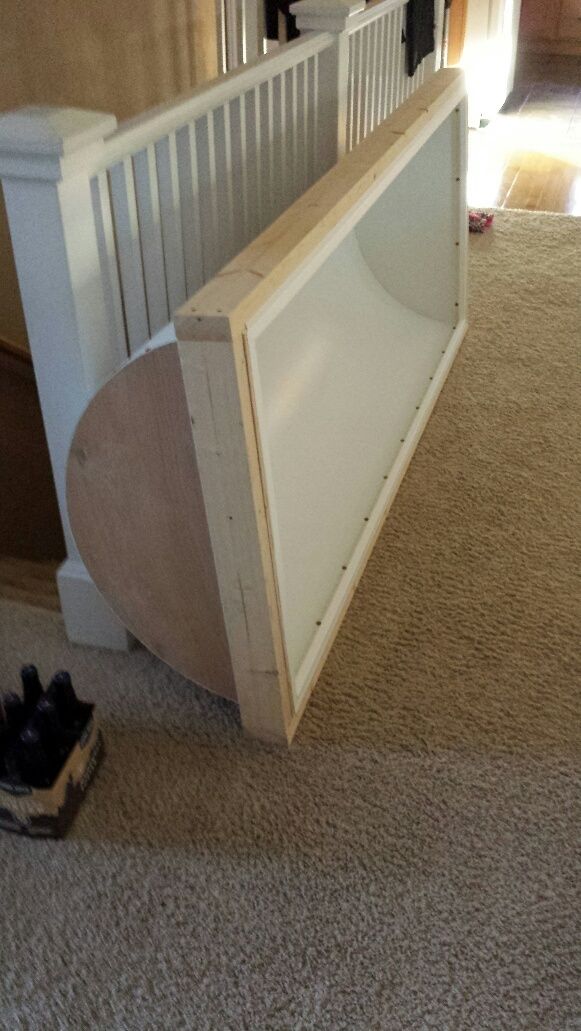
due to the curvature of the frp, there is a pretty decent 'gap' between the long sides of the 2x4 frame and the frp. shot below is the exterior of the hood. this gap will cause a problem when i screw the j-channel on the long side of the hood interior:

i had some pieces of wood lath left over from siding my sauna so i used those to fill in part of the gap. this will prevent the frp from getting 'squeezed' against the 2x4 frame when i screw in the j-channel:
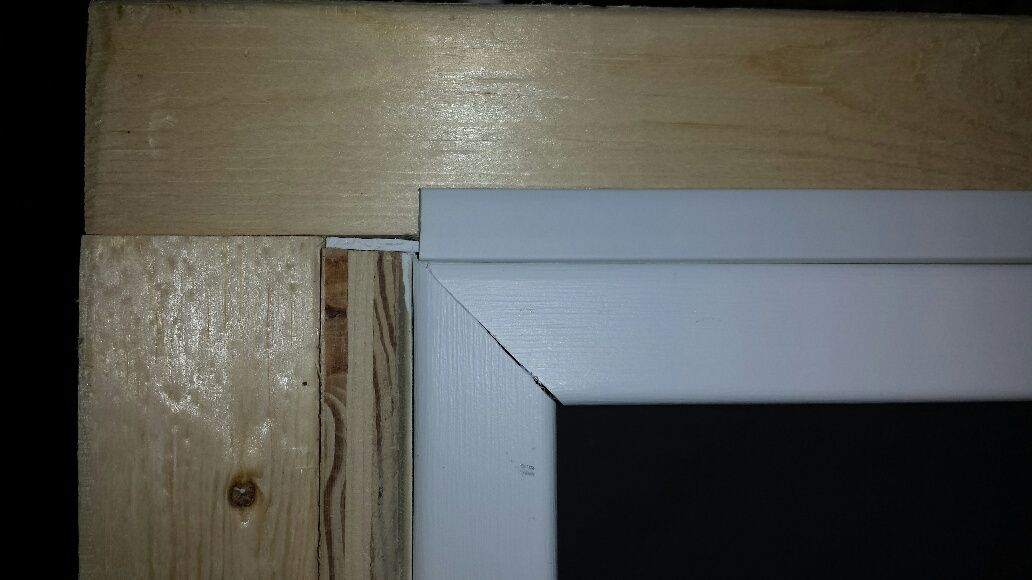
that darn frp curvature gave me all sorts of fits! after i attached the long pieces of j-channel, i noticed the corners had a pretty good size gap. i suppose i could just caulk it but that will make for a less than desirable gutter system:
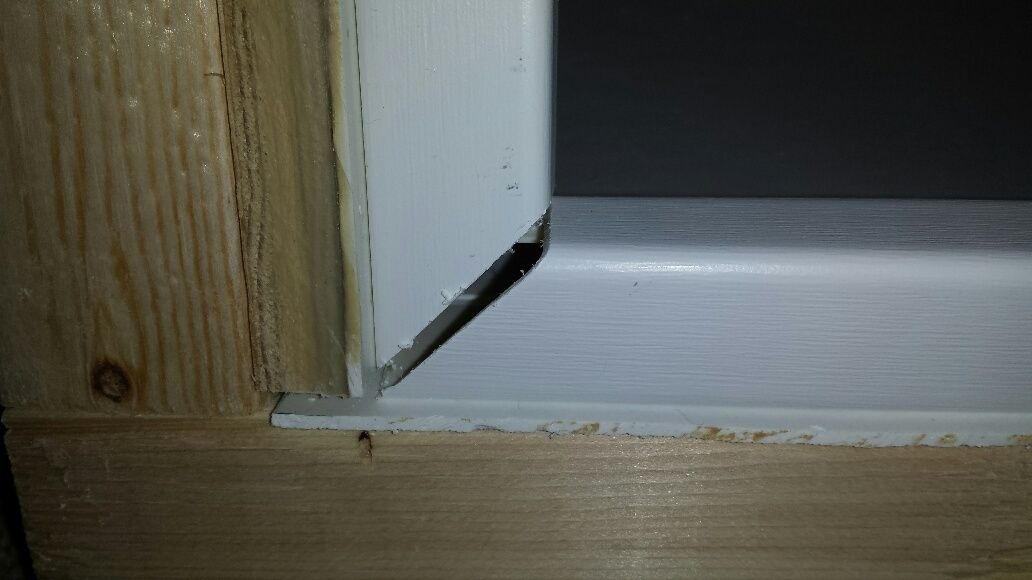
i had bought some frp outside corner trim pieces to finish of the area where the frp met the 2x4 frame but once i got things put together, it looked pretty good with out it. i though about scrapping the idea but put a test piece in on the long side and noticed it 'pushed' the j-channel such that it lined up the corners!
and the semi-finished product, a little caulk in the corners and some stain on the wood and this one is good to go:
great weather today so the perfect time to tackle all the cutting for the vent hood. as mentioned previously, i am stealing deprecated's design. i'd glued some scrap frp onto some 'scrap' oak plywood earlier in the week. time to bust out the jigsaw and cut out the half-circles for the ends of the hood:
the cuts weren't perfect and i had some overhang on the frp anyway so i busted out the belt sander to smooth them up a bit:
vinyl j-channel mitered up for the end pieces. you can see part of the 2x4 frame in the background:
j-channel attached to end piece and screwed into the 2x4 support frame behind it. i used lath screws so the screw heads would sit flat. more j-channel to cut up in the background:
both end pieces attached to the 2x4 frame. i've left one long side of the frame not attached, to facilitate mounting the frp:
frp sheet rolled over the top of the half-circle end pieces. i'm using a flexible tape to mark the locations for the lath screws, to attach the frp sheet to the half-circle end pieces:
and driving in the screws. before driving each screw, i made sure the end piece lined up with the edge of the frp panel:
once both ends were complete, i measured and cut the remaining pice of the frame:
turns out one end piece had a slightly smaller radius than the other. i was left with a little frp overhang on one end, which tapered from one end to the other. a little pull saw work to clean it up (i'm inside now, with the packer game on
):
due to the curvature of the frp, there is a pretty decent 'gap' between the long sides of the 2x4 frame and the frp. shot below is the exterior of the hood. this gap will cause a problem when i screw the j-channel on the long side of the hood interior:
i had some pieces of wood lath left over from siding my sauna so i used those to fill in part of the gap. this will prevent the frp from getting 'squeezed' against the 2x4 frame when i screw in the j-channel:
that darn frp curvature gave me all sorts of fits! after i attached the long pieces of j-channel, i noticed the corners had a pretty good size gap. i suppose i could just caulk it but that will make for a less than desirable gutter system:
i had bought some frp outside corner trim pieces to finish of the area where the frp met the 2x4 frame but once i got things put together, it looked pretty good with out it. i though about scrapping the idea but put a test piece in on the long side and noticed it 'pushed' the j-channel such that it lined up the corners!
and the semi-finished product, a little caulk in the corners and some stain on the wood and this one is good to go:
Nice work on the hood
kal
Well-Known Member
Just curious: Are you having your electrical work inspected? I notice a few things that seem odd like no loop or slack before the single gang boxes (you're supposed to stable within so many inches and then leave some slack), odd looking romex 12 ga wiring (it looks flat?) and wire harness (looks like plastic?).
Wouldn't want you to get in trouble down the road!
Kal
Wouldn't want you to get in trouble down the road!
Kal
OP
OP
Just curious: Are you having your electrical work inspected? I notice a few things that seem odd like no loop or slack before the single gang boxes (you're supposed to stable within so many inches and then leave some slack), odd looking romex 12 ga wiring (it looks flat?) and wire harness (looks like plastic?).
Wouldn't want you to get in trouble down the road!
Kal
no inspection but thanks for the comments. i do have a few more staples to put up but in general, i am taking advantage of the exception to 314.17(C) of the nec, which does not require nm cable to be secured at an outlet box, provided it is a single-gang non-metallic box and is secured within 8" of the box. there is no nec requirement to leave loops or slack at the boxes. the #10 cable for the control panel receptacles needs a clamp at the box but nothing else for staples while it runs through holes in the ceiling joists (334.30(A) of the nec). where cables run parallel to framing members, requirement is a staple every 4.5' but i used way more.
the nm cable (romex) is standard 12/2 (black, white and bare ground, all #12 awg). it comes as a flat cable. the 15 amp circuits use #14 awg of the same construction
not sure what you mean by 'wiring harness'. are you asking about the staples?
kal
Well-Known Member
Ok - never mind... you know what you're doing. Just looked a bit "non-standard" to what I see up here (in Canada).
I think I asked similar things in the past too. Carry on, ignore me.
Edit: Yes - I meant staples when I said harness. Cheers!
Kal
I think I asked similar things in the past too. Carry on, ignore me.
Edit: Yes - I meant staples when I said harness. Cheers!
Kal
OP
OP
10/12/2015 update
my 30 amp gfci breaker showed up this morning so i stopped by menards during my lunch hour to pick it up. got home and dinner wouldn't be ready for 15 minutes so i quick threw it in my sub panel. landing the field conductors on the breaker:
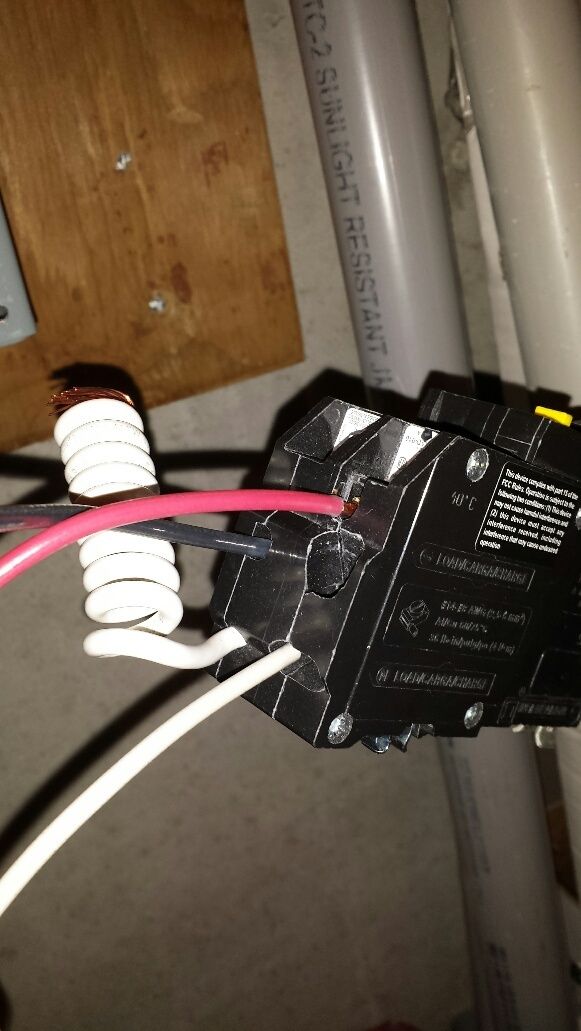
breaker installed in the panel:
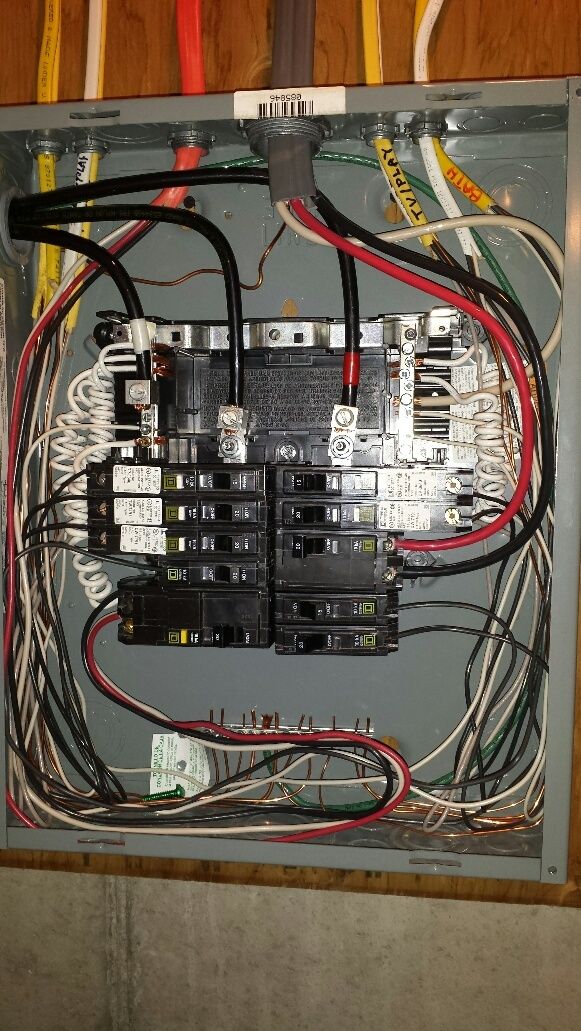
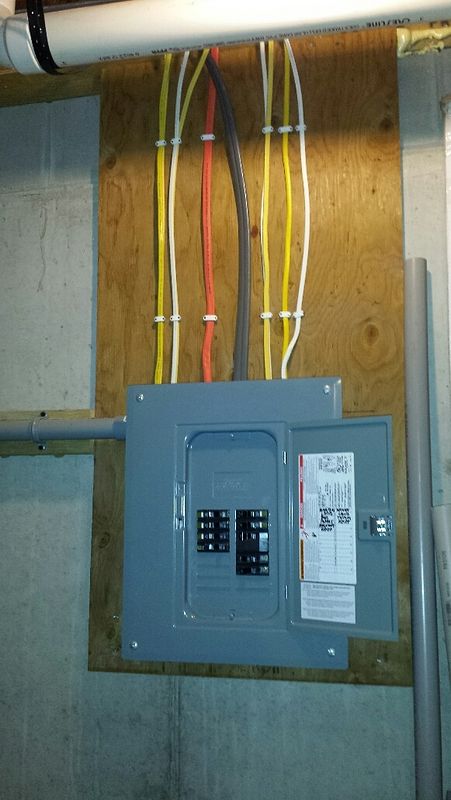
and the panel front re-installed. no more panel work!
i also lugged the hood downstairs to stain it, had a tiny bit leftover from the table build. i put some painter's tape on the trim to keep things clean:
and with the stain:
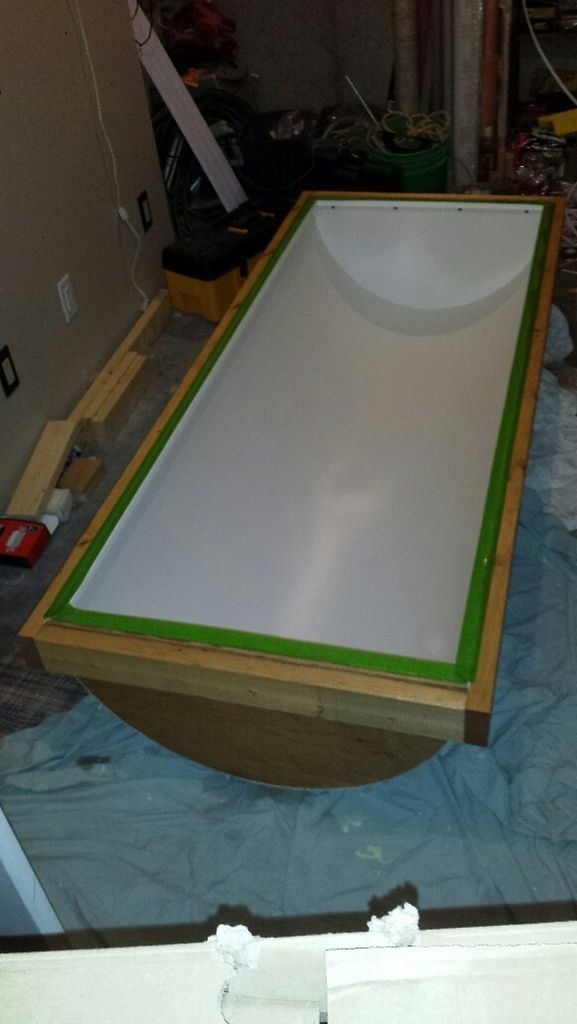
so nice to have the vent fan down there to suck out the fumes. tomorrow is a coat of polly and another on wednesday. then i start thinking about how to get that bad boy installed...
my 30 amp gfci breaker showed up this morning so i stopped by menards during my lunch hour to pick it up. got home and dinner wouldn't be ready for 15 minutes so i quick threw it in my sub panel. landing the field conductors on the breaker:
breaker installed in the panel:
and the panel front re-installed. no more panel work!
i also lugged the hood downstairs to stain it, had a tiny bit leftover from the table build. i put some painter's tape on the trim to keep things clean:
and with the stain:
so nice to have the vent fan down there to suck out the fumes. tomorrow is a coat of polly and another on wednesday. then i start thinking about how to get that bad boy installed...
RyanDe680
Well-Known Member
Did you give any thought to covering the outside of the hood in aluminum/sheet metal?
OP
OP
Did you give any thought to covering the outside of the hood in aluminum/sheet metal?
nah, a bunch of extra cost/effort and i'm not much of a metal working guy. plus the frp matches the finish of my walls.
OP
OP
10/13/2015 update
not much work today, just a coat of poly on the vent hood wood
not much work today, just a coat of poly on the vent hood wood
OP
OP
10/14/2015 update
another easy day. sanded the first coat of poly and threw the second (final) coat on. tomorrow's plan is to caulk the seams/gutters and it will be ready for hanging. but in more interesting news, a large package was waiting on my porch when i got home from work:
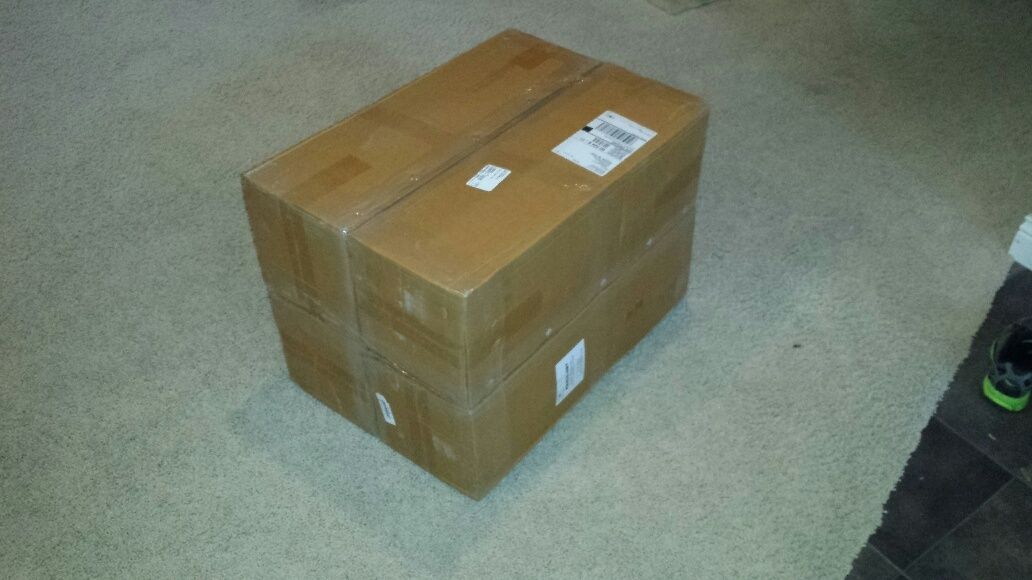
actually four boxes taped together:
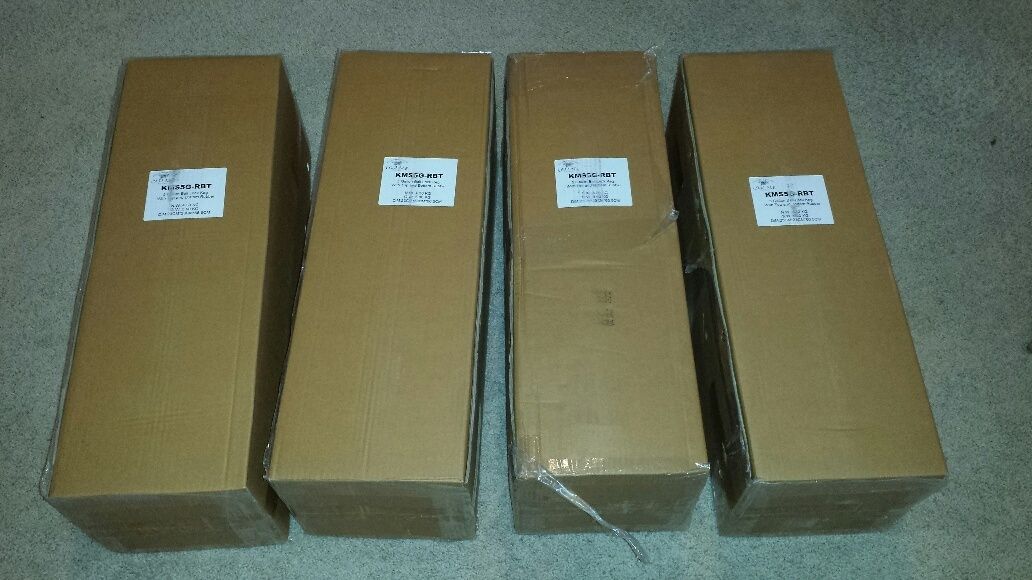
and the prize:
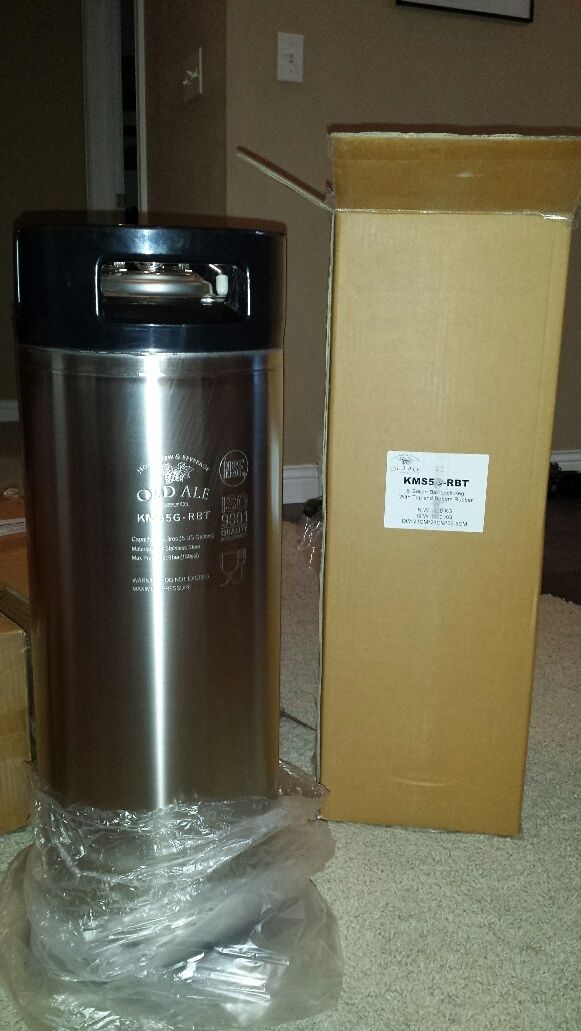
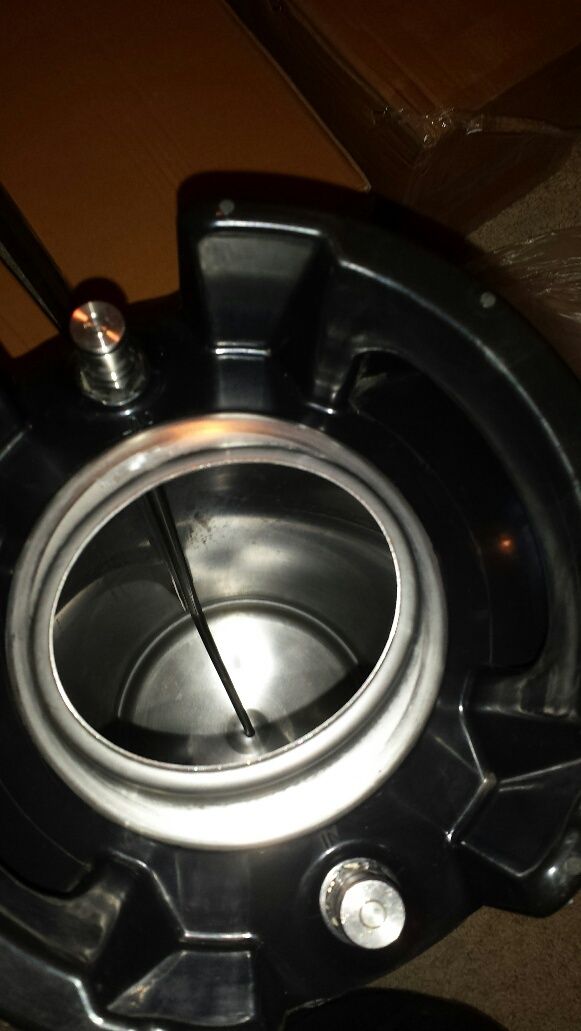
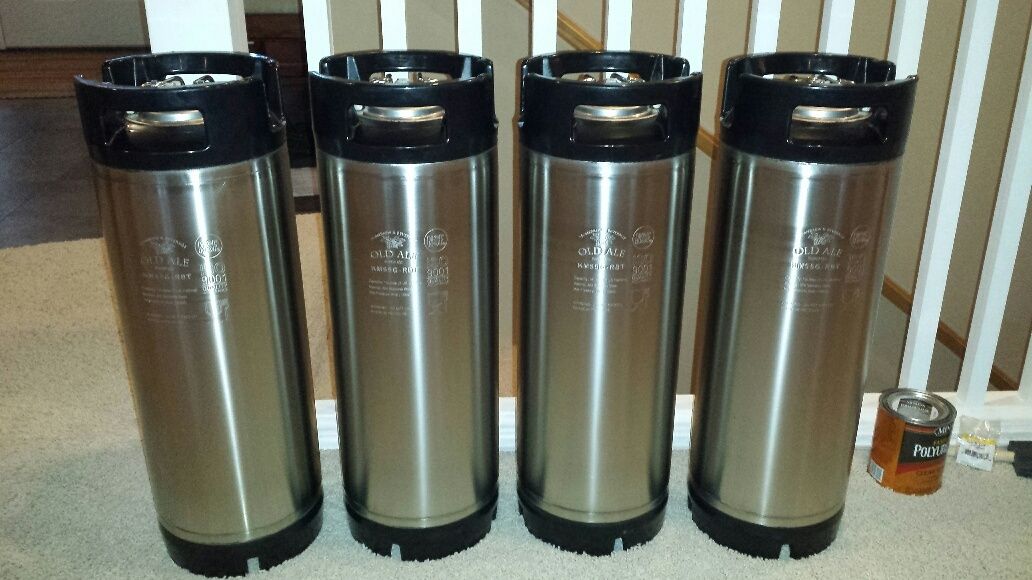
of course, i won't be able to do anything with these for several months but they were on sale and it was my birthday.
another easy day. sanded the first coat of poly and threw the second (final) coat on. tomorrow's plan is to caulk the seams/gutters and it will be ready for hanging. but in more interesting news, a large package was waiting on my porch when i got home from work:
actually four boxes taped together:
and the prize:
of course, i won't be able to do anything with these for several months but they were on sale and it was my birthday.
10/14/2015 update
another easy day.
You and I have VERY different definitions of "easy" day.
I hate to say it but those kegs look great. I've only owned used kegs and thought they were fine but wow they look really good brand new.
OP
OP
I hate to say it but those kegs look great. I've only owned used kegs and thought they were fine but wow they look really good brand new.
price was hard to beat. normally $119 each, on sale for only $75 (33% off).
iijakii
Well-Known Member
You and I have VERY different definitions of "easy" day.
I hate to say it but those kegs look great. I've only owned used kegs and thought they were fine but wow they look really good brand new.
Look up the single handle (no rubber) ones! So shiny.
Used kegs work, and you definitely cant argue with the price if you can find 'em on CL and what not. Most of my old used ones gave me blackhands everytime I touched the rubber though. Hated them.
kal
Well-Known Member
Weird. I have 19 of them of various ages (all used ball lock) and none of them do this. I've always preferred the exact style shown here because they're easier to lift I find with two thick handles. (More info on why I like'em here).Most of my old used ones gave me blackhands everytime I touched the rubber though. Hated them.
Kal
Similar threads
- Replies
- 11
- Views
- 952
- Replies
- 4
- Views
- 335
