[Initial Release] RaspberryPints - Digital Taplist Solution

Homebrew Talk - Beer, Wine, Mead, & Cider Brewing Discussion Forum

Help Support Homebrew Talk - Beer, Wine, Mead, & Cider Brewing Discussion Forum:

This site may earn a commission from merchant affiliate links, including eBay, Amazon, and others.
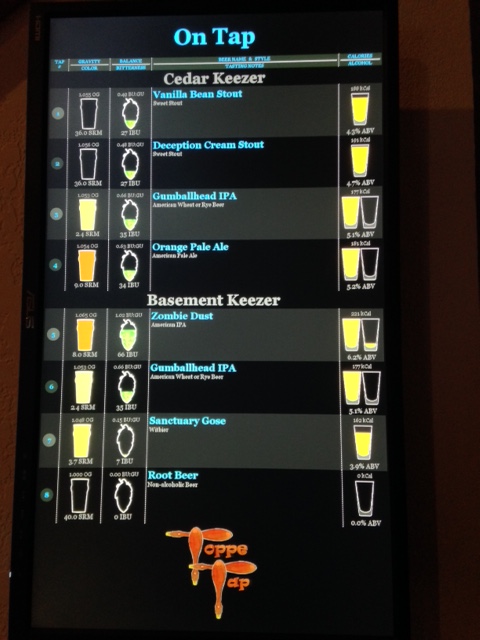
I know I inquired about this a little while ago, but I was still wondering if anyone was able to split the display vertically to basically have two different keezers on display.
Ex. I have 2 different keezers so I would like to put "basement keezer" after tap #4 to show that these taps are in the basement vs. upstairs keezer.

I attached a picture of what JonW has, but was hoping to edit the index.php to do this vertically instead of horizontally.

Thank you for any input.

Not real clear on what you're asking for. You're not going to get a 2 column layout like mine in portrait (vertical) orientation - there just isn't enough width to show the info (which is why this is horizontal).

If you were to use the original layout in vertical, you could do what you want. You'd need to put some conditional code in the middle of the loop that draws the tap list to basically say "when tap = 4 then write new header". If you have 8 taps and 4 are upstairs and 4 are downstairs, you could do my layout with a header and/or footer for each column to say which keezer it is.

Just not clear on what exactly you're asking for though, so I can't really give any more guidance than this.
 
I attached a picture of what I'm trying to do.

1002225_1458043717747350_1701940807_n.jpg
 
You need to insert some conditional code near the beginning of the tap list loop. This code needs to check if the tap # equals 1 and if so, write a keezer name description row. You can then repeat that if the tap # equals 5 and write the second keezer description row.

Below is a real basic example. Note that only the highlighted code is what has been added. You may need to do some addtional formatting.

taplist_mod.png
 
Since I run my rpints on a tablet and I don't use the flow meters I wanted a cheap and dirty way to track pours. I think I may have mentioned in this thread before that I was working on some touch controls. Here is the first thing I've implemented:

http://brewingintheburgh.com/raspberrypints/

Tap (or click) on any row and a popup will appear allowing you to select how much you are pouring with a slider. Hit Pour and the amount you entered will be subtracted from the amount remaining in the keg. Simple and should at least give you a general idea how much you have left in the kegs.

If anyone is interested I will share the code.

I'd be very interested in how you implemented this. I'm just starting to set up Raspberrypints, but I don't know if I'll jump right to flow meters. I love your solution for a starting point to track volume
 
Since I run my rpints on a tablet and I don't use the flow meters I wanted a cheap and dirty way to track pours. I think I may have mentioned in this thread before that I was working on some touch controls. Here is the first thing I've implemented:

http://brewingintheburgh.com/raspberrypints/

Tap (or click) on any row and a popup will appear allowing you to select how much you are pouring with a slider. Hit Pour and the amount you entered will be subtracted from the amount remaining in the keg. Simple and should at least give you a general idea how much you have left in the kegs.

If anyone is interested I will share the code.

I'd also be interested in this code. I am currently using code another user made for tracking pours in this post .
 
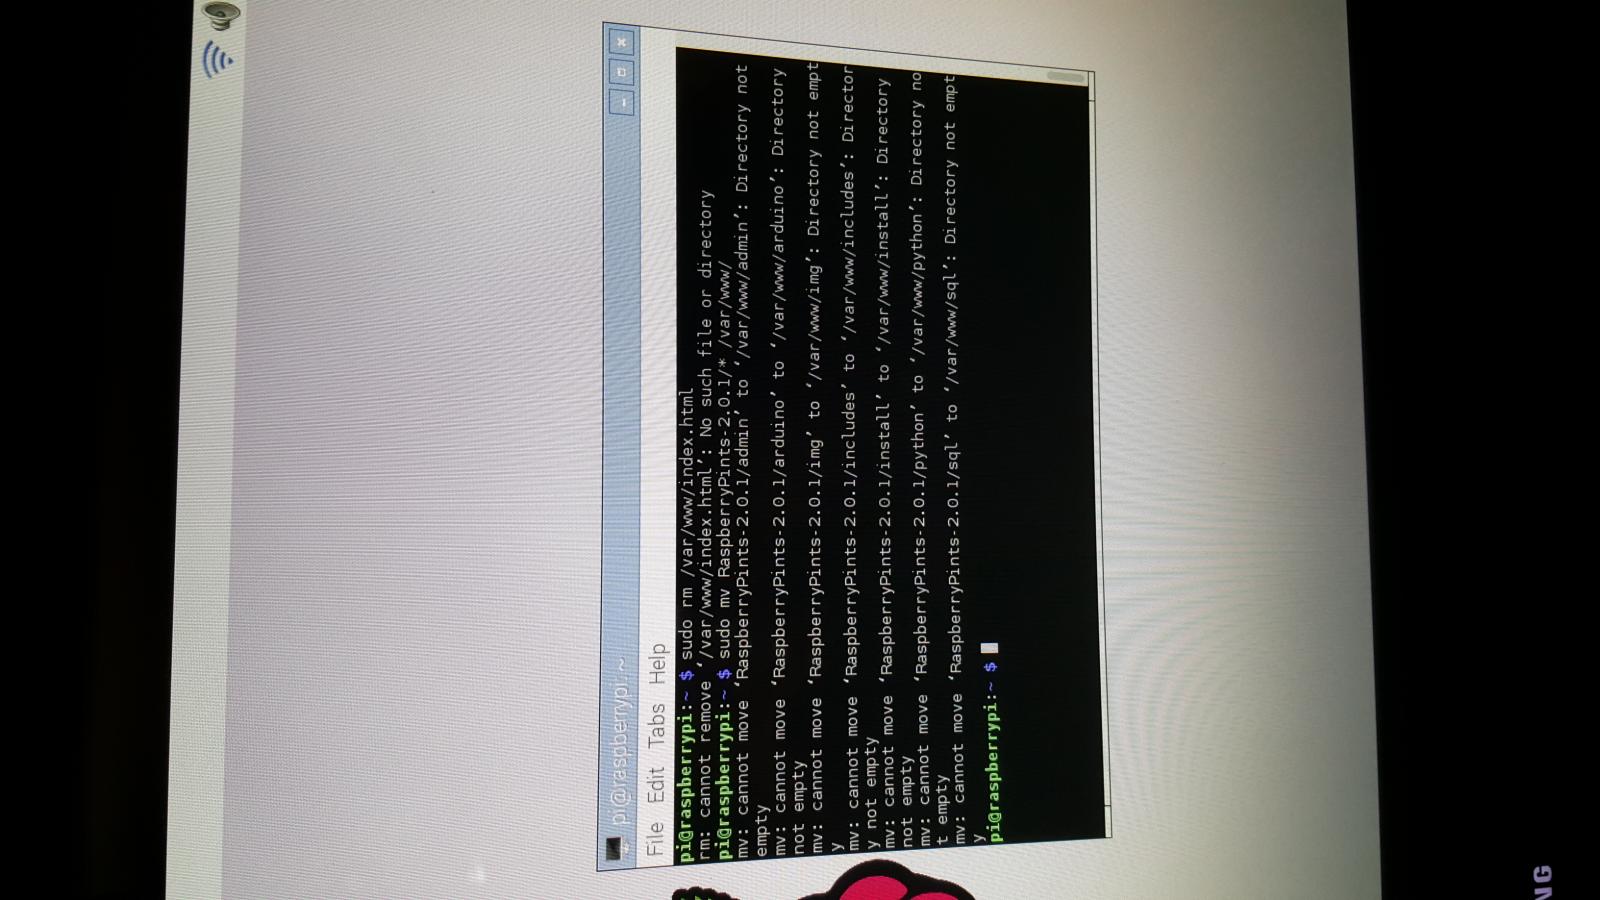
Wondering if anyone can help?
I have a Raspberry Pi2 running Fashion Jessie. Have come a long way into the raspberry pints set up. Now I'm stuck at the step to unzip Raspberry Pints 2.0.1 file.

I type sudo rm /var/www/index.html
I get this error

Rm: cannot remove '/var/www/index.html': No such file or directory

Also get other errors with other commands during this process.
It's doing my head in.......please help

Screenshots attached (hopefully)

FB_IMG_1458795265223.jpg


FB_IMG_1458795417995.jpg
 
You're not finding an index.html file in /var/www on Jessie - because unlike Wheezy, Jessie's default folder for web stuff moved to /var/www/html...

Cheers!
 
You're not finding an index.html file in /var/www on Jessie - because unlike Wheezy, Jessie's default folder for web stuff moved to /var/www/html...

Cheers!

ok, sorry but im kinda new to the world of Raspberry Pi so not understanding what your saying.

is there a link i can follow that will help with the install? as the RaspberryPints website isnt much help at the moment

thanks for responding
 
ok, sorry but im kinda new to the world of Raspberry Pi so not understanding what your saying.

is there a link i can follow that will help with the install? as the RaspberryPints website isnt much help at the moment

thanks for responding

Just type
sudo rm /var/www/html/index.html

instead. Of course you want to copy the RaspberryPints install files into
/var/www/html instead of /var/www/
 
Thanks but I tried that and this is what I got
pi@raspberrypi:~ $ sudo rm /var/www/html/index.html
rm: cannot remove ‘/var/www/html/index.html’: No such file or directory
 
Thanks but I tried that and this is what I got
pi@raspberrypi:~ $ sudo rm /var/www/html/index.html
rm: cannot remove ‘/var/www/html/index.html’: No such file or directory

Click the up arrow in the file manager twice, go to var > www > html. Verify index.html is there!
sudo chmod -R 777 /var/www (the R is upper case)
sudo rm /var/www/html/index.html
 
Click the up arrow in the file manager twice, go to var > www > html. Verify index.html is there!
sudo chmod -R 777 /var/www (the R is upper case)
sudo rm /var/www/html/index.html

ok. done the mentioned steps.
clicked the up arrow in file manager twice, clicked var, then www then html and the folder is empty.:confused:
 
ok. done the mentioned steps.
clicked the up arrow in file manager twice, clicked var, then www then html and the folder is empty.:confused:

Step 6: "If you get an error message stating that the file was not found, you can safely disregard it."

Should be good to go! Extract Raspberrypints files to the HTML folder.
 
Step 6: "If you get an error message stating that the file was not found, you can safely disregard it."

Should be good to go! Extract Raspberrypints files to the HTML folder.

ok. ive extracted the zip file to HTML, then i type:
sudo rm /var/www/index.html
and get this error::::::

pi@raspberrypi:~ $ sudo rm /var/www/index.html
rm: cannot remove ‘/var/www/index.html’: No such file or directory

I dont see index.html in there. Only the extracted file RaspberryPints 2.0.1


sorry to be a pain but ive no where else to turn as i really want this up and running for my homebrewery

thanks again

The command "sudo rm /var/www/index.html" is just there to delete the built in "This is a placeholder webpage" that is on the pi. You do not want to delete it again after extracting the files.

two questions:
- What happens when you open a web browser and type http://localhost/ in the address bar and hit enter?
- When you did the copy from the raspberrypints folder, did you copy the folder itself or did you copy the contents of the folder?
 
ok. ive extracted the zip file to HTML, then i type:
sudo rm /var/www/index.html
and get this error::::::

pi@raspberrypi:~ $ sudo rm /var/www/index.html
rm: cannot remove ‘/var/www/index.html’: No such file or directory

I dont see index.html in there. Only the extracted file RaspberryPints 2.0.1


sorry to be a pain but ive no where else to turn as i really want this up and running for my homebrewery

thanks again

Already covered this > Step 6: "If you get an error message stating that the file was not found, you can safely disregard it."

The file was already gone!

Continue the setup...
 
The command "sudo rm /var/www/index.html" is just there to delete the built in "This is a placeholder webpage" that is on the pi. You do not want to delete it again after extracting the files.

two questions:
- What happens when you open a web browser and type http://localhost/ in the address bar and hit enter?
- When you did the copy from the raspberrypints folder, did you copy the folder itself or did you copy the contents of the folder?[/QUOTE

when I type http://localhost/ into my Chromium web browser i get this....
Index of /

[ICO] Name Last modified Size Description
[DIR] RaspberryPints-2.0.1/ 2014-09-11 10:05 -
Apache/2.4.10 (Raspbian) Server at localhost Port 80

not sure about when i copied the Raspberry Pints if I copied the folder or the contents.

sorry about this but its doing my head in not being able to get a result from the Raspberry Pints website instructions
 
ok all, i followed the intructions posted and its now up and running.
Thank you DrunkleJon for your input as it helped out a lot.

i couldnt be a happier brewer right now
 
Aaaaand it just plain works!

To answer DanH: The HC SR501 PIR motion sensor is powered directly by the RPi, via the 5V rail. The sensor uses three connections to the RPi: 5V, GND, and GPIO7. The sensor has a local regulator that converts the 5V to 3.3V which runs the entire board, and making the output "RPi Safe" without dividers, etc.

Ok...So I haven't had to put an "instructable" together for a looong time, so bear with me. First person through let me know if there are any problems and I'll fix 'em up pronto. And I hope putting this here is ok with the 'Pints community!

Preview: You'll install xscreensaver and verify it works, stick the test and runtime scripts in the /home/pi folder, shut down and wire up the sensor, power up and test the sensor, then add an entry to the LXDE autostart file, and finally reboot to what should be a working feature.

Right then, we're off:

Unpack zip file:

I've put a zip file up on Google Drive with the two scripts, the instructions, and a couple of images to orient the user to the RPi GPIO header and the sensor. That file can be downloaded from here.

Unpack the file and place the two Python scripts (pir_test.py and pir_run.py) in the /home/pi folder. Have the other files handy as you put things together.


Install xscreensaver from an LXDE terminal:

apt-get install xscreensaver

After the installation completes, you can Add the ScreenSaver Preferences shortcut from the 'start' menu (look in folder "Other") to the desktop to make it handy while you're setting things up.

Most of the screensavers are not installed as part of the kit, but they are selected in the ScreenSaver Preferences - Display Modes sheet. You'll want to de-select the unavailable screensavers (stick your cursor on a title and if it doesn't show up in the preview pane it isn't installed), and probably quite a few of the installed ones as well. The Preferences gui is a total POS but it's free, so don't complain ;)

In any case, you'll want to verify the xscreensaver is actually working before proceeding. In ScreenSaver Preferences - Display Modes you can set the "Blank After" delay to something short so you're not twiddling your thumbs waiting for it to kick in.


Shut down, remove power and wire up the PIR sensor

Refer to hc_sr501.jpg and 2x13_header.jpg for connection locations (pictures are below).
A detailed description of the HC SR501 can be found here: http://www.mpja.com/download/31227sc.pdf

5V: Pin 2
GND: Pin 6,9,14,20 or 25 (pick one)
GPIO7: Pin 26

For orientation on a Model B RPi, Pin 2 is located almost in the very corner of the RPi board. Pin 26 is at the opposite end of the same row.

You don't need heavy wire for this. The PIR sensor uses very little power, so 18-22ga stranded is fine.

Notes:
- Verify that the two pin jumper is positioned as shown in hc_sr501.jpg
- Set the Sensitivity Adjust to 50% of travel to start
- Set the Time Delay Adjust full counter-clockwise to start (minimum delay between triggers is roughly 10 seconds)


Power up and boot to the desktop

Open an LXDE terminal and run pir_test.py as root

sudo python pir_test.py

You'll see the following text appear:

PIR Module Test (CTRL+C to exit)
Ready


Let the PIR settle for ~10 seconds, then wave a hand in front of the sensor.
The terminal should immediately show:

Motion Detected!

The script will continue to respond to PIR interrupts until you CTRL+C out.

If you do not get the PIR to respond, shut down and verify your wiring, then verify the above steps.

You can play around with the Sensitivity Adjust potentiometer until you're happy with the response, and you'll likely want to tune it when you have the RPi and sensor in their final locations. The Time Delay Adjust can be left at minimum - the sensor will retrigger after the delay and keep the display "alive" while you're moving around in front of your dispensing system.


Set up Autostart for the PIR runtime script

Add an entry to LXDE startup to autostart the PIR run time script. In an LXDE terminal:

sudo nano /etc/xdg/lxsession/LXDE/autostart

Add this line at the bottom:

sudo python pir_run.py

Write out the file (^o) and exit (^x)


Restart the RPi and boot to the desktop

Allow xscreensaver to kick in, then wake it up by waving at the PIR sensor.


That's all there is to it!

fwiw, both sensors I received worked perfectly (best as I can tell, anyway).

I haven't spent a lot of time playing with the Sensitivity adjustment. Set at 50% of travel the sensor picks me up when I come in my office door a good ten feet from the sensor, which isn't even pointed at the doorway. So it appears the sensor is certainly sensitive enough for this application :)

Cheers!

Hey day_tripper....I know this is a much older thread than the current one but I was wanting to implement the motion detector system on my Pints setup. With the use of flow meters and an Alamode board, does the pin selection for the PIR change? I'm assuming that I can use the VIN and ground pins on the Alamode instead of the GPIO pins.....what about the signal pin you used (I think it was pin 26 on the GPIO)? Thanks!
 
Hey day_tripper....I know this is a much older thread than the current one but I was wanting to implement the motion detector system on my Pints setup. With the use of flow meters and an Alamode board, does the pin selection for the PIR change? I'm assuming that I can use the VIN and ground pins on the Alamode instead of the GPIO pins.....what about the signal pin you used (I think it was pin 26 on the GPIO)? Thanks!

The pin selection does not change with the Alamode board. The Alamode board pulls up the GPIO pins directly from the Pi. You use 26 on the GPIO for the signal and then any 5v and GND pins that you want on the Alamode.
 
The pin selection does not change with the Alamode board. The Alamode board pulls up the GPIO pins directly from the Pi. You use 26 on the GPIO for the signal and then any 5v and GND pins that you want on the Alamode.

Totally correct, and thanks for helping out!
Been out on a BVI beach all day and need to catch up :d

Cheers!
 
Something minor that i can tweak if you guys weren't planning on it. But yes, when I tap a keg and add my beer to it that has already been created, it does not auto populate any of the data. The only data it pulls is the description (which is not an option to be filled in). I am required to add data into the blank cells, which then will overwrite what was supposed to be pulled.


Mine does the same thing . It fails to auto populate the beer parameters when I select the beer from the drop-down .
Ideas??
 
Auto-population failure is a result of using hard returns in the "Tasting Notes" field in a "My Beers" table entry.

Don't do that. Let the entry wrap on its own.
And don't use TAB characters or any other formatting character...

Cheers!

Ah yes, went back and looked. Turns out all it takes is one bad apple to spoil the whole database.

Thanks
 
Using NOOBS 1.9, im trying to install chromium using the sudo get-apt -y install chromium-browser command and it says the package is not available but may be part of another package. Is there another line of code that will work to install Chromium?
 
yes it was posted here too because it was over looked by everyone there . There was more activity here. Need help

The other reason for lack of response might very well be that this question has come up numerous times, and a search of the thread would have yielded an answer.

Chromium is no longer supported in the RPi Jessie distribution. Your alternatives are:
* install the (older) wheezy distribution
* use a different browser (as long as you don't have flow meters, it doesn't matter much which one)
* use my forked version of raspberry pints which supports updates w/o the hack of using xdotools (and the requirement of using chromium)
https://github.com/HentschelT/RaspberryPints/releases/tag/th-2.1.1

Cheers,
-Th
 
Aaaaand it just plain works!

To answer DanH: The HC SR501 PIR motion sensor is powered directly by the RPi, via the 5V rail. The sensor uses three connections to the RPi: 5V, GND, and GPIO7. The sensor has a local regulator that converts the 5V to 3.3V which runs the entire board, and making the output "RPi Safe" without dividers, etc.

Ok...So I haven't had to put an "instructable" together for a looong time, so bear with me. First person through let me know if there are any problems and I'll fix 'em up pronto. And I hope putting this here is ok with the 'Pints community!

Preview: You'll install xscreensaver and verify it works, stick the test and runtime scripts in the /home/pi folder, shut down and wire up the sensor, power up and test the sensor, then add an entry to the LXDE autostart file, and finally reboot to what should be a working feature.

Right then, we're off:

Unpack zip file:

I've put a zip file up on Google Drive with the two scripts, the instructions, and a couple of images to orient the user to the RPi GPIO header and the sensor. That file can be downloaded from here.

Unpack the file and place the two Python scripts (pir_test.py and pir_run.py) in the /home/pi folder. Have the other files handy as you put things together.


Install xscreensaver from an LXDE terminal:

apt-get install xscreensaver

After the installation completes, you can Add the ScreenSaver Preferences shortcut from the 'start' menu (look in folder "Other") to the desktop to make it handy while you're setting things up.

Most of the screensavers are not installed as part of the kit, but they are selected in the ScreenSaver Preferences - Display Modes sheet. You'll want to de-select the unavailable screensavers (stick your cursor on a title and if it doesn't show up in the preview pane it isn't installed), and probably quite a few of the installed ones as well. The Preferences gui is a total POS but it's free, so don't complain ;)

In any case, you'll want to verify the xscreensaver is actually working before proceeding. In ScreenSaver Preferences - Display Modes you can set the "Blank After" delay to something short so you're not twiddling your thumbs waiting for it to kick in.


Shut down, remove power and wire up the PIR sensor

Refer to hc_sr501.jpg and 2x13_header.jpg for connection locations (pictures are below).
A detailed description of the HC SR501 can be found here: http://www.mpja.com/download/31227sc.pdf

5V: Pin 2
GND: Pin 6,9,14,20 or 25 (pick one)
GPIO7: Pin 26

For orientation on a Model B RPi, Pin 2 is located almost in the very corner of the RPi board. Pin 26 is at the opposite end of the same row.

You don't need heavy wire for this. The PIR sensor uses very little power, so 18-22ga stranded is fine.

Notes:
- Verify that the two pin jumper is positioned as shown in hc_sr501.jpg
- Set the Sensitivity Adjust to 50% of travel to start
- Set the Time Delay Adjust full counter-clockwise to start (minimum delay between triggers is roughly 10 seconds)


Power up and boot to the desktop

Open an LXDE terminal and run pir_test.py as root

sudo python pir_test.py

You'll see the following text appear:

PIR Module Test (CTRL+C to exit)
Ready


Let the PIR settle for ~10 seconds, then wave a hand in front of the sensor.
The terminal should immediately show:

Motion Detected!

The script will continue to respond to PIR interrupts until you CTRL+C out.

If you do not get the PIR to respond, shut down and verify your wiring, then verify the above steps.

You can play around with the Sensitivity Adjust potentiometer until you're happy with the response, and you'll likely want to tune it when you have the RPi and sensor in their final locations. The Time Delay Adjust can be left at minimum - the sensor will retrigger after the delay and keep the display "alive" while you're moving around in front of your dispensing system.


Set up Autostart for the PIR runtime script

Add an entry to LXDE startup to autostart the PIR run time script. In an LXDE terminal:

sudo nano /etc/xdg/lxsession/LXDE/autostart

Add this line at the bottom:

sudo python pir_run.py

Write out the file (^o) and exit (^x)


Restart the RPi and boot to the desktop

Allow xscreensaver to kick in, then wake it up by waving at the PIR sensor.


That's all there is to it!

fwiw, both sensors I received worked perfectly (best as I can tell, anyway).

I haven't spent a lot of time playing with the Sensitivity adjustment. Set at 50% of travel the sensor picks me up when I come in my office door a good ten feet from the sensor, which isn't even pointed at the doorway. So it appears the sensor is certainly sensitive enough for this application :)

Cheers!


I can't get this to work. RuntimeWarning: this channel is already in use....
 
Back
Top