If I understand what you mean--is that to cool the wort, or to heat to strike temp? Anyway, I am pretty sure, yes, I have that included somewhere.... still laying out my inventory... thank you for replying!Wonder if there is a HERMS coil hiding out somewhere, considering can't direct fire that tun?
You are using an out of date browser. It may not display this or other websites correctly.
You should upgrade or use an alternative browser.
You should upgrade or use an alternative browser.
I'm so lost. HELLLP! Just upgraded from white buckets to 10+ gallon stainless system...
- Thread starter bmac8
- Start date

Help Support Homebrew Talk - Beer, Wine, Mead, & Cider Brewing Discussion Forum:
This site may earn a commission from merchant affiliate
links, including eBay, Amazon, and others.
Hope my questions help you too! Let's GOOOOOO!!!!Jump into the deep end from the wading pool.
A bit ironic though this came up. Just yesterday I bought a two burner Blichmann Top Tier stand and a single controller Tower of Power off FB marketplace, but not all the kettles and extra bling you got.
I've been doing 5g all grain with one kettle, a cooler mash tun, and lots of lifting so maybe not quite as steep learning curve but still some, no doubt.
Thank you so much for all of this amazing info. I'll get there... it may take a while... but I will! I'll keep the group informed!You have a very nice propane system.
Don't run a propane burner in that garage without adequate ventilation (I know you know, just making sure.)
The system you have makes use of an SSBrewtech Mash tun which can't be heated directly.
I would recommend reading the manual first:
https://www.blichmannengineering.com/pub/media/wysiwyg/UpdatedManuals/TOP_Owners_Manual-V5.pdf
The first step would be to hook up the controller, boil kettle, burner, mash tun and just be able to heat some water.
Practice makes perfect, so get to work and just start working with the equipment, even if you don't understand it. Tackling a problem head on makes fear disappear.
Take the boil kettle:
View attachment 834872
Place it on the burner (hidden behind the fermenter in this picture, couldn't find a clear picture of it):
View attachment 834873
Connect the output of the mash tun (bottom valve) to the input of the pump (bottom valve) (using a silicone hose and quick connects)
Connect the input of the mash tun (top valve) to the output of the pump (top valve)
Connect the output inside of the mash tun to the wort disperal ring and set that ring on top of your grain bed.
View attachment 834874View attachment 834875View attachment 834876
View attachment 834877View attachment 834878
Connect the sensor on the burner to the input on the tower of power:
View attachment 834879View attachment 834880
Fill your mash tun half full with water
Plug in the tower of power.
Turn on the pump, water should flow from the pump and back to the mash tun (recirculating)
Light the burner and turn on the mash controller.
Set mash controller to your desired temperature (This will heat the water in your boil kettle)
The mash controller is a PID, it will display the current temperature of the water (wort) and the desired temperature. The controller will fire the burner trying to match the desired temperature.
Once the basic mash tun recirculation is working and you can heat water in your boil kettle, you can then pump (or drain) the hot water from your boil kettle into your mash tun and start recirculating.
AND YES re propane and the ventilation--I appreciate your reminder--never hurts to put safety first!
It will make 10-gallon batches. I bought the grain at the local home brew supply and I put it through the crusher there. The guy was not helpful to me otherwise... but I didn't want to leave empty handed. It seems I am headed toward a pale ale of sorts, but Smash sounds cool... um, what is a Smash?Having a sac of grain means you have a mill. I suggest that for the first couple of brews (if recirculating) set the gap at .035-.040 to prevent stuck mash. Use 65% efficiency for the first one and then you can figure out with an OG measurement.
Make sure when using the pumps that the inlet is wide open and you control the flow rate with the pump outlet valve to prevent cavitation.
I think a SMASH with pale malt and cascade will make an awesome beer,just ordered a pound of cascade.
Are those 10 gal vessels or can you make 10 gal batches?
Single Malt And Single Hop (i.e. one variety of each), often used to try out different hops and base malts for comparison.
Thank you for the thoughtful reply. I gotta give this thing a shot! But it is nice to know an experienced brewer like you can also do your thing with a do-over setup that works best for you. ...I'm giving this all-grain system my best shot. What's the worst that can happen? Thank you again. Glad you came back to brewing too. I'm sure you are a master!bmac - I can't speak for others but I was responding to your saying this would be not only your first time with your system, but your first all-grain brew. Hence my suggestions. It's a totally different world in so many ways. Mashing, most obviously. So diving into that while diving into an advanced brewing system will be really difficult. You're overwhelmed and frustrated already, and I believe this will only multiply going forward without some basic experience on all-grain.
I am an experienced brewer, though I've had periods when I've been away for years. My last system was a 3-vessel 20 gallon Spike system I built myself, learning welding along the way. I had substantial investment in time and money not only in brewing equipment, but lab and yeast propagation equipment, 3-roller mill (with substantial after-market investment to make it a motorized bench mill), complete cask ale setup, dedicated 1/2 bbl fermenter with 4" tri-clover, complete counterfill bottling and kegging equipment, not to mention a ton of hop, yeast and malt inventory, and a ton of books.
I sold everything down to the last worm clamp. I am literally starting over. I have a 7 gallon stock pot left over from my chef-owner days. No spigot or wp tubes, ports, etc. That will be my brew kettle. My sparge vessels will actually be a few 2-3 gallon stockpots, also on the stove indoors. The LHBS where I work has water cooler mash tuns for rent, and I can use one for free. That will be my mash tun. I'll be using a plastic bucket for a fermenter and will bottle condition naturally. Roughly 30 bucks to get back in.
You can do the same and I think you'd be wise to do it.
To be honest, I don't think having a friend along for your first several brews is also not a bad suggestion. To some extent, everything new we learn in life tends to come on the shoulders of someone who came before us....tips, practical experience and theoretical knowledge, wealth of answers to questions that can only come up through brewing itself and not reading books, etc.
Oh, thank you bmac, but I am about as far from a master as it comes, though I've been plinking for a long time now. The people on here, in particular the Brits like @Northern_Brewer and @cire and all the people who have really worked to make good ale in this line (but there are so, so many more here, too numerous to mention, who do such a boundless variety of excellent beers!), are where I learned. I just know my intent and do my best. And it's taken a long time for me to simply relax and quit chasing some kind of impossible ideal. Age will tend to take the wind out of that sail, I suppose.Thank you for the thoughtful reply. I gotta give this thing a shot! But it is nice to know an experienced brewer like you can also do your thing with a do-over setup that works best for you. ...I'm giving this all-grain system my best shot. What's the worst that can happen? Thank you again. Glad you came back to brewing too. I'm sure you are a master!

Good luck and happy brewing to you! Looking forward to seeing how things come along for you.
The issue is that you bought a rather advanced system from someone that kind of pieced it together to suit their own progression in the hobby. If I were you, I'd sell it immediately and grab a Brewzilla Gen 4 or Anvil Foundry. I can't emphasize enough how much easier it is to brew on systems like that, especially given the stage of brewing you're at right now.
Brushwood Brewing
Cast your bread upon the waters
- Joined
- May 5, 2022
- Messages
- 194
- Reaction score
- 309
Keep it simple: Remember that the only difference with all-grain brewing (compared to the extract brewing you were doing) is that you soak the grains first, for roughly 60min around 150F. Otherwise everything is the same.
You've received some very helpful responses which should help you piece it together, and I definitely agree with the advice to do a test run with water first. Try a few batches on this system, but if it's not for you, don't give up the hobby. You have a very advanced system, and it may not fit your brewing style. Like @Bobby_M said, you could switch over to an electric all-in-one system and do brew-in-a-bag (BIAB), with something like an Anvil Foundry. There are much simpler ways to make beer that's just as good.
Most of all: keep it fun. Keep trying. That's fantastic that you were enjoying the extract beers you started with, so don't lose that joy!
As a homebrew store owner, I kind of understand how you feel like you couldn't get the kind of help you needed. Did the guy have the benefit seeing all the pictures of what you had or were you just trying to describe them not knowing what they were yourself? Maybe he hadn't seen some of that gear and was unfamiliar. Not every shop owner has operated a Blichmann Tower of Power. I certainly haven't as automated gas valve systems where on their way out over 10 years ago. This is kind of like buying a car that needs a new clutch and you tow it to the shop, you tell the guy you want a racing clutch even though you've never driven a manual transmission car before.
Join a local homebrewing club. And search YouTube.
Last edited:
Sweet system you got there. I used to live in Salem and learned to brew there. I used to go to a small homebrew supply store where the owner guided me through my brewing issues and mistakes. I am now in Florida and belong to a very active homebrew club. Do you have a local homebrew club where you could seek out a brew buddy?
Really cool set up. Looks like you will have a very capable brewery once you get your process figured out. I would reach out through your LBS to identify someone in your local home brew community or HB Club to come by and help you out. Perhaps even walk you through a couple brews. Most folks I know around me would welcome an opportunity to help out and play on someone's new gear. Good luck and have funI appreciate the reply. I am a decent 5-gallon brewer. This is totally different. I like your suggestion to find a local friend with more experience, but, respectfully, that's kinda why I am posting here...
Also, just venting my frustrations.
Thank you for trying to help me...I'll grt there somehow.
I'm still looking for a group like that! But there has to be. I appreciate my new friends here. I'm getting closer to knowing what I am doing.Sweet system you got there. I used to live in Salem and learned to brew there. I used to go to a small homebrew supply store where the owner guided me through my brewing issues and mistakes. I am now in Florida and belong to a very active homebrew club. Do you have a local homebrew club where you could seek out a brew buddy?
You are not incorrect about this. He kind of sold me on the idea that I was getting a turn-key "nano brewery, ready to go. I can't give up yet! And I can't afford the systems you mention, but if this goes south, I am sure I can get my money back selling each of my components separately. I am trying to make this work. I've received a lot of good help here. Thanks!The issue is that you bought a rather advanced system from someone that kind of pieced it together to suit their own progression in the hobby. If I were you, I'd sell it immediately and grab a Brewzilla Gen 4 or Anvil Foundry. I can't emphasize enough how much easier it is to brew on systems like that, especially given the stage of brewing you're at right now.
Here's some additional baby step info.
This is your mash tun (SS Brewtech Infussion):
View attachment 834859
This is where you're gonna put your crushed grain into warm water and let it sit for like 60 minutes to extract the sugars.
This is your RIMS heater:
View attachment 834860
It will have an electric heating element in it that you'll control with one of those two Blichmann Tower of Power controllers. It will use a temperature probe to measure the wort as it recirculates through the RIMS. You'll pick a mash temperature (148F - 156F), and then use your pump to pull wort out of your Mash Tun, send it through the RIMS, and then based on the temperature reading, the controller will either turn on or off if it's below or above the temperature you set on the controller.
When the wort you're recirculating during the mash comes back into the top fitting of your mash tun, you connect it to this Recirc Manifold:
View attachment 834861
It lets the wort come in in a nice pattern so you're not drilling a hole in your grain bed with a firehose gusher stream of wort.
Since your pictures show 2 kettles (one SS Brewtech, the other Blichmann), you have what's referred to as a 2-Vessel (2V) setup. So after you mash for an hour, you pull the sugary wort liquid out of your mash tun using the same pump that has been recirculating, and direct it into the other kettle, which will be called a Boil Kettle (BK).
View attachment 834862
This point forward in your process is exactly like how you made your beer when using extract. The mash tun portion is creating your extract from soaking crushed grain. Now the BK is going to need some further pictures/investigation from you to see what is the planned heat source. Is there an electric heating element inside? If so, you would probably hook it up to the other Tower of Power controller. If not, maybe you'll be using your propane burner, or however you did your extract batches.
The Stout is your fermentor:
View attachment 834863
It's basically just your new plastic bucket. Treat it the same way. Sanitize it before putting your cooled wort into it. Monitor the temperature and put your yeast in at the right time. Have a blow-off or airlock to allow the CO2 created during fermentation to escape, etc.
The controllers for use during your mash and/or your boil are pretty simple. If you flip the toggle switch up to "Auto", it's going to turn the power on & off based on the temperature you've set with the little digital readout on the left, while comparing to the temperature it's measuring from your temperature probe. The middle position "Reset" is like off. And when the toggle switch is down to the "On" position, the controller will just be sending continuous power, not monitoring the temperature. When in that mode, the black control screen to the left lets you set the % power output, so you can dial down your boil intensity once your BK starts to boil.
View attachment 834864
Now on your control stand, you have two controllers:
View attachment 834865
There are little labels on there for "Mash", which would control your RIMS. And "HLT" which stands for Hot Liquor Tank, which is just a dumb name for hot water pot. If your Boil Kettle is electric, you could use this controller to control its heating element (even though someone put a sticker on there saying HLT). If your BK is not electric, then this HLT would be for a 3rd kettle that you use to heat water for sparging (since your RIMS can heat your water for mash-in). As a beginning journey, you can probably just skip the sparge step, and a do a "full volume mash" / "no sparge". If you so desire later, and want to do a 3rd vessel to heat sparge water, it makes your process a bit more complicated, but gets you better mash efficiency out of your grain. But that sparge process in itself is the topic for a whole other debate.
The seller--the poor guy is in the hospital. Something serious, I believe, so I don't want to bother him until he is well again. He did offer to guide me later. Thank you for replying.Any chance the seller would help you out with your first brew?
Just an update: getting closer to brew day! Of all the great replies in this forum, yours probably helped me most. Cleaning garage, getting set. Thank you for encouraging me with the equipment IDs and kind words. The baby steps were missing... I am at least crawling and cruising now...Odds were against me, but improving now...having fun thinking of names already:Here's some additional baby step info.
This is your mash tun (SS Brewtech Infussion):
View attachment 834859
This is where you're gonna put your crushed grain into warm water and let it sit for like 60 minutes to extract the sugars.
This is your RIMS heater:
View attachment 834860
It will have an electric heating element in it that you'll control with one of those two Blichmann Tower of Power controllers. It will use a temperature probe to measure the wort as it recirculates through the RIMS. You'll pick a mash temperature (148F - 156F), and then use your pump to pull wort out of your Mash Tun, send it through the RIMS, and then based on the temperature reading, the controller will either turn on or off if it's below or above the temperature you set on the controller.
When the wort you're recirculating during the mash comes back into the top fitting of your mash tun, you connect it to this Recirc Manifold:
View attachment 834861
It lets the wort come in in a nice pattern so you're not drilling a hole in your grain bed with a firehose gusher stream of wort.
Since your pictures show 2 kettles (one SS Brewtech, the other Blichmann), you have what's referred to as a 2-Vessel (2V) setup. So after you mash for an hour, you pull the sugary wort liquid out of your mash tun using the same pump that has been recirculating, and direct it into the other kettle, which will be called a Boil Kettle (BK).
View attachment 834862
This point forward in your process is exactly like how you made your beer when using extract. The mash tun portion is creating your extract from soaking crushed grain. Now the BK is going to need some further pictures/investigation from you to see what is the planned heat source. Is there an electric heating element inside? If so, you would probably hook it up to the other Tower of Power controller. If not, maybe you'll be using your propane burner, or however you did your extract batches.
The Stout is your fermentor:
View attachment 834863
It's basically just your new plastic bucket. Treat it the same way. Sanitize it before putting your cooled wort into it. Monitor the temperature and put your yeast in at the right time. Have a blow-off or airlock to allow the CO2 created during fermentation to escape, etc.
The controllers for use during your mash and/or your boil are pretty simple. If you flip the toggle switch up to "Auto", it's going to turn the power on & off based on the temperature you've set with the little digital readout on the left, while comparing to the temperature it's measuring from your temperature probe. The middle position "Reset" is like off. And when the toggle switch is down to the "On" position, the controller will just be sending continuous power, not monitoring the temperature. When in that mode, the black control screen to the left lets you set the % power output, so you can dial down your boil intensity once your BK starts to boil.
View attachment 834864
Now on your control stand, you have two controllers:
View attachment 834865
There are little labels on there for "Mash", which would control your RIMS. And "HLT" which stands for Hot Liquor Tank, which is just a dumb name for hot water pot. If your Boil Kettle is electric, you could use this controller to control its heating element (even though someone put a sticker on there saying HLT). If your BK is not electric, then this HLT would be for a 3rd kettle that you use to heat water for sparging (since your RIMS can heat your water for mash-in). As a beginning journey, you can probably just skip the sparge step, and a do a "full volume mash" / "no sparge". If you so desire later, and want to do a 3rd vessel to heat sparge water, it makes your process a bit more complicated, but gets you better mash efficiency out of your grain. But that sparge process in itself is the topic for a whole other debate.
"UNLIKELY PALE ALE"
"IMPOSSIBLE JOURNEY ALE"
"SMASH & LIKE"
"HULK SMASH" (maybe add some drops of green? Ha! For St. Pat's?
"ALL-GRAINER NO-BRAINER"
Today I am tackling temp control for the fermenter. Oregon winter temps and my garage range mostly in high 40s, low 50s. I'm checking out heating ideas and working on insulation jacket (using furniture pads.) I think I could get away with a long heat wrap designed for outdoor plumbing freeze-protect... wrapped multiple loops around just above the cone. The other way to go is to build a little wooden box around the fermenter and keep a small space heater in that box. I will decide today. Pics to follow...
Getting there. having fun.
Micraftbeer, I am replying to your post, but I mean to thank the whole thread. Still getting used to this site. Everyone has been helpful. I will keep everyone posted!
Could also brew on your new system but ferment in your old buckets until the weather is more favorable, that would remove a project that is keeping you from brewing.
Putting something flammable against the heat wrap does not seem like a good idea. I am sure the heat density of the wrap is low but they meant to be used in free air.
Putting something flammable against the heat wrap does not seem like a good idea. I am sure the heat density of the wrap is low but they meant to be used in free air.
beren
Well-Known Member
Great that you are getting there! One thing did stick out which says a lot more than it seems: 'a turn-key "nano brewery, ready to go.' You bought a borderline semi-pro brewery, not simple homebrew, gear before fully learning how to brew. Not the end of the world but makes things a lot more complex. Also, 10gal batches are a lot unless you give a lot away or like drinking the same thing all the time, that's 5 cases of beer. I do 5-6 gal batches on the stove with a heatstick and a cooler mash tun. Some batches I wish I had more of, but some are kinda 'meh'. Not bad enough to dump but takes forever to finish the keg. Just some personal thoughts as every so often I'm tempted to get a bigger setup.
beren
Well-Known Member
Simple solutions are an old freezer or fridge. if you only ever need heat, they don't even need to runToday I am tackling temp control for the fermenter. Oregon winter temps and my garage range mostly in high 40s, low 50s. I'm checking out heating ideas and working on insulation jacket (using furniture pads.) I think I could get away with a long heat wrap designed for outdoor plumbing freeze-protect... wrapped multiple loops around just above the cone. The other way to go is to build a little wooden box around the fermenter and keep a small space heater in that box. I will decide today. Pics to follow...
All you need for heat is something like a brewbelt or waterproof seed heater and an inkbird temp controller. Or a thin plywood box with 2" of foam panels if you want a more custom diy route.Pick 1 and substitute a lager yeast suitable for the lower temperatures and see what happens. I am just about sure the result will enjoyable. Here is the heat wrap I use when my temps get too cold. Seemed to work well w/out further insulation keeping my beer @ ~68 while ambient temps were in low 50's a couple years back. My basement stays warmer now that it is occupied by my F-in law so cool is less of a problem.
https://www.northernbrewer.com/products/fermotemp-electric-fermentation-heater
https://www.northernbrewer.com/products/northern-brewer-dual-stage-temp-controller
https://www.northernbrewer.com/products/fermotemp-electric-fermentation-heater
https://www.northernbrewer.com/products/northern-brewer-dual-stage-temp-controller
If you can get one of the burner running, the 15gal kettle and one of these,
BIAB Mesh Grain Bag 27.5 x 32.5 in. – F.H. Steinbart Company, would work well for making 5gal batches.
Don't have to deal with the pump and the all of the fancy stuff, just heat to 150s and dunk your grain for a while.
BIAB Mesh Grain Bag 27.5 x 32.5 in. – F.H. Steinbart Company, would work well for making 5gal batches.
Don't have to deal with the pump and the all of the fancy stuff, just heat to 150s and dunk your grain for a while.
You've got an amazing stack of new gear. You might consider learning it one stage at a time. For example, make wort as before and learn about the fermenter. Or, learn to use your new mashtun but boil with your old kettle.
All that said, you might consider the wisdom according to @Bobby_M, skip the mashtun and HLT altogether and go with BIAB as others have suggested.
Enjoy learning your new brewery, @bmac8 !
All that said, you might consider the wisdom according to @Bobby_M, skip the mashtun and HLT altogether and go with BIAB as others have suggested.
Enjoy learning your new brewery, @bmac8 !
Brewer Mike
Well-Known Member
- Joined
- Sep 27, 2021
- Messages
- 101
- Reaction score
- 70
I don't think it would work for your fermenter, but as a tip for others...Today I am tackling temp control for the fermenter. Oregon winter temps and my garage range mostly in high 40s, low 50s. I'm checking out heating ideas and working on insulation jacket (using furniture pads.) I think I could get away with a long heat wrap designed for outdoor plumbing freeze-protect... wrapped multiple loops around just above the cone. The other way to go is to build a little wooden box around the fermenter and keep a small space heater in that box. I will decide today. Pics to follow...
I have a big 120 qt (I think) cooler. I set it on it's end, and it'll fit my Fermonster, or a bucket, carboy, etc. I use one of those seed starter type heating mats with an Inkbird temp controller. I can pull the drain plug out and run a blow-off tube in when necessary.
Thank you. Yeah. Turn-key nano brewery is a lot to understand...but also going to enjoy the journey. I am really enjoying the discussion here and learning.Great that you are getting there! One thing did stick out which says a lot more than it seems: 'a turn-key "nano brewery, ready to go.' You bought a borderline semi-pro brewery, not simple homebrew, gear before fully learning how to brew. Not the end of the world but makes things a lot more complex. Also, 10gal batches are a lot unless you give a lot away or like drinking the same thing all the time, that's 5 cases of beer. I do 5-6 gal batches on the stove with a heatstick and a cooler mash tun. Some batches I wish I had more of, but some are kinda 'meh'. Not bad enough to dump but takes forever to finish the keg. Just some personal thoughts as every so often I'm tempted to get a bigger setup.
In the past, brewing 5 gallons seemed to work out to about 50 12-oz bottles of beer or two cases (call it 48 beers after -2 breakage/sample.) So if I make....14 gallons (it's a 14.5 gallon fermenter,) then that should be something between 5-6 cases of bottles. I could say about 22-23 six packs which will be fun to give away.
I really do like to give most of the beer away. I enjoy naming the brew and getting creative with funny labels.
Could also brew on your new system but ferment in your old buckets until the weather is more favorable, that would remove a project that is keeping you from brewing.
Putting something flammable against the heat wrap does not seem like a good idea. I am sure the heat density of the wrap is low but they meant to be used in free air.
Thank you and I understand your concern about heat wrap under insulation or blankets. I will be very careful. Taking my time to design the best option. Leaning toward plywood box-in with insulation. I have a small space heater with temp setting that would keep the box nice and warm, and it has safeties built in. I think building out that square box will also give me someplace to stack bottles and materials on top. Measuring... stay tuned!Thank you. Yeah. Turn-key nano brewery is a lot to understand...but also going to enjoy the journey. I am really enjoying the discussion here and learning.
In the past, brewing 5 gallons seemed to work out to about 50 12-oz bottles of beer or two cases (call it 48 beers after -2 breakage/sample.) So if I make....14 gallons (it's a 14.5 gallon fermenter,) then that should be something between 5-6 cases of bottles. I could say about 22-23 six packs which will be fun to give away.
I really do like to give most of the beer away. I enjoy naming the brew and getting creative with funny labels.
Well, I hate to post this, but FH Steinbart has a store here in Portland, and I was disrespected there. I will not give another penny to FHB unless I could be convinced there was just one bad apple behind the counter that day. But I have been reading reviews, and I do see similar experiences to my own. My original "HELLLLLLP" post followed that visit the same evening and it left me discouraged. Pretty rude place.If you can get one of the burner running, the 15gal kettle and one of these,
BIAB Mesh Grain Bag 27.5 x 32.5 in. – F.H. Steinbart Company, would work well for making 5gal batches.
Don't have to deal with the pump and the all of the fancy stuff, just heat to 150s and dunk your grain for a while.
Great suggestions. Thank you.Pick 1 and substitute a lager yeast suitable for the lower temperatures and see what happens. I am just about sure the result will enjoyable. Here is the heat wrap I use when my temps get too cold. Seemed to work well w/out further insulation keeping my beer @ ~68 while ambient temps were in low 50's a couple years back. My basement stays warmer now that it is occupied by my F-in law so cool is less of a problem.
https://www.northernbrewer.com/products/fermotemp-electric-fermentation-heater
https://www.northernbrewer.com/products/northern-brewer-dual-stage-temp-controller
Sorry to hear that about the place, I picked that place as I knew it would be local to you. Maybe things have changed since the last owner passed away. There is an earlier post by @doug293cz for bags made by a fellow HBT incase you want to give BIAB a shot.Well, I hate to post this, but FH Steinbart has a store here in Portland, and I was disrespected there. I will not give another penny to FHB unless I could be convinced there was just one bad apple behind the counter that day. But I have been reading reviews, and I do see similar experiences to my own. My original "HELLLLLLP" post followed that visit the same evening and it left me discouraged. Pretty rude place.
Sorry to hear that. Steinbart has been my main LHBS for over 30 years, and I've never been treated poorly there. I've often observed staff patiently advising customers at all levels of expertise.FH Steinbart has a store here in Portland, and I was disrespected there.
There are others not too far from there - a small shop called The Homebrew Exchange on NE Interstate, and a big one in Hillsboro called MainBrew. We're fortunate here in the Portland metro area.
Since posting this, I have learned that I have a 14.5-gallon fermenter, so I am trying to make 14 gallons. That should amount to something like 22 or 23 six-packs to give away... or about 135 bottles of beer. Need to have at least "100 bottles-of-beer-on-the-wall" so we can sing the song!It will make 10-gallon batches. I bought the grain at the local home brew supply and I put it through the crusher there. The guy was not helpful to me otherwise... but I didn't want to leave empty handed. It seems I am headed toward a pale ale of sorts, but Smash sounds cool... um, what is a Smash?
It looks like you have a 15gal brew kettle which can brew a 10gal batch including the trub/break but needs to be watched.
Your fermentor needs some head room if you put 14gals in there you are going to lose some beer to blow-off. You will also have more sediment/trub with a all grain brew vs an extract brew.
Your fermentor needs some head room if you put 14gals in there you are going to lose some beer to blow-off. You will also have more sediment/trub with a all grain brew vs an extract brew.
Thank you again. I want to avoid changing the methods--I need to learn how to operate the system I bought. I've learned a lot and I am enjoying the challenge. I found a very good resource less than a mile away--Bridgeview Brew Supply in Oregon City. That place and the owner have been very helpful and they are right around the corner.
Oh. How much head room do you think I need to leave? Should I go 13 gallons?It looks like you have a 15gal brew kettle which can brew a 10gal batch including the trub/break but needs to be watched.
Your fermentor needs some head room if you put 14gals in there you are going to lose some beer to blow-off. You will also have more sediment/trub with a all grain brew vs an extract brew.
The mash is 20 gallons.Oh. How much head room do you think I need to leave? Should I go 13 gallons?
Whisky River
Well-Known Member
Glad to see you’re rising to the challenge ahead of you. I don’t recall which fermenter you have but usually when a fermenter lists it’s capacity as 14.5 gallons that is taking into account the extra room or headspace that is needed for fermentation so that would probably indicate a maximum batch size of 10 or maybe 12 gallons. Just something to keep in mind as you start figuring out your batch size.In the past, brewing 5 gallons seemed to work out to about 50 12-oz bottles of beer or two cases (call it 48 beers after -2 breakage/sample.) So if I make....14 gallons (it's a 14.5 gallon fermenter,) then that should be something between 5-6 cases of bottles. I could say about 22-23 six packs which will be fun to give away.
If you want to do a full volume boil the brew kettle is your determining factor for midrange beers. The 20gal mash tun would allow for a larger volume if you want to top off the wort after the boil. You need a couple gallons of head space in your brew kettle to keep from boiling over. I can do a 10gal batch in my 15gal kettle. I start with about 13gal of wort and end with about 11gals after it cools. I watch the pot for boil start or I have a mess.
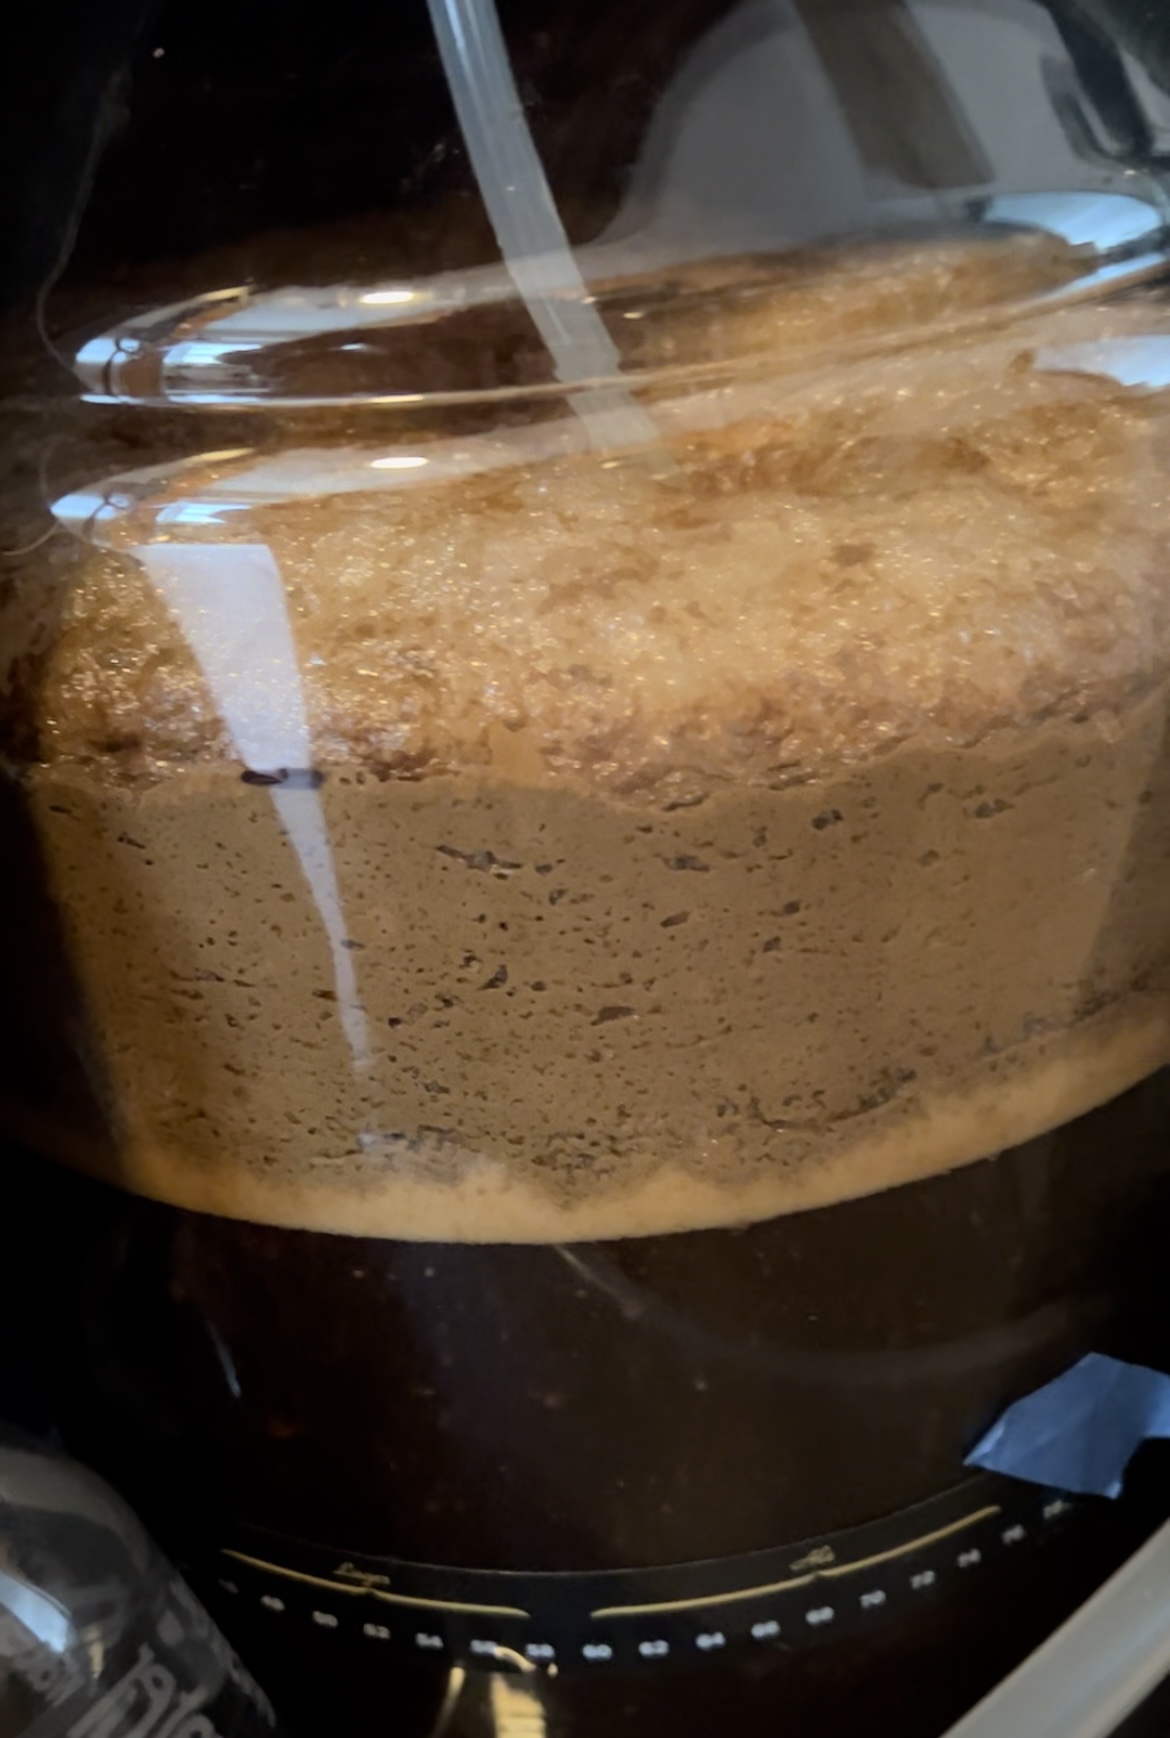
I would say 12 to 12.5 would be safe but the head space is somewhat dependent on the yeast. I brew 5gals batches in a 7gal fermentor and most of the time dont have a mess but some ale yeasts still require a blow off tube.
I would say 12 to 12.5 would be safe but the head space is somewhat dependent on the yeast. I brew 5gals batches in a 7gal fermentor and most of the time dont have a mess but some ale yeasts still require a blow off tube.
I have poured 13 gallons of water into the fermenter and there is still about 4 inches of room at the top of the vessel. It's a Stout fermenter.Glad to see you’re rising to the challenge ahead of you. I don’t recall which fermenter you have but usually when a fermenter lists it’s capacity as 14.5 gallons that is taking into account the extra room or headspace that is needed for fermentation so that would probably indicate a maximum batch size of 10 or maybe 12 gallons. Just something to keep in mind as you start figuring out your batch size.
Whisky River
Well-Known Member
I just posted these recently in another thread but these are from a 5 gallon batch.I have poured 13 gallons of water into the fermenter and there is still about 4 inches of room at the top of the vessel. It's a Stout fermenter.
Attachments

Similar threads
- Replies
- 0
- Views
- 238
- Replies
- 7
- Views
- 676
- Replies
- 4
- Views
- 771
- Replies
- 13
- Views
- 1K
- Replies
- 11
- Views
- 1K
