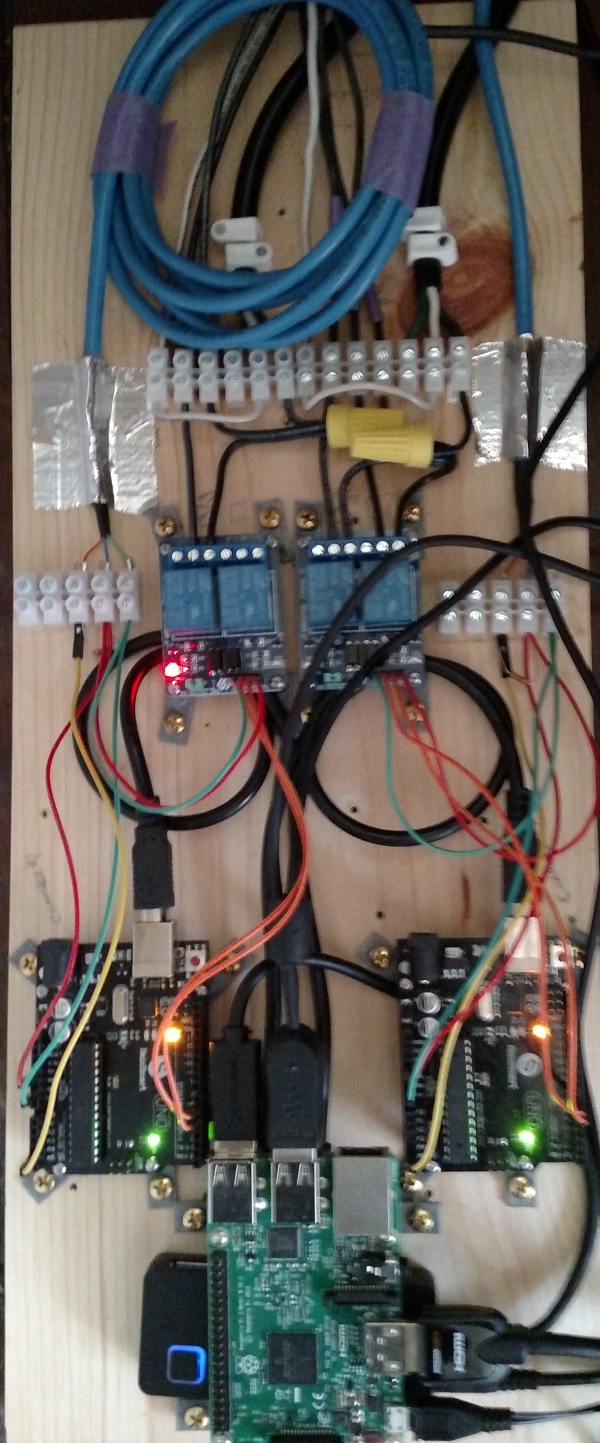
HOWTO - Make a BrewPi Fermentation Controller For Cheap

Homebrew Talk - Beer, Wine, Mead, & Cider Brewing Discussion Forum

Help Support Homebrew Talk - Beer, Wine, Mead, & Cider Brewing Discussion Forum:

This site may earn a commission from merchant affiliate links, including eBay, Amazon, and others.
Status
Not open for further replies.
That is really odd.

I've tried a few different wiring combinations to see if I can come up with one that gives your results, but I can't find one.

Maybe try one sensor at a time? If one is operating in parasitic mode, it will affect all of them.

I tried that as well, and same results.. Im starting to wonder if the 5v / signal lines were swapped? not sure.
 
Where did you purchases your probes from? Can you install one of the old probes that didnt work on the new Uno and see if it works?

Amazon...I like Amazon because I'm a Prime member and I can return defective items...no charge in shipping.

1st Set of Probes: http://www.amazon.com/dp/B01AJA6E6Y/?tag=skimlinks_replacement-20

2nd Set of Probes (worked with new board...already returned the other ones): http://www.amazon.com/dp/B00EU70ZL8/?tag=skimlinks_replacement-20

1st and 2nd Arduino: http://www.amazon.com/dp/B00E5WJSHK/?tag=skimlinks_replacement-20

I hope something in this works for everyone.
 
Last edited by a moderator:
Amazon...I like Amazon because I'm a Prime member and I can return defective items...no charge in shipping.

1st Set of Probes: http://www.amazon.com/dp/B01AJA6E6Y/?tag=skimlinks_replacement-20

2nd Set of Probes (worked with new board...already returned the other ones): http://www.amazon.com/dp/B00EU70ZL8/?tag=skimlinks_replacement-20

1st and 2nd Arduino: http://www.amazon.com/dp/B00E5WJSHK/?tag=skimlinks_replacement-20

I hope something in this works for everyone.

I bought the same exact Arduino boards and sensor brand (+1 for Amazon Prime). I mistakenly bought the 100cm length sensors and ended up extending them with Cat6 cable. Everything has been cruising right along since ripping out the STC's wiring and replacing it with the BrewPi last Saturday.

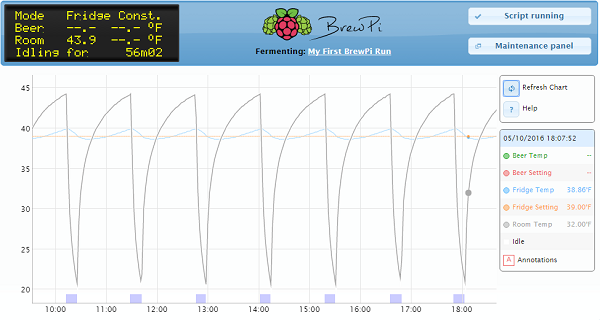
I am running the refrigerated part of my cabinet in fridge mode with the temp probe in a bottle of water. The other probe is hanging in the air and I have it set to the room temp option. The fridge temp is set at 39F with a 0.9F limit. My water temp ranges from 38.6 to 40F. I tested out the fermentation chamber last night and it ran as expected also.

BrewPi2.jpg


BrewPi2.png


Untitled.png
 
Last edited by a moderator:
Amazon...I like Amazon because I'm a Prime member and I can return defective items...no charge in shipping.

1st Set of Probes: http://www.amazon.com/dp/B01AJA6E6Y/?tag=skimlinks_replacement-20

2nd Set of Probes (worked with new board...already returned the other ones): http://www.amazon.com/dp/B00EU70ZL8/?tag=skimlinks_replacement-20

1st and 2nd Arduino: http://www.amazon.com/dp/B00E5WJSHK/?tag=skimlinks_replacement-20

I hope something in this works for everyone.
So your set up that works is #2 board and #2 probes?Have you tried to run #2 probes on #1 board and #1 probes on #2 board just to isolate between bad probes or a bad board.That leads me to another question. How can you clone BrewPi on different sd cards? Edit: I see that you returned the #1 set of probes
 
Last edited by a moderator:
So your set up that works is #2 board and #2 probes?Have you tried to run #2 probes on #1 board and #1 probes on #2 board just to isolate between bad probes or a bad board.That leads me to another question. How can you clone BrewPi on different sd cards? Edit: I see that you returned the #1 set of probes


Run windiskimager one the functional sd card and hit read and select a location to burn the image to. then flash that image onto the new sd card
 
Ok- I can definitely confirm I received a bad batch of probes.I found a old -2 years ago probe that I bought for another project but didn't use and got it to work. Ran the sketch program posted earlier and it confirmed parasite power is off.
this is what the only identification on the 2 yro probe
60893 (C89D05) DS18b 2014-5-12
 
I'm not sure how to set up things in the maintenance panel yet but this is farther along than I was before.
Device 0
Device slot
Assigned toAssigned to
Hardware typeTemp Sensor
Device typeNone
OneWire Address28D06950050000D5
Controller PinA4(OneWire)
Function
Value75.424
 
Amazon...I like Amazon because I'm a Prime member and I can return defective items...no charge in shipping.

1st Set of Probes: http://www.amazon.com/dp/B01AJA6E6Y/?tag=skimlinks_replacement-20

2nd Set of Probes (worked with new board...already returned the other ones): http://www.amazon.com/dp/B00EU70ZL8/?tag=skimlinks_replacement-20

1st and 2nd Arduino: http://www.amazon.com/dp/B00E5WJSHK/?tag=skimlinks_replacement-20

I hope something in this works for everyone.

Interesting... I notice that your first probes and board were the exact same setup as mine. I have replaced the board with one I found at the Microcenter (Inland brand) and I have ordered new sensors since the new board still did not find the current sensors. The new sensors I will wire and waterproof my self. Makes me wonder if your issue was with the sensors as well? Running the parasite check sketch with the sensor I tore apart returned results it was running in parasite mode. I will test the new sensors with both boards to confirm the problem was with the sensors like I am assuming.
 
Last edited by a moderator:
Can you read the markings from the suspicious sensors? They are very hard to read as they have poor contrast and are very small.
 
Ok- I can definitely confirm I received a bad batch of probes.I found a old -2 years ago probe that I bought for another project but didn't use and got it to work. Ran the sketch program posted earlier and it confirmed parasite power is off.
this is what the only identification on the 2 yro probe
60893 (C89D05) DS18b 2014-5-12

This gives me great hope that soon my issue will be solved as well. It seems quite odd that all of the sudden there are these parasitic probes out there not labeled correct. I am Glad you got the problem worked out! Now to find another sensor and you are all set.
 
Can you read the markings from the suspicious sensors? They are very hard to read as they have poor contrast and are very small.

In my case I can not... I ripped a pre-assembled probe apart and was just barely able to get to the bare terminals and hook up to run the test sketch. The sensor was sealed in the stainless tube with some sort of epoxy.
 
In my case I can not... I ripped a pre-assembled probe apart and was just barely able to get to the bare terminals and hook up to run the test sketch. The sensor was sealed in the stainless tube with some sort of epoxy.
Ok, well, if the three leads were separate but the device comes up as parasite-powered then it's probably a -PAR part. In the -PAR part the 5V and GND are shorted together inside the chip, and the 5V lead is not connected. For a regular part you must short the 5V lead to GND to make it operate as a parasitically powered part.

I don't know if the packages are marked differently. I suppose I could take a look at the data sheet...
 
Hmm. They may be marked DS18B20P, with the P indicating parasitic power.
 
Hmm. They may be marked DS18B20P, with the P indicating parasitic power.

That is what I believe as well. I just was unable to read the markings on the part due to it being encased in the epoxy. It has to be the "p" part. The people who manufactured the probes must have got their hands on some cheap sensors and just placed them in like they were the regular sensor.
 
This is a beer profile question...maybe off topic? If so...could you direct me where to ask?

How do you change the date of one line of the program to get a different time? I'm trying to ramp and want it to ramp up over 36 hours not 48?

Don't mind me....just put a .5 after the day. Figured it out! Yay!

on the left side of the profile page there's a HELP button.

very helpful
 
Yeah, yeah...but it didn't speak about fractional days to get the time to change. I just "took a stab in the dark" and it worked. Haha. Thanks for at least pointing me somewhere!

didn't mean to sound snarky

took me a long time before I had my duh moment and clicked on it.

:mug:
 
FWIW, I went straight to the shield without any testing and it worked. It just adds another layer of troubleshooting because the soldering could potentially be part of the problem. But it should work.

My one BrewPi has been running great on the shield. I had an LCD scramble about two weeks ago but it has been running without problems since then. It is connected to the Pi via Bluetooth, so that part works, too.

I'm about to order parts to get a second instance of BrewPi running for my keezer.
Where do you mount the HC05?
 
By "mount" do you mean connect to the BrewPi shield? If so, there are 4 header pins labeled BTOOTH next to the chip.
Where do you mechanically attach the HC05 pcb ?I was thinking of hot gluing it to the side of the risers on the shield.I still haven't decided on an enclosure yet.
 
Where do you mechanically attach the HC05 pcb ?I was thinking of hot gluing it to the side of the risers on the shield.I still haven't decided on an enclosure yet.

Ah, got it. My box is still in a temporary testing state. I have a batch fermenting to test the setup. When that batch finishes and I can power down the unit, I intend to mount stuff permanently inside of the enclosure. I planned on attaching it to the underside of the lid next to to the arduino.
 
Last edited by a moderator:
Ok got my sensor in today. I am still having issues. I programmed the uno hooked up the sensor in the bread board and plugged everything in. As soon as I plugged in the wire to the sensor to the uno the uno light dimmed and the sensor got hot to the touch. I double checked triple checked the wires. I have pin one as ground pin 2 as data and pin 3 as 5v. resistor between the 5v and data.
Is the sensor supposed to get warm? I thought this ment it was hooked up backwards? But I know I have it hooked up just like the pins say...

I cant even get it to run the sketch because as soon as I plug the sensor in it just kills the uno basically.
 
If if gets hot, you connected it wrong. Your Arduino turns off because the sensor draws too much current.

Next time, only connect data and GND. If you confirm that those are correct with a test sketch, then connect 5V. You can throw away this sensor.
 
Hella drama over probes the last couple weeks.

Sheesh.

fwiw, I've bought over two dozen pre-assembled 3m ds18b20 "waterproof" (cough) probes on eBay, all of them with rational wire colors (red/white/black or red/yellow/back for pwr/sig/gnd), with actual ds18b20 parts in non-PAR mode, and that actually work.

Cheap, too, if you have any patience ;)

eg: http://www.ebay.com/itm/Black-Pract...-Temperature-Temp-Sensor-Probe-/121672290296?

Cheers!
 
If if gets hot, you connected it wrong. Your Arduino turns off because the sensor draws too much current.

Next time, only connect data and GND. If you confirm that those are correct with a test sketch, then connect 5V. You can throw away this sensor.

It will try this. I followed the lead diagrams for Ds18b20 and I am curious if connecting what I think is grd and data will ruin it if it is reversed? What test should I run?
 
Are you sure you followed the wiring diagram properly? The middle pin is data, and the outer two are power and ground.

If you are holding the sensor with the leads pointing towards you and the flat face of the device (with the markings on it) facing you the ground is on the left, power is on the right.

Do you have a short somewhere, either at the device end or the Arduino end? A solder blob, a stray strand of wire?

The sensor should not get warm. You might have damaged this one, or you might be lucky. Try again and be methodical.

Here is a few pictures of my set up... No relay is wired up in this pic. Just the one test sensor I was testing to see if it works. I should not have any shorts as it is done with a breadboard and jumper wires. No solder to worry about yet. I wired the left pin ( looking at the flat side with markings) grd. Middle data, right 5v. 4.7k between data and 5v. I did y this with two different Uno boards. Same result.

View attachment 1463193135171.jpg

View attachment 1463193155158.jpg

View attachment 1463193173797.jpg
 
Just to see what I would get... I took a reading across the grd and 5v leads. It is reading 1.1 v. If I take the reading on the wires feeding the sensor I get 5.0v. Is this normal to get this low reading on the leads of the Ds18b20?
 
Status
Not open for further replies.

Latest posts

Back
Top