HOWTO - Make a BrewPi Fermentation Controller For Cheap

Homebrew Talk - Beer, Wine, Mead, & Cider Brewing Discussion Forum

Help Support Homebrew Talk - Beer, Wine, Mead, & Cider Brewing Discussion Forum:

This site may earn a commission from merchant affiliate links, including eBay, Amazon, and others.
Status
Not open for further replies.
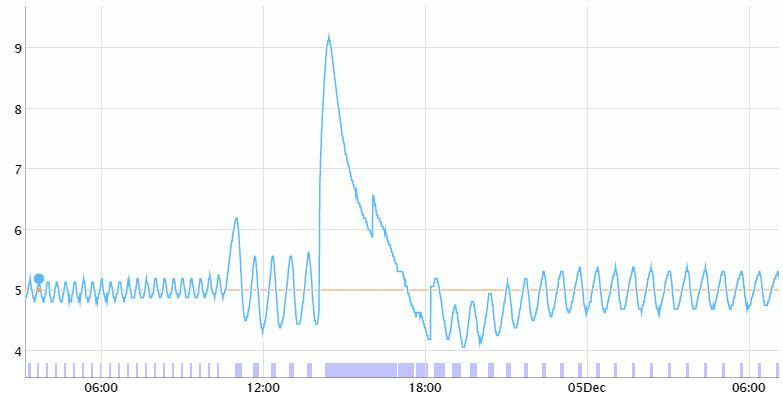
Something seems wrong with that graph. Why is it showing your room temperature in the LCD in the top left? It should be beer and fridge..

That 2nd Temperature line alternates between Fridge temp and Room temp if you have all three probes assigned. The screen shot was probably taken during the time it was displaying the room temp.

I agree, it looks to me like you have the frige and beer probes reversed.
 
much better, from +.1 to -.06.

I'd call that "tight enough"

thanks, guys

much better.JPG
 
@wbarber69 and anyone else using telephone jacks, what are you using for female connectors at the panel? Can you list a source?
 
@wbarber69 and anyone else using telephone jacks, what are you using for female connectors at the panel? Can you list a source?

I just used a telephone extension cord, cut and solder probes to male-ended piece, run female-ended wire through hole in box. Nothing fancy.
 
Do you have a link to a specific product? Or something similar

I used something similar to these in black. They accept a standard RJ11 plug and they had them in stock at my local Home Depot.

Keystone Jacks

Wall Plate

Pictures:

Wall Plate
BrewPI_2_zpsl4aifijj.jpg

Inside Enclosure
BrewPI_1_zps5wc6f2cu.jpg


I trimmed the wall plate so that it would fit on my cigar box enclosure.

I am still a little nervous about the wood enclosure, and want to change it out soon, but have had zero issues in 6 brews with it.

Edit: Mine were actually Leviton Quickport products. This and This.
 
lol... guess what time I brought the dog in and what time I fired up the baseboard heater in the brew lab?

guess.JPG
 
I've been playing around with this for a few months now. I've got brewpi to run on uno's and 5v minipro's vi bluetooth and esp8266wifi. But I am having serious problems getting it to run on the 3.3v mini pro's. I purchased 2 from different sources to reduce the chance of hardware problems. I got a 8MHz version and another 16Mhz version, both Chinese clones. The both program fine via the brewpi web page programmer. read/write/read on AVRdude 100% successful. This works via a ch340 or FTDI usb/serial converter. This is where the problems begin. when the mini pro's then boot up the brewpi script says please reprogram old/unknown version.
Did some digging and looked at the output on putty. On the uno's you type L into the serial port and it returns the LCD display data. On the non functioning min pro's it responds with gibberish that just happens to be the same length of character string, so it does respond to the serial command from brewpi. I assumed that the baud rate was set incorrectly so I tried every baud rate setting. Some baud rates return nothing others just gibberish. Has anyone got any idea's? I should mention that both of these 3.3V mini pro's work with blink and serial stuff through Arduino IDE no problem.
Could it be that the bootloaders are too big on these boards??? help!
 
Are you positive that the brewpi script successfully loaded the hex? I ask because the pro mini and the uno upload sketches at different baud rates, 57600 for the pro mini and 115200 for the uno. The brewpi script is only set up to upload to unos at 115200 baud. I used avr dude commands to manually upload the hex file to my (5v) pro mini.
 
Are you positive that the brewpi script successfully loaded the hex? I ask because the pro mini and the uno upload sketches at different baud rates, 57600 for the pro mini and 115200 for the uno. The brewpi script is only set up to upload to unos at 115200 baud. I used avr dude commands to manually upload the hex file to my (5v) pro mini.
Just used Xloader the windows front end for avrdude to upload the hex at 57600, no difference but thanks for the info. I should mention that I had no problem uploading the hex on the 5v mini pro via the brewpi script, its just the 3.3v one that don't seem to work.
 
Last edited:
I don't think you're going to have much luck running at 3.3v. while it's great for the bt modules, the probes need 5v although they say they can run at 3-6v I've never been able to get reliable results from the probes without 5v. if get nanos if I were u. I've messed with minis and while they do work just fine, it's a lot more work to get em programmed and all that. the ones I used even needed to be reset in order to program them, making it even more of a hassle. the nano is basically the same size and its bit for bit the same as an uno. you can get them pretty cheap on eBay by the 5 pack.
 
I don't think you're going to have much luck running at 3.3v. while it's great for the bt modules, the probes need 5v although they say they can run at 3-6v I've never been able to get reliable results from the probes without 5v. if get nanos if I were u. I've messed with minis and while they do work just fine, it's a lot more work to get em programmed and all that. the ones I used even needed to be reset in order to program them, making it even more of a hassle. the nano is basically the same size and its bit for bit the same as an uno. you can get them pretty cheap on eBay by the 5 pack.

In my experience I haven't had those problems with the mini. You just need an ftdi cable and it works just like the rest.
 
I have most of the parts for this already, and am planning to buy the rest shortly. I have a bunch of temp probes left over from building the STC 1000+. Can I use one of those instead of the one recommended here?

Cheers!
 
I have most of the parts for this already, and am planning to buy the rest shortly. I have a bunch of temp probes left over from building the STC 1000+. Can I use one of those instead of the one recommended here?

Cheers!

No. Your probes are NTC 10K analog probes while BrewPi uses digital "one wire" probes...

Cheers!
 
Building this bad boy today.

question.. What is the recommended SD size?
 
8GB is a sane size.
Don't forget to run raspi-config and expand the file system to actually use the full capacity...

Cheers!
 
I think the "legacy" branch is essentially that fork.

I have to say I'm not wild about the new "low HZ PID" wrt compressor cycling anyway.
I wager you could measure a domestic appliance compressor life span in start-up cycles...

Cheers!
 
How is this development going to affect my plans to build a mulit-instance brewpi with an old laptop? The old software has me pulling my hair out as it is!
 
The good thing is beyond forking there are plenty of tags in the Git Repo. You can pull any of the previous versions, i still use one from over a year ago.
 
Hi Guys,

A reason for creating the legacy branch in the main repo, is that I can merge commits that will also work on the Arduino into the legacy branch.
For example, a button to reset the EEPROM could be handy.

I just have not had the time yet to go through the commits to see which ones are backwards compatible. Last few weeks have been very, very busy.

Of course, I'll happily take pull requests against the legacy branch too.

@daytripper:
The low Hz PWM will have much tighter control, see the screenshot below. I switched to fridge constant at point F. The PWM period is 20 minutes here. If you think that is a bit much, which I do based on the chart, you can just increase the period to 40 min. My point is, with this release, you can control exactly how often your fridge will cycle. And the temperature will cycle around your setpoint, not above it like the old code.

You can also set a minimum ON and OFF time for the fridge.

I have put a lot of work in the new controller code and I have ran a lot of simulations. I know PWM of a fridge sounds weird, but this works very well.

9dfc280dfd5b6e8b63787714b30469fde5fb2ccc.png


Cheers!
 
Elkoe

I entered the --ask command and received a no such file or directory error.

pi@raspberrypi ~ $ sudo python updater.py --ask
python: can't open file 'updater.py': [Errno 2] No such file or directory

Never mind. I needed to change to the brewpi-tools directory.

But I don't see a legacy option.


Available branches on the remote 'origin' for /home/brewpi:
[0] develop
[1] master
[2] Skip updating this repository
Enter the number of the branch you wish to update [master]:
 
I have to say I'm not wild about the new "low HZ PID" wrt compressor cycling anyway.
I wager you could measure a domestic appliance compressor life span in start-up cycles...

It's entirely up to you how often you want the fridge to run, see the difference between a period of 20 and 40 minutes:

5b4aac2ee730afa402dbf02458a300af35a5d83f.png
 
Well... after re-installing Debian Wheezy on my old laptop for the 5th time, I finally got a working multi-instance set-up. For those that do not know (like me) you install the legacy version of the BrewPi software with the following command:

Code:
sudo -u brewpi git clone -b legacy [url]https://github.com/BrewPi/brewpi-script[/url] /home/brewpi

or for a multiple instance

Code:
sudo -u brewpi git clone -b legacy [url]https://github.com/BrewPi/brewpi-script[/url] /home/brewpi/brewpi1

the "-b legacy" is the important part that designates the legacy branch.

I could not have done it without Day_Tripper's guide and the DIY BrewPi Wiki that @FuzzeWuzze started, so many thanks to those guys.

Also, I recommend using the arduino serial SYMLINK rather than the kernels SYMLINK that @day_trippr suggests in this post. Thanks again! Now I desperately need to brew something.
 
I am in the middle of a fermentation chamber build and am trying to decide on which direction I should go for temperature control. I really love the idea of brewpi I just haven't decided if its the direction I should go. Is brewpi something I can setup once....and use consistently while updating it as versions are released, or does it require constant maintenance and "fiddling" with in order to work properly?
 
On balance, once you have a working BrewPi setup, you're pretty much done - at least if using the "legacy" Arduino-based system, which itself is reasonably mature. There's no real "care and feeding" at this point.

I ran BrewPi for almost a year before doing any updates - and the only reason I finally did was to further the attempt to use a Wifi connection to the Arduino in place of the Bluetooth connection I came up with - that itself replaced the "oem" USB connection.

otoh, if you go with the new Spark-based system, there may be more frequent updates - certainly more likely on that side than the Arduino side.

Still, even then it's nothing like Windows Update ;)

Cheers!
 
Well... after re-installing Debian Wheezy on my old laptop for the 5th time, I finally got a working multi-instance set-up. For those that do not know (like me) you install the legacy version of the BrewPi software with the following command:

Code:
sudo -u brewpi git clone -b legacy [url]https://github.com/BrewPi/brewpi-script[/url] /home/brewpi

or for a multiple instance

Code:
sudo -u brewpi git clone -b legacy [url]https://github.com/BrewPi/brewpi-script[/url] /home/brewpi/brewpi1

the "-b legacy" is the important part that designates the legacy branch.

Would this have something to do with why I can't get my second instance configured
I didn't have the b legacy part when I did my setup
 
If you have one instance running, it seems unlikely that versions are an issue.

All you need to do at that point is create the new port, clone the working instance, change the port definition in the config file, change the folder pointers that need changing and you should be in business...

Cheers!
 
Status
Not open for further replies.

Latest posts

Back
Top