HOWTO - Make a BrewPi Fermentation Controller For Cheap

Homebrew Talk - Beer, Wine, Mead, & Cider Brewing Discussion Forum

Help Support Homebrew Talk - Beer, Wine, Mead, & Cider Brewing Discussion Forum:

This site may earn a commission from merchant affiliate links, including eBay, Amazon, and others.
Status
Not open for further replies.
I'm 3d printing now. So if anyone needs anything 4x4x5 or smaller and can provide me with a workable stl file I can get you what you need at a reasonable price. Currently printing black white blue and semi transparent (natural) pla with ninja flex on order.
 
need a little help here. I finally got my brewpi wired up from the instructions provided, but I am having a little but of an issue with the relay board. I checked over my wiring and it looks good, but i can not get the audrino uno to activate IN1 on the relay board. IN2 is working fine and can be controlled by the UNO.

I can manually activate the IN1 relay by grounding it out, it switches on lights up and sends 120 to the outlet. I am thinking there is an issue w the UNO and outputting from ~6. Is there something I can do here?

Thanks
 
Do you have a multimeter? Directly measuring the state of the pin is pretty straightforward. You can just use another pin.
Have you double checked your configuration in software?
 
I do have a dmm. I am very very unfimaliar with all of this so im not 100 percent sure how to check the settings and or how to change the pin and tell brewpi to use that pin. Sorry learning as i go.
 
Looks like i just made a bonehead mistake and didnt set act 1 pin 6 to chamber cool in the settings. Now i just have to wait 7min for it to cycle. Thanks for making me question that the settings werent done correctly, it saved me a lot of time.
 
Holy Moly, I actually just read through all 389 pages of this incredible thread. Thanks to everyone for such an incredible resource. I only wish there were more pictures of everyone's builds, my uncertainly mostly lies around parts to build an all-in-one box and the associated wiring. I'm planning out my build for one of these to control a single fermentation chamber and have some questions.


First off I'm wondering what the box pictured here is called and where I can get one (Amazon hopefully):
Very nice! I used the same box, but the bigger version. I was able to get everything into it. I have built 2 for myself and 2 for my buddies. People love these things!

Here are a few pics of mine.

OHjSZVs.jpg


mgxCoEt.jpg


0Y9ZrpY.jpg


This was during testing of the newest one I made for lagers today, hence the no cover, and no heater. I made a plexi cover so it remains see-thru.

Also, could anyone help me by posting a mini guide on the parts and steps required to hook up a a couple of these probes via RJ-11 or that 3 pin (mic style) connector I see above?

*edit* Looks like this would work well, do I need any special crimper for wiring the probe into the female end?

Lastly, in this pictured wiring scenario would it be safe to plug the Pi and the Arduino power adapters into the added extra unswitched outlet? Or better yet is there a power adapter part I could buy, wire that into the power cable and then directly wire the Pi and Arduino to the that power adapter (thus saving space in the project box by eliminating the two wall warts)?
Here's the original wiring diagram with the new outlet added. It's basically just an extra unswitched outlet that you can stuff inside your enclosure with the adapter to keep things neat.

attachment.php
 
Last edited by a moderator:
- that looks like a PVC junction box. I've seen them in HomeDepot and Lowes.

- I've used solder-tabbed XLR connectors like the ones shown, switched to mini-XLR connectors for compactness, also solder-tabs.
In either case, the probe wiring is arbitrary, just make a standard and stick to it.

- There is no "unswitched outlet" shown in that design.
There is an AC ingress, right below the wires to what I presume is a 9-12V wall-wart (which could have been mounted inside the box, as I've done)...

Cheers!

Gotcha, ya the AC ingress is what I was referring to. With the way that is wired I just wanted to make sure it would be safe to plug in and power both the Arduino and RPi from that.

Rather than wiring up an AC ingress (which I'd probably just chop off a spare extension cable) and stuffing two wall warts (1 for Arduino, 1 for RPi) into a project box could I buy an AC to DC transformer and wire that into the wall power on one end and the Arduino/RPi on the other? Like this guy?

Any suggestions you have for good project boxes I could use which would have enough space for internal mounting of RPi, Arduino, Terminal Block, etc would be appreciated.
 
Last edited by a moderator:
Note that while the Arduino Uno will run on 12V, the RaspberryPi won't. It wants a 5V power supply, so you'd need to provide that in your implementation as well.

Alternatively, I made a modest modification to the Arduino Uno R3 board to allow it to run directly from a 5V supply (basically, removing one component and adding a wire) which enabled a single brick solution. So that's an option - I've documented it here on HBT somewhere.

So I use a similar brick supply (5V @3A) to power everything inside my BrewPints system.
brewpints_18.jpg
brewpints_02.jpg

which slides into the dolly under my keezer...
brewpints_44_sm.jpg

It's all rather extreme but it satisfies both my inner and professional engineers ;)

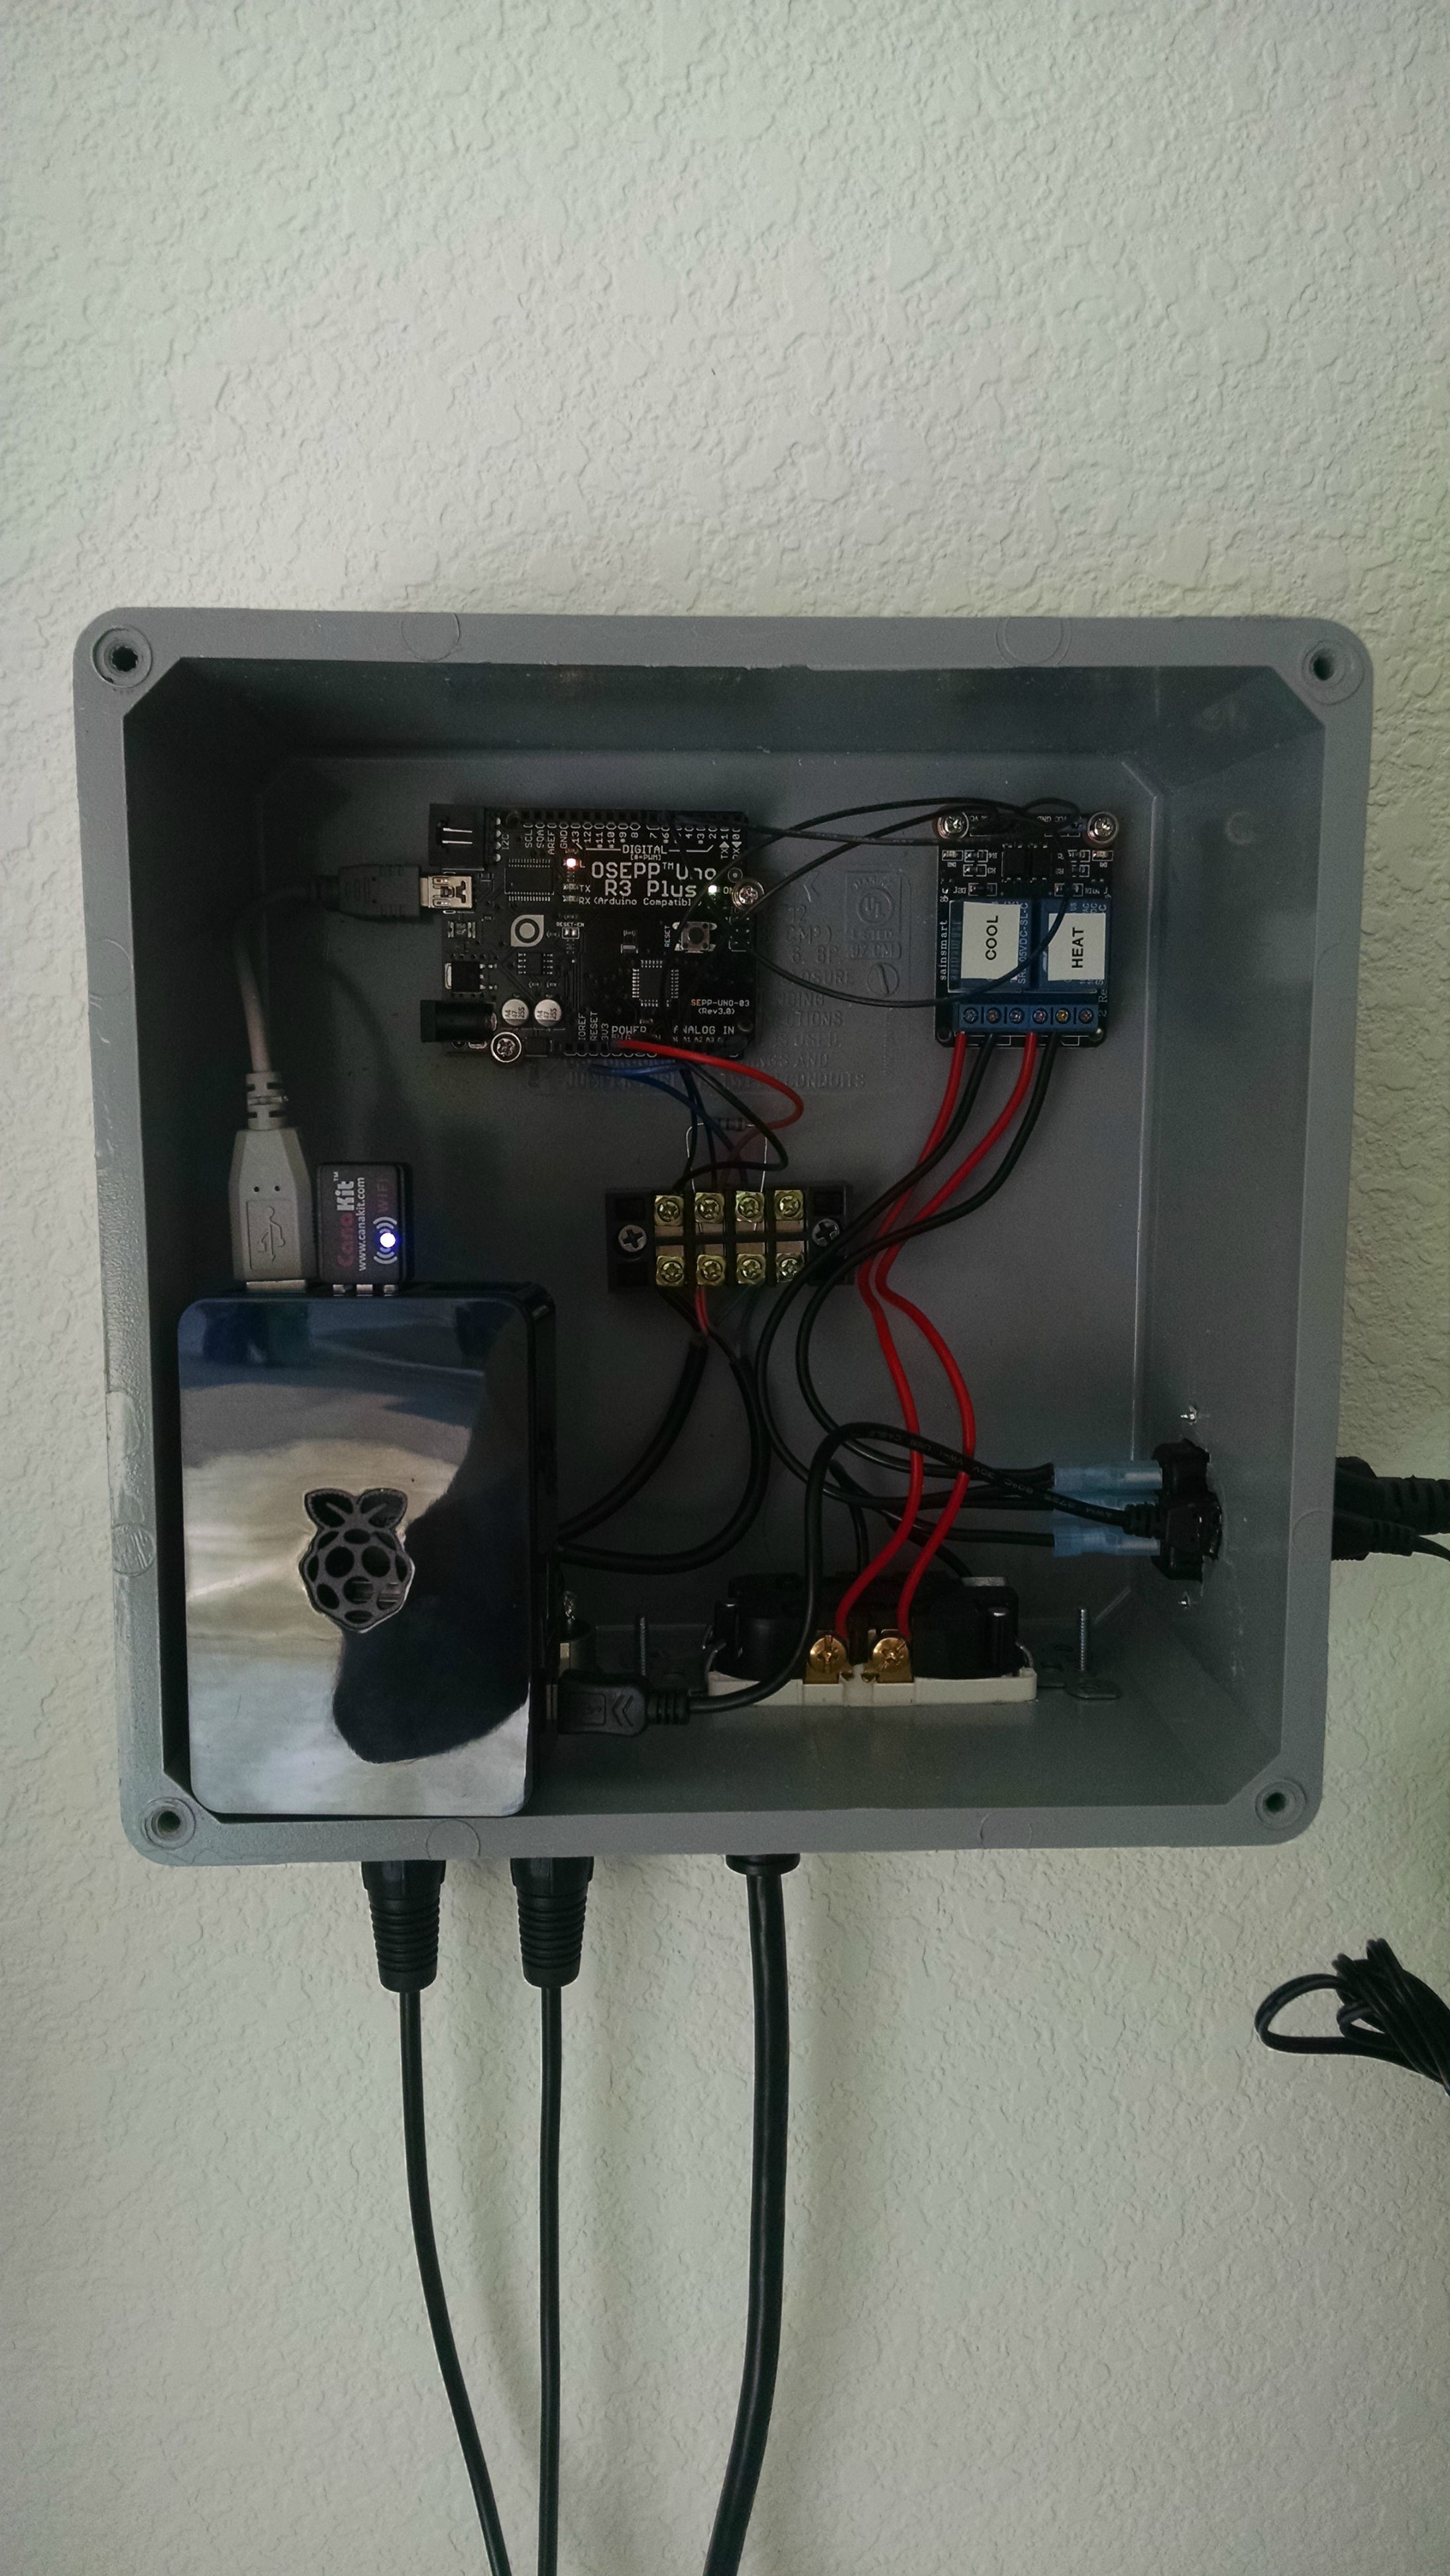
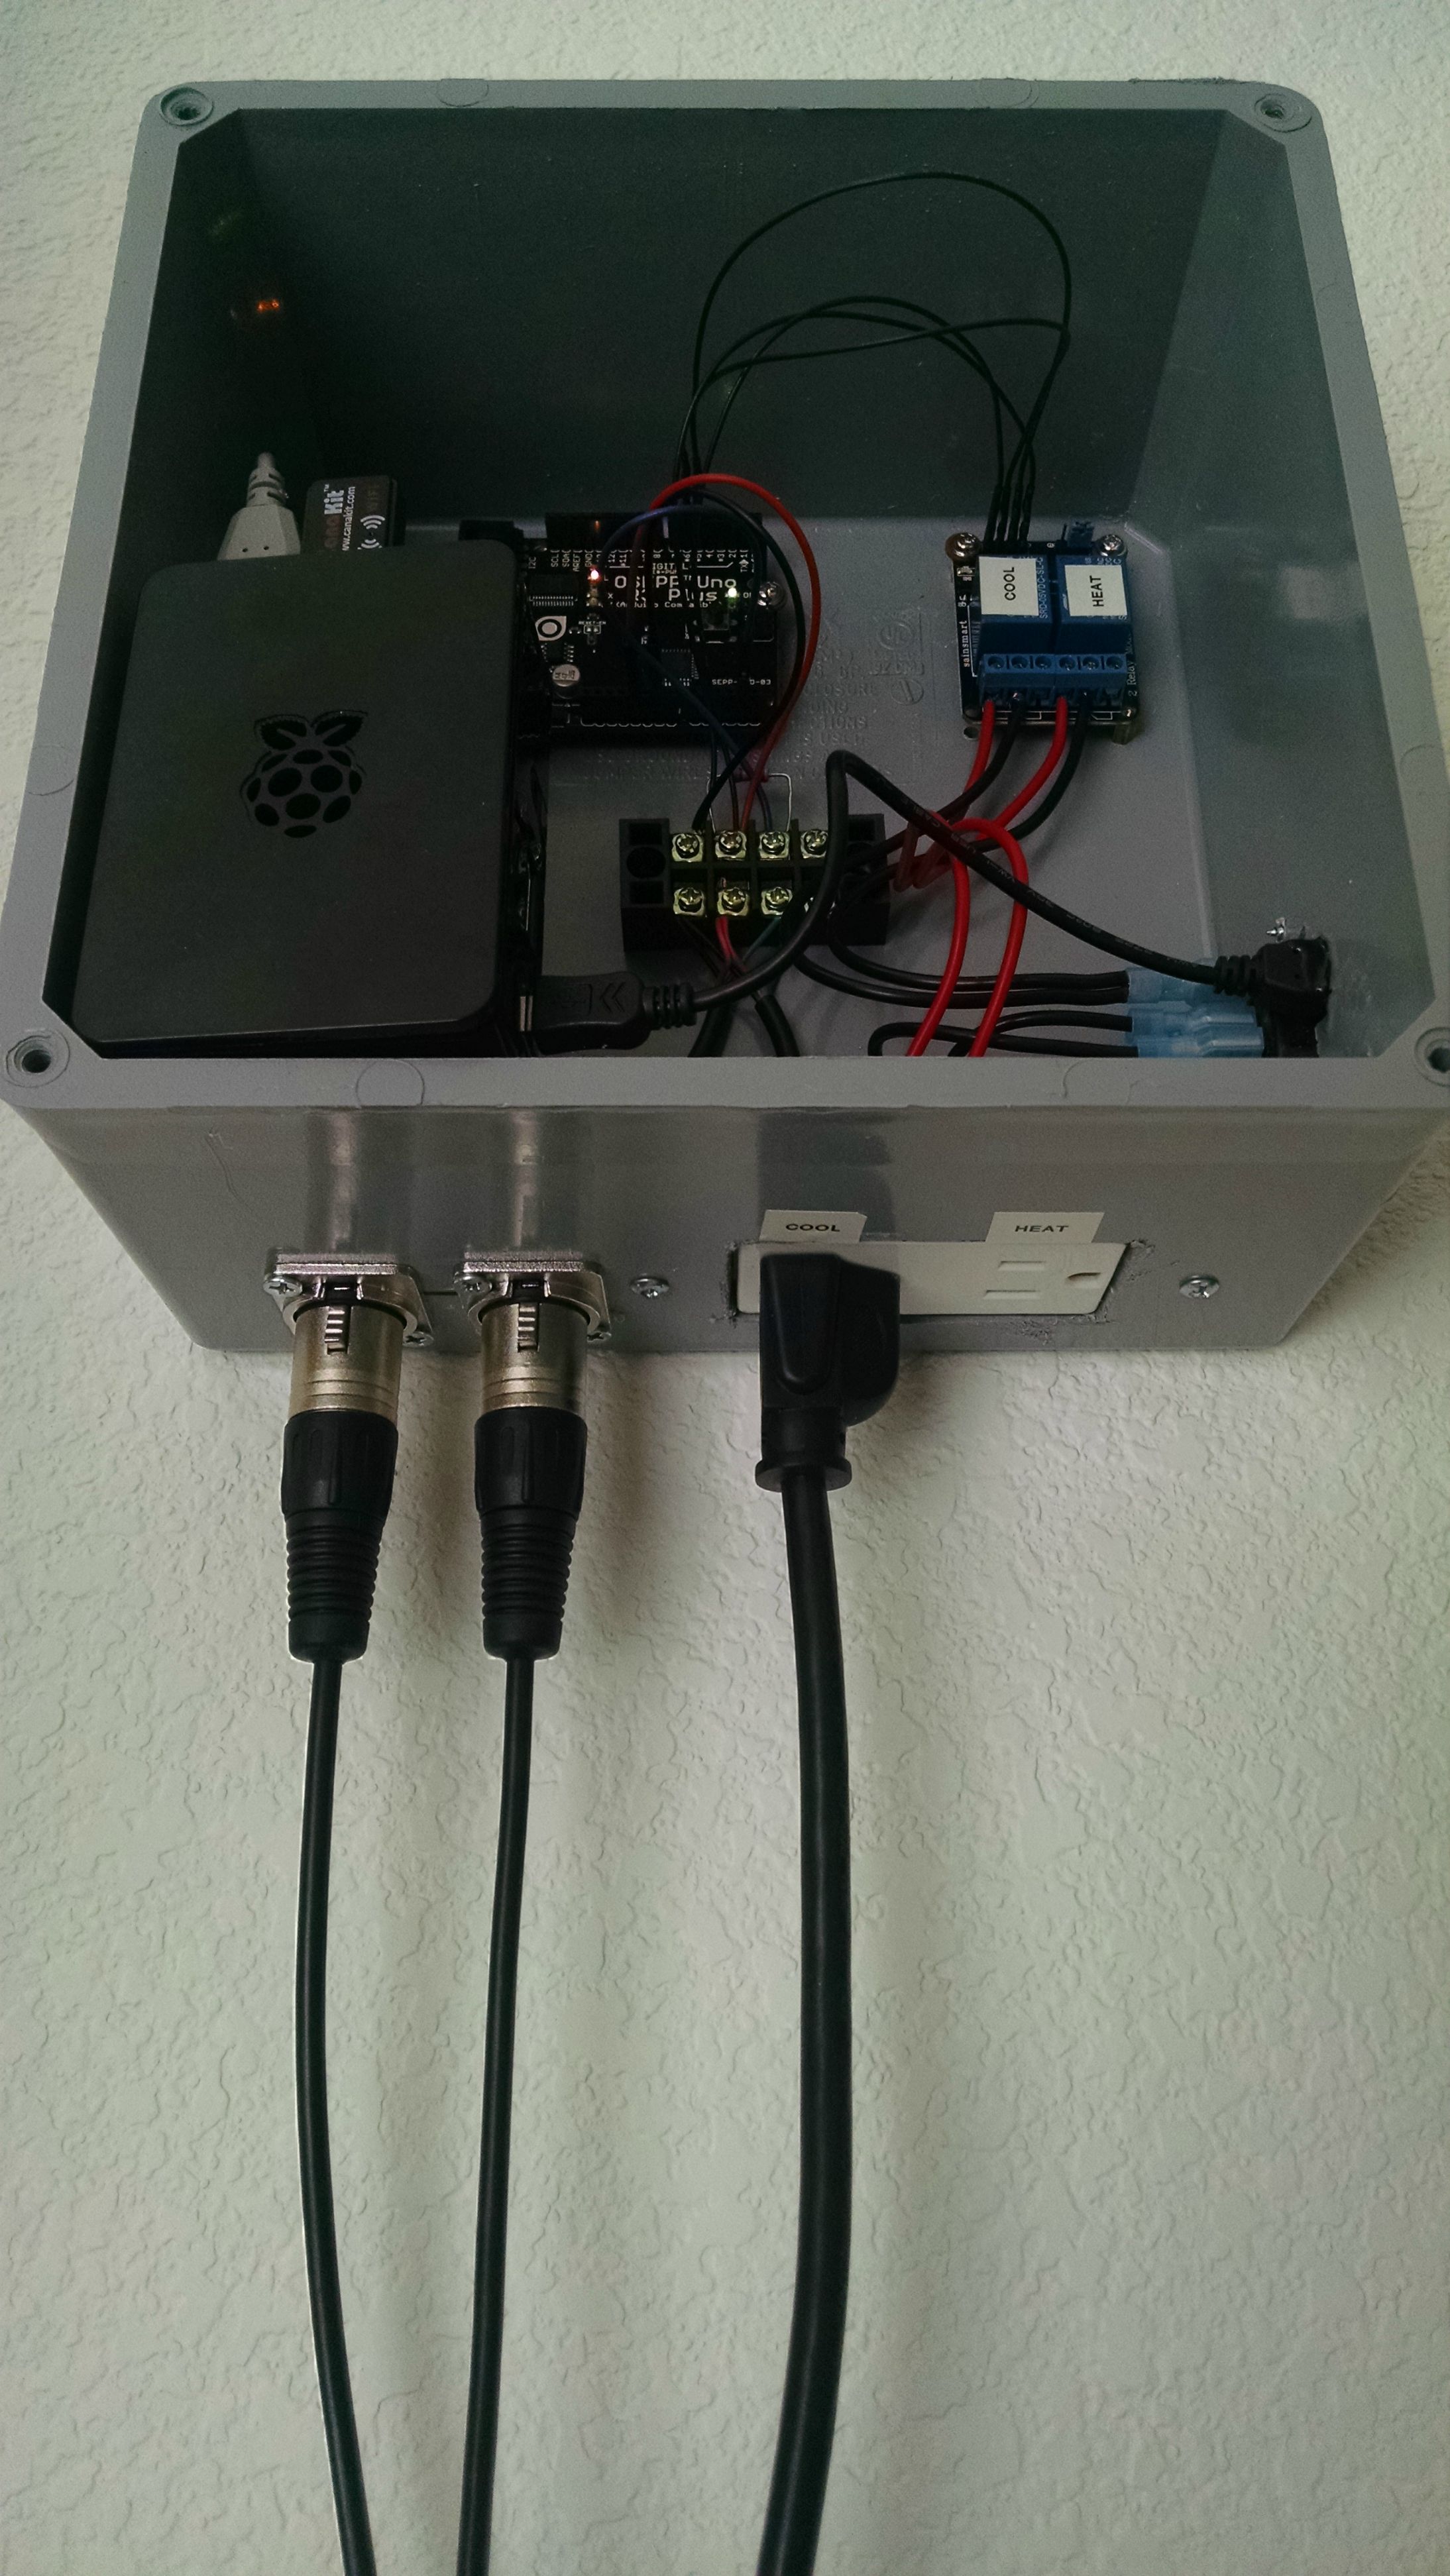
The box is 12x7x3" and has everything to support RaspberryPints (principally, the Arduino AlaMode shield atop the RPi) and one internal BrewPi instance that controls my keezer. It also has a Bluetooth dongle to talk to three remote BrewPi instances that control two fridges and a cold-season (ie: heated only) ferm chamber. Everything needing power was modded where necessary to run directly from that same 5V brick.

So, aside from the AlaMode shield, that's pretty much the footprint of all the chunks needed for BrewPi running on an RPi: RPi, some compatible Arduino module, a dual relay card, and a power source to run them all. Spread out like I have it isn't particularly volume-efficient but it's reasonably easy to work on.

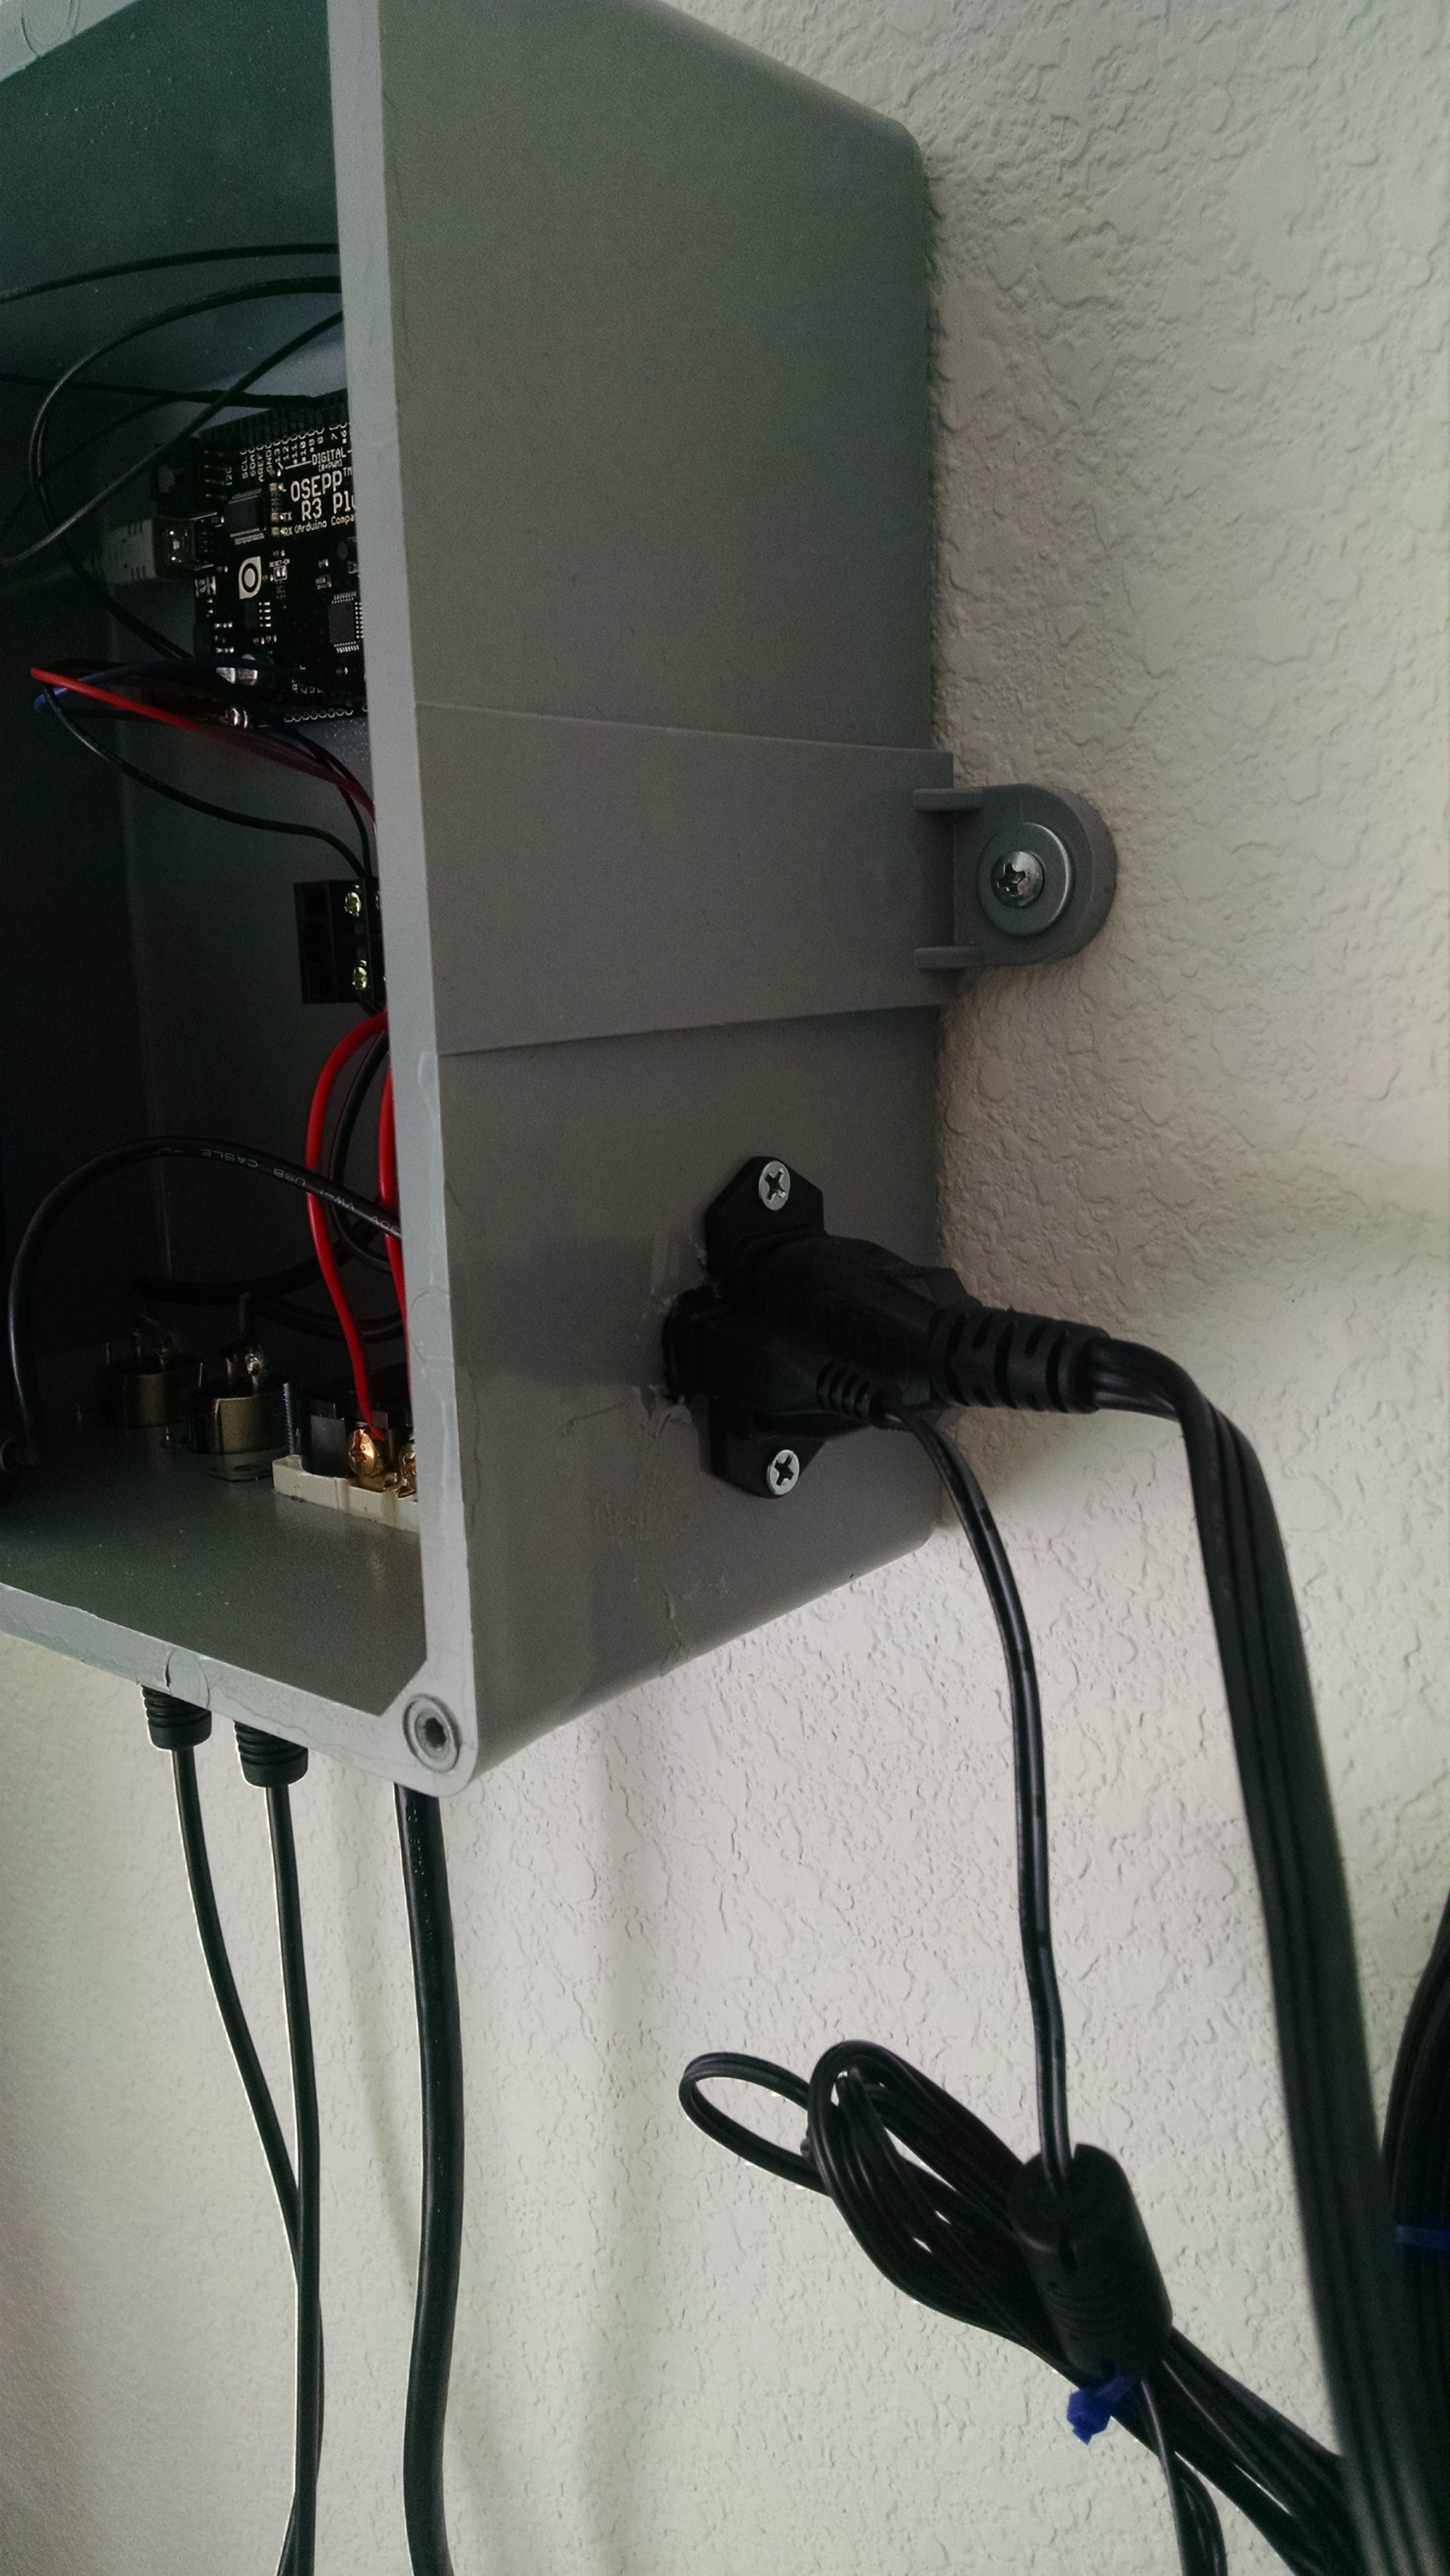
The only thing missing in my implementation is the duplex outlet. I'm switching a 30A relay (for the compressor) that's behind the other panel on the keezer dolly, and thus sending a low-current signal connection (you can see the cable between the panels) instead of switching AC power at the box.

If that had been a consideration I suspect I'd have had to go with a wider box and panel, but in a free-standing design there'd be room in the back-left corner where I have a USB hub now.

Just tossing this all out there...

Cheers!
 
Gotcha, ya the AC ingress is what I was referring to. With the way that is wired I just wanted to make sure it would be safe to plug in and power both the Arduino and RPi from that.

Rather than wiring up an AC ingress (which I'd probably just chop off a spare extension cable) and stuffing two wall warts (1 for Arduino, 1 for RPi) into a project box could I buy an AC to DC transformer and wire that into the wall power on one end and the Arduino/RPi on the other? Like this guy?

Any suggestions you have for good project boxes I could use which would have enough space for internal mounting of RPi, Arduino, Terminal Block, etc would be appreciated.

Yea its just one of the Carlon Junction boxes, what size you need is a bit tough you'd probably want to measure everything out

http://www.homedepot.com/s/carlon%20junction%20box?NCNI-5
 
Last edited by a moderator:
Got a canakit set up the pi with raspian
Updated and upgraded according to instruction on the wiki for multiple chambers and when I run the script to identify the ports is/dev/ttyACM* I get
No such file or directory
Anyone know what I'm doing wrong?
 
Got a canakit set up the pi with raspian
Updated and upgraded according to instruction on the wiki for multiple chambers and when I run the script to identify the ports is/dev/ttyACM* I get
No such file or directory
Anyone know what I'm doing wrong?

did the same thing its Ls not is
 
Note that it's LS *space* /dev/ttyACM*

The "ls" is the command (list directory contents) and the rest is the target directory.
 
I think im almost done have chamber 1 up and running now onto chamber 2.

how do I fix this.
Aug 30 2015 19:09:03 Opening serial port
Aug 30 2015 19:09:13 Errors while opening serial port:
[Errno 2] No such file or directory: '/dev/chamber2'
Could not configure port: (25, 'Inappropriate ioctl for device')
 
Still saying there is no such file or directory
I have tried every possibility
Please help
 
The command looks like this:

Code:
$ ls /dev/ttyACM*

ls is a verb, /dev/ttyACM* is a wildcarded object.
You always have to have a space between verbs and objects...

Cheers!
 
My Brewpi runs fine until I enable the temperature control so I think I need to screen the Arduino from the relay board which in my case is a Sainsmart 2 channel one.
Any tips on the best way to do this or are SSRs the way to go. I could also try another relay board as I have a few.
I have a number of ferrite cores on most cables which has helped but the Uno still fails after 8-12 hrs. Without the temp control enabled it has run for days.
 
I think im almost done have chamber 1 up and running now onto chamber 2.

how do I fix this.
Aug 30 2015 19:09:03 Opening serial port
Aug 30 2015 19:09:13 Errors while opening serial port:
[Errno 2] No such file or directory: '/dev/chamber2'
Could not configure port: (25, 'Inappropriate ioctl for device')


Either you got a bad usb cable or you didn't create the symlinks
 
Sweet.
I figured there was a way. I just need to stop by Microcenter and get some jumper wires and I will be set to wire it up.

Thanks guys

Love Love Love Microcenter... They had the new Pi 2's for sale for $30, so naturally I bought 2...

you magnificent bastids. :tank::mug::rockin:

why didn't I think of MicroCenter?
 
I noticed.

My wish list keeps getting longer


You can fill most of your wish list with ebay seller alice1101983. I'm not advertising for this seller I literally get all my electronic gizmos from this one seller. Cheapest prices and you get discounts on shipping the more you buy. Once you see the prices you'll see why I recommend them. The shipping speed is actually pretty fast coming from China.
 
Alright,

So I'm starting my first complete fermentation with the brewpi, and when I entered a new fermentation name, the data stopped logging.

And I cannot save a beer profile, I get "Error Saving Profile" which doesn't direct me anywhere.

Is this a permission thing?

Thanks,

Mark
 
Sounds like it. Did you ever run the /home/brewpi/fixPermissions.sh script after the installation was complete?

Cheers!
 
No, I saw that command. And I couldn't use putty, and I just corrupted my system because I couldn't remotely shut it down.

And I just started a fermentation.

Hopefully the arduino can handle this headless.

Will I have to reconfigure the arduino after I reinstall, or will it happily pick up where it left off?
 
I'm about to have an anger meltdown. It took 3 hours to reinstall and update everything. I made sure I could log in with putty before I shut it down. I move the pi to the hallway with the fridge and boot it up. Nothing. Not connected to the internet like it was two seconds prior. No way to safely shut down. I pull the plug and everything is corrupted. Again.

On the upside, I'm getting really good and installing and editing files.

Next time, I will make sure that the network is saved and will log on automatically.
 
It shouldn't do that much damage to unplug it. Are you constantly writing data to the sd card
 
I would humbly suggest that next time you create a working system on your card, that you image it on your PC for future use! It's happened to me too many times to count with RaspberryPints and eventually I just imaged the card to cut my re-install time down to about 20 minutes.
 
I would humbly suggest that next time you create a working system on your card, that you image it on your PC for future use! It's happened to me too many times to count with RaspberryPints and eventually I just imaged the card to cut my re-install time down to about 20 minutes.

Where were you 4 hours ago?

It shouldn't do that much damage to unplug it. Are you constantly writing data to the sd card

Not that I'm aware of, but each time I had to pull the plug, I couldn't boot the pi.


Now I'm having more problems. I can't access the webserver page from a remote computer (on the same network) and I can no longer putty into the PI command line. These were issue that I didn't last time.

Suggestons?

*SOLVED*

I think the answer makes me even more angry, but I hope if someone reads the 392'd page of this thread and avoids my mistake, it'll be worth it.

I couldn't connect to the webpage, I couldn't ping the pi, not putty in. I did not have these problems before. So what happened? What changed?

My router is dual band. I was on a different band than my brewpi.

I wonder if I had it set up correctly the second time and the last 4 hours were another waste.

*sigh*

*UNSOLVED*

I cannot access the web interface on either the Rpi or my laptop.

I tried reinstalling brewpi without success.

Suggestions?
 
Anyone having the cannot connect to server issue with the LCD display through the web browser Elco has solved it and it requires changing a Config file in Apache

sudo nano /etc/apache2/apache2.conf

Then find the line that says KeepAliveTimeout 5 and change that to 99 save the file and reboot the pi and hey presto problem solved

More details posted here on the official forum

https://community.brewpi.com/t/comm...r-and-pi-fails-intermittently-on-safari/601/1
 
Help Please. I have a problem I haven’t seen documented yet. I’ve added a second Arduino to my set up, everything seems to be functioning correctly except it will only recognize a single One Wire at a time. I’ve rotated through 3 different probes, each will work individual but not when combined with a second probe. My connections are good.
I’ve added a 12v auxiliary wall wart to the Arduino and measure a full 5 volts at the terminal strip. Without the auxiliary power it was just below 5v.

My first Arduino functions perfectly. The only difference between the two are the brands of Uno's. The first one that works is a Sainmart, I don't see a brand name on the one I'm having difficulty with

Could there be something wrong with the Arduino Uno?
Thanks in advance.

****Problem solved I used the wrong pull up resistor. Works perfectly with a 4.7k
 
Last edited:
I can't understand how the brewpi worked so well the first time, and now, I'm on try number 5.

Again, I shut down the brewpi, move it 30 feet, plug in the arduino and pi....boom. Failure to boot.

I re-flashed the working image and it appeared to bring me back to where I left off, but the web interface does not work on either the Pi or my laptop. How is that even possible? It's an exact copy...

Do I need to reflash the arduino? Is That what has been causing all these problems? Hooking up the arduino from the first setup without the permission fix to the pi with the permission fix?

I've tried googling both this and the brewpi community, and I've been unsuccessful.

Any and all help will be greatly appreciated!

Edit:

I formatted my micoSD card. Installed Rasbian. I ran the update, upgrade, rebooted, ri-update, rebooted . I cloned the git hub account and installed. Literally, that's all I did. I then shut down, and instead of moving it to the fermentation area with no monitor, I rebooted it up.

2015-09-04_04-32-58 by Mark E, on Flickr

Seriously, what did I do wrong? Why is it crashing?

The only thing that changed from when I did this the first time would be the updates. Are they too new?
 
Anyone having the cannot connect to server issue with the LCD display through the web browser Elco has solved it and it requires changing a Config file in Apache

sudo nano /etc/apache2/apache2.conf

Then find the line that says KeepAliveTimeout 5 and change that to 99 save the file and reboot the pi and hey presto problem solved


Had problems with iPhone 6 with errors reading graphs. Changed this and problem fixed. Thanks
 
Totally new to soldering question. I removed the male pins from the relay module and soldered the wire through. When it comes to the arduino female ports, do those wires need to be soldered or will the friction of the female port hold it steady enough? And if they do require soldering, any technique advice? Thank you everyone who has contributed to this! All my stuff came last night and I couldn't sleep with anticipation for this morning!
 
Status
Not open for further replies.
Back
Top