webguru1974
Active Member
- Joined
- Sep 24, 2012
- Messages
- 29
- Reaction score
- 0
Ok thank
Sent from my iPad using Home Brew
Sent from my iPad using Home Brew

OK, essentially there are 2 parts:
The part that takes a pic every "however" long.
And the part that sticks it on the webpage.
Taking the pic:
Plug in your webcam.
In terminal, type "lsusb", check that the webcam shows up.
To take a pic, type the following:
If that doesn't work, install streamerCode:streamer -f jpeg -o image.jpeg
If it still doesn't work, try it with sudoCode:sudo apt-get install streamer
Code:sudo streamer -f jpeg -o image.jpeg
If that's all working then we just need to get it running often.
Let's start with once per minute.
In Ubuntu, type
Add the following line at the bottom:Code:sudo crontab -e
(omit the "html" bit if you don't have that folder)Code:* * * * * streamer -f jpeg -o /var/www/html/image.jpeg
[Note: I don't know how to edit cron for other Unix os's. Maybe someone else can help with that, or Google it]
Exit crontab
Wait a minute, check if image.jpeg has showed up in the right folder, and that it's pointing in the right direction.
Editting the webpage:
Back up your index.php
Then, edit this line:
to this:Code:<body>
Code:<body onload="JavaScript:timedRefresh(60000);">
Then, add this just before the </body> tag:
Code:<canvas id="x" width="600" height="600"/> <script type="text/JavaScript"> var x=0, y=0; var canvas, context, img; function timedRefresh(timeoutPeriod) { canvas = document.getElementById("x"); context = canvas.getContext("2d"); img = new Image(); img.src = "image.jpeg?t=" + new Date().getTime(); img.onload = function() { context.drawImage(img, x, y); setTimeout("timedRefresh("+timeoutPeriod+")",timeoutPeriod); }; } </script>
Save, and refresh your webpage.
You should be all set
Note:
This is almost definitely not the optimum way to do this, but it works, and took me 5 minutes to do. I may optimise it this weekend when I get a chance.
I'm keen to get it taking a pic a second, but that requires extra work as cron only works in minutes.

Hello all. Thanks for this great thread.
I'm trying to get the BrewPi up and running with a physical LCD display, but have no real output showing. The LCD powers on and shows two rows of blocks. The POT works to adjust contrast. But no characters as emulated in the top left hand corner of the BrewPi interface.
Do I need to modify any code in BrewPi to enable the display or will it work out of the box?
Thanks in advance for any suggestions!
======================
Background Info
======================
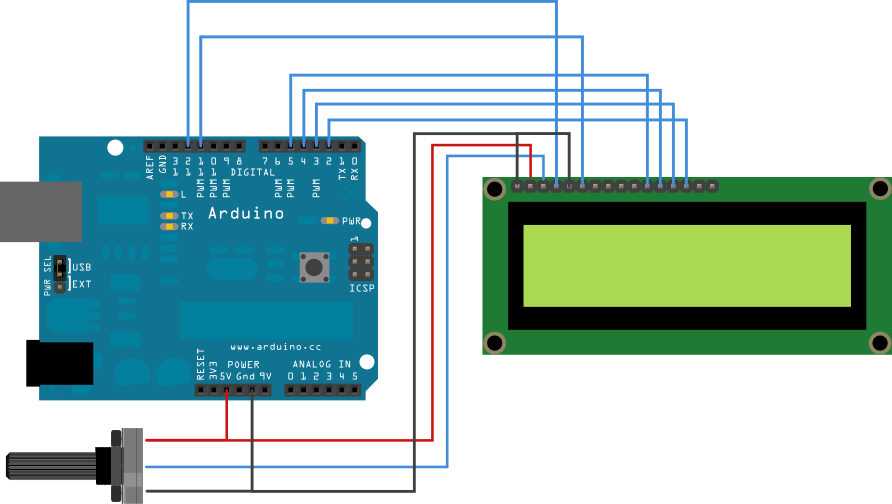
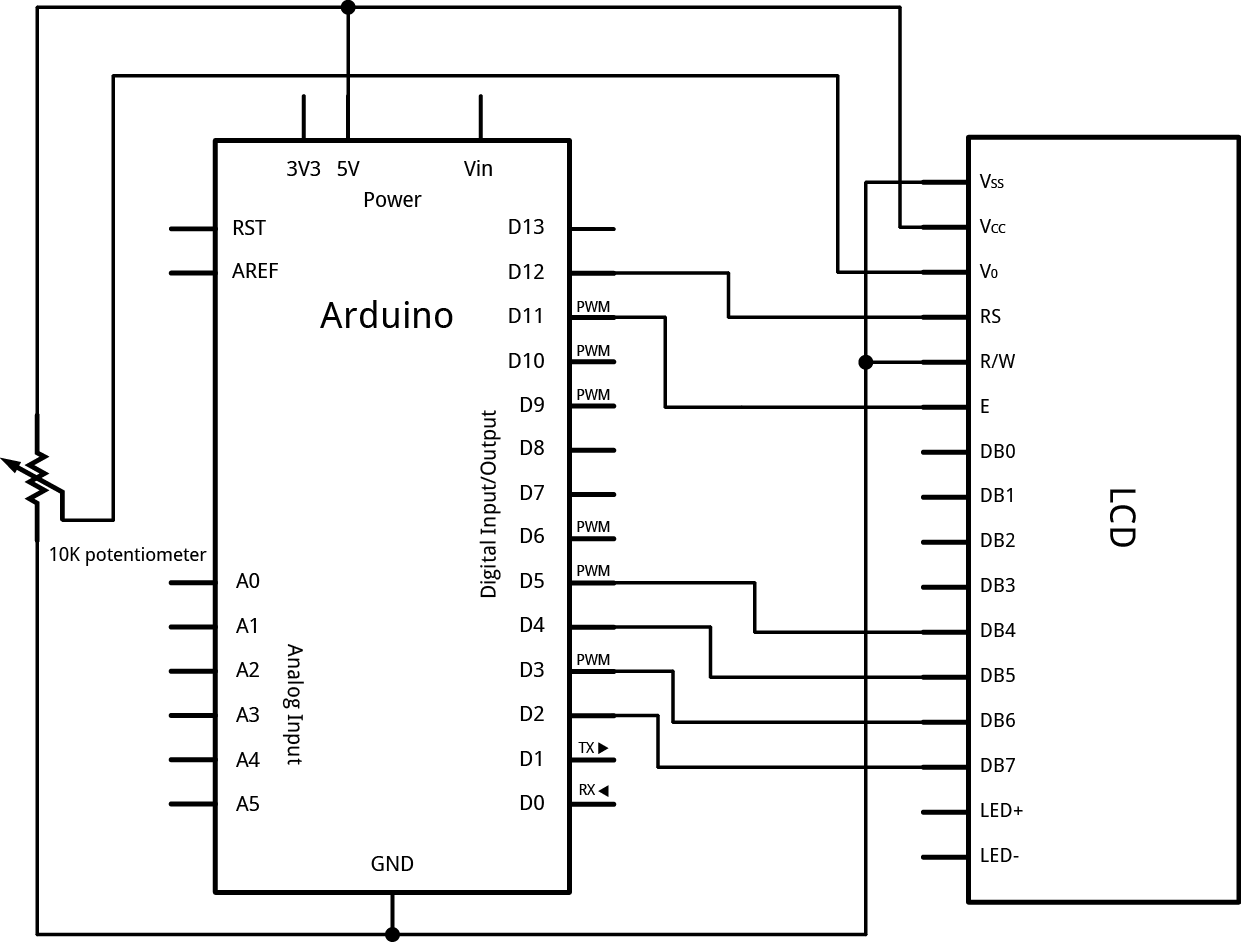
I am using a 20X4 board compatible with the Hitachi HD44780 driver, with 16 pins.
I have wired the LCD according to the following:
Wire your LCD screen to your Arduino. Connect the following pins:
LCD RS pin to digital pin 12
LCD Enable pin to digital pin 11
LCD D4 pin to digital pin 5
LCD D5 pin to digital pin 4
LCD D6 pin to digital pin 3
LCD D7 pin to digital pin 2
Additionally, wire a 10K pot to +5V and GND, with it's wiper (output) to LCD screen's VO pin (pin3).
I just wouldnt publish the external site, there are too many vulnerabilities that can be exploited by someone who knows its a BrewPi system.


![Craft A Brew - Safale S-04 Dry Yeast - Fermentis - English Ale Dry Yeast - For English and American Ales and Hard Apple Ciders - Ingredients for Home Brewing - Beer Making Supplies - [1 Pack]](https://m.media-amazon.com/images/I/41fVGNh6JfL._SL500_.jpg)


I took mine off the 'net for that same reason.
[...]The LCD interface for brewpi's setup uses spi I believe.
") )
)[...]I see that the Arduino's 5 pin is common. I can move that to Pin 9, but will need to update the code to reflect the pin change, correct?
"You are correct, Sir!" (<-in best Ed McMahon voice
From the schematics they don't use the actual SPI packet protocol, they just use those AVR pins to bit-bang a shift register on one of their shield kit boards that in turn coughs out the LCD interface signals.
It seems there are plenty of free pins on a 328Mega running the BrewPi script that one could directly interface an LCD, but then you'd have to hack the BrewPi AVR code (at least) to make that work...
Cheers!
Hmm... I wonder....[...]
Ok so I can't figure out what's going on here. I have everything up and running for testing. I go in and setup all 3 temperature probes and refresh the settings to see they are in my installed devices. Then 1 of them (and it's a different one every time) ends up showing up with all but the first 4 or 5 characters of the address name shows up as FFFFFFFFF. And the real device shows up under detected devices again making up 4 one wire devices. I setup the new real entry as my temp sensor but I cannot remove or reassign the faulty ghost device. Which continues to receive temperature data. I go in and reprogram again get everything set up and then one of the other temp probes starts doing it. I don't know exactly what's wrong here but it just started doing this about 30 minutes ago. I left it running all night with no problems.
[...]But I'm incredibly OCD and this thing is just pissing me off having a 4th retarded ghost device thy won't go the hell away when I set everything to unassigned.
I'm starting to think that it may be em interference.
My probes are on 1m wires. I say em interference because every since I brought this fridge home I've had problems with wifi devices all over my house.
Also while I'm testing there at high and low voltage wires going every which a way.
I put shrink tubing on the handle part!
I put shrink tubing on the handle part!
Hey I built my entire brewery with those test leads. They are super legit.

Your also the only person here out of 20+ that have built it with this problem and the only one using them
Im not saying thats the issue, but its the only thing i can see thats different than everyone elses setup.
There really isn't much heat dissipated by the 'Pi, Arduino and relay board, and all of the components have at least a commercial rating (so they're good way above the temperatures you'll see in a garage - even one that's too hot to spend any time therein).
I'd be more concerned with the freezer compressor than any of this stuff...
Cheers!

Hello all. Thanks for this great thread.
I'm trying to get the BrewPi up and running with a physical LCD display, but have no real output showing. The LCD powers on and shows two rows of blocks. The POT works to adjust contrast. But no characters as emulated in the top left hand corner of the BrewPi interface.
Do I need to modify any code in BrewPi to enable the display or will it work out of the box?
Thanks in advance for any suggestions!
======================
Background Info
======================
I am using a 20X4 board compatible with the Hitachi HD44780 driver, with 16 pins.
I have wired the LCD according to the following:
Wire your LCD screen to your Arduino. Connect the following pins:
LCD RS pin to digital pin 12
LCD Enable pin to digital pin 11
LCD D4 pin to digital pin 5
LCD D5 pin to digital pin 4
LCD D6 pin to digital pin 3
LCD D7 pin to digital pin 2
Additionally, wire a 10K pot to +5V and GND, with it's wiper (output) to LCD screen's VO pin (pin3).

Hey MongooseMan. Have you tried say a minute of video every hour?
Sent from my iPhone using Home Brew
Problem solved. ... now I can do the drum solo from In A Gadda Da Vida without perturbing BrewPi...
So...what to do next while waiting for R'Pints v.2...
Cheers!
I tried my hand at setting up a VLC stream yesterday.
That worked fine (I could view the stream using VLC on my laptop), but is tricky to get into a webpage, which is my priority.
I did increase the number of photos per minute (just by adding lines like this to my crontab:
"sleep 1;streamer -f..."
But I found that if you do too many, then the PC gets overloaded (it's trying take a new photo whilst still processing the old one, and hasn't fully released the device, etc) so settled on a sweet spot of 1 every 3 seconds.
The end goal is definitely a live video stream though.
Will hopefully get some time to work on that this weekend.


