HOWTO - Make a BrewPi Fermentation Controller For Cheap

Homebrew Talk - Beer, Wine, Mead, & Cider Brewing Discussion Forum

Help Support Homebrew Talk - Beer, Wine, Mead, & Cider Brewing Discussion Forum:

This site may earn a commission from merchant affiliate links, including eBay, Amazon, and others.
Status
Not open for further replies.
It's been running for over 6 hours and no fires yet!

ImageUploadedByHome Brew1406288387.316237.jpg
 
OK, here's a quick tut on how to get live video streaming onto your brewpi page (following on from this post on getting images from your webcam onto the page):

Disclaimers:
  • I've tested this in chrome, it works there
  • I've tested this on Safari on iOS devices, it does NOT work there
  • I've tested this using VLC on iOS devices, it works there

Setting Up VLC:
(Get VLC if you don't have it-> sudo apt-get install vlc)

Make sure your user has permissions to access the webcam:
Give a group called 'video' ownership of the webcam:
Code:
sudo chown root.video /dev/video*
Then, add 'brewpi' to the group:
Code:
sudo adduser brewpi video
Then, give brewpi access:
Code:
sudo chmod g+rw /dev/video0
That should work great. (Source)

Create a file in your home folder called "webcam.sh"
In it, put the following:
Code:
#!/bin/bash
cvlc v4l2:///dev/video0 :v4l2-standard= :input-slave=oss://denull :live-caching=300 :sout='#duplicate{dst="transcode{vcodec=theo,vb=1024,channels=1,ab=128,samplerate=44100,width=320}:http{dst=:8084/stream.ogg}"}'
Note: If your video still doesn't work because of permission errors accessing /dev/video0, then you can add the following line to your shell script, above the cvlc line (replacing the <password> bit with your brewpi password):
Code:
echo <brewpi password here> | sudo -S chmod 666 /dev/video0
Obviously, echo-ing the password into the sudo is bad and should be avoided if you can.


Save that file.
You can test it by running it (./webcam.sh) over SSH and seeing if VLC on any other computer can get to the stream (File->Open Network Stream->http://<brewpi address>:8084/stream.ogg

Making the script run on startup:
Now you want this script to run every time the computer starts up, so we'll add a task to the crontab:
Code:
crontab -e
Add a line at the bottom like so:
Code:
@reboot /home/brewpi/webcam.sh > /home/brewpi/vlclog.log 2>&1 &
This tells cron to run the script on reboot, and to pipe the output to that log file, just in case.

Adding the video to your page:
Now that that's working (hopefully), you can edit your index.php file to include the video:
So, where we previously had the canvas (down at the bottom of the page), we'll now just have this simple code:
(again, replacing the url portion with the correct address)
Code:
<video id='webcamVid' width='600px' controls>
[INDENT]<source src='http://<brewpi url>:8084/stream.ogg' type='video/ogg'>[/INDENT]
</video>

Reload the page in Chrome, and you should see the live stream from your webcam.
Good luck, let me know how it goes!

webcampi.jpg
 
Hey everyone, I've been trying to get this setup for the past few days.

I've got the BrewPi page up and running. It lets me access the maintenance panel and it seems every other feature is running fine.

I just can't seem to get my temp sensors recognized. I wired one DS18B20 sensor just like FuzzeWuzze's example on the first page, and it didn't recognize it. So I wired both just like he posted, and still nothing. The only difference is that I don't yet have the relay board wired, but I didn't think that mattered.

Any suggestions? I've followed all the instructions on here and the BrewPi documentation for configuring a device. Ground goes to GND, VCC goes to 5V (tested it with voltmeter just in case), Data goes to A4, and 4.7k ohms resistance between the VCC and Data. What's wrong?
 
At least I know how to find the ground pin now using a tester. For everyone else. Set to ohms 2k. With 1 lead on com and the other on V-ohm. Start testing by taking 2 wires and placing one of each on a separate tester leg. When you get a reading look at your leads. The one attached to Vohm is your ground. Now keep that one attached to ground alternating the other 2 wires to read their values. The higher value is you 5v in and the lower value is data.


I posted this earlier when I found out how to figure out which wire goes where
 
I posted this earlier when I found out how to figure out which wire goes where

I actually found your posts by searching the thread right after posting my question! I almost sent you a pm asking which one you have. I'm pretty sure we have the same one because mine also have the red, yellow and green wires. Who would put green for anything but ground?! That's so weird.

I've very hopeful that this will solve me problem and then I'll start working on the relay and outlet circuitry. I'm not able to see if this is the solution until later. I really do hope that's it.
 
Great work now I just have to find some cheap webcams for this purpose and figure out how to get 3-4 of them to work with each separate instances of brewpi in the same system.
 
And I ripped out most of the air dam in the back so maybe the top and bottom will cool a bit more relatively
 
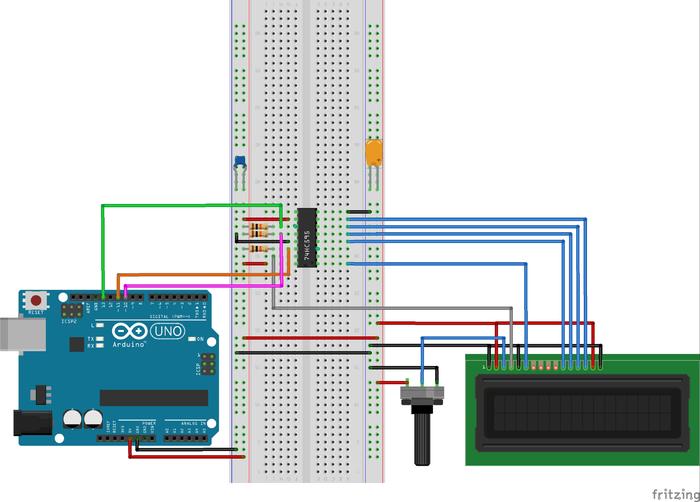
This is the schematic you want. You'll need a 595 shift register. No reprogramming of pins. Should be able to wire it up and have it work. I'm leaving on vacation for two weeks tomorrow or I'd throw this together and test it out. If nobody has by the time I get back maybe I'll put it together.

LCD_using_74HC595_and_SPI.png

Here's a drawing of the circuit that I built on a Radio Shack Prototype Shield (plugs right on top of an Uno). It's based on the BrewPi Rev C shield schematic and uses a 20x4 LCD, a 74HC595 Shift Register and a couple of 10K pull-up resistors.

As Homer Simpson would say Doh! :drunk:

Here's an corrected layout that connects the LCD to ground (properly). The original shield also includes a couple of capacitors that I did not need (blue cap is 100nF and yellow one is 10uF - if using a polarized cap watch your orientation). If your power source is marginal adding these two caps may help. Also the contrast pot (in my case) had a very narrow range of use.

BrewPi Rev.C - Jeff's Shield(2.0)_bb.jpg


IMAG0001r.jpg
 
So cool. Thank you for posting. I will be trying this very soon when I can get to radio shack.
 
Here's a drawing of the circuit that I built on a Radio Shack Prototype Shield (plugs right on top of an Uno). It's based on the BrewPi Rev C shield schematic and uses a 20x4 LCD, a 74HC595 Shift Register and a couple of 10K pull-up resistors.
Thank you for posting!
 
How important is the 4.7 k Ohms resistor's accuracy? I measured the resistors I bought and they were all 4.6 k Ohms, which is within the stated 5% accuracy. Will if affect the accuracy of the temp sensors?

I could easily wire a 100 Ohms resistor in series with the 4.6k Ohms and achieve the 4.7 k Ohms. Would that be better?
 
So cool. Thank you for posting. I will be trying this very soon when I can get to radio shack.


Just remember they don't sell shift registers at rshack in store. Unless it's in one of the maker kits possibly. and the ones they sell online I haven't been able to verify any like-correlation between them and the 595. I'm sure one of theirs would work I just don't like how non-descript the website is.
 
Has anyone tried using the DS2431 module they sell at adafruit in order to setup a couple relays on the 1-wire bus
 
Has anyone tried using the DS2431 module they sell at adafruit in order to setup a couple relays on the 1-wire bus
 
Ok I finally got my brewpi up and running. I've had so many issues with this, from the Debian OS (which I ended up using Ubuntu anyway), to the temp sensors, to the null values for the temps.

I was struggling a lot with the null values. I had everything working fine without plugging in the power cord to the wall. So I decided to go set everything up near my fridge, and suddenly, null values for my temps.

I finally got everything functioning exactly as it's supposed to (after reprogramming, removing devices, changing device assignments, everything). I'm so excited. I checked it at least 3 times while writing this post just to make sure it's still running fine.

Just one question, how do I make sure it doesn't give me the null values for the temps again? I was searching this thread and found maybe something to do with the power source or the usb cable? Any definitive way of making sure it doesn't happen again?

Edit: My fears came true. My laptop was inactive too long and it powered down. I lost everything and it says my arduino was an unknown version. I couldn't get my devices back and all were gone. I unplugged the cable from the wall and they suddenly reappeared. Plugged the power cable back in, and they were gone again. At least I've isolated the problem, but how do I fix it???
 
I had to set the laptop to still be alive when closed and also keep power supply plugged in if using for extended periods. Some people have reported here that if you power the arduino from a wall wart rather than just the usb the power is more stable and less prone to issues. Also make sure usb cable is not near power cables. I have been lucky so far with this and haven't had the same issues :)


Sent from my iPhone using Home Brew


Agreed. My ancient Dell chugs along fine always on, plugged in, Arduino power separate not just USB, power cords away from USB which has ferrite choke on it.


Sent from my iPod touch using Home Brew
 
Just remember they don't sell shift registers at rshack in store. Unless it's in one of the maker kits possibly. and the ones they sell online I haven't been able to verify any like-correlation between them and the 595. I'm sure one of theirs would work I just don't like how non-descript the website is.

$3.00 for 10 of 'em on Ebay with free shipping

10 x 74HC595 8 bit Shift Register IC DIP-16 TEXAS - USA SELLER - Free Shipping
http://www.ebay.com/itm/231229934732?ssPageName=STRK:MEWNX:IT&_trksid=p3984.m1439.l2649
 
I had to set the laptop to still be alive when closed and also keep power supply plugged in if using for extended periods. Some people have reported here that if you power the arduino from a wall wart rather than just the usb the power is more stable and less prone to issues. Also make sure usb cable is not near power cables. I have been lucky so far with this and haven't had the same issues :)


Sent from my iPhone using Home Brew


Ok so after troubleshooting, the problem isn't the circuitry or the power cable powering the refrigerator. I have isolated the problem to my laptop battery charger, which is a bummer. I can unplug the charger, and my temps come up right away after 3 seconds. Then I plug it in, and they go away and the display only shows "--".

It's a third party charger that I bought because I couldn't find my original one, but I don't really know what to do.

I found a long cable (5 feet) that works with the arduino, and it has a ferrite clamp at either end. I used this cable and was able to move my laptop very far away from the circuitry, but it still interfered too much. I plugged the charger at the other end of the room, and it still couldn't get the temps.

Any ideas besides getting a new charger? Any way to block interference? I've already tried a ferrite clamp on either side of the charger and it didn't help.

What sensors are you using? DS18b20's can have problems with interference. Try shielding the cable for your sensor.
 
With the LCD is there any other coding need or is it built into the hex file that is out?


Sent from my iPad using Home Brew
 
What sensors are you using? DS18b20's can have problems with interference. Try shielding the cable for your sensor.

I'm using some DS18B20s that I got very cheap on eBay. I'm wondering if better quality sensors will fix the issue. I ordered a new charger and some ferrite cable clamps. Hopefully that will be enough. I've been able to get it up and running and I've been monitoring it from work using TeamViewer and it seems to be holding the temperature but the temp lines on the chart are like dashed lines, presumably from when it loses the readings.

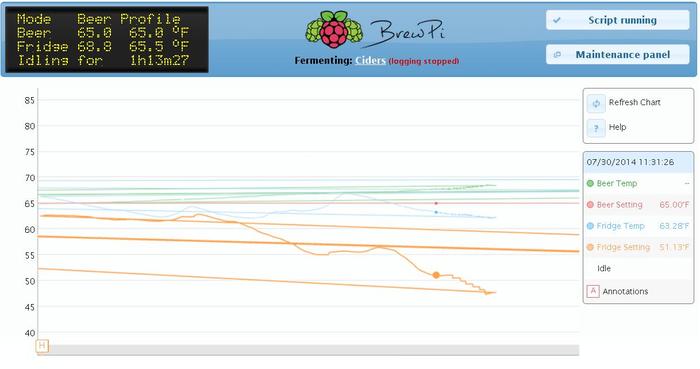
Also, one other question. Are any of you having problems with your chart? I tried searching this issue but I couldn't find anything. My chart will lose the time stamps on the x axis and I have no idea how to get it back. How do I fix that? I've tried refreshing both the chart and the page, as well as stopping and restarting the script. Any ideas?

Try wrapping the cables in aluminum foil. That might help.
 
I am unable to fix my chart. On my phone, I can navigate the charts much better on my phone, where it lets me see the earlier graph.

I've attached a couple of pictures to show you what I mean.

In the first picture, you can see that the time stamps are all gone, and the graphs all look weird. If I hover over them with my cursor, it will tell me the temps of each one and the time. But if you look at the second picture, I've moved the cursor back to the earlier part, and the time stamp shows a later time. I have no idea how to fix it.

brewpi.jpg


brewpi2.jpg
 
The data or json file has a glitch and the graph is showing the data points all the way through the file and hitting a bad zero at the end or something
 
I cant help but think its related to your sensors cutting in and out, once thats fixed I bet the graph is
 
I cant help but think its related to your sensors cutting in and out, once thats fixed I bet the graph is

I don't think so. I thought of that, but it logs even when the sensors are gone. Also, I started a new brew 2 hours ago and it was working perfectly until right now (which prompted me to post this).

I have been watching closely and I have the BrewPi on my second monitor while I've been on HBT.com and reddit. The sensors haven't cut off not even once this entire time, but it suddenly lost the timestamps and my chart looks screwed again.

The data or json file has a glitch and the graph is showing the data points all the way through the file and hitting a bad zero at the end or something

Perhaps you're right. But how would I fix it? I checked my logs, and found that it said "New day, creating new JSON file" at midnight. Does that mean anything? Do you guys think I should remove and reinstall BrewPi from my computer?
 
I am unable to fix my chart. On my phone, I can navigate the charts much better on my phone, where it lets me see the earlier graph.

I've attached a couple of pictures to show you what I mean.

In the first picture, you can see that the time stamps are all gone, and the graphs all look weird. If I hover over them with my cursor, it will tell me the temps of each one and the time. But if you look at the second picture, I've moved the cursor back to the earlier part, and the time stamp shows a later time. I have no idea how to fix it.


I had strange things. (So I thought) when I ran my last brew. On my phone I could navigate and see more than on my dell lappy. It turned out that the way I was using the mouse and holding / clicking gave different results. I couldn't see below 8 deg c. Was only because somehow I had scrolled down on the y axis with my mouse pointer. Have a play with the mouse by dragging and clicking around the axis. I thought there was something wrong also but was only the way I navigate around on the laptop vs the phone.


Sent from my iPhone using Home Brew

if you ever think you screwed up the graph just hit the reset graph button it resets it to the max display.

Really not sure what could be wrong with his display other than maybe a bad SD card not writing the file properly?
 
Status
Not open for further replies.
Back
Top