HOWTO - Make a BrewPi Fermentation Controller For Cheap

Homebrew Talk - Beer, Wine, Mead, & Cider Brewing Discussion Forum

Help Support Homebrew Talk - Beer, Wine, Mead, & Cider Brewing Discussion Forum:

This site may earn a commission from merchant affiliate links, including eBay, Amazon, and others.
Status
Not open for further replies.
I ordered the SainSmart one everyone said to get...not as cheap as some, but definitely not as expensive as the true Arduino board.

Also, I went to the calibrating probe page. That seems pretty crazy for the programming inept, but wondering if someone has written a program that will relatively calibrate the sensors based on ice water? Just curious.

How far off are your probes?
 
I have made it to the part where I am trying to reprogram the controller from the web interface. When I go through this it says that I need to install a new version of brewpi I think error 4 pops up as well. I have to my knowledge installed the newest version. The brewpi updater does not be able to program the controller. It pauses when it tries to open the serial port and says it can not determine the version. Im new at all of this and appreciate any help I can get. Thank you!

I do believe I got the arduino flashed... but now I have the script running on the interface and I get a list of devices. Although I can not seem to get them to read a value or even be associated with the correct pins. I notice that in the setup at the begining it should read the values and also show one wire for some of the devices. I can not see any of this. What could be the issue?
 
How far off are your probes?

Actually, I checked my probes out with a ThermoWorks K-Type Probe, and one was spot on...the other was 0.1*F off. I'm thinking this should be good enough for government work...by the time they get to a 50*F - 80*F, they will probably be different even if I calibrated them, right?

Also, I notice that one changes temp pretty quickly, and it takes the other one about 5 minutes to catch up (the beer one). I changed the slow probe out to a different one, but the same thing happens (although that one was closer to the "calibrated" probe than the first one).
 
Actually, I checked my probes out with a ThermoWorks K-Type Probe, and one was spot on...the other was 0.1*F off. I'm thinking this should be good enough for government work...by the time they get to a 50*F - 80*F, they will probably be different even if I calibrated them, right?
I'd be very happy with 0.1F off. The ds18b20 is only accurate to +- 0.9F anyway.

Also, I notice that one changes temp pretty quickly, and it takes the other one about 5 minutes to catch up (the beer one). I changed the slow probe out to a different one, but the same thing happens (although that one was closer to the "calibrated" probe than the first one).
I've noticed that too in my cheapo amazon probes. I'm guessing it has to do with poor construction. I would put the slow changing probes in the beer and the fast changing one in the open air of the fridge. The temperature of the fermenter is very slow changing anyway.
 
Also, I notice that one changes temp pretty quickly, and it takes the other one about 5 minutes to catch up (the beer one). I changed the slow probe out to a different one, but the same thing happens (although that one was closer to the "calibrated" probe than the first one).

I've noticed that too in my cheapo amazon probes. I'm guessing it has to do with poor construction. I would put the slow changing probes in the beer and the fast changing one in the open air of the fridge. The temperature of the fermenter is very slow changing anyway.


I've mention it previously, but the beer (and fridge, I believe) temp is software filtered. That is why it reacts more slowly than the others. It has nothing to do with the sensor itself.

It's discussed on the Brewpi forum here: Room Temp Sensor Sensitivity
 
What do you guys use to power the Pi and the Arduino. Ideally I would like to have 1 power cord going into my enclosure whether its AC or DC doesn't matter. Just looking for a clean install.
 
What do you guys use to power the Pi and the Arduino. Ideally I would like to have 1 power cord going into my enclosure whether its AC or DC doesn't matter. Just looking for a clean install.
I have an electrical enclosure which is big enough for the electronics and a single outlet receptacle (comprising an electrical back box and a single-outlet faceplate). The mains supply cable enters the enclosure and enters the back box to feed this outlet. I plug a 5V USB power supply into that outlet to power the Pi, but it's still inside the enclosure. My mains relay is housed in the space inside the outlet's back box, and powered by the same mains supply cable. The relay outputs are wired to electrical outlets on the outside of the outer enclosure.

I am happy with this design because all of the mains-level stuff is inside a properly rated box (the outlet back box) inside the large enclosure. It means I can open the outer enclosure for inspection or fiddling, but there is no exposed or accessible mains wiring. To access that I need tools to remove the outlet faceplate.
 
I have an electrical enclosure which is big enough for the electronics and a single outlet receptacle (comprising an electrical back box and a single-outlet faceplate). The mains supply cable enters the enclosure and enters the back box to feed this outlet. I plug a 5V USB power supply into that outlet to power the Pi, but it's still inside the enclosure. My mains relay is housed in the space inside the outlet's back box, and powered by the same mains supply cable. The relay outputs are wired to electrical outlets on the outside of the outer enclosure.


I am happy with this design because all of the mains-level stuff is inside a properly rated box (the outlet back box) inside the large enclosure. It means I can open the outer enclosure for inspection or fiddling, but there is no exposed or accessible mains wiring. To access that I need tools to remove the outlet faceplate.


What size is the big box? Right now my main dilemma is aesthetic approval from SWMBO. Could I use something like this to provide DC power to both the Pi and arduino?

http://m.ebay.com/itm/GEREE-AC-DC-C...Protector-Output-12V-/262388177395?nav=SEARCH
 
Hi there,

The enclosure is about 210mm x 160mm x 130mm (about 8" x 6" x 5").

The PSU you linked to is fine I suppose, but it is a bare module, so you'd have to put it in an enclosure for safety. Also, it has a 12V output, which you'd have to drop to 5V for the Pi. I am using a plug-in USB wall wart rated at about 1.5A, which I plug into the outlet inside the enclosure.

If you look through this thread (massive undertaking, I know) you can see a lot of DIY assembly ideas. If you do a Google image search for brewpi you might get some interesting ones more quickly. A lot of them have everything inside one box, but mains power and low-voltage are not separated, and the mains terminals are exposed. Of course, it's safe when the enclosure is sealed, but I don't like the idea that a loose wire could bridge between the mains parts and the low-voltage parts. Also, it would be too tempting to run it with the lid off and forget that some terminals are live when you're poking at the Pi or checking the wiring between the parts.
 
The instructions for uploading work fine, ive done it a dozen times when writing them. Its because for whatever reason people are getting these **** arduinos now that have no bootloader or anything loaded on the Atmel chip...i probably need to write instructions to flash the Arduino with a blank image using the Arduino IDE first, but its one of those things i cant really test.
 
What size is the big box? Right now my main dilemma is aesthetic approval from SWMBO. Could I use something like this to provide DC power to both the Pi and arduino?

http://m.ebay.com/itm/GEREE-AC-DC-C...Protector-Output-12V-/262388177395?nav=SEARCH

You dont want 12V...you want 5.

I use this for my RPI in my StrangeBrew Elsinore panel.

http://www.amazon.com/dp/B008LT2PGY/?tag=skimlinks_replacement-20

I wire in my 120V mains to one side, and cut an old USB cable i had up, looked online for which color is what in a usb cable and wired it up to the output of the power supply and plug the micro usb side into the RPI.
 
Last edited by a moderator:
I started with dual 200w incandescent globes. Found this was cycling heat and cool too often.
Dropped to 1 x 100w. Then 1x 60w.finally 1x 25w.i found for my setup 25w is all I need.
I also run a small pc fan 24/7 in the fridge.
It's a small fridge that just fits my plastic carboy. I brew 23litre batches.
I also tried a personal 200w fan heater. This was too much. I also tried a 1500w hairdryer for no real reason.
25 w is fine for my setup for similar ambient temps you are showing.
I would think 60 w would be plenty.
Many here use much bigger heaters than 25 w
Reptile heaters. Heat tape. Personal 200 w heaters. Doesn't really matter.
If you haven't put a small fan in id try that first.

So I had a play around with putting in 5 gallons of water to see if the increased thermal mass would make a difference, and adding a fan, but I could not maintain 22degrees C at night.

Looking at your graphs, your ambient temp isn't going quite as low as mine (8 vs around 2 for me)

I ended up getting a replacement 200W heater with a fan built in, and it has improved things dramatically.

I think its time to get some beer in this thing!

bewpi.png


bewpi zoom-in.png
 
Why would you think that?
Also, I have always compiled my brewpi avrs with gcc.

I sit corrected, I thought I'd read that the entire code set for the BrewPi hex file was structured specifically for Atmel Studio.

Any chance you could further enlighten me with the process used to compile using the Arduino IDE?

Cheers!

[edit] Here's what led me to believe Atmel Studio was needed...

"Building the firmware for Arduino
[...]
To build our firmware for Arduino, you will have to use Atmel Studio."

This is what I do to compile the code, been working great for 2ish years now:
Compiled on a ubuntu linux system with gcc-avr toolchain installed. (this can probably be done from the rpi too)
1) go to the brewpi-avr/Build directory
2) add two directories to this directory, one named "tmp" and one named "final"
3) open a terminal in the brewpi-avr/Build directory
4) use the following command to compile (from Elco):

make RM=rm TOOLCHAIN_BIN=/usr/bin/ EXE= BOARD=uno SHIELD=revC TARGET_NAME=brewpi-uno-revC BUILD_NUMBER=00000 BUILD_NAME="revC" all

After that command finishes you'll have a shiny new .hex file in brewpi_avr/Build/final

-UNTESTED-
I can't speak as to whether or not the IDE produced hex file works as expected as I haven't uploaded it, I just used this procedure a while back for quickly testing size limits (or something or other) for different boards. To compile in the arduino IDE:
1) go to the brewpi-avr directory and change the file name of Main.cpp to brewpi_avr.ino
2) open brewpi_avr.ino in the IDE
3) within brewpi_avr.ino comment out line #43, change "void main(void)" to "int main(void)", and in between line #58 and 59 add "return 0;"
4) in brewpi.h comment out line #48

Using Arduino IDE 1.0.5 this *compiles* without issue, however I haven't bothered to upload and test it simply because I hadn't needed to yet.

(IE at this point I'm not promoting this procedure, just responding to your request. I recommend the first method (at this point) as that's how the official hex file is compiled anyway)
 
Last edited by a moderator:
The instructions for uploading work fine, ive done it a dozen times when writing them. Its because for whatever reason people are getting these **** arduinos now that have no bootloader or anything loaded on the Atmel chip...i probably need to write instructions to flash the Arduino with a blank image using the Arduino IDE first, but its one of those things i cant really test.

Interesting, knock offs of knock offs then? So you're thinking to just send folks with these issues to this page: https://www.arduino.cc/en/Tutorial/ArduinoToBreadboard ?

I'll say that I haven't experienced trying to use an atmega with out the bootloader installed. But I do seem to remember still having issues with the brewpi's upload script myself, so I just did it manually... This was a while ago, I could be mistaken.

[edit]
You can test it by removing your bootloader and going from there http://higherorderinnovation.com/remove-those-bootloaders/
I just received 2 UNO R3 knockoffs today.I was able to run the BLINK script from the Arduino program. How do you check if the bootloader is installed?
 
I just received 2 UNO R3 knockoffs today.I was able to run the BLINK script from the Arduino program. How do you check if the bootloader is installed?

That's how! If the arduino ide is able to upload a sketch in the first place that means the atmega chip already has the bootloader installed. Sounds like you're good to go.
 
Question about USB cables for Arduino. I tried using a regular, longer cable with my Arduino and "Python can't run script" or something like that. I used the USB able that came with the Arduino...everything is working fine. Unfortunately, that cable is way too short. Do any of you have experiences with the AmazonBasics Hi-Speed, Gold Plated USB cables? I only need 3 feet, but there is a 6 foot one that is pretty cheap. Do you think this is a "good" cable for running the Arduino off a laptop?

Also, is there a way to change how long it waits to heat/cool? It waited 5 minutes or so to heat when I tested it and 10 minutes to cool. Actually, it says "Waiting for peak..." right now...cooling just kicked in. New case and everything is working...just would like to get the lag time to heat and cool down a bit.
 
Mine I tested today and my probes are good to go as well as my relay surprisingly worked fine despite the previous blunder and my outlet turned on with the relay 🙂. Thanks to all who have helped. I havent switched the wire colors yet to represent the correct colors but plan on in before I get everything sealed in the project box all nice and neat. When I go to the brewpi IP address on my tablet (iPad Air 2 using chrome) I get a cannot receive lcd text from Python script message but it's intermittent. It will show for 5 seconds or so the. Go to the normal screen for another 5 seconds or so. It does t seem to affect the brewpi as the heating or cooling stays on as it goes through this cycle. I'm sorry if this has been asked before but I could only read so many pages of this super long thread.
 
Mine I tested today and my probes are good to go as well as my relay surprisingly worked fine despite the previous blunder and my outlet turned on with the relay 🙂. Thanks to all who have helped. I havent switched the wire colors yet to represent the correct colors but plan on in before I get everything sealed in the project box all nice and neat. When I go to the brewpi IP address on my tablet (iPad Air 2 using chrome) I get a cannot receive lcd text from Python script message but it's intermittent. It will show for 5 seconds or so the. Go to the normal screen for another 5 seconds or so. It does t seem to affect the brewpi as the heating or cooling stays on as it goes through this cycle. I'm sorry if this has been asked before but I could only read so many pages of this super long thread.

Grand that you have got it working!

The intermittent "cannot read from lcd.." can be fixed by changing the KeepAliveTimeout 5 to KeepAliveTimeout 99 in apache.conf and then restart the raspberry pi.

Regards /A
 
[...]Do any of you have experiences with the AmazonBasics Hi-Speed, Gold Plated USB cables? I only need 3 feet, but there is a 6 foot one that is pretty cheap. Do you think this is a "good" cable for running the Arduino off a laptop?

The problem you're seeing is most likely being caused by voltage drop across the long cable. If you powered the Uno with a 9V wall wart the odds of success improve substantially with any USB cable conveying just the USB data (and providing a ground reference to the host).

Also, is there a way to change how long it waits to heat/cool? It waited 5 minutes or so to heat when I tested it and 10 minutes to cool. Actually, it says "Waiting for peak..." right now...cooling just kicked in. New case and everything is working...just would like to get the lag time to heat and cool down a bit.

The 10 minutes to cool is actually there to protect a compressor against short-cycling. It would be inadvisable to shorten it. As far as I know there's no comparable delay on the heating side.

"Waiting for peak" is not the same, it's actually the PID trying to figure out how things work...

Cheers!
 
Question about USB cables for Arduino. I tried using a regular, longer cable with my Arduino and "Python can't run script" or something like that. I used the USB able that came with the Arduino...everything is working fine. Unfortunately, that cable is way too short. Do any of you have experiences with the AmazonBasics Hi-Speed, Gold Plated USB cables? I only need 3 feet, but there is a 6 foot one that is pretty cheap. Do you think this is a "good" cable for running the Arduino off a laptop?


Also, is there a way to change how long it waits to heat/cool? It waited 5 minutes or so to heat when I tested it and 10 minutes to cool. Actually, it says "Waiting for peak..." right now...cooling just kicked in. New case and everything is working...just would like to get the lag time to heat and cool down a bit.


Using a powered hub is your best bet or powering the arduino externally.

Let the brewpi do its thing for a while. it has to learn in order to function properly. its waiting for peak because it is trying to determine the right amount of time to stop cooling or heating to avoid thermal momentum.
 
Using a powered hub is your best bet or powering the arduino externally.

Let the brewpi do its thing for a while. it has to learn in order to function properly. its waiting for peak because it is trying to determine the right amount of time to stop cooling or heating to avoid thermal momentum.


I grabbed a longer USB I had from an old external hard drive and it worked fine. Other one was just a crappy cable. Not sure the voltage drop on the same size wire over 6 ft. Should really matter. It doesn't in the electrical biz. I'm thinking this new cable will work fine.

Also...thanks on the BrewPi program info. HomeBrewTalk is such a great forum. I guess I was wondering about the lag with the BrewPi 'cause my keezer temp controller is set more on temp swings than time...and it will take longer than 10 minutes to drop 2 degrees! However, don't want a 4 degree swing in the ferm chamber, so that makes total sense!
 
It definitely makes a difference in the duino world. I've had success with up to four running off one powered USB hub on a 16' micro USB cable. but they were all high density monoprice cables and hub.
 
If noobs has Jessie will brewpi install correctly with the wiki instructions? I know it is set up for wheezy so maybe I should look particularly for noobs that has wheezy?
 
If noobs has Jessie will brewpi install correctly with the wiki instructions? I know it is set up for wheezy so maybe I should look particularly for noobs that has wheezy?

I installed Jessie and then BrewPi software. There were a couple screens during install that you have to figure out.

However, I have to say "SUCCESS!!!" and thanks to everyone for their help. Now, I just have to learn from everyone about profiles, etc.

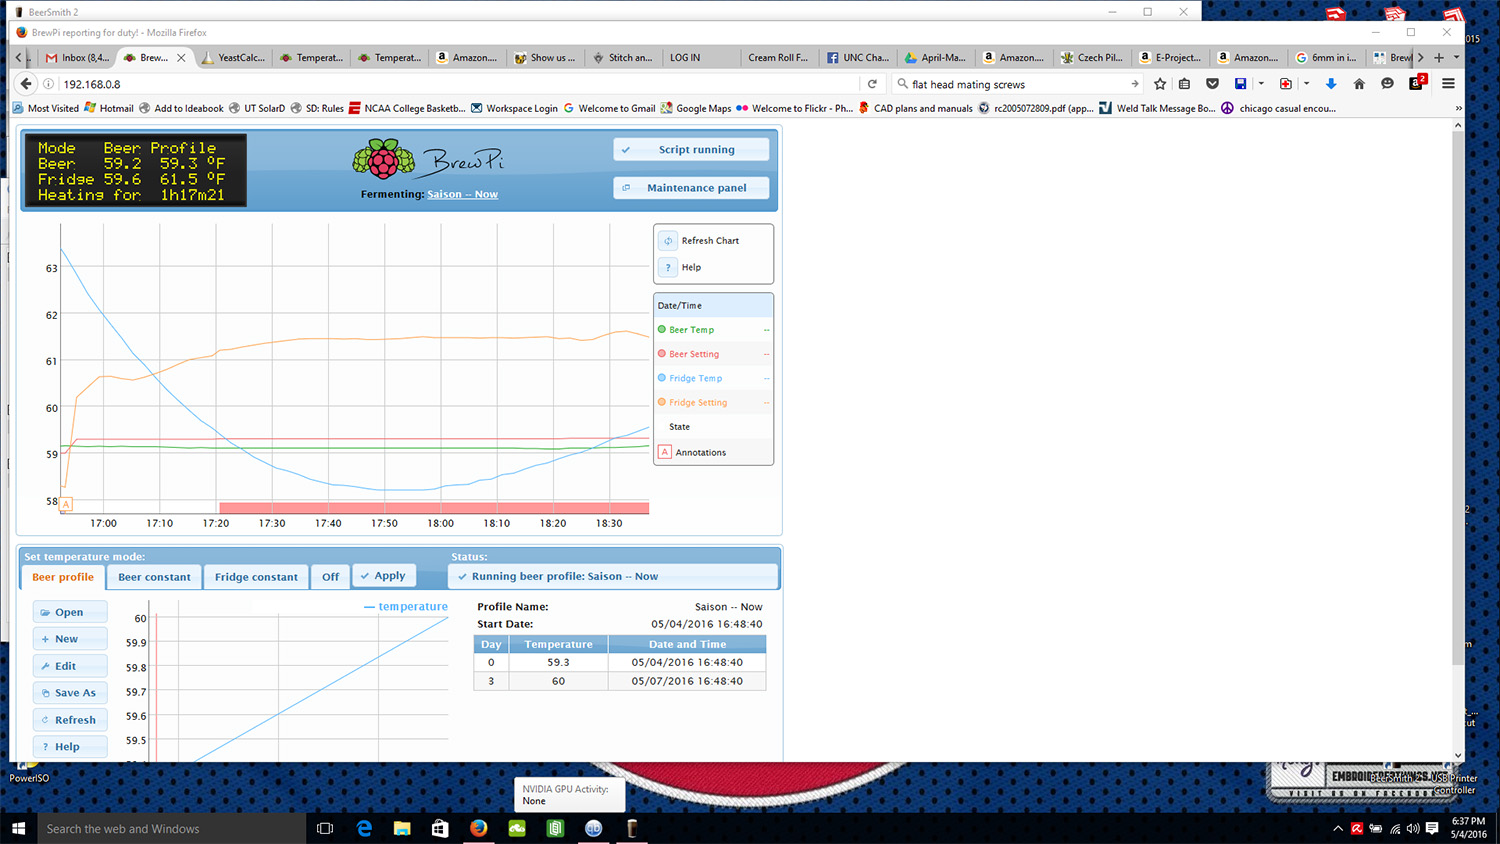
Here is my BrewPi setup. I love this because my WiFi LAN (with repeater at back of the house) lets me check on this in the comfort of my home...while ferm chamber is in garage. I mounted this all in a Hammond Ice Blue case. I also added some Blue Sea LED lights to let me know at a glance if it is cooling/heating (Red = Heat, Green = Cool). Screenshot is from my computer accessing BrewPi via WiFi LAN. This is a test run with a saison that is coming down from a peak of 81.2*F. It was at 59.1, so I set the thing at 59.3.

:mug:

20160504_brewpi-setup-chamber.jpg


20160504_brewpi-screen.jpg
 
Grand that you have got it working!


The intermittent "cannot read from lcd.." can be fixed by changing the KeepAliveTimeout 5 to KeepAliveTimeout 99 in apache.conf and then restart the raspberry pi.


Regards /A


Just noticed it doesn't ever do this from my desktop with chrome should I change these values anyways?
 
If noobs has Jessie will brewpi install correctly with the wiki instructions? I know it is set up for wheezy so maybe I should look particularly for noobs that has wheezy?

It seemed to work for me. I am still setting up hardware but everything installed fine with exception to having to modify an Apache2 config file. I am using the Raspberry Pi 3 and couldn't get Wheezy to even boot with an image on the SD card. That may be because of using a Pi 3, so I went with the latest version of NOOBS with Jessie. I guess it is a good thing because I don't think Wheezy can support the on board Wifi of the Pi 3 without a kernel modification.

Anyway, everything is running and temps are being recorded. I can get my relays to turn on and off as expected so it seems to be working fine with Jessie.

I don't remember exactly what file I changed in the Apache2 config and I am not sitting in front of the Pi to take a look. But in the config file Apache is pointing to /Var/WWW/HTML for available webpages. This needs to be changed to /Var/WWW since the tutorial is placing the files in /Var/WWW/Chamber1 and /Var/WWW/Chamber2.

If you don't change that config file, when you open a browser and go to your local machine that is running Apache2, it will still show the "It's working" page as opposed to the directories for Chamber1 and Chamber2.


On Edit: I did a quick Google for the file and I do believe this is the one that needs the above mentioned change:

/etc/apache2/sites-enabled/000-default.conf
 
It seemed to work for me. I am still setting up hardware but everything installed fine with exception to having to modify an Apache2 config file. I am using the Raspberry Pi 3 and couldn't get Wheezy to even boot with an image on the SD card. That may be because of using a Pi 3, so I went with the latest version of NOOBS with Jessie. I guess it is a good thing because I don't think Wheezy can support the on board Wifi of the Pi 3 without a kernel modification.

Anyway, everything is running and temps are being recorded. I can get my relays to turn on and off as expected so it seems to be working fine with Jessie.

I don't remember exactly what file I changed in the Apache2 config and I am not sitting in front of the Pi to take a look. But in the config file Apache is pointing to /Var/WWW/HTML for available webpages. This needs to be changed to /Var/WWW since the tutorial is placing the files in /Var/WWW/Chamber1.

If you don't change that config file, when you open a browser an go to your local machine that is running Apache2, it will still show the "It's working" page as opposed to the directories for Chamber1 and Chamber2.


People shy away from Jesse because it requires more work to get it work with the current instructions. but Jesse has been around for some time. in fact early last year when I last messed with this project it was already available on pc and that's what I did all my testing on. it can be an issue for rpints but mostly because of inconsistencies with chromium not being able to be installed, which as far as I know, has been fixed also. the problem isn't Jesse it's the changes that came with the apache update changing the root web folder, which can be worked out in multiple ways.

Wheezy can be run from a pi3 but it requires a little work and access to a pi2. you'd have to install wheezy on a pi2, finish all necessary updates and upgrade then install rpi-update and update the firmware. then you can put the sd card back in the pi3 and it *should* work.
 
It seemed to work for me. I am still setting up hardware but everything installed fine with exception to having to modify an Apache2 config file. I am using the Raspberry Pi 3 and couldn't get Wheezy to even boot with an image on the SD card. That may be because of using a Pi 3, so I went with the latest version of NOOBS with Jessie. I guess it is a good thing because I don't think Wheezy can support the on board Wifi of the Pi 3 without a kernel modification.

Anyway, everything is running and temps are being recorded. I can get my relays to turn on and off as expected so it seems to be working fine with Jessie.

I don't remember exactly what file I changed in the Apache2 config and I am not sitting in front of the Pi to take a look. But in the config file Apache is pointing to /Var/WWW/HTML for available webpages. This needs to be changed to /Var/WWW since the tutorial is placing the files in /Var/WWW/Chamber1 and /Var/WWW/Chamber2.

If you don't change that config file, when you open a browser and go to your local machine that is running Apache2, it will still show the "It's working" page as opposed to the directories for Chamber1 and Chamber2.


On Edit: I did a quick Google for the file and I do believe this is the one that needs the above mentioned change:

/etc/apache2/sites-enabled/000-default.conf

If I remember I believe it asks about the var/www file while installing. If I don't accept the default, which I believe in Jessie will say var/www/html, and I tell it to go to var/www instead. Will this make the same change you made?
 
Not sure where in the 5300 posts this might be mentioned, but how long does it take for the BrewPi to "learn" your system? I've been "ramping" a saison from 59.3 to 60.0 over 3 days to see how the system works. Beer is about 10.5 gallons (Chronical with Thermowell in the middle). It is installed in a 14 cu ft freezer and has a reptile heating wrap on it.

Over the past 18 hours, I have noticed a couple of things. There were 5-10 minute "SPIKES" in the reading, so I'm guessing these are "glitches" in the system...no way to spike 10.5 gallons over 5 minutes. Also, the cooling portion of the profile dips WAY down. I don't think it would need to do this unless very active fermentation. This beer has reached almost terminal gravity...so thermal momentum (as someone coined earlier) is almost nill.

I have noticed that cooling "dips" get less and less. The overshoot is about 0.5 degrees at max.
 
If I remember I believe it asks about the var/www file while installing. If I don't accept the default, which I believe in Jessie will say var/www/html, and I tell it to go to var/www instead. Will this make the same change you made?

It should, but I installed from the latest NOOBS and I didn't see any questions while installing. It just installed and when re-booted automatically logged in with the user "Pi." So I created a new user "brewpi" and added it to all the same groups that "Pi" was a member of so I could just copy/paste all of the commands from the tutorial and not have to change anything. I also turned off the automatic log in of user "Pi." :)

Even when installing Apache2, PHP, MySQL (for Raspberrypints) the only thing I remember being asked is what my admin password was for the database. And I think that was only for SQL. It was late and the home brew clouds my memory...aha

I guess the other minor hassle was with setting preferences. I don't know if it is Jessie related or not, but trying to configure your localization (US, UK, etc.) for time zone and keyboard and such was a pain. When using the GUI for setting preferences they would never stick. I ended up using the raspi-config command from the terminal and setting everything that way.
 
...it can be an issue for rpints but mostly because of inconsistencies with chromium not being able to be installed, which as far as I know, has been fixed also...

Yeah, I am going to have to dig into that. I think I tried to install chromium during the rpints install and it balked at me for not being able to find it in the repositories. I didn't spend any time with it though. Hopefully it is fixed or there is an easy work around if it isn't.

I'm not sure I am going to run a dedicated monitor for displaying rpints. I can access the beer list on the rPi3 from my laptop and iPad without any issues. I don't entertain, and the GF always makes me pour her beer anyway ;), so I am the only one who needs to know what is where.
 
Status
Not open for further replies.
Back
Top