How to prevent scorching in my electric RIMS?

Homebrew Talk - Beer, Wine, Mead, & Cider Brewing Discussion Forum

Help Support Homebrew Talk - Beer, Wine, Mead, & Cider Brewing Discussion Forum:

This site may earn a commission from merchant affiliate links, including eBay, Amazon, and others.

humulus1

Member
Joined
Nov 30, 2010
Messages
10
Reaction score
2
Location
Portland
I've been RIMS brewing for years with my 1/2 barrel gas-fired system. Maintaining mash temperatures has always been a pain in the rear though, so recently I put together a PID-controlled electric inline heater for the recirc. The heating element is this:

DERNORD 240V 5500W Foldback Heating Element Water Heater with Low Watt Density:Amazon:Home Improvement

It's a 240V, 5500W, foldback, low-density element. I run it on 120V, so it should be 1400W and pretty low density. I've been wanting to brew a Hefe Weizen, and I thought this would be the perfect test for the heating element, as I could use it for a multi-step mash. I mashed in at ~99F, and stepped through a couple rests, when the unmistakable smell of scorched wort made itself known. I ended up dumping the batch; it wasn't even worth pitching the yeast.

How do I avoid the scorching? For the steps, the element was running at full power. I had the flow turned back a bit to avoid compaction, but I was controlling the temp at the outlet of the element so the wort temperature never got above my step target. I assumed running a low watt density element at half-voltage should give me plenty of leeway, what went wrong?
 
Sounds like you might have some dead flow zones in your RIMS tube. Can you post some pictures of your system, particularly the RIMS tube configuration.

Brew on :mug:
 
What does the element look like when you remove it from the RIMS tube? You may see scorching on some parts of the element and not others, which would be a sign of what Doug suggested above.

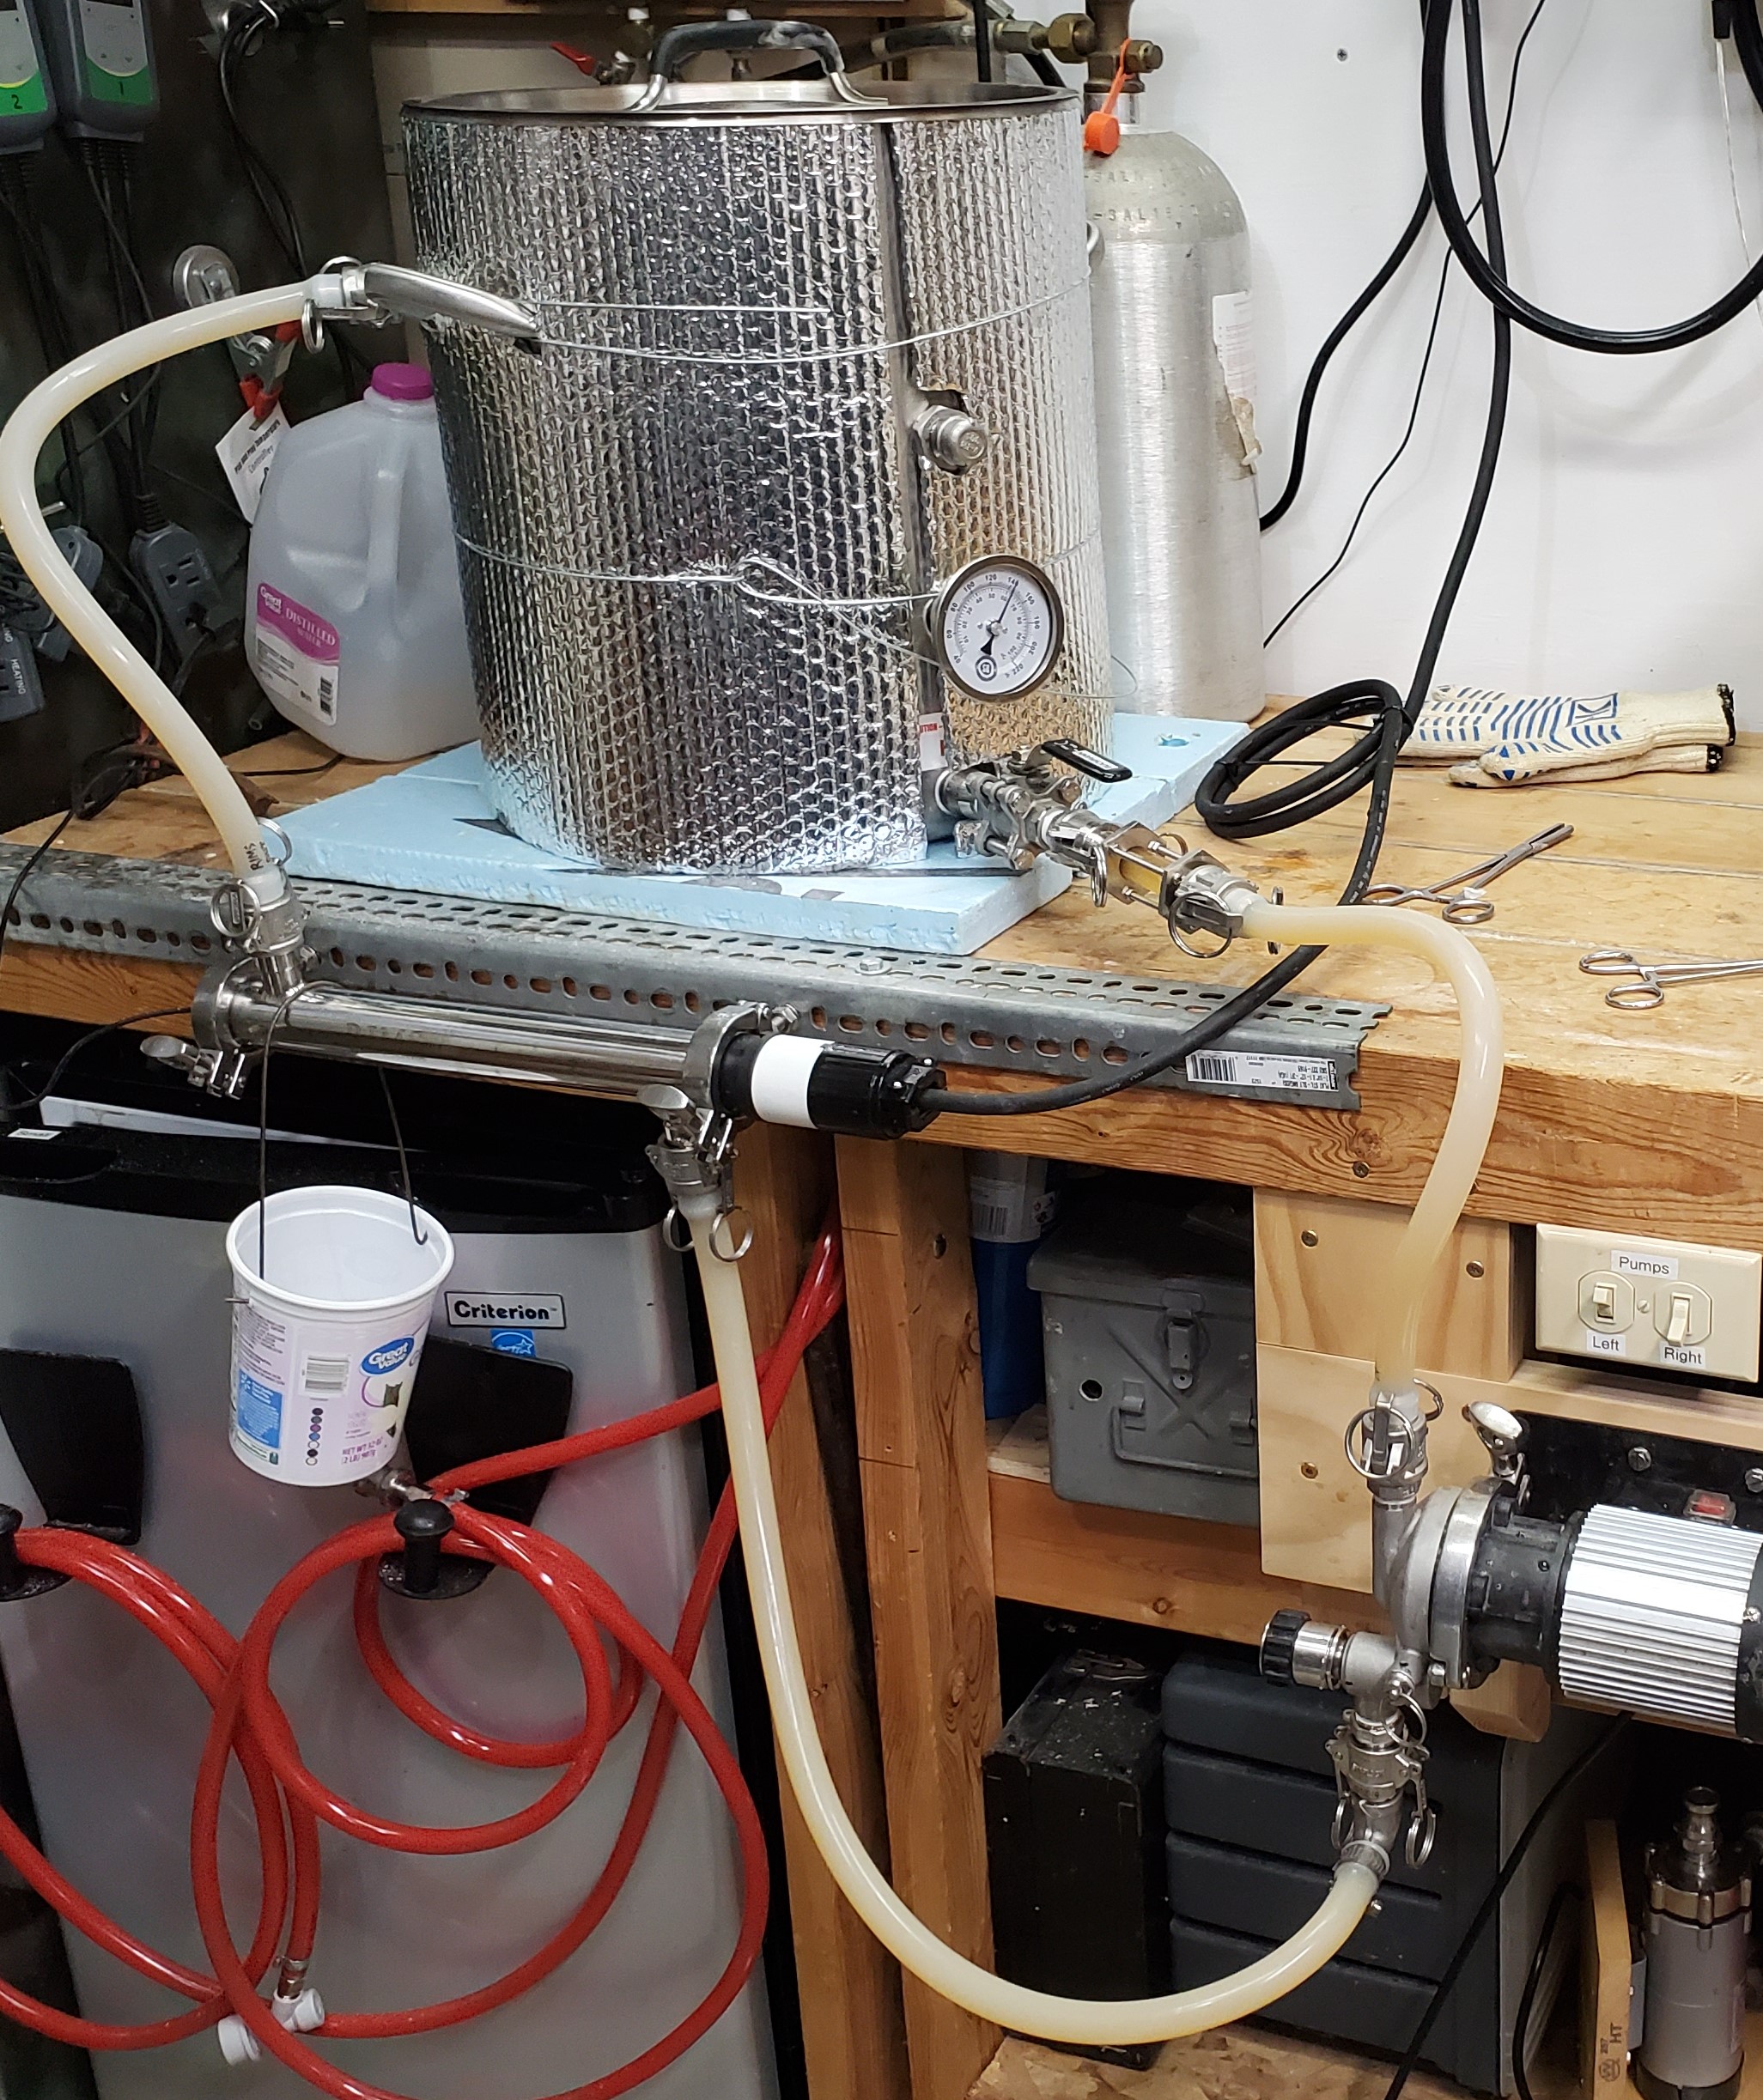
My RIMS is only 120v, but early on I learned the hard way that the power to the element does not come on until I've established a good flow with the pump and there are no bubbles remaining in the tube. Below is a pic of how it's set up; the input port points down, the output port points up. The idea is the bubbles should exit the top and be disposed of in the mash, resulting in a complete liquid bath for the element.

Some orient the tube vertically, which I shied away from because I didn't like the prospect for an air bubble at the very top of the RIMS tube.
brewarearims.jpg
 
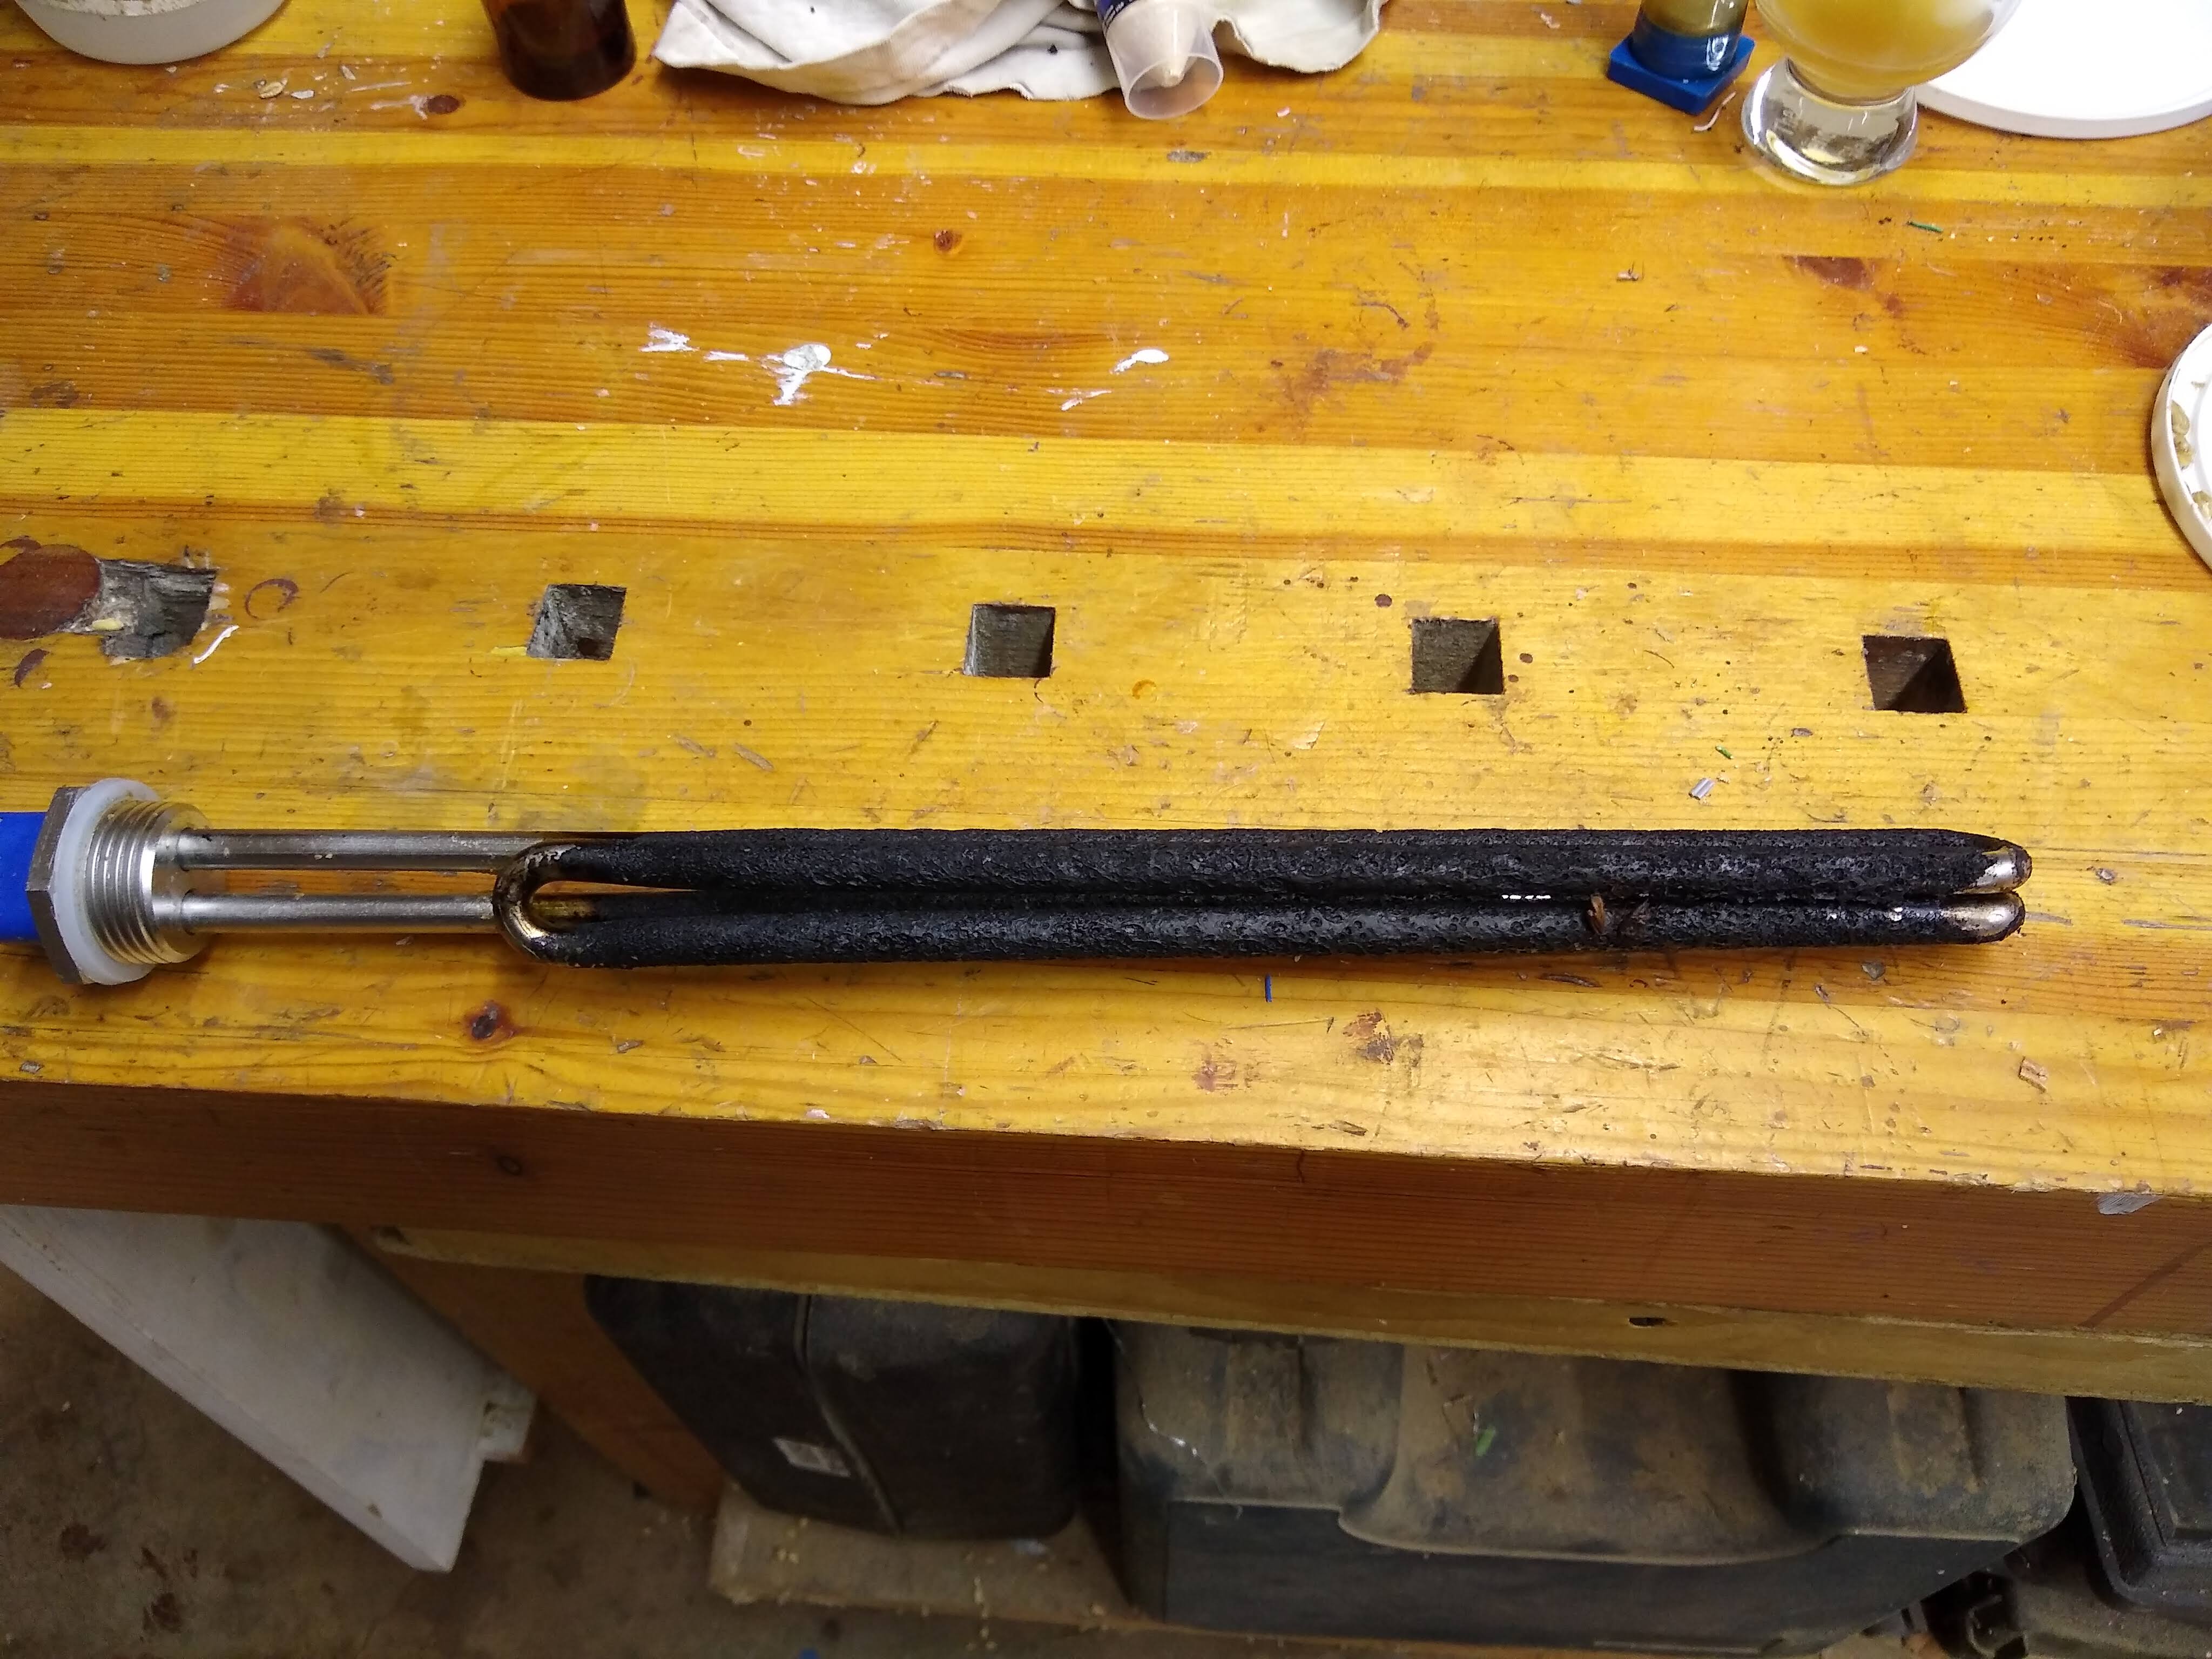
Tough to get a good pic right now... This is the element:
IMG_20200711_212811343.jpg


This is the heater:

IMG_20200711_212723286.jpg


It's a vertical copper pipe, 1.5" ID. The inflow comes in from the right, about 3" above the bottom where the element screws in. The outflow is straight out the top. The element goes all the way up to the reducer at the top of the column. The only real dead zone is the 3" at the bottom, but that does not appear to be where it is scorching.

(BTW, I'm not sure the scorch you see on the element is an accurate depiction of what really happened. After the recirc was done and the wort was in the kettle, I started taking apart the system and drained wort from the column. After several minutes I realized that the heater was still on, at about 20% power. So some of that scorching on the element is the result of running the element 'dry' for a little while.)
 
So much for the dead flow zones. Can't imagine how that would happen with your setup. All the more bizarre with running it at 120v.

Only thing I can think of is the PID is not correctly sensing and correcting.....unless when you start pumping you have an air lock and aren't actually pushing liquid through the tube.
 
Thanks for the replies, all. The tip of the thermoprobe is a couple inches above the tip of the element.
I get the flow going, first - I can see wort coming back into the tun - before I turn on the heater.
 
What do you think the rate of flow was?

I had issues with scorching a while back and by increasing the flow to about 2gal per minutes I was able to avoid it.

I played around with lowering the power to the RIMS but flow rate seemed to be more important.

It also seem like when I first dough-in and the wort is very starchy it is easier to scorch so I have been heating the mash water high enough to allow the grain to drop the temp to the desired mash temp then allow to sit for 10 to 15 minutes before applying heat.

There might be some information in this thread

anyone doing protein rest with their RIMS?
 
I've never measured flow rate; I'll try next time I mash. It varies a lot though, depending on what, and how much, I'm mashing.
I could lower the power, but that would make step mashes (which is one of the reasons I added the element) pretty slow.
 
As someone who uses a RIMs element at full power (5.5kW) for direct sparge heating and mashout, I have done a lot of testing on RIMs configurations. I recommend the following (some of which you are doing already).

1. Mount your RIMs tube vertically. This is a must because if you get a low flow situation (or local boiling), the heated wort (or steam) will rise along the element and the temp probe/controller will pick up the temperature change and dial back the heat. @mongoose33 mentioned but I think horizontal is a no-no. Also, your probe should be right above the element.
2. The RIMs tube should have as little dead space as possible as @doug293cz mentioned. Your mention 1.5" ID, which is a bit bigger than standard 1.5" tubes which are 1 3/8" ID. When you have a small element in a big tube, the wort surrounding the element will be super-heated while the wort at the tube edges will just be chillin (literally - NO temp increase). Once they blend at the exit, they will be at the temperature you are aiming for, leading you to believe the whole volume of wort is being equally heated. Trust me - it is not.
3. Which brings me to this point: mixing is needed. To get this, aka turbulent (vs. laminar) flow, you need a fast flow rate, or some type of baffling inside the tube. These elements were not made to heat wort, so we can't expect them to work correctly out of the box. You can wrap the element in figure-8's of stainless wire - I did this a while back and it successfully created some mixing in the tube while also dispersing heat away from the element.

It takes a lot of effort to get that level of scorching... I'm suspecting you had a no flow situation at one point and overlooked it. Once you get caramelization on the element, it will snowball though. Try limiting your output power to, say 50% max and make sure your duty cycle is as fast as practical (say, 1 second), then see what types of temp control you get with it.
 
As someone who uses a RIMs element at full power (5.5kW) for direct sparge heating and mashout, I have done a lot of testing on RIMs configurations. I recommend the following (some of which you are doing already).

1. Mount your RIMs tube vertically. This is a must because if you get a low flow situation (or local boiling), the heated wort (or steam) will rise along the element and the temp probe/controller will pick up the temperature change and dial back the heat. @mongoose33 mentioned but I think horizontal is a no-no.

The main criterion I had read about was that the output side of the RIMS tube should be up and the input side pointing down so you don't get trapped air in the tube. I'd never seen that it shouldn't be horizontal. I've never had mine any other way than horizontal and the only scorching I ever experienced was when I decided to run it without the pump moving wort. :)

Learned that lesson the hard way. Now, I turn on the pump, and there's always some gurgling from air bubbling out in the return manifold in the mash, and only when I have no bubbles do I turn on the PID.

Mine is from BrewHardware. In the instructions at the end of the product page: The unit can be mounted either horizontally or vertically, but for each of those, the wort in/out ports should be a certain way. If you go vertical, orient the element end down and pump liquid from the lower port up to the upper port. If horizontal, put the element end port in the "down orientation" and use this as the input.

 
I'm sure I must have an air pocket at the top, but the temperature sensor extends into the liquid, so it shouldn't be an issue.
 
I’m definitely not trying to call you out - I realize I worded it strongly above - sorry about that. If it’s working for you then I don’t think you need to think twice about it.

My suggestions are based on my testing and experiences. That testing showed that local boiling happens sooner in a horizontal config. I’ll also restate that the situation you mentioned of the lesson learned should not occur with a vertical tube - the overheated liquid gets sensed by the probe where this does not happen horizontally.

Again, the most important factor is mixing and contact. More movement in the wort without over stressing it mechanically is key. These elements have a fraction of the area of a HERMs setup so need to dump more more heat into a small surface area. We actually make a purpose-built RIMs element to solve this. I’d like to see a legit tube that helps reduce dead volume too.
 
Lots of good advice above, but here's something else to consider...

After a couple scorched batches related to low flow rate, I threw in the towel and converted my RIMS to a HERMS so I could run the wort any rate without worrying about scorching. The PID performance is also highly dependent on flow rate, and varying the flow speed really diminishes it's ability to control the temperature in my experience.

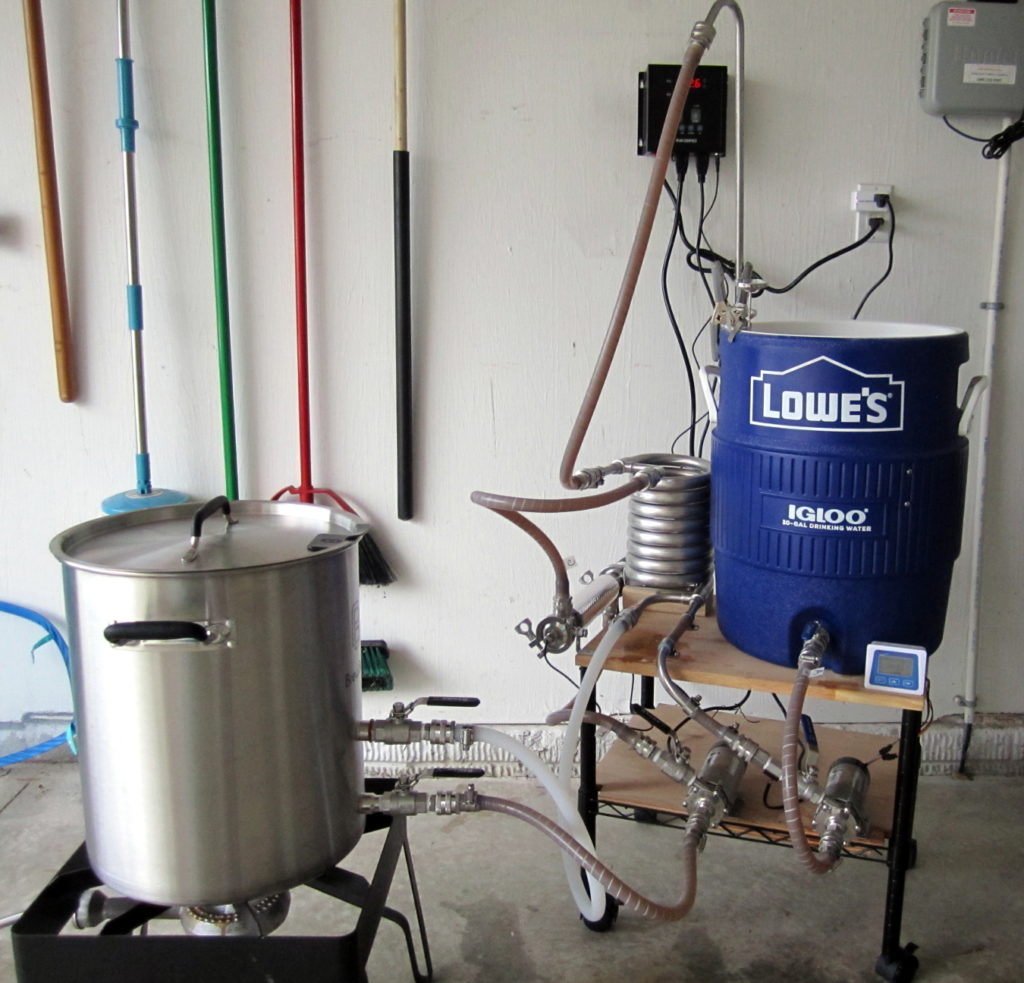
Here's my 2-vessel (no-sparge) counterflow HERMS with dual propane and electric heating for strike water and mash steps. Digital flow meter on the right pump. The counterflow heat exchanger pulls double duty: heating and chilling.
brewing-system-2-1024x983.jpg
 
After a couple scorched batches related to low flow rate, I threw in the towel and converted my RIMS to a HERMS so I could run the wort any rate without worrying about scorching.

Make that two former RIMs brewers who have switched to HERMs. One simple screw-up, be it an errant flip of the wrong switch or a tap of the computer mouse to turn on the burner when you have no flow, whether it be just a couple seconds or till you start to smell it can mean either a dumped batch or a batch with a burnt aftertaste.

I'm sure there many who have brewed hundred of batches on their RIMs successfully, I'll say I made plenty of great batches as well but I'll admit it sure it a lot harder to screw up on the HERMS.

Sorry to hear of your troubles, best of luck in solving it!
 
Temp probe distance from heater element should be as close to zero as possible. I've never had any scorching, but I did get some pretty thick deposits occasionally. I tried 3 or 4 different ways of setting mine up over the years. With the temp probe touching the heater all the issues stopped. A couple inch gap will work if you can keep the flow rate high, but the reaction time lag becomes too much when you turn the pump down.
 
I've been RIMS brewing for years with my 1/2 barrel gas-fired system. Maintaining mash temperatures has always been a pain in the rear though, so recently I put together a PID-controlled electric inline heater for the recirc. The heating element is this:

DERNORD 240V 5500W Foldback Heating Element Water Heater with Low Watt Density:Amazon:Home Improvement

It's a 240V, 5500W, foldback, low-density element. I run it on 120V, so it should be 1400W and pretty low density. I've been wanting to brew a Hefe Weizen, and I thought this would be the perfect test for the heating element, as I could use it for a multi-step mash. I mashed in at ~99F, and stepped through a couple rests, when the unmistakable smell of scorched wort made itself known. I ended up dumping the batch; it wasn't even worth pitching the yeast.

How do I avoid the scorching? For the steps, the element was running at full power. I had the flow turned back a bit to avoid compaction, but I was controlling the temp at the outlet of the element so the wort temperature never got above my step target. I assumed running a low watt density element at half-voltage should give me plenty of leeway, what went wrong?
when step mashing with certain adjuncts like rye and wheat you may end up with a buildup on the element which can cause scorching due to the stage where the adjunct turns into a slime that easily coats everything. Ive only had this happen once in years of many many rims uses myself when step mashing with rye. and that was when I went to a much higher wattage element.... I found lower watt density works fine for me even at home with 1.5gpm flow rate and all my rims have been horizontal as well
 
I've never measured flow rate; I'll try next time I mash. It varies a lot though, depending on what, and how much, I'm mashing.
I could lower the power, but that would make step mashes (which is one of the reasons I added the element) pretty slow.
I get 1.8-2 degrees per minute rise from my 1800w 36" long rims element in my horizontal rims at home when brewing 11 gallons of beer... just saying... longer contact time per pass with a longer element results in more efficient gentler heating and less likely to denature any enzymes in the process... I also agree the probe should be close to the element and NEVER stop the flow. if the flow were to ever drop on either of my systems the flow switch automatically shuts off my elements. at the brewpub I use two elements in my 6ft rims... one is 6000w and one is 2200w they are both running at 70% max power thanks to brewcontrol unless im heating water while cleaning where I run them at 100% or step mashing with lots of adjuncts where I turn them down to 50-60% at 75% power and between 4 and 5 gpm flow I get a 10 degree increase max per pass. way more than I need but large mashes can take close to 15mins just to have all the mash pass through once at 3bbl so time is of the essence.
 
Last edited:
when step mashing with certain adjuncts like rye and wheat you may end up with a buildup on the element which can cause scorching due to the stage where the adjunct turns into a slime that easily coats everything. Ive only had this happen once in years of many many rims uses myself when step mashing with rye. and that was when I went to a much higher wattage element.... I found lower watt density works fine for me even at home with 1.5gpm flow rate and all my rims have been horizontal as well

Totally a problem with wheat & rye. It doesn't shock me at all that this happened to you while brewing a wheat beer. Flow rate is important. I also run my RIMS with the element turned off for a while, until the "vorlauf" is clear before turning it on.
 
could you post a pic of the probe area in relation to the wort exit?
I'll try to post a pic later but I'm questioning whether this is the issue. I was under the impression that with a LWD heater, I should be able to run at full power without scorching. The only influence probe location could have is limiting the power, meaning that I CAN'T run at full power. Do you think I should be able to run the element I showed, at full 120V power during recirc? (If not, I can adjust my software to limit the power, but again that will make steps kind of tedious.)
 
Here's an alternative to RIMS and directly heating wort: A small eHERMS.

One of my brew friends uses a small, 1 or 1.5 gallon pot containing a 6' wort coil and a regular, cheap, short water heater element, 2000W or so.
The element heats the water in the pot which heats the wort coil. Wort is recirculated through the coil. PID controls the heating element based on the output temp of the wort coil.

He has a 20 gallon, 3 vessel system, and this works like a charm! It prevents scorching, as well as overheating the wort. The quick response due to the small volume eHERMS vessel is second to none, providing excellent control.

It’s a great idea. The water provides a buffer that ensures the wort is not overheated.

That said, I think heating liquid to heat more liquid is overly complicated and isn't addressing the problem at its core. A proper element/tube/flow combination should be very capable of safely heating wort. @augiedoggy's example is a good one. I have a purpose-built RIMs element that is based in his experience of using cartridge heaters. You need a heat density:wort-volume ratio that is very low. My suspicion is that the OP's tube has too much dead space and not enough mixing. You might try something like this to get the wort mixed more inside the tube. This made a big difference when I implemented it before switching to the purpose-made RIMs element.
 
Back
Top