Most are doing this for the decorative aspect but it can help with long term aging for beers. The caps will allow oxygen transfer through the plastic liner over time. This just provides an additional barrier for the oxygen to work though.
You are using an out of date browser. It may not display this or other websites correctly.
You should upgrade or use an alternative browser.
You should upgrade or use an alternative browser.
Hot Glue bottle wax experiment
- Thread starter conpewter
- Start date

Help Support Homebrew Talk:
This site may earn a commission from merchant affiliate
links, including eBay, Amazon, and others.
danorocks17
Well-Known Member
cracked open a barleywine that i had waxed dipped. The bottle was easy to open, and the wax was easy to remove with a butter knife. Beer was damn good too hahaha
tennesseean_87
Well-Known Member
Decorative element for gifts, possible aid in preventing any oxidation through the cap.
This is why I'm doing it. I am also curious to the effects of long-term aging of wine bottles with #8 corks (which I don't think seal as well) once they've been waxed. I've only done apfelwein, but I might try a mead and don't wanna lay out cash for an expensive corker (the $5 hammer operated job does just fine with #8s).
I'll edit with pictures:
.jpg")
.jpg")
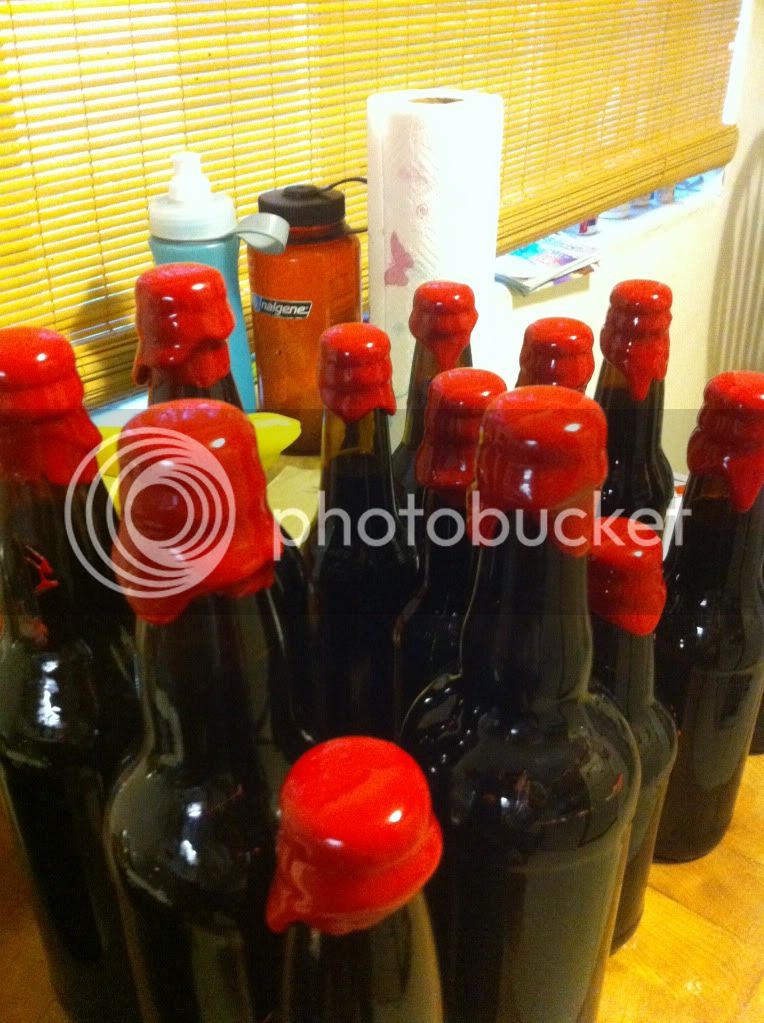
The color is a little better in real life because I suck at photography. The one on the right was without shellac, the two on the left have it. The middle one is probably the best, since I waited for the wax to cool a bit and thicken up. I was just practicing with these because they are headed to my brewpal who doesn't remove his own labels.
OP
OP
conpewter
Well-Known Member
Cool, glad this is still being played around with ") If I try this again I'll definitely throw some parafin in.
If I try this again I'll definitely throw some parafin in.
If I try this again I'll definitely throw some parafin in.JNewbs
Member
Updating the thread with my results. I was doing half batches using the following recipe:
6 crayons
3 - 10 inch 0.44 diameter hot glue sticks
a little bit less than 1/4 lb paraffin (Gulf) wax
I chopped it up, threw it into a tin soup can, and put it right on the glass top of my electric range on medium heat. It took about 5 minutes with intermittent stirring to reach total well-mixed liquid form.
After that it was a quick dip into the wax, a quick spin to get off some of the excess wax, then a quick flip of the bottle to let some of the excess drip down the side of the bottle to get that classic look you see on bottles of Dark Lord.
As I previously stated my problem was that using the crayon/glue combo looks gorgeous but I couldn't get the bottle opener to crack the top without serious effort. I was looking to thin down the mix so the spurs of the cap would stick out enough for the opener to get purchase on them.
Adding the paraffin successfully accomplished this. I can open the bottles without the floss/string or a knife or a sprained wrist. Also the wax comes right off of the bottle with no problem. The only downside here is that the wax is thin enough that any writing on the caps still comes through (as you'll see in the pictures I'll post later).
Also to answer a possible question in the future, I did this with these ratios 3 times with different colors. The exact amount of wax produced was enough to coat the tops of 30 bottles +/- 5 depending on how hot/cold your wax is (it goes on thicker if it's colder).
Hope this helps people out with some of the issues I was wrestling with!
Edit - pictures attached:


$33.99 ($17.00 / Count)
$41.99 ($21.00 / Count)
2 Pack 1 Gallon Large Fermentation Jars with 3 Airlocks and 2 SCREW Lids(100% Airtight Heavy Duty Lid w Silicone) - Wide Mouth Glass Jars w Scale Mark - Pickle Jars for Sauerkraut, Sourdough Starter
Qianfenie Direct
![Craft A Brew - Safale S-04 Dry Yeast - Fermentis - English Ale Dry Yeast - For English and American Ales and Hard Apple Ciders - Ingredients for Home Brewing - Beer Making Supplies - [1 Pack]](https://m.media-amazon.com/images/I/41fVGNh6JfL._SL500_.jpg)


$10.99 ($31.16 / Ounce)
Hornindal Kveik Yeast for Homebrewing - Mead, Cider, Wine, Beer - 10g Packet - Saccharomyces Cerevisiae - Sold by Shadowhive.com
Shadowhive


$176.97
1pc Commercial Keg Manifold 2" Tri Clamp,Ball Lock Tapping Head,Pressure Gauge/Adjustable PRV for Kegging,Fermentation Control
hanhanbaihuoxiaoshoudian


$22.00 ($623.23 / Ounce)
AMZLMPKNTW Ball Lock Sample Faucet 30cm Reinforced Silicone Hose Secondary Fermentation Homebrew Kegging joyful
无为中南商贸有限公司

$7.79 ($7.79 / Count)
Craft A Brew - LalBrew Voss™ - Kveik Ale Yeast - For Craft Lagers - Ingredients for Home Brewing - Beer Making Supplies - (1 Pack)
Craft a Brew


$20.94
$29.99
The Brew Your Own Big Book of Clone Recipes: Featuring 300 Homebrew Recipes from Your Favorite Breweries
Amazon.com


$58.16
HUIZHUGS Brewing Equipment Keg Ball Lock Faucet 30cm Reinforced Silicone Hose Secondary Fermentation Homebrew Kegging Brewing Equipment
xiangshuizhenzhanglingfengshop

$49.95 ($0.08 / Fl Oz)
$52.99 ($0.08 / Fl Oz)
Brewer's Best - 1073 - Home Brew Beer Ingredient Kit (5 gallon), (Blueberry Honey Ale) Golden
Amazon.com


$53.24
1pc Hose Barb/MFL 1.5" Tri Clamp to Ball Lock Post Liquid Gas Homebrew Kegging Fermentation Parts Brewer Hardware SUS304(Liquid MFL)
yunchengshiyanhuqucuichendianzishangwuyouxiangongsi

$53.24
1pc Hose Barb/MFL 1.5" Tri Clamp to Ball Lock Post Liquid Gas Homebrew Kegging Fermentation Parts Brewer Hardware SUS304(Liquid Hose Barb)
Guangshui Weilu You Trading Co., Ltd

danorocks17
Well-Known Member
Seems that adding the bottling wax from midwest or nb to your next order would be the easiest. You cant be saving that much by doing it on your own.
You're probably right, but it's still fun to experiment. It fits the DIY ethos of homebrewing, so I think that's why I enjoyed doing it.
camiller
Well-Known Member
Seems that adding the bottling wax from midwest or nb to your next order would be the easiest. You cant be saving that much by doing it on your own.
Seems that buying beer from store would be the easiest. You cant be saving that much by doing it on your own.
:cross:

Seems that buying beer from store would be the easiest. You cant be saving that much by doing it on your own.
:cross:
That doesnt really work. You actually cant get similar beer in taste and variety for the price of homebrew, which equipment costs aside, is usually .50 to .60 cents a beer. The price for the wax and crayons is at least 7 or 8 dollers, probably more. The wax off of midwest is 12 and you know its going to work.
tennesseean_87
Well-Known Member
But you get a whole lot more home-made wax, and the ability to make different colors. I will be experimenting with some candle dye in my wax recipe. To do the Christmas-style green and red I would have had to shell out $24, not $7. For four colors the dye was only an additional $6, plus maybe $2-$5 more for more gulf wax, and I've got $48 worth of bottle wax.
Plus, I like messing with it, too. DIY and all that.
Plus, I like messing with it, too. DIY and all that.
louie0202
Well-Known Member
12 - 15 glue sticks and 4 crayons

3-1 ratio of "smaller" glue sticks to crayons

3-1 ratio of "smaller" glue sticks to crayons
That...is a sexy bottle. I'm gonna go ahead and say you have some of the best results on the thread, can you please post a more detailed description of your process? I'd love to do something like this on a 15% oak-aged imperial stout I'm bottling soon...
OP
OP
conpewter
Well-Known Member
3-1 ratio of "smaller" glue sticks to crayons
Now that looks great!
Thanks guys.
However, I didn't reinvent the wheel, I just took the advice of the forefathers of this thread. As detailed by Conpewter, I used an empty soup can directly on the stovetop. I would suggest thinking through the width of your can. I would suggest as narrow a can as possible that lets you fit the whole bottle neck into as when you get to the last 1/4 of bottles, the volume will get low and its tough to cover enough to look right. This is the first time I have done it, and I am saving the extra to heat up and use in the future.
At my local hobby store (for me, Hobby Lobby with their weekly 40% off coupon) I bought a pack of 25 of the thinner gluesticks for about $3. These were plain with glitter imbedded in them which gives the sparkly look sort of comes through in the picture, but looks great in person and matches the background of my label. With that, I took 4 blue crayons that I bought a mixed lot on ebay. Together, I used less than $4 worth of supplies. Dropped them all into the can and turned on the heat. With something disposable (i.e. a popsicle stick, NOT a knife from your wife's fine china) I stirred a couple times until it was throughly mixed.
OH-I also wrapped a produce tie around the top of the bottle neck to get a tab to pull off to help it uncapping it, ala Makers Mark. As soon as I open one, I will report back with whether or not that works.
1 by 1, I dipped the bottles, let the major excess drip back into the can, then flipped to let some run down the side. The amount of drips you want will make a bid difference to how far the volume will go. Not having tried reusing it yet, I would suggest using more than you need and saving the leftovers. If it melted the first time, I have no idea why it wouldn't melt again.
Hope that helps.
I tried this out tonight on some bottles of apfelwein. Other than the wax cracking on a couple bottles, it worked beautifully.
To aid in wax removal, I wrapped floral stem tape around the top of the bottle and doubled it over to leave a tag hanging off. I tried it on one of the bottles and it works perfectly.
The tape is nearly identical to stuff I've seen used on commercial waxed bottles, and much cheaper than the stuff sold for waxing bottles. I got about 60 feet for $2.49.
tennesseean_87
Well-Known Member
I use some string taped to the top of the cap or tied around right under the lip, then dip in glue.
GatorBeer
Well-Known Member
Using 15 glue sticks and 5 crayons.
KBentley57
Well-Known Member
I just tried this with a smaller batch, using the 5 gs/3 crayon ratio, and it worked great! However, it seemed that it was just a little too thick to be comparable to the other commercial bottle waxes. I think that next time I bottle, I'm going to try a 10/7 ratio and report back in with some pics. For those who are wondering, I also used a soup can setting directly on an electric range element. I turned it on 5, for whatever that is worth; the crayons melted before the glue sticks, and the whole melting process took less than 10 minutes. I had to stir it with an old knife to get it to mix.
Peeling off the bottle was easy with the 5/3 ratio. it wasn't stuck on hard, but it had a confident hold.
Peeling off the bottle was easy with the 5/3 ratio. it wasn't stuck on hard, but it had a confident hold.
KBentley57
Well-Known Member
So I tried the 10/7 combo tonight, and I think it was perfect. The wax was thin enough to dip the bottles in, and get some run lines down the bottle. the only problem I had was bubbles forming on top of the cork, where I had just pressed them in. The bottles are 375 ml Bordeaux style wine bottles, the wine is a pomegranate experiment, which, by the way, is tart as one would expect! I'm not sure if these will ever make it. They will however, serve well as gifts, so that no one else wants some of my good stuff.


3-1 ratio of "smaller" glue sticks to crayons
When you say the smaller glue sticks, you're referring to the 4" .28D ones. The ratio would be a little different for the .44D right?

Sharkman20
Well-Known Member
Smokinghole, thanks for putting up that image of your waxed beer bottle. I like how that turned out with the etched images polymer so much I went on and ordered some tonight for waxing the tops of my mead I'm bottling next week. Bright yellow, Maker's style. lol
Sharkman20
Well-Known Member
Got my no chip dip "wax" from etched images today and played around with a sample bottle of my mead. I must say I'm very happy with the results.

brrman
Well-Known Member
Looks awesome, Sharkman
cbehr said:When you say the smaller glue sticks, you're referring to the 4" .28D ones. The ratio would be a little different for the .44D right?
The packaging I use just says 4". It doesn't list the diameter. But if you are in a hobby supply store and looking at both types side by side, it's obvious. If .28 and .44 are standard sizes, then I will assume yes, it's the .28 ones.
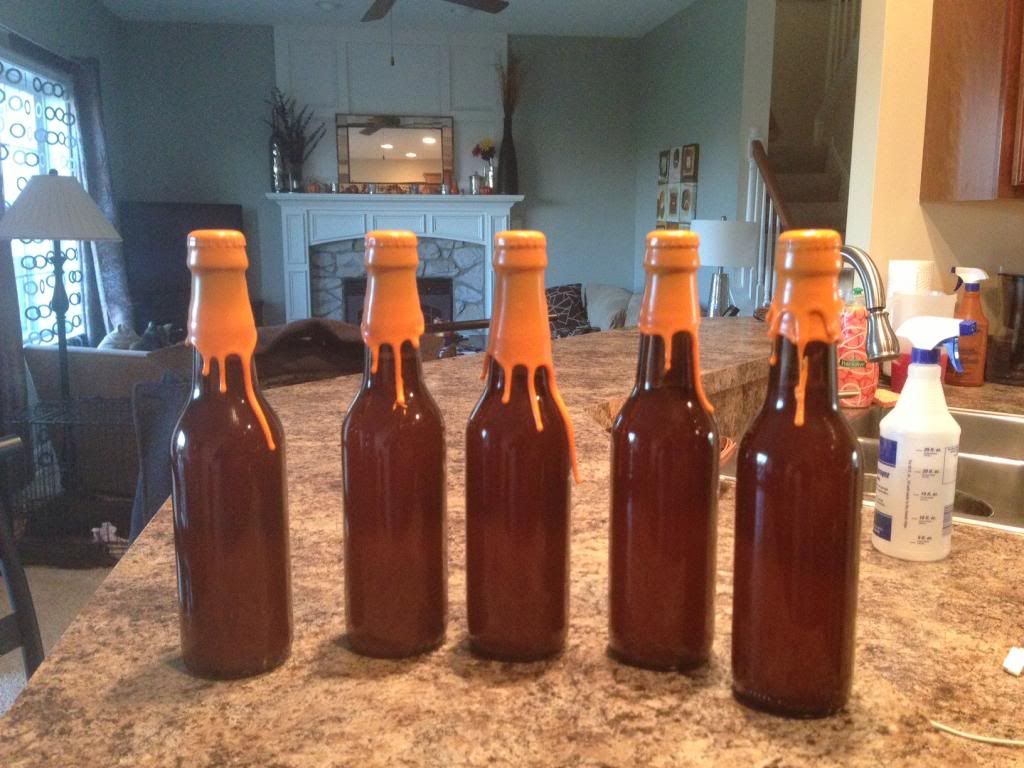
Here is my first attempt, was rather pleased but will probably alter a bit for next time or at least alter my dipping technique as the back 1/2 fo the bottle did not drip as nicely. I used 20 small .28D"x4" glue stick, 6 crayons, and about 1/16 lb of parafin wax. The bottle on the far right was dipped twice as an experiment to see how a second color would layer on top.

Similar threads
- Replies
- 23
- Views
- 2K
- Replies
- 2
- Views
- 984
- Replies
- 20
- Views
- 932
