• Please visit and share your knowledge at our sister communities:
  • If you have not, please join our official Homebrewing Facebook Group!

    Homebrewing Facebook Group

Hop Dropper for SSB Unitank

Homebrew Talk

Help Support Homebrew Talk:

This site may earn a commission from merchant affiliate links, including eBay, Amazon, and others.

philm63

Supporting Member
HBT Supporter
Joined
May 8, 2019
Messages
109
Reaction score
25
Location
Plain City, OH
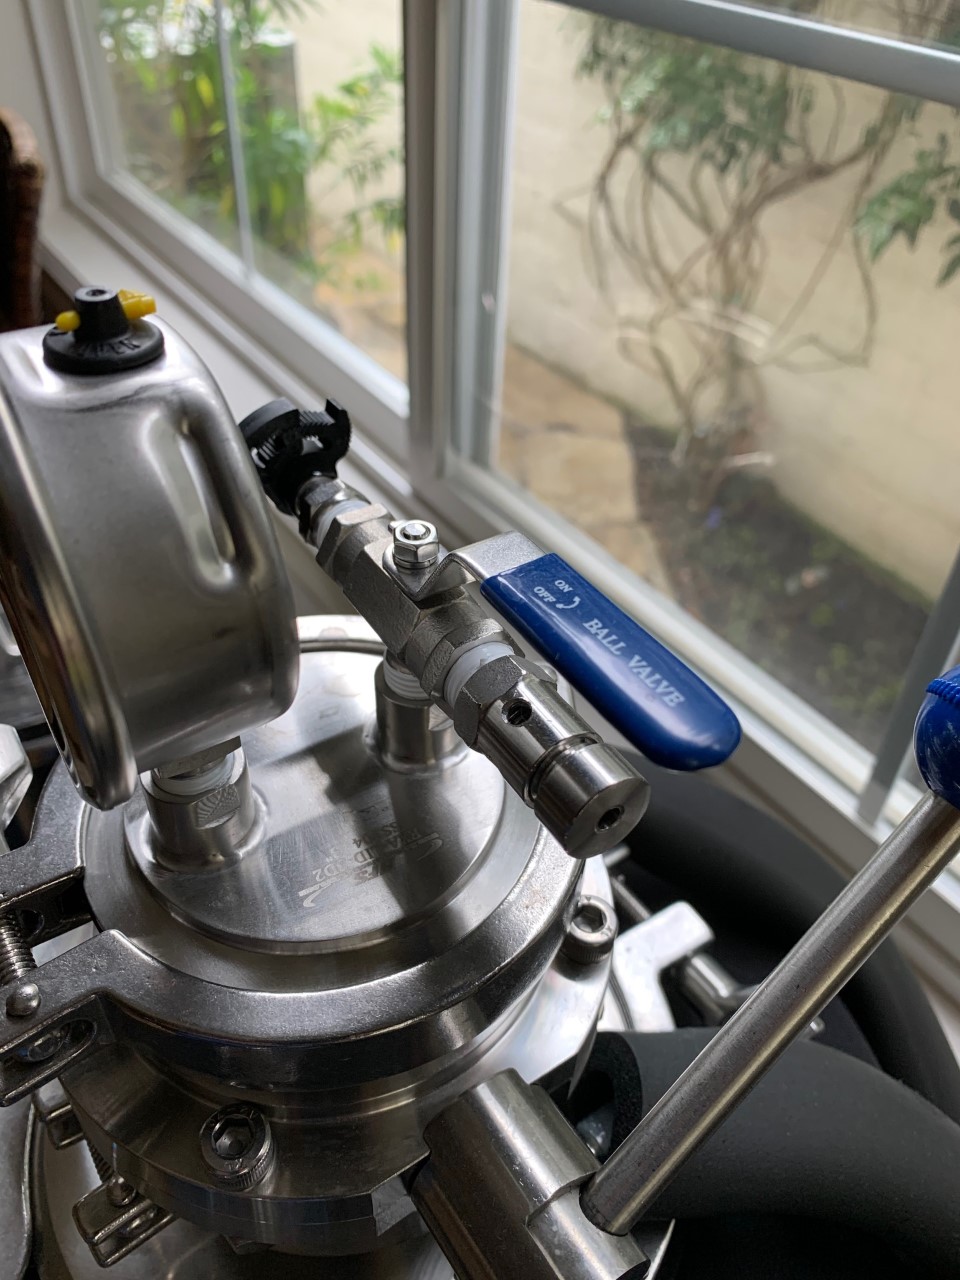
Ok, so here’s my hair-brained idea for a hop dropper, and I’m sure I’m not the first to think of this design. Placement will be at the 3” TC port on the top of my 7-gallon SSB unitank. I normally just pull the 3” PRV plate off the top and drop my hops in late in the fermentation cycle to take advantage of some CO2 production to scrub the O2 introduced when I opened the top. I’ve never been able to dry-hop after fermentation without the risk of introducing O2.

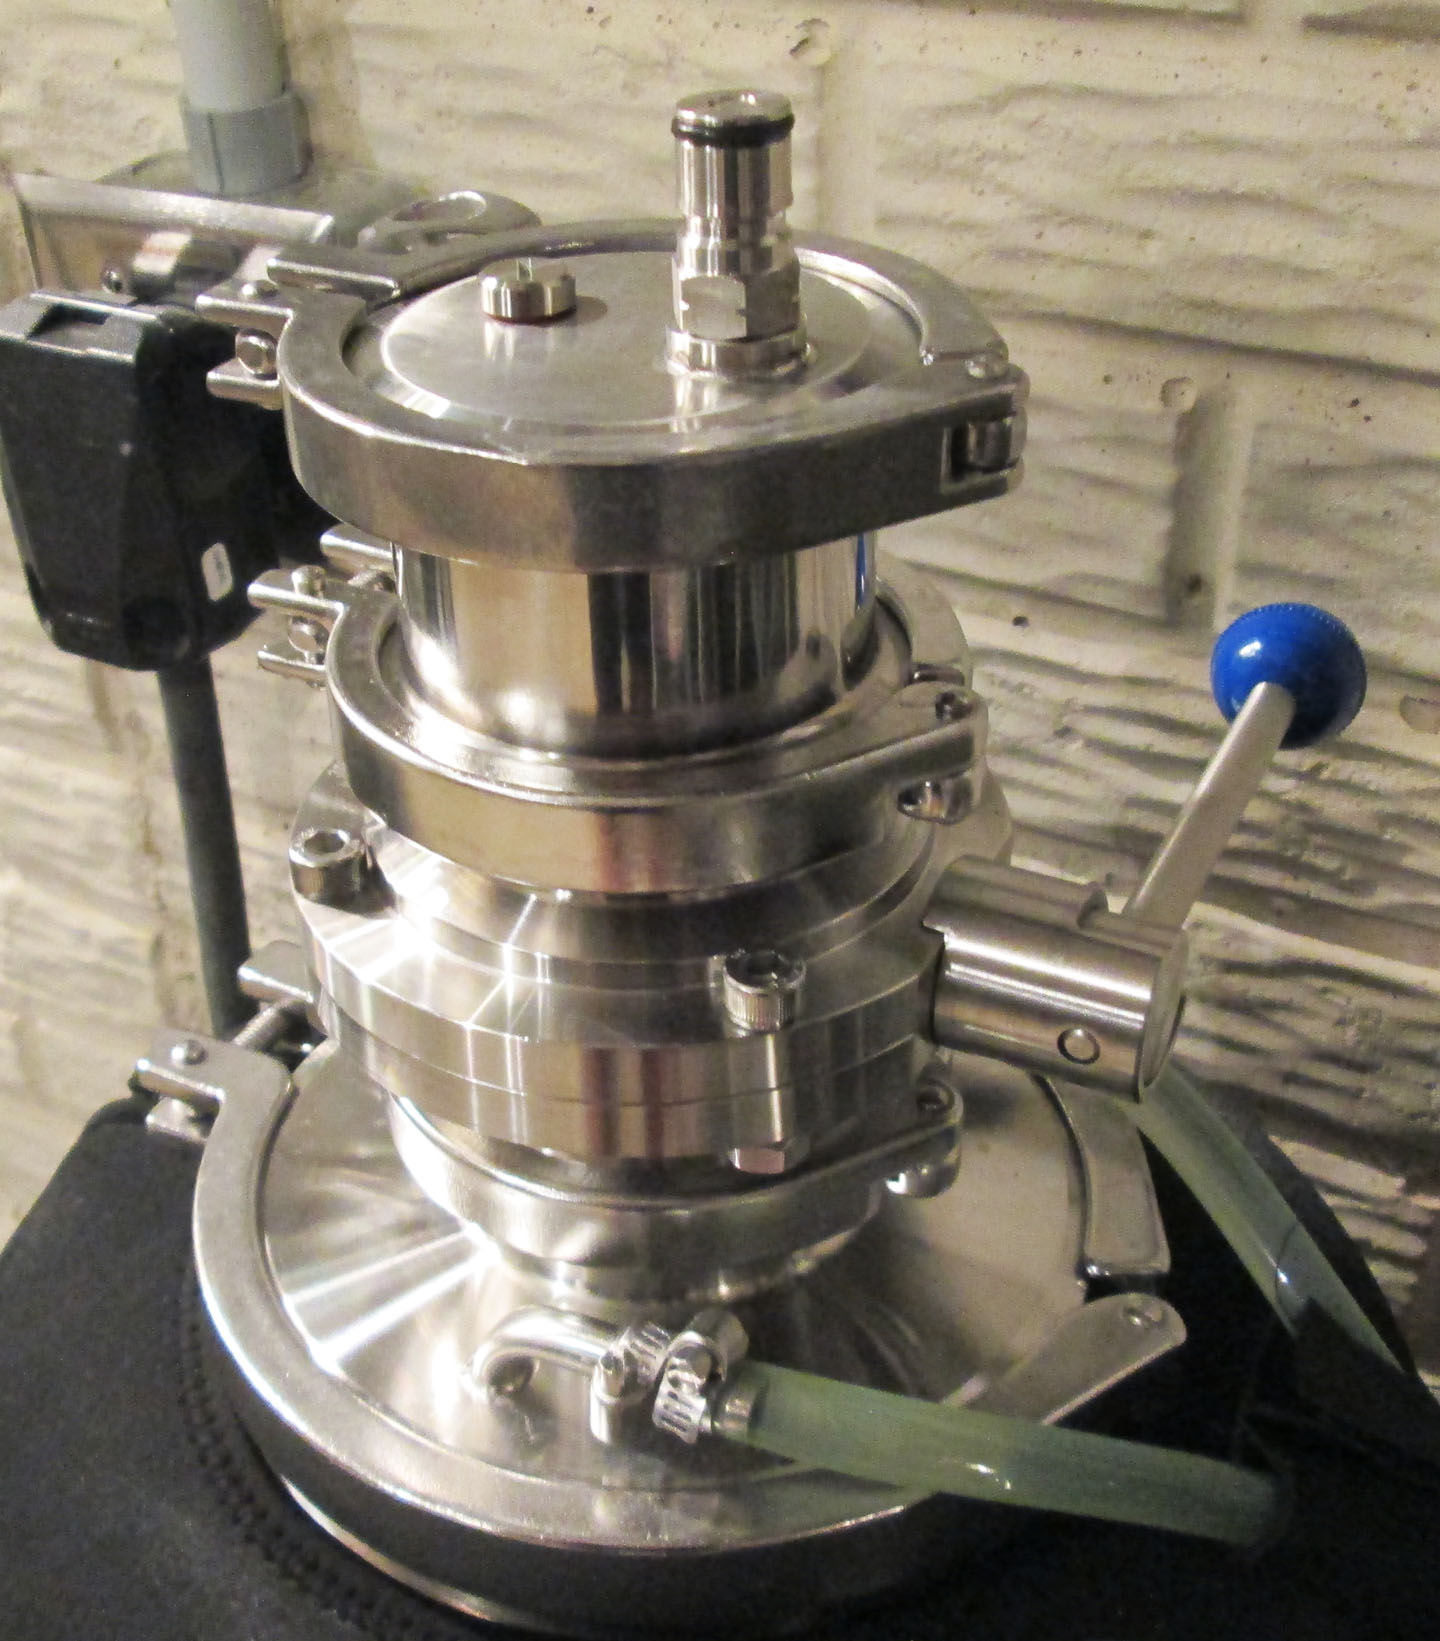
Imagine these components oriented vertically starting with a 3” butterfly valve clamped to the unitank, coupled to a 3” TC Spool of 4 or 6 inches in length (depending on the anticipated hop charge), capped at the top with a 3” TC cap with integral gas-in post and adjustable PRV (a gauge would also be nice) so I can purge with CO2 prior to dropping the hops.

Load with hops, button it up, purge a bunch of times, slowly open the butterfly valve and voila! Hops can go in without introducing O2. Sanitary design, only a few parts and all comes apart for cleaning/sanitizing.

Anyone done this yet?
 
I have been considering the same. I was thinking about using a wort strainer I already have, 1.5” TC, and using that for the canister with either a spike gas manifold on top or something like a gas post and prv for purging.

I also know @Jaybird sells a really nice Dry hopper I was talking to him about today actually.

I wanted to do that with a 10 gallon keg but I can’t fit a 1.5 TC ferrule in the lid and use the lid clamp. But for a conical it seems really nice. They also have a cheaper version using Mason jars.
 
Last edited:
Ok, so here’s my hair-brained idea for a hop dropper, and I’m sure I’m not the first to think of this design. Placement will be at the 3” TC port on the top of my 7-gallon SSB unitank. I normally just pull the 3” PRV plate off the top and drop my hops in late in the fermentation cycle to take advantage of some CO2 production to scrub the O2 introduced when I opened the top. I’ve never been able to dry-hop after fermentation without the risk of introducing O2.

Imagine these components oriented vertically starting with a 3” butterfly valve clamped to the unitank, coupled to a 3” TC Spool of 4 or 6 inches in length (depending on the anticipated hop charge), capped at the top with a 3” TC cap with integral gas-in post and adjustable PRV (a gauge would also be nice) so I can purge with CO2 prior to dropping the hops.

Load with hops, button it up, purge a bunch of times, slowly open the butterfly valve and voila! Hops can go in without introducing O2. Sanitary design, only a few parts and all comes apart for cleaning/sanitizing.

Anyone done this yet?

Yes, I believe so as it sounds very much like @mongoose33's setup No oxygen dry hopping

 
Exactly! That's what I'm looking to do. I've located the valve and the stainless steel spool and the other parts, but by the time you get the clamps, and gaskets added to your cart, it comes to over $200 to build this thing. I see similar things in commercial breweries - Hop Cannon's and the like - and I was hoping someone would've built something like this for the homebrewing market. If not, $200 is not that bad when it comes to protecting the aroma of those expensive hops when dosed in massive quantities.
 
Exactly! That's what I'm looking to do. I've located the valve and the stainless steel spool and the other parts, but by the time you get the clamps, and gaskets added to your cart, it comes to over $200 to build this thing. I see similar things in commercial breweries - Hop Cannon's and the like - and I was hoping someone would've built something like this for the homebrewing market. If not, $200 is not that bad when it comes to protecting the aroma of those expensive hops when dosed in massive quantities.

There's at least one thing different in how I do it from how you're conceptualizing it. Fermentation produces prodigious amounts of CO2. I load the hop dropper then crack the valve slightly to allow that CO2 to exit the fermenter through the hops. That way purging happens automatically.

If I were to do it over again, I'd probably use a 1.5 to 2.0 inch adapter at the fermenter, then a 2" butterfly valve, then a 2" sight glass, then another 1.5 to 2" adapter to transition into the pressure manifold on top. That would have increased the height by 5.5" but I'd have less likelihood of bridging of the hop pellets plus I'd have greater capacity.

And you're right about the cost though I don't think it's as much as $200. Presuming someone had the pressure manifold already, the 2" butterfly valve would be $63, the 2" sight glass $60, various clamps and gaskets $15, two 1.5 to 2" reducers $36, shipping about $10....well, I guess you're right, it's not that terribly far away from $200.

One thing I discovered is that if the garage where I brew and ferment is cold, I'll get some condensation on the inside of the sight glass. This makes the hop pellets a bit sticky.

I used the CO2 line on top in the hopes that I could sort of "inject" the hops into the fermenter with a blast of pressure. All that tended to do is pack them tighter, so I'd probably omit that step.
 
The advantage of the 3" port is that it's very unlikely that the pellets could get stuck and not drop completely, meaning an expensive 3" sight glass is not really necessary. A 3" butterfly valve on the other hand is not cheap but it's really the only way to avoid creating a restriction that would invariably cause pellets to get stuck.

As for purging with CO2 I'd recommend getting an inexpensive vacuum pump and setting the hop dropper up in a way that allows alternating purging and evacuation cycles. Only purging with CO2 will consume an inordinate amount of gas before O2 levels are reduced to a level that can be considered "oxygen-free". With a vacuum pump capable of pulling at least -0.8 bar 5 to 6 cycles will be more than enough and will use a negligible amount of CO2.
 
One more thing and that's very important. Since you have to remove SSB's original 3" PRV in order to be able to use the 3" port for the dropper, it is IMPERATIVE that you replace the PRV with one mounted in such a way that it can never be disabled by mistake by, for example, someone operating a valve. On my Unitank I've mounted a 1.5" PRV on the blow-off arm right before the shut-off valve. All you need for that is a 1.5" tee, to be placed at the end of the blow-off before the shut-off valve. The PRV will then be mounted on the horizontal arm of the tee. That way the Unitank can never pressurize above the maximum pressure allowed by the PRV.
 
I was looking to add a 1.5" TC cross at the blow-off arm to facilitate adding this more permanent PRV and also support my existing gauge AND a gas in post which I'd use during pressure transfers. I just saw on BrewHardware.com a Blichmann 1.5" TC Spunding Assembly for $75 which would allow me completely replace the gauge on my blow-off arm, as it has the spunding valve, gas in post, and a gauge. This would also enable me to spund if I so choose, which is something I'm sure I'll eventually do.

Question: Can this particular spunding valve act in the capacity of a PRV? In other words, does it have a max allowable pressure that is less than my unitank's pressure rating? Or from a safety perspective should I include a stand-alone PRV no matter what; seeing as I am essentially dealing with a pressure vessel?
 
One more thing and that's very important. Since you have to remove SSB's original 3" PRV in order to be able to use the 3" port for the dropper, it is IMPERATIVE that you replace the PRV with one mounted in such a way that it can never be disabled by mistake by, for example, someone operating a valve. On my Unitank I've mounted a 1.5" PRV on the blow-off arm right before the shut-off valve. All you need for that is a 1.5" tee, to be placed at the end of the blow-off before the shut-off valve. The PRV will then be mounted on the horizontal arm of the tee. That way the Unitank can never pressurize above the maximum pressure allowed by the PRV.

^^^this^^^

On STEROIDS!!!
 
I was looking to add a 1.5" TC cross at the blow-off arm to facilitate adding this more permanent PRV and also support my existing gauge AND a gas in post which I'd use during pressure transfers. I just saw on BrewHardware.com a Blichmann 1.5" TC Spunding Assembly for $75 which would allow me completely replace the gauge on my blow-off arm, as it has the spunding valve, gas in post, and a gauge. This would also enable me to spund if I so choose, which is something I'm sure I'll eventually do.

Question: Can this particular spunding valve act in the capacity of a PRV? In other words, does it have a max allowable pressure that is less than my unitank's pressure rating? Or from a safety perspective should I include a stand-alone PRV no matter what; seeing as I am essentially dealing with a pressure vessel?

I suppose it "could". But I wouldn't. Spunding valves are adjustable; i.e., anywhere from "full open" to "full closed". Somewhere in the middle is your maximum operating pressure. Miss set your release pressure and the spunding valve may allow an over-pressure condition in your fermenter. The only really safe solution (meaning, the only solution) is a dedicated, foolproof PRV directly mounted on your fermenter with nothing between it and the outside ambient pressure of your brew space.

Brooo Brother
 
Good point on the PRV thing - I certainly can T off of the blow-off arm, perhaps near the gauge - and place a permanent PRV in the circuit.

If you look carefully at the setup in the video above, you'll see the pressure manifold on top. On that I have the blowoff valve. You could just use a blowoff cane on the top with tubing terminating in a jug of star-san, and as long as the valve is cracked--which you want anyway to purge the hops and sight glass--you have the capacity for pressure release. Then when fermentation wanes, close the butterfly valve and you have your closed fermenter.
 
I think 2" butterfly valve is sufficient and a lot easier to come by than a 3" valve. I like @mongoose33 's idea with the sight glass, will need to see if I can incorporate that and not have the height be out the roof. Here's my setup:
 

Attachments

  • 6C08987F-4139-461B-9621-DD121261BBCC.jpeg
    6C08987F-4139-461B-9621-DD121261BBCC.jpeg
    1.4 MB
Here’s mine:
3” Butterfly Valve - Amazon
76mm 3” tri clamp site Glass - Amazon
3" Sanitary Tri Clamp To 2 X 1/4" Npt Female Tri Clover - Ebay
1/4” SSB PRV - SSbrewtech
1/4” npt gas ball lock - Amazon
3” clamps and gaskets

I add my pellet hops and purge air w/CO2. Drop the hops And close valve. I have a SSB sounding valve set to 15 psi. You can also leave the valve open and set your PRV to 15 as well.

Works great.

2968A1CF-55AF-4511-8202-2A8F695928E3.jpeg
5A4B4B5D-8971-4FFC-AE96-4776F5558E9A.jpeg
DE3D529B-B910-40FF-9CA2-E5CE59EE7BDC.jpeg
 
Wow - nice setup, guys! That is exactly what I'm looking to do but I'm thinking of going in to start with a 2" length on my spool - all 3" TC. I figure with a shorter spool I'll have less head space to purge taking less gas. Calculating the volumes now to be sure 2" length is enough for up to a 4 oz hop charge - should be, I think...
 
I've looked at doing exactly what you've put together. BUT. I'm not seeing any safety relief. I do see two spunding valves capable of relieving pressure, but I also see a closed butterfly valve that prevents one of them from providing any safety relief, and certainly no safety backup. The pictures don't show the positioning of your ball valve shut-off below the second (cup) spunding valve on the manifold, but if it is closed, then you are only "protected" by the (cup) spunding valve which may clog or be miss set. I've found krausen in the manifold as far down as the spunding valve and even in the collection jar for the blow-off. That sticky krausen can dry pretty solid and clog the tiny ports on a spunding valve. Consider that possible scenario as the Homebrewer's Corollary to Murphy's Law. Which is why SSBT, Spike, and all the others including any professional brewery have safety relief systems designed integrally into their brew systems. The Homebrew manufacturers caution you never to, and OSHA wouldn't allow you to, operate without those systems in place.

I've been brewing with an identical unitank setup as yours for the last year. I've even got the same sight glass yeast brink and butterfly valve. But the way you have your system modified right now has a serious safety deficiency without the OEM 3" PRV in place. Without some sort of independent safety relief upstream of any positionable shutoff valve you're courting disaster. The solution might be as simple as drilling a 17mm hole in the top of the cooling coil TC cap and installing a button pop-up PRV. There are some on the market identical to the Ss Brewtech pop-up that have stiffer springs to release at around 20 psi (well above SSBT's recommended max operating pressure) instead of 2~3 psi., like the ones on the Chronicals and Brew Buckets. The 3" TC 'permanent' PRV that came mounted on your Unitank releases somewhere around 22 psi. to prevent catastrophic failure. A button pop-up PRV won't give you negative pressure (implosion) protection like the one the engineers designed into your Unitank, and it may be less reliable and resistant to clogging from an over-active krausen, but it would afford at least a layer of protection that I'm not seeing in your pictures.

Hopefully I just missed it in your write-up or failed to see it in your pictures, and if so I apologize. It's a beautiful setup and clearly you've spent a great deal of time and effort (and $$$, believe me, I know) in putting your system together. I'm just concerned for your safety (and of course your equipment) that you may have overlooked an important consideration.

Brooo Brother
 
My tank is empty at the moment and just took the pics to show what I’ve got. I leave the valve open...the PRV on top is an OEM 15 psi directly from SSB. Spunding is backup...never clogged on me.
When not dry hopping, I use the 3” PRV.
I’m 1000% about safety.
 
My tank is empty at the moment and just took the pics to show what I’ve got. I leave the valve open...the PRV on top is an OEM 15 psi directly from SSB. Spunding is backup...never clogged on me.
When not dry hopping, I use the 3” PRV.
I’m 1000% about safety.

Got it. Brings a smile to this old Safety Officer's face.

I'd considered doing exactly what you do but never could figure out how to swap out the 3" PRV and the shut-off valve without letting at least some oxygen into the mix. Then of course you've got to replace the sight glass/shut-off valve assembly back to the PRV configuration again without O2 exposure. I emailed Jaybird with an idea for my Chronical that would have a shut-off valve directly on top of the domed lid with a blow-off tube and pop-up PRV on the same 3" TC, since the Chronical is generally unpressurized except for pressure transfers. I haven't heard back yet, but it would involve a 3" TC x 1.5" TC reducer, whereas 3"x 3" is obviously preferable. If it works it might be upscalable for a Unitank. The sight glass brink works well for dry hopping into a pressurized vessel, but as you probably know it can get cumbersome. More and more I've been getting away from dry hopping altogether and loading up on late hops and whirlpool/hop stand to compensate. It's 'O.K.' for lagers and light beers, but not so much for hoppy ales and IPAs where dry hops really make a difference. I'm currently finishing a keg of Galaxy/Simcoe/Citra IPA that wasn't dry hopped. It was great for about a week or two, then faded quickly into mediocrity. Gotta' find a way to do dry hopping and LoDO at the same time without clogging up the keg posts.

BTW, the OEM 3" PRV doesn't release until ~22 psi., even though the literature suggests (but doesn't actually state) 15 psi. release point. Startlingly loud also. Don't ask me how I know. (hint: "spunding valve").

Brooo Brother
 
No O2 is exactly what I was trying to accomplish for my heavily dry hopped NEIPAs. I do not swap out the dry hopper when fermenting these types...just leave the valve open for full use of the installed PRV.
My 3” PRV blows at 18psi...and its loud, wakes you up for sure. It’s only blown when doing my pressure tests. I use this when fermenting under pressure and no DH additions.

Wow what a coincidence. I have a galaxy, Citra, simcoe kegged for about 4 weeks now. Hasn’t faded and has retained most of its haze. Small FWH, Whirlpool additions @ (195, 185, 170 temps). Dry hopped at 1.020 and again at end of fermentation after soft crash (50) and yeast drop. I also purge StarSan filled keg with CO2 and completely close transfer.
Seems to work really well for these hoppy beers.

Totally agree on the hops. My first time using this combo and I really like(d) it. FWH Simcoe; 50/50 Galaxy/Citra at :10 min, :05 min, and :20 min hop stand @ 170F. 64 total IBUs. Great aroma and flavor after initially tapping. Now on first pour I only get a whiff, a hint, of what once was initially mind-blowing, but now is mostly just Simcoe remaining in the glass and aftertaste. Plenty of dank bitterness, but not much of the juicy, fruity goodness, In fairness, I ran out of Citra on brew day and had to throw in some 3 year old Lemondrop at the tail end. But a good dosing of Citra/Galaxy DH may just be the ticket to reviving the last half of this keg.

Curious about your experiences with pressure fermentation. I haven't tried it yet, other than spunding when I'm down to within ~5 psi of Final Gravity. There's not a lot of literature out there other than "the Big Boys do it" to speed up thru-put getting the product out the door. Speed is not my objective, quality is. What positives/negatives have you seen. Suspecting biotransformation was a motivating factor?

Brooo Brother
 
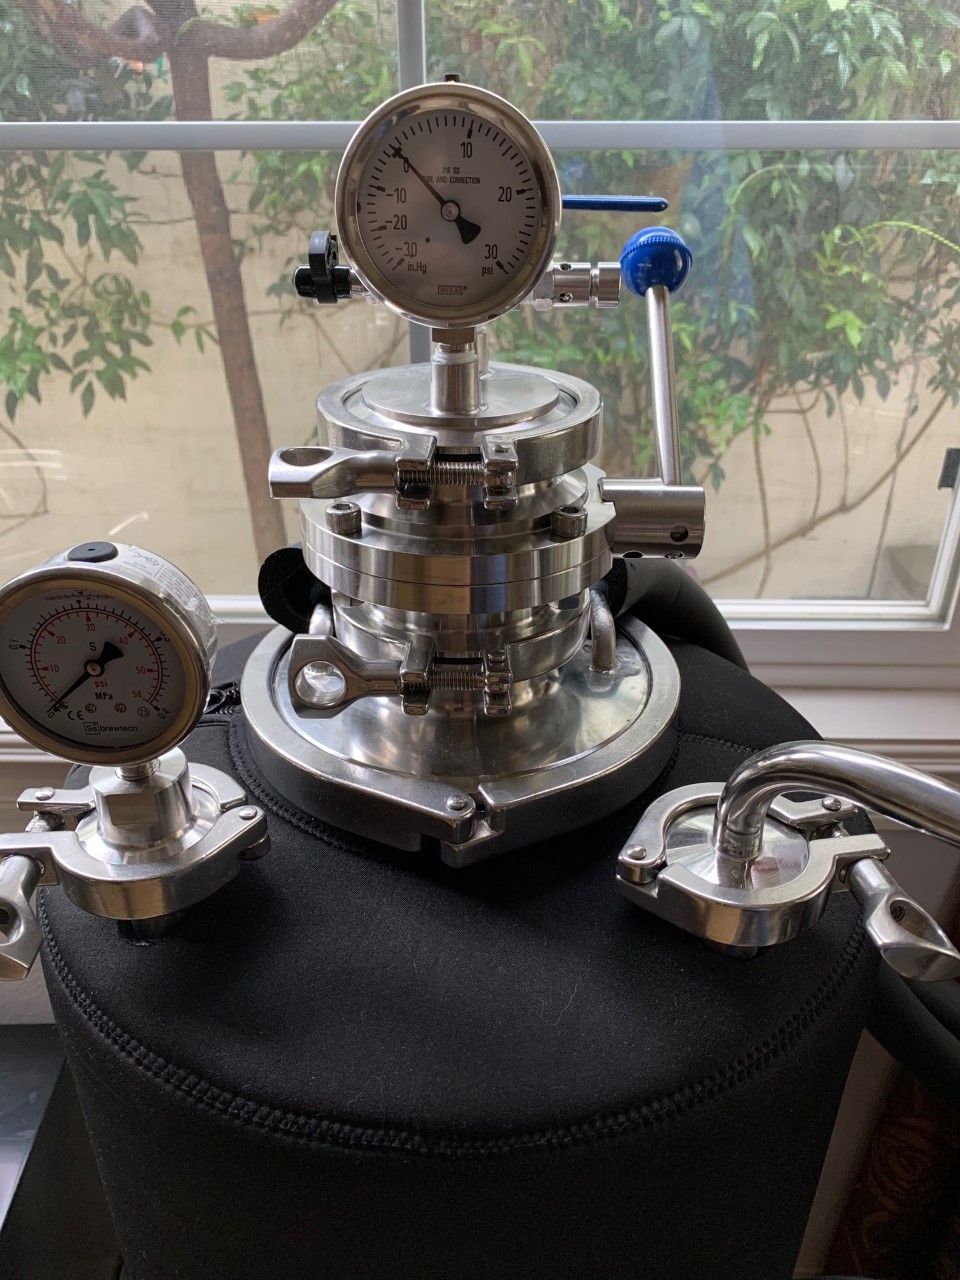
I have a setup similar to K9tpr's. Mine differs in that I use a 3x12" SS spool (not pictured) instead of the sight glass. I also have my 3" TC to 2x 1/4npt cap configured with a combo pressure gauge, and a three way ball valve that has a 5/16" barb and a adjustable PRV. I also have a vacuum pump that I modified to have a shut off ball valve with 5/16" barb on the intake. My dry hopping process is as follows:

  1. Close the 3" TC valve to isolate the fermenter from the environment. Write down the pressure reading on the top cap combo gauge. Turn the three way ball valve to the barb position to vent pressure between the top cap and the butterfly valve.
  2. Remove the top cap and sanitize the interior surfaces of the 3" TC valve and cap. Sanitize the interior surfaces of the 3" TC x 12 spool and install it on to the 3" TC valve with the proper clamp.
  3. Dump your dry hops into the spool and install the top cap with the proper clamp.

Here is where my method changes a bit:

  1. Use three lengths of tubing that will not collapse under vacuum and not burst under pressure. The tubing I use is the 5/16" pvc free ultra barrier tubing from EJ Beverage. Connect the three lengths of tubing using a three way barbed fitting.
  2. Open the main valve on your CO2 tank and purge the regulator by opening the ball valve on the regulator for a second or two. Close this valve when complete, but leave the main tank valve open. Set the pressure on the regulator to 3 psi more than the pressure reading that you wrote down before.
  3. Connect one length of the tubing to your CO2 tank, one length to the vacuum pump, and one length to the barbed fitting on the 3" Top cap.
  4. Close the three way valve on the 3" TC top cap (middle position)
  5. Open the shutoff valve on the vacuum pump and turn the pump on. Let it run for 10 seconds to evacuate the tubing between the CO2 tank and the fermenter.
  6. Very slowly turn the three way valve on the top cap to begin drawing vacuum on the spool containing your hops. You don't want to open this valve quickly because it can suck hop dust into the vacuum pump from the rush of air. Dont ask me how I know. The valve can be opened fully once the combo gauge is reading about -20 in Hg. Allow the vacuum pump to draw vacuum on the spool containing your hops and the tubing between the pump and CO2 tank for roughly a minute.
  7. Close the shut off valve on the vacuum pump, then shut the pump down. Close the three way valve on the top cap (middle position)
  8. Slowly open the shutoff valve on the regulator to pressurized the tubing. Slowly open the three way valve on the top cap to begin pressurizing the spool.
  9. Loosen the adjustment on the PRV valve so it will blow off at low pressure (2-3 psi)
  10. Purge any remaining oxygen from the spool by cycling the three way valve between the 5/16" barb position and the prv valve position. The barb position will fill the spool with CO2, the prv position will release the CO2 in the spool into the atmosphere.
  11. Pressurize the spool to the pressure reading you wrote down for the combo gauge on the top cap earlier and close the three way valve (middle position).
  12. Dump the hops into the fermenter by opening the 3" TC valve. Open and close it a couple times to make sure the pellets all fell into the fermenter.

After dry hopping the the majority of the above steps are repeated to configure the fermenter with the top cap installed directly to the 3" TC valve. Once the volume between the top cap and 3" TC valve has been evacuated and purged, the 3" TC valve is opened and the three way valve on the top cap is left in the PRV position. This will provide protection against an over pressure condition.

Unitank 1.jpg

Unitank 2.jpg
 
Again, some very impressive setups here.

Question: Anyone have trouble with the hops sticking to the butterfly valve in any way? We're talking all 3" TC so I would not think you could have them stick in the spool, but have they ever stuck to the valve from any moisture that enters the spool during the loading-purging-discharging process? Just trying to work out the bugs before I pull the trigger on this upgrade.
 
When I brew lagers condensation always forms on the outside surface of the valve since it gets colder than ambient air, not so when I brew ales. If there is any condensation I simply remove the contraption (with the valve shut, obviously!) and dry off any moisture present. I then quickly reattach the contraption, load the hops and start purging before condensation can form again. It helps that my contraption is a 3" TC tee and not a straight pipe, so that I was able to close the top off with a sight glass allowing me to see the inside of the contraption without having to open it up again. If a couple of pellets do get stuck (I've never had more than one or two) I simply cycle the valve and/or tap the fermenter until they've been shaken loose and that's it.
 
Again, some very impressive setups here.

Question: Anyone have trouble with the hops sticking to the butterfly valve in any way? We're talking all 3" TC so I would not think you could have them stick in the spool, but have they ever stuck to the valve from any moisture that enters the spool during the loading-purging-discharging process? Just trying to work out the bugs before I pull the trigger on this upgrade.

Same as VAle71. Site glass helps with seeing if all hops have dropped...I too have a pellet or two get stuck on the edge of the site glass that are easily shaken loose...Nothing sticks to the 3” valve.
 
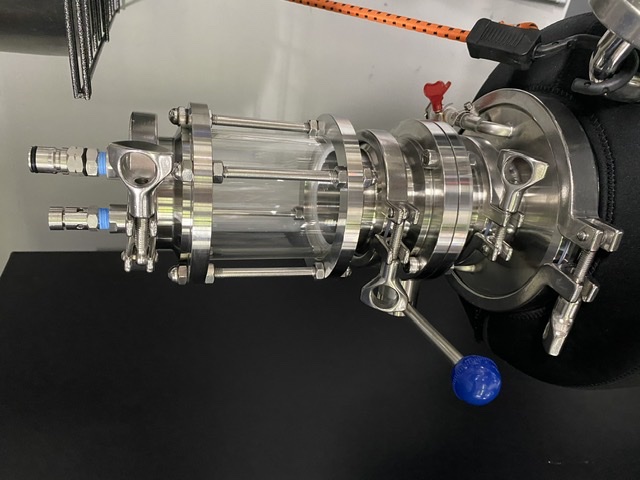
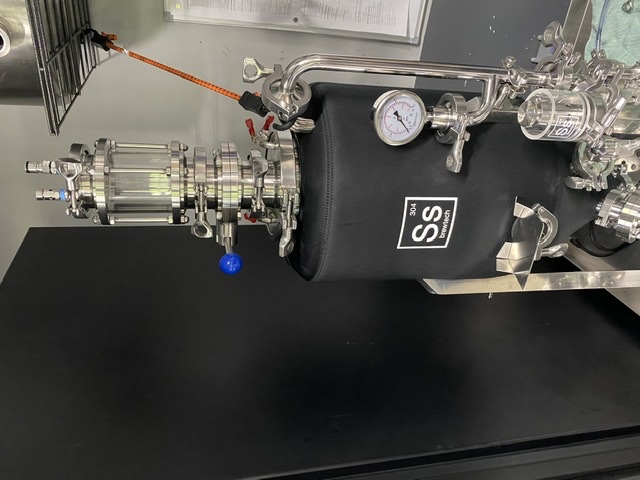
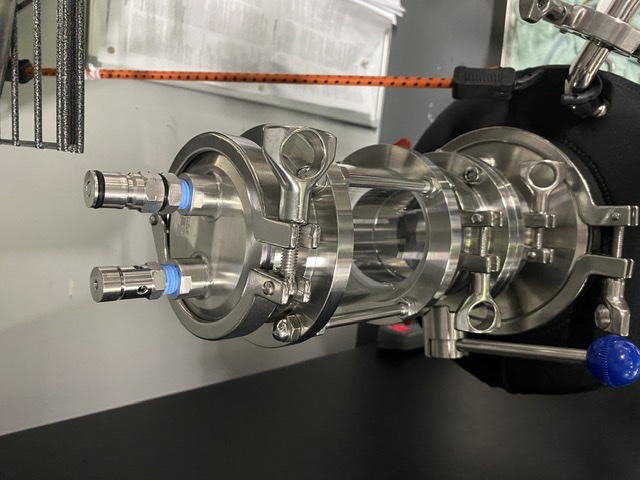
Well, I done did it - I built me a Hop Dropper. Used it on my last IPA and it worked flawlessly! Thanks to all for your input.

...and yes; there is a second PRV down on my blow off arm - I ran a Tee at the end and put a 1.5" TC cap having a standard PRV and Gas In post. Tested all PRVs prior to using the fermenter and all works as expected.

Hop Dropper 1.jpg
 
Hey guys, I have very similar set up and I was wondering by dry hopping under pressure, will that make the hops sink to the bottom of the unitank (which is ideal)? What pressure do I set it at? How long do you recommend the dry hop in there for a nice IPA aroma?
 
The way I drop the hops is after several purge cycles, I release the pressure prior to opening the 3" butterfly valve. I haven't dropped hops under pressure so I cannot speak to that.

Regarding how long to leave the hops in there depends on several variables - but for my system I wait until fermentation is done, soft-crash to 50 F, and drop the hops in at a rate of between 5 and 7 grams per liter (roughly 6.5 gallons of beer, 6 oz hops on my last IPA), let it sit 24 hours, crash to 35 F and let it sit another 24 hours then run it to the keg and the resulting aroma is real nice. A lot depends also on the freshness of the hops - always try to dry-hop with the freshest hops possible.

Do a search on line and you'll get loads of info on dry-hopping - there's so much to learn about this topic and it is changing all the time.
 
So, I tried this a while back with a 1.5" butterfly and the hops got stuck. I think this is a use where a quick clean ball valve would work better.
 
Back
Top