• Please visit and share your knowledge at our sister communities:
  • If you have not, please join our official Homebrewing Facebook Group!

    Homebrewing Facebook Group

Happiness is: Home malting

Homebrew Talk

Help Support Homebrew Talk:

This site may earn a commission from merchant affiliate links, including eBay, Amazon, and others.
It's beer o'clock!

After two weeks in the fermentor, bubbling had almost ceased and I decided to put it in the keg. I ran some sanitizer through the keg and tap system first, then made a siphon and filled up the keg. This is the first time I've made a siphon work out well, previously I'd decanted the fermentor like an idiot.

The keg is now under gas, and I'll be keeping it cool and rolling it to get it carbonated by Saturday.

The beer tasted like beer! It has a mild chocolatey taste I've come to expect from my home brew. There is a grainy/grassy taste in there too that isn't great, but it doesn't ruin the beer. A souvenir from having home-grown everything, I guess. I think this is much better than my first batch, and almost as good as my other ones.

Cheers!
Yf15bt4.jpg


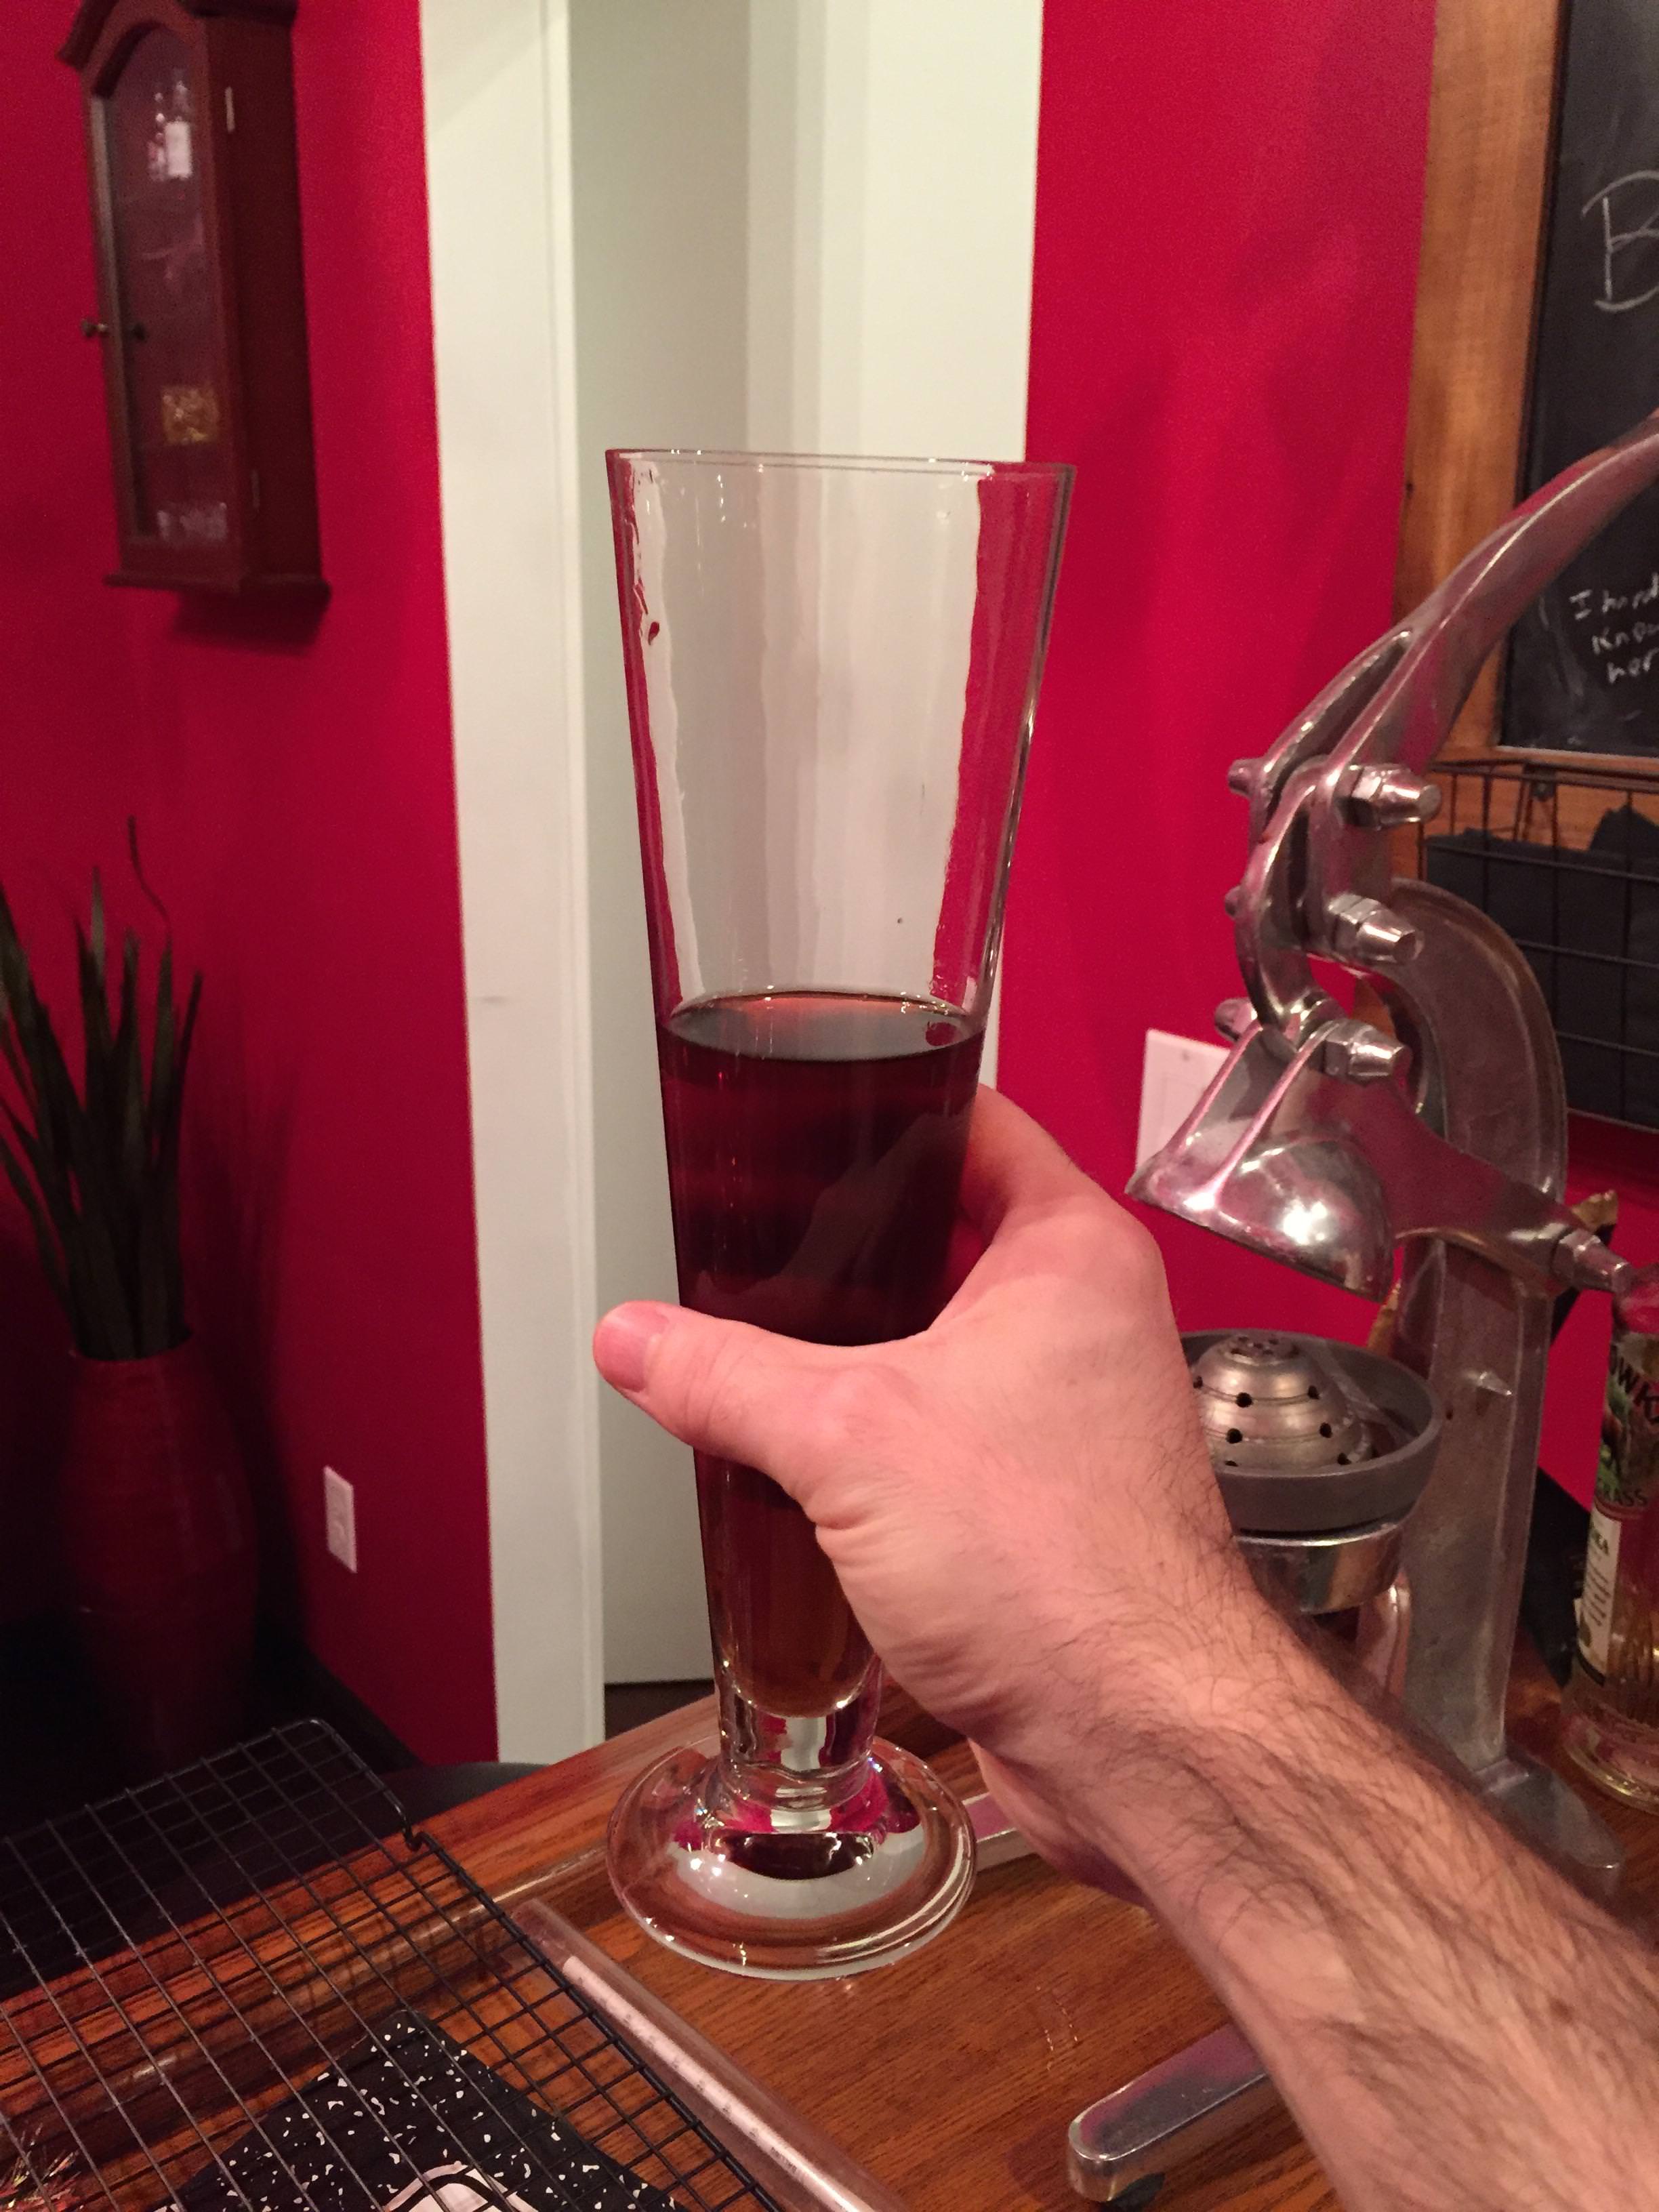
The color is very dark amber but not quite black. The final gravity is 1.015 down from 1.040, so I didn't get much attenuation. Alcohol content is about 3.3%, calories are 133 per 12 oz according to brewers friend. It's a dark, light beer.

I made a brown smoked malt that turned out the same color as yours. I was little disappointed, but its a smokey, roasty-toasty amber. Been toying at buying one of these to just to make chocolate malt.

Keep working on what you done so far.

I'm not malting, but I'm committed to smoking and roasting my own malts. I have a thread link in my signature. - Roast'em Toast'em Smoke'm If You Got'em! - I like to hear how your roasting an toasting goes. Not to mention smoking if you're so inclined.

41v%2BLYStiQL._SL500_AC_SS350_.jpg
 
Last edited:
While randomly browsing around Pinterest, I came across a few posts about sprouting barley as a winter time snack for chickens. This is our first winter with chickens and thought this would be a good activity for the kiddos. Likewise, I thought this would also be a good way for me to see if malting my own barley would be feasible.

My first two attempts to simply sprout the grain have failed miserably. I'm using a clear plastic storage container about the size of a large shoebox. I go through wash and steep process until the barley chits. After that, I keep it moist and turn it a few times per day. Rootlets have developed by day 2 and everything seems to be going well. The problem is, about day 4, white mold begins to pop up in the grain. From what I've read and observed, I need another day or two for the acrospires to be at the proper length in the majority of the grain. But by day 6, its so covered in mold that I end up pitching it.

I'm leaving the container open, no lid or active air circulation. This is in the house, so the air temp is about 69 -72F. What steps do I need to take to keep the mold growth at bay? Put a lid on the box? Set up a computer fan?
 
I assume it is not root fuzz.

Try sanitizing with Star Sans and maybe rinse before the sprout. Many many people grow seed sprouts. look this up.

I question where the mold spores come from in the first place. raw grain, air, water, human interference, children, SWMBO you need to figure this part out.
 
While randomly browsing around Pinterest, I came across a few posts about sprouting barley as a winter time snack for chickens. This is our first winter with chickens and thought this would be a good activity for the kiddos. Likewise, I thought this would also be a good way for me to see if malting my own barley would be feasible.

My first two attempts to simply sprout the grain have failed miserably. I'm using a clear plastic storage container about the size of a large shoebox. I go through wash and steep process until the barley chits. After that, I keep it moist and turn it a few times per day. Rootlets have developed by day 2 and everything seems to be going well. The problem is, about day 4, white mold begins to pop up in the grain. From what I've read and observed, I need another day or two for the acrospires to be at the proper length in the majority of the grain. But by day 6, its so covered in mold that I end up pitching it.

I'm leaving the container open, no lid or active air circulation. This is in the house, so the air temp is about 69 -72F. What steps do I need to take to keep the mold growth at bay? Put a lid on the box? Set up a computer fan?

Put a cup of hydrogen peroxide or a bit of campden tablet in the final steep water. Keep the grain at a cooler temperature mid - upper 50's is ideal. When the steep is done don't keep it in the steeping container instead spread it out on the floor on a large plastic garbage bag (unscented) maybe 1 - 2 in. thick. Mist it very lightly and turn it 2 - 3 times a day by hand the first day or two after steeping, then stop misting it, and spread it out even more, but continue to turn it (i.e. scoop it up in your hand and turn it / mix it). Keep an eye on it and check the length of acrospires, they shouldn't break out of the husk but should grow to the length of the kernel. You can use a fan to blow across the grain after the acrospires are full length, this will help dry it out. You can malt in the 69-72F range but it promotes mold/fungus growth and rigorous/overgrowth of the acrospires.

The temperature, boxed in container and continually adding moisture is what is promotes the mold growth. Once the grain has been saturated with moisture (steeped), keeping it in the open (on the floor, i.e. floor malting), allowing germination while turning the piece and then slow drying with good air flow is key.

I think I'm trying to do two different things. Sprouting for the chickens is one thing, but malting for beer is a just a different process. I think I'll just end up using a little bit of potting soil for the chickens.
For malting, my garage, this time of year, is in the 45-50F range. I have a long weekend, so maybe i can get a small batch started and build a small lightbulb heated kiln for drying. Just one more way to spend money in this hobby.


I've been homemalting for 2 years now..just happened across this thread google searching for a better way of deculming than the bucket to bucket method. But saw this wasn't dead, and thought i'd share my experience with bacteria. I've found that the advice to soak for 8 hours and again doesn't work for me, I get rotten grain (that by the way still makes a beer that tastes fine and hasn't killed me yet). But I don't get the rot with just a 30 min soak. drain. let breath for an hour. soak again for maybe an hour. drain let breath. then just soak it once a day for 5min until the acrospires are mostly coming out of the husks...(sorry for my poor writing skills)

I use sweater drying racks 3 of them stacked with a box fan blowing over them for 1 day to dry, after a day the grain is firm enough to lock up the enzymes and I put it in the over at 170f for 12 hours to kiln. then bucket to bucket to blow off the rootlets, I've found storage tote to storage tote works better though because I can drop it further without the grain blowing out of the path.

one last thing I've noticed with homemalt dryed this way is I get 75% effecincy with a single infusion mash at 150's, but if I do a second step at 165f, for an alpha rest, it bumps up to 85%
 
I started a new batch on Sunday to see if I can get this going again. Two days of steeping and resting about every 8 hrs got 2.5 lbs of barley to 40% moisture content. During the steep and rest, I placed the barley on the basement floor at 64F on an instant read thermometer.
I moved it to the garage this morning (50F) to start the germination process. Hope to see some chitting when I get home.
I've spent the past two weeks working on a "kiln" which is my old Little Chief smoker that I hardly used. With the addition of two porcelain light sockets and a few different wattage bulbs, I came up with a combination to cycle the malt through drying and kilning. There's a little more testing to be done before I finalize everything.
 
Long time since I contribute to the post
Just to let you know that I hare revamped my project of micro malthous all in one, full automated project and now I’m committed to complete the job

the mechanical parts is almost ready
the controller and the software completely developed

Just a preview here


stay tuned
Davide
 
Hi guys

project update, control panel installed and wiring in progress , few more stuff than can do I dry run

stay tuned
Davide

 
The home malting experiment continues. Trying to malt feed barley earlier this year didn't go well. The barley contained lots of reddish seeds that I suspected was fusarium. Fast forward to now.

This is Robust barley planted in the second week of June. Frost the week prior kept me from planting. This was much later than I wanted but the Alaskan summer just didn't want to get started. I'm going to need a warm dry September to let this patch fully mature.

 
Just for some gratuitous barley porn, here's some Maris Otter just four days after your last-but-one post : https://twitter.com/RobinAppelLtd/status/1012388077338324994

Been a crazy year for winter barley in the UK (and from what I hear over much of northern Europe) - a long hot summer has meant some farmers even started cutting their Otter in June, which is unheard of, and the winter barley is pretty much in by now. But that same dry weather has been a bit of a disaster for spring barley.
 
Growing your own barley too! awesome!

just to keep this thread alive thought i'd post a pic of my new toggle switch oven, on low the temp probe has a 200ohm resistor in series so the oven has a range of 95f-~i'd guess 350f. so when i kiln my malt i can get a constant 150f, instead of the old low temp of 200f. it says 170f, but actually went up to 200...


being i have no way to constantly stir my crystals in the oven for roasting i'm playing around with longer lower temps, did one batch of wet green malt let the grain come up to 150f covered, sit for about an hour, then bumped the temp up to 220f for 12hours uncovered. this is what i got...a lot better than the blended mostly too dark stuff i was getting at 350f

100_0468.JPG
100_0469.JPG


this camera sucks, if i do more of this i'll look into getting a better one.

P.S. yes the stove is a mess because i use it to brew 10 gal batches...i just had to take a knife and bore out the orifices just a bit to get the flames bigger....
 
Anyone doing anything exciting? Anyone? Anyone? . . . . . . . .:rock:


well i'm drinking homemalt beer now....still have a burning desire to make a homemalt crystal malt, that is pressure cooked at 15psi for an hour or so after stewing and all that....haven't actually gotten around to it yet....
 
So, this thread planted the seed many years ago about home malting. I finally got the opportunity and gumption to do it!

Naturally, I ignored most advice in the interest of making the process easier. Instead of mixing in a couch, I just laid out the chit malt on the dehydrator trays in a thin (3/4") layer and didn't touch it again.

This is wheat BTW. So far, it stalled out at about 50%. Drying it anyway because I already have another batch in the pipeline.
20231204_173931.jpg
20231204_173937.jpg
 
The malt must flow!
I had good success with even growth using a large graniteware canner and 7lbs dry malt at a crack. Naturally this was feeling a bit slow after the first sack.

I still don't have anywhere clean with stable temperatures to couch on the floor. So my first attempt at minimal footprint was with 25lbs dry grain and a pair of 5 gallon buckets. With three times a day turning, it looks like I have very uneven modification, with many that probably suffocated.
20240416_192405.jpg


I drug out the hop oast in a stroke of genius for how to rapidly dry all this malt.

20240416_190025.jpg


Luckily, I've got enough contacts in various manufacturing settings who know I love freebies, that I had something on hand to line the 1/4" mesh.

20240416_190212.jpg


And as I stare at this setup, it's got me thinking if I can malt and dry in the same oast. Off to sift through the AI generated garbage Google throws at me for some possible answers.
 

Latest posts

Back
Top