Hope you're doing it outside. I roasted some just to a quasi brown malt in the oven and was unprepared for the amount of smoke given off just at that level. My wife was less than pleased with my experiment. Think I went by the Barleypopmaker blog which has good info on home roasting. Also saw a YouTube video where someone had taken one of those countertop rotisserie machines and made a drum out of a coffee can for the roaster looked like a great idea been looking for a rotisserie at a garage sale ever since.
You are using an out of date browser. It may not display this or other websites correctly.
You should upgrade or use an alternative browser.
You should upgrade or use an alternative browser.
Happiness is: Home malting
- Thread starter COLObrewer
- Start date

Help Support Homebrew Talk:
This site may earn a commission from merchant affiliate
links, including eBay, Amazon, and others.
Also great write up although I'll never get into growing my own barley i would love to be able to make my own specialty malts from 2 row. My nearest lhbs is more than 2 hours away if I could buy a couple sacks of base two row a year and make different styles by self roasting it I'd be thrilled (the hops and yeast ship cheap). I've had decent success with the lighter roasts including crystal by following that Barleypopmaker blog.
CtrlMaltDel
Well-Known Member
- Joined
- Sep 20, 2016
- Messages
- 62
- Reaction score
- 27
Thanks Zibe, I'll definitely give those videos a watch before I start to roast. I think making darker malts from pale malt would be totally do-able.
CtrlMaltDel
Well-Known Member
- Joined
- Sep 20, 2016
- Messages
- 62
- Reaction score
- 27
This morning I had a crack at roasting a dark malt in my oven. I ended up baking 1/2 pound of barley for an hour at 350, 30 mins at 415, and 20 mins at 450. It ended up with golden husks, black kernel surfaces, and brown kernel interiors. It didn't smoke much, but ended with a solid astringent taste. I'm. It sure if it's "chocolate malt" yet, or if it needed more time and temp.
Here are some kernels during the 450 F heat treatment:
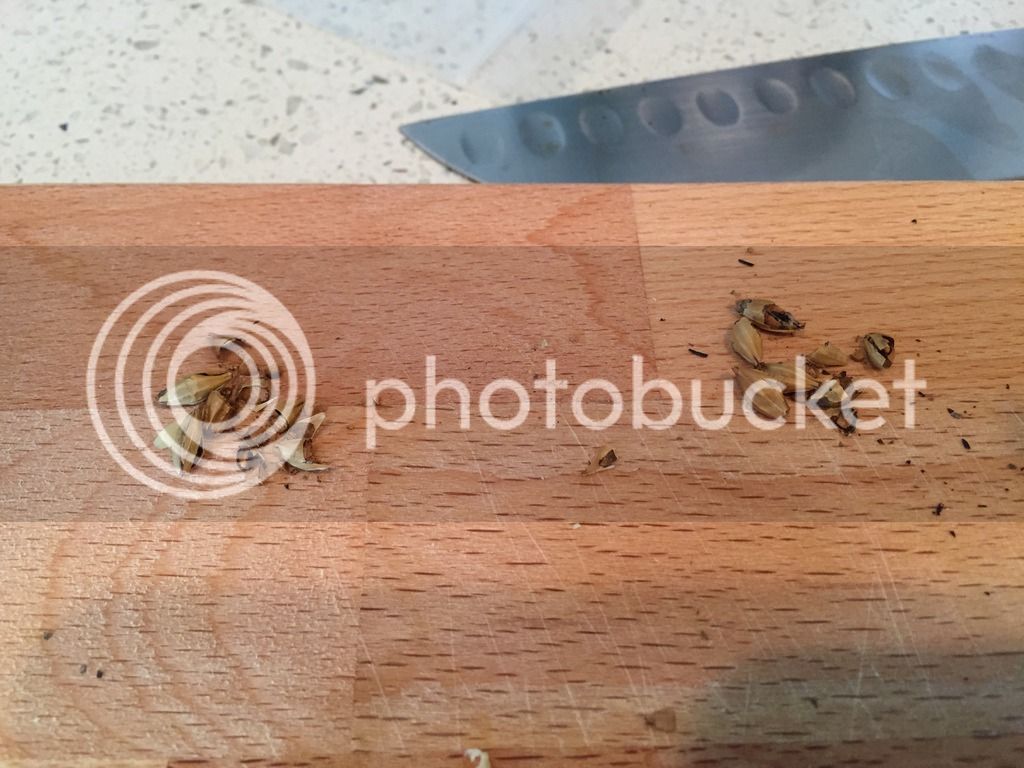
Here are some kernels during the 450 F heat treatment:


$53.24
1pc Hose Barb/MFL 1.5" Tri Clamp to Ball Lock Post Liquid Gas Homebrew Kegging Fermentation Parts Brewer Hardware SUS304(Liquid MFL)
yunchengshiyanhuqucuichendianzishangwuyouxiangongsi
![Craft A Brew - Safale BE-256 Yeast - Fermentis - Belgian Ale Dry Yeast - For Belgian & Strong Ales - Ingredients for Home Brewing - Beer Making Supplies - [3 Pack]](https://m.media-amazon.com/images/I/51bcKEwQmWL._SL500_.jpg)


$39.22 ($39.22 / Count)
Brewer's Best Home Brew Beer Ingredient Kit - 5 Gallon (Mexican Cerveza)
Amazon.com


$10.99 ($31.16 / Ounce)
Hornindal Kveik Yeast for Homebrewing - Mead, Cider, Wine, Beer - 10g Packet - Saccharomyces Cerevisiae - Sold by Shadowhive.com
Shadowhive


$719.00
$799.00
EdgeStar KC2000TWIN Full Size Dual Tap Kegerator & Draft Beer Dispenser - Black
Amazon.com


$176.97
1pc Commercial Keg Manifold 2" Tri Clamp,Ball Lock Tapping Head,Pressure Gauge/Adjustable PRV for Kegging,Fermentation Control
hanhanbaihuoxiaoshoudian


$20.94
$29.99
The Brew Your Own Big Book of Clone Recipes: Featuring 300 Homebrew Recipes from Your Favorite Breweries
Amazon.com


$53.24
1pc Hose Barb/MFL 1.5" Tri Clamp to Ball Lock Post Liquid Gas Homebrew Kegging Fermentation Parts Brewer Hardware SUS304(Liquid Hose Barb)
Guangshui Weilu You Trading Co., Ltd

$58.16
HUIZHUGS Brewing Equipment Keg Ball Lock Faucet 30cm Reinforced Silicone Hose Secondary Fermentation Homebrew Kegging Brewing Equipment
xiangshuizhenzhanglingfengshop


$22.00 ($623.23 / Ounce)
AMZLMPKNTW Ball Lock Sample Faucet 30cm Reinforced Silicone Hose Secondary Fermentation Homebrew Kegging joyful
无为中南商贸有限公司

$27.29 ($13.64 / Count)
$41.99 ($21.00 / Count)
2 Pack 1 Gallon Large Fermentation Jars with 3 Airlocks and 2 SCREW Lids(100% Airtight Heavy Duty Lid w Silicone) - Wide Mouth Glass Jars w Scale Mark - Pickle Jars for Sauerkraut, Sourdough Starter
Qianfenie Direct


$172.35
2 Inch Tri Clamp Keg Manifold With Ball Lock Posts, Pressure Gauge, PRV (0-30 PSI) – Homebrew, Fermentation, Kegging System
wuhanshijiayangzhiyimaoyiyouxiangongsi


$7.79 ($7.79 / Count)
Craft A Brew - LalBrew Voss™ - Kveik Ale Yeast - For Craft Lagers - Ingredients for Home Brewing - Beer Making Supplies - (1 Pack)
Craft a Brew
CtrlMaltDel
Well-Known Member
- Joined
- Sep 20, 2016
- Messages
- 62
- Reaction score
- 27
I've put in another half pound into the oven and roasted it at 350 F for 20 mins and 450 F for 20 mins. It looks and tastes about like the first batch.
Last week I also went to a buddy's house and roasted the rest of the barley at 180 F for about two hours. We had a thermometer in the baking trays the barley was loaded into, and it never read higher than 168 F, but it might have a bias.
After that step, which gave the barely a slightly different taste, I took a pound of quick oats and 1.5 pounds of the light roasted barley and brought it up to 350 F for 20 minutes, stirring every 5 mins or so. This gave a small amount of burnt look to the oats, and caused some popping in the barley. I was aiming to make something like a Munich, following a recipe from one of the home malting websites. The oats, which have no enzymes, can be roasted to gain milliard flovors without sacrificing enzymatic power. I'm interested to see how this turns out.
I went to the local homebrew store and bought all the supplies I'll need, plus I ground the malts, keeping the dark malt separate. Brew day is this Sunday!
CtrlMaltDel
Well-Known Member
- Joined
- Sep 20, 2016
- Messages
- 62
- Reaction score
- 27
Today, the day before brew day, I'm taking some last preparatory steps. I tried to buy a stock pot large enough for the 7 or 8 gallons I'll need, but I was unsuccessful. I'll have to make do with the five gallon pots I have.
I've also readied the dark malts for cold steeping. Following this article (https://www.homebrewersassociation....steeping-getting-the-most-out-of-dark-grains/) I boiled 2 quarts of water and am now letting that cool. I'll leave the dark malt in overnight, and hopefully get some good tea.
I've also readied the dark malts for cold steeping. Following this article (https://www.homebrewersassociation....steeping-getting-the-most-out-of-dark-grains/) I boiled 2 quarts of water and am now letting that cool. I'll leave the dark malt in overnight, and hopefully get some good tea.
CtrlMaltDel
Well-Known Member
- Joined
- Sep 20, 2016
- Messages
- 62
- Reaction score
- 27
Brew day has come and gone. While I had been planning this for weeks and had the whole day blocked out, that didn't stop fate from intervening.
The morning of we got a call from my in-laws that they were in desperate need of help moving out of their house. We went over to help them, and only left several hours after my planned start time, with the promise we'd be back once the beer was away. This meant that Joe, who had until the evening to help me, was only able to be there for the first half of my endeavor. Things might have ended up better if I wasn't in a big rush and had benefited from Joe's experience in the end, but who can say?
I had 1/2 gallon steeping the dark malt (which came out near-black and smelling like coffee), and would use 6.5 gallons for the other 11.8 pounds of grains. I didn't have a pot big enough, so I used a six and five gallon pot, each with about 3 gallons of distilled water. I used two bags, mixed and divided the grain, and once I got to temp I added the bags.
They went in at 160 F, and the temp dropped to 153 F pretty quickly. I turned off the heat and wrapped the pots in coats and sweaters. Every ten minutes or so the temp would drop below 150 F and I'd turn on the burners on low for a minute or so, swirling the pots and and cracking open the lid to stir. The temp fluctuated between 149 and 154 F in this way.
After an hour and 15 mins I lifted out the grains, put on gloves, and squeezed the bags (I know, some people don't do that). The squeezed grain bags still felt pleanty sticky and tasted a little sweet, so I'm sure I left some sugar behind. Either way, I tossed the residue without rinsing and got ready to raise the temp to boil the wort.
Then I remembered I never checked the pH.
I checked it as the temp was starting to climb into the high 150 F, and had trouble reading the very faint hue on the pH strips. My best guess was that the wort was off the 4.5-6.5 scale, on the low end. I added a 1/2 teaspoon of baking soda and worried for about 15 mins. The pH seemed to go closer to 5.5, but the colors on the pH paper did not match the legend on the container very closely at all. My buddy Joe, who's was there helping me, reasoned that the wort tasted sweet, and the starting pH must therefore have been tolerable.
We boiled the wort for about an hour. I added a packet of cascadia hops with about 20 mins left to go. The hops were divided in half in teabags made of cheese cloth, and smelled really good.
After boiling I took each pot out back and dropped the copper cooler in it. I had sanitized it and hooked it up to the very cold garden hose. The wind was howling, and wild yeast could have easily got into the pots as I stirred the copper around.
For each pot, the temp quickly dropped to 115, and didn't go any lower. The first pot I dumped into the six-gallon nozzles bucket at "115", figuring I'd cool the other pot to the correct temp. That one also dropped to 115 F and didn't go any lower. In the pitch black and freezing cold, I got a little suspicious.
I took the thermometer out of the chilled wort and ran it under tap water inside, and it read "121 F". The thermometers were off. I had a matching pair from Target, the kind with a probe on a mesh wire. They were supposed to be good for 40 F to 400 F, but I had suspected on if getting a bias when I used it for malting. The other was brand new that day, and the two were in agreement. Both pots felt room-temp, so in the nozzled bucket they went.
Inside the fermentor was waiting the dark malt. I had taken the steeping from the night before, and ran it through a coffee filter, which mostly cleaned it up. Then I got the camp stove out (the stove top was full of wort-pots), and heated it to 170 to sanitize it. I dumped in in the fermentor, and it had a few hours chilling in there before I started adding wort.
For the yeast, I had a wet pack warming to room temp for about four hours before I used it. I wanted to get it off to a good start, and had a sanitized cup for it to go in. What I didn't have was sanitized water. I took the risk of adding about a cup of filtered water and a few tablespoons of table sugar and mixed that up, letting it sit for about half an hour as I chilled the wort.
I started filling the fermentor with wort and addded the yeast when half the wort was added. A sanitized aerator (from the barley steeping) was dropped in the fermentor and bubbled for about 15 mins. It was then I realized I'd dumped all my sanitized without sanitizing a satillite container, a baster to transfer out a sample, or the hydrometer. That added up to me not getting any hydrometry data. Feeling none to hopeful but at least glad to be done, I pushed the 64 F five gallons of wort into the bar room. It was way past my bed time, and I still had to head to my in-laws and move furniture.
It was a very long day (about six hours of brewing?) that certainly could have gone better. Joe's lending me his time and equipment was invaluable, but my failure to check the the pH combined with to potentially mis-handled yeast may have fatally damaged the process.
Next time I'll have a test instruction with steps delineated and forms for data input made in advance. I'll use different pH paper and thermometers. I'm also going to buy an 8 gallon pot so I can use only one mash tun. I'll build an insulated tub for it out of foam so the mash temp stays constant without extra heat and stirring. I'll also keep at least 1/4 gallon aside to rinse the grains, since I worked hard for those sugars and want to catch them all.
In a few days I'll see if there is any activity in the fermentor. I'll let you know how it goes.
CtrlMaltDel
Well-Known Member
- Joined
- Sep 20, 2016
- Messages
- 62
- Reaction score
- 27
Some photos from yesterday:
My pots getting up to temperature:

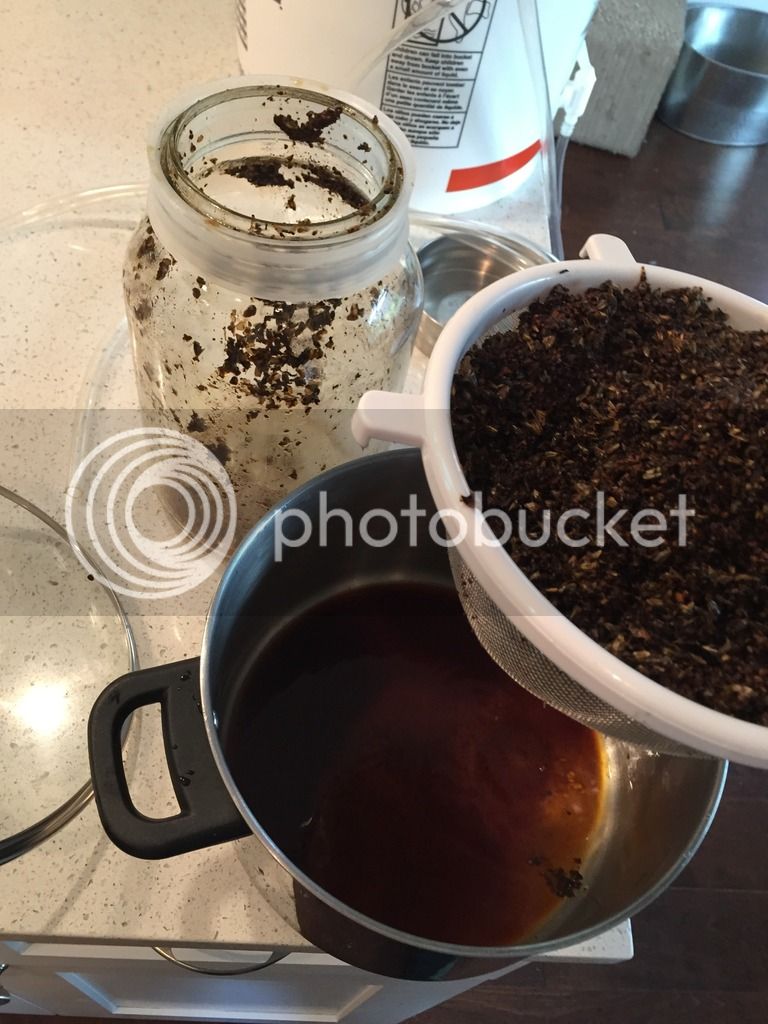
Straining my dark malts. I think these came out more like a brown or caffe; I'll have to roast longer or hotter next time.
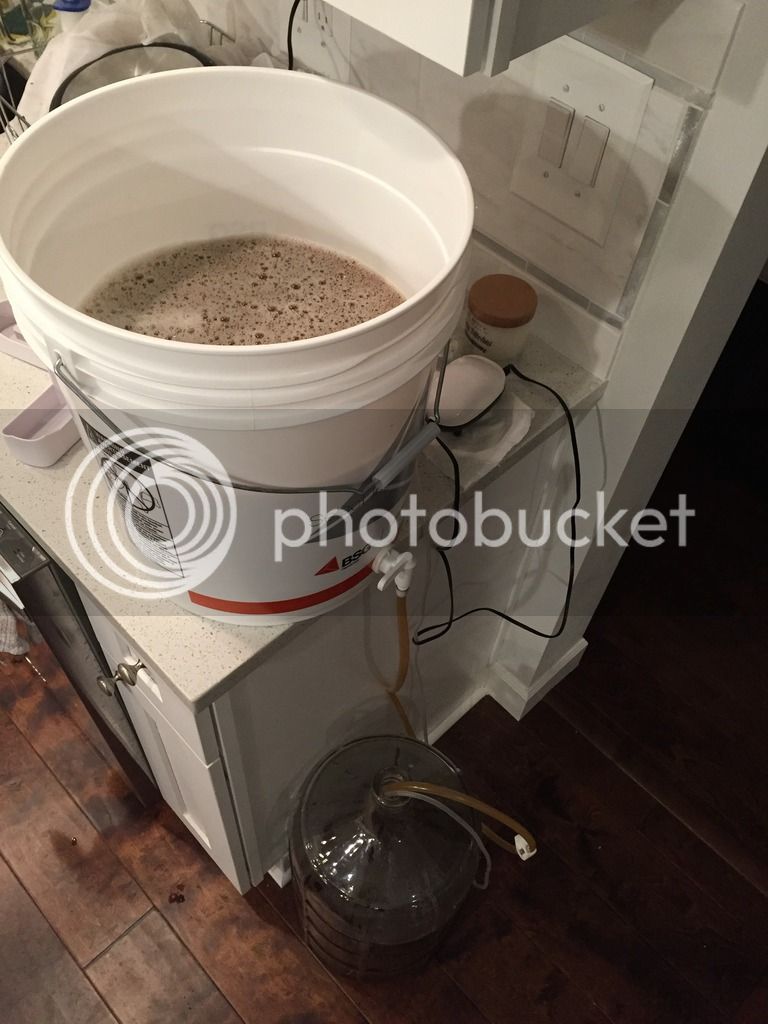
My nozzled bucket draining into the fermentor at the end of the process:
My pots getting up to temperature:

Straining my dark malts. I think these came out more like a brown or caffe; I'll have to roast longer or hotter next time.

My nozzled bucket draining into the fermentor at the end of the process:

CtrlMaltDel
Well-Known Member
- Joined
- Sep 20, 2016
- Messages
- 62
- Reaction score
- 27
It's alive!! At the 21 hour mark the fermentor is bubbling away. There is a lot of yeast-looking material in the bottom, and a complete frothy layer across the top that wasn't there this morning. The ale yeast should be on top, so I'm not sure what's happening.
You should avoid using distilled water unless you're adjusting your water pre-mash. You can use the "Bru'n Water" spreadsheets widely suggested in these forums if you continue with distilled.I had 1/2 gallon steeping the dark malt (which came out near-black and smelling like coffee), and would use 6.5 gallons for the other 11.8 pounds of grains. I didn't have a pot big enough, so I used a six and five gallon pot, each with about 3 gallons of distilled water. I used two bags, mixed and divided the grain, and once I got to temp I added the bags.
Squeezing is OKAY (and I would encourage it). Don't forget to sparge, you worked really hard growing all that sugar!After an hour and 15 mins I lifted out the grains, put on gloves, and squeezed the bags (I know, some people don't do that). The squeezed grain bags still felt pleanty sticky and tasted a little sweet, so I'm sure I left some sugar behind. Either way, I tossed the residue without rinsing and got ready to raise the temp to boil the wort.
Then I remembered I never checked the pH.
I checked it as the temp was starting to climb into the high 150 F, and had trouble reading the very faint hue on the pH strips. My best guess was that the wort was off the 4.5-6.5 scale, on the low end. I added a 1/2 teaspoon of baking soda and worried for about 15 mins. The pH seemed to go closer to 5.5, but the colors on the pH paper did not match the legend on the container very closely at all. My buddy Joe, who's was there helping me, reasoned that the wort tasted sweet, and the starting pH must therefore have been tolerable.
pH strips are terrible at measuring the pH of your wort. Either use a digital pH meter or trust the "Bru'n Water" spreadsheets.
It was a very long day (about six hours of brewing?) that certainly could have gone better. Joe's lending me his time and equipment was invaluable, but my failure to check the the pH combined with to potentially mis-handled yeast may have fatally damaged the process.
Things always seem to go wrong on brew day and 6 hours isn't surprising for your first time. Don't stress too much - you'll still make beer!
Next time I'll have a test instruction with steps delineated and forms for data input made in advance. I'll use different pH paper and thermometers. I'm also going to buy an 8 gallon pot so I can use only one mash tun. I'll build an insulated tub for it out of foam so the mash temp stays constant without extra heat and stirring. I'll also keep at least 1/4 gallon aside to rinse the grains, since I worked hard for those sugars and want to catch them all.
You have the right ideas to improve your brewing process. I would say that you should reserve much more water for sparging (rinsing). Typically, you want 1.25 quarts of water per pound of grain during the first mash step. I've found this to be unnecessarily low and you can go with more water (as long as you have adjusted for pH and other salts). I would say a good starting point for BIAB is 4-5 gallons in the first mash and 2-3 gallons of sparge water. You know you've extracted everything when your sparge water results in a mash gravity of 1.010. Don't go any lower than that!
Also, fantastic job at malting. You're a rock star and I'll be keeping this post bookmarked in case I ever venture down the malting path!
sfish
Well-Known Member
subscribed.
CtrlMaltDel
Well-Known Member
- Joined
- Sep 20, 2016
- Messages
- 62
- Reaction score
- 27
Dang Babaganuj, thanks for all the advice and encouragement! Both go a long way to helping me out for next time.
I've decided that I want another crack at this whether it goes well or not. To that end, I'm going to start malting the next batch of grain over the long weekend. Regardless of what happens with the current batch, I can make a pale malt out of it all (roasting darker if needed later) and store it a few months.
I've decided that I want another crack at this whether it goes well or not. To that end, I'm going to start malting the next batch of grain over the long weekend. Regardless of what happens with the current batch, I can make a pale malt out of it all (roasting darker if needed later) and store it a few months.
sfish
Well-Known Member
My friend and I grew about 60 pounds on Conlon 2 row summer barley over the summer and I have been waiting for some time to malt. Our first time. This thread is great reading.
Do you know the time in hours it took for you to go from the beginning of wetting the grain to the start of the drying process when you needed to stop the seed from growing?
I have done a test batch and over grew the sprouts. The sprouts grew a lot between the time I left for work and then arrived home.
I would like to figure the time I need to begin drying and make certain I am home with time to process it. I figure the window is only a few hours.
Can a picture be resized?
.jpg")
Do you know the time in hours it took for you to go from the beginning of wetting the grain to the start of the drying process when you needed to stop the seed from growing?
I have done a test batch and over grew the sprouts. The sprouts grew a lot between the time I left for work and then arrived home.
I would like to figure the time I need to begin drying and make certain I am home with time to process it. I figure the window is only a few hours.
Can a picture be resized?
CtrlMaltDel
Well-Known Member
- Joined
- Sep 20, 2016
- Messages
- 62
- Reaction score
- 27
sfish, after two 8-hour soaking period during the first day, I found that two and a half additional days was sufficient for a small portion of acrospires to start bursting through.
Now, the sprouts (rootlets) will end up about three time the length of the kernels, but it's the acrospire (inner shoot, looks like a sliver or a leaf, and is under the husk until it gets over the length of kernel) that tells the progress of the germination. When a few acrospires start pushing through the husk and becoming visible is when the whole lot is in that 75-100% length-of-kernel range.
Now, the sprouts (rootlets) will end up about three time the length of the kernels, but it's the acrospire (inner shoot, looks like a sliver or a leaf, and is under the husk until it gets over the length of kernel) that tells the progress of the germination. When a few acrospires start pushing through the husk and becoming visible is when the whole lot is in that 75-100% length-of-kernel range.
sfish
Well-Known Member
Thank you looks like i need to start on a wed. before work
CtrlMaltDel
Well-Known Member
- Joined
- Sep 20, 2016
- Messages
- 62
- Reaction score
- 27
Yesterday, at the one week mark, the fermentor was bubbling at one bubble every 90 seconds. The high point was on Tuesday when it was trucking along at one bubble every second. The color is also much darker than it was when all the yeast was suspended.
I ordered a keg last week, and I'll be legging the beer next weekend, I think.
I ordered a keg last week, and I'll be legging the beer next weekend, I think.
homemaltster
Well-Known Member
CtrlMaltDel, awesome to see you're getting into malting! Sounds like you had a successful first go of it, which not all of us can say ") I ended up with some nasty, stinky compost my first couple times.
I ended up with some nasty, stinky compost my first couple times.
Have you started your next batch yet? What have you thought about changing in your malting process/setup?
I ended up with some nasty, stinky compost my first couple times.Have you started your next batch yet? What have you thought about changing in your malting process/setup?
homemaltster
Well-Known Member
Also, way to go on putting a big chunk of your lawn into barley! Got to keep the neighbors guessing.
Regardless the results, regardless the posts, you guys are my homebrew heros.
sfish
Well-Known Member
Is it better to have slightly undermodified malt or slighty overmodified malt?
I think undermodified would be better with set rest when mashing.
I think undermodified would be better with set rest when mashing.
OP
OP
COLObrewer
Well-Known Member
Awesome! More home maltster interest. Myself, I am still dealing with life . . . . . even BUYING beer. We do have some Mead in the cooler though
CtrlMaltDel
Well-Known Member
- Joined
- Sep 20, 2016
- Messages
- 62
- Reaction score
- 27
Homemalt, I'll have to wait and taste my brew before I venture to take any credit for it working! I am considering how to push more grain through each time I malt- I think the drying phase is my bottle neck right now. If I can get more food dehydrators I can scale up my six-pound batches into 12-pound batches with little trouble.
My garden is exciting for me, and will give me a shot next fall of having a truly home made product. I planted 200 square feet and expect 20-30 pounds of grain.
sfish, I tried reading a few papers about levels of modification, but it was all pretty complicated. It does sound like prevailing wisdom is that 75-100% modification is desired, and a protein rest can liberate enzymes trapped in undermodified grains.
Keep malting when you're able, Colo! Your the catalyst for so much fun here in the thread!
sfish
Well-Known Member
COLObrewer Maybe we should send you some homebrew
Thanks CtrlMaltDel I am going with under for now.
Posted this on another thread but seems more relevent here.
So far on my road to brew a farmhouse ale "from field to glass"~
A friend and I have planted and harvested about 60 pounds of barley and needs to be malted. This took 2 years because the first year it was planted in the winter and froze. We have grown 10 pounds of red wheat as will.
we have harvested about a pound of hops from second year plants.
We have harvested 2 strains of yeast.
I will call this "homegrow beer".
Next year I will rinse the skins of grapes and apples grown on his land, add to a starter and see is I can harvest a strain of yeast.
I will call this "Terrior Beer"
------------
Have you read this book?
"The Perfect Keg: Sowing, Scything, Malting & Brewing My Way to the Best-Ever Pint of Beer" by Ian Coutts
It was being passed around, don't know it the chain stopped though.
https://www.homebrewtalk.com/showthread.php?t=496350
homemaltster
Well-Known Member
Is it better to have slightly undermodified malt or slighty overmodified malt?
I think undermodified would be better with set rest when mashing.
What's "better" is up to your own discretion, of course. The degree of modification gives you different options as a brewer.
Most commercial malts these days are overmodified, and thus affectionately termed "powdered beer." Your mashing options are limited with powdered beer. A good chunk of the enzymatic work that was once done in the mash is now done in the malthouse. That's why protein rests have basically ceased to be a thing - the protein inside the kernel has already been degraded enough by the malting process, so theres not much more the protein enzymes (proteases) can do during the mash.
Undermodified malts give the brewer more flexibility in their mash. For this reason, they were preferred by traditional European brewers who wanted more control over the process.
CtrlMaltDel
Well-Known Member
- Joined
- Sep 20, 2016
- Messages
- 62
- Reaction score
- 27
sfish, that is amazing! I don't have the guts yet to try and use my own yeast, bravo and good luck to you on that score. How did your second barley harvest go? Did you use any soil measurements to track nitrogen levels? Did your plants tinge yellow just before the winter started (mine have, not sure if that's normal)?
Homemaltster, that's great info, thanks for providing that.
Homemaltster, that's great info, thanks for providing that.
sfish
Well-Known Member
homemaltster Thank I will shoot for undermodified malt.
CtrlMaltDel Second went well that is where we harvested about 60 pounds of Conlon spring barley, planted 5 pounds of seed. The darker green in the field is the barley harvested in July. the amber is wheat.
tHE

.jpg")
CtrlMaltDel Second went well that is where we harvested about 60 pounds of Conlon spring barley, planted 5 pounds of seed. The darker green in the field is the barley harvested in July. the amber is wheat.
tHE
CtrlMaltDel
Well-Known Member
- Joined
- Sep 20, 2016
- Messages
- 62
- Reaction score
- 27
That is glorious, sfish. It looks like your patch is about two or three times the size of mine, so I think my estimate of twenty to thirty pounds is good.
I can't wait to watch my barley grow next summer. I'll be harvesting in early August, I believe.
I can't wait to watch my barley grow next summer. I'll be harvesting in early August, I believe.
CtrlMaltDel
Well-Known Member
- Joined
- Sep 20, 2016
- Messages
- 62
- Reaction score
- 27
I'm at the two-week point of fermentation today. My fermentor is still at 68 F, and it's still bubbling at about 1 bubble every two minutes. I'm not sure how long this will last!
My keg arrived in the mail, so I've started preparing for the keg and tap system to be installed. I've bought a handful of parts to make a fan that can recirculate air in the mini fridge, and I've bought parts to make an insulated pipe to carry the beer line behind the wall from the mini fridge to the tap.
I'm all little hesitant to start sawing away the dry wall, but I've put a 1" hole in the fridge this morning:
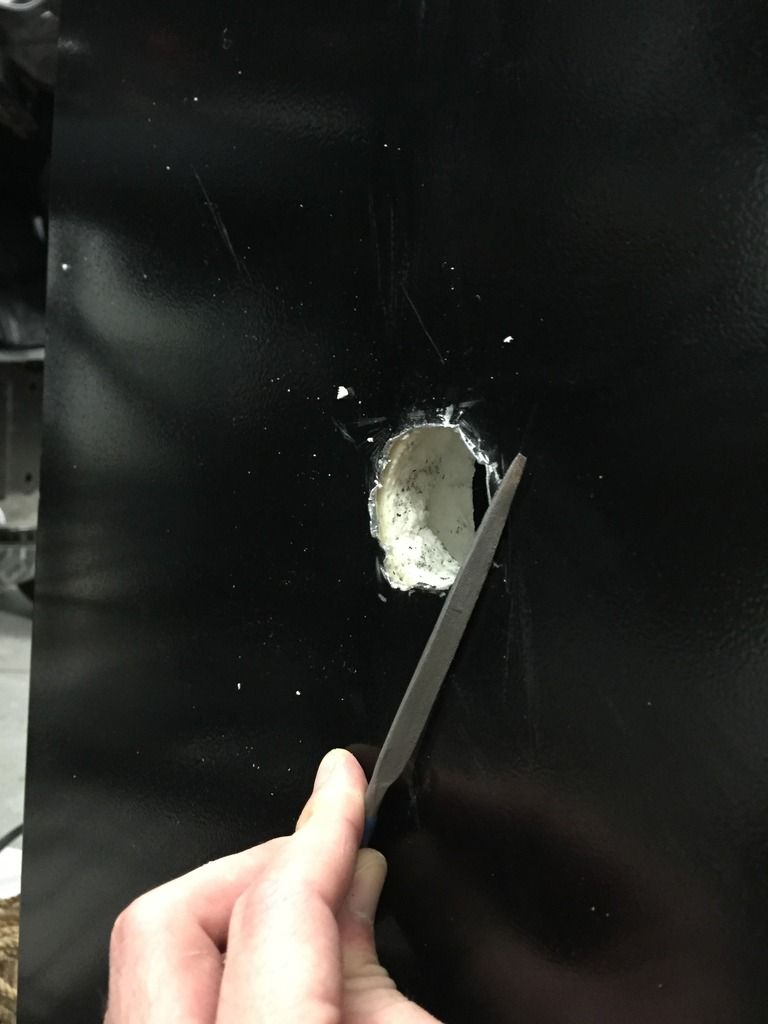
I used an exacto knife to cut through the plastic wall inside the fridge, and carefully carved through the insulation so as not to hit any coolant lines. I never saw any, and reached the metal exterior wall. That was harder to get through. I punched a series of hole with a small drill, then used the exacto to connect each hole.
I'll make the next steps later this week.
Similar threads
- Replies
- 9
- Views
- 1K
