• Please visit and share your knowledge at our sister communities:
  • If you have not, please join our official Homebrewing Facebook Group!

    Homebrewing Facebook Group

GE 7 CF (FCM7SUWW) keezer conversion

Homebrew Talk

Help Support Homebrew Talk:

This site may earn a commission from merchant affiliate links, including eBay, Amazon, and others.
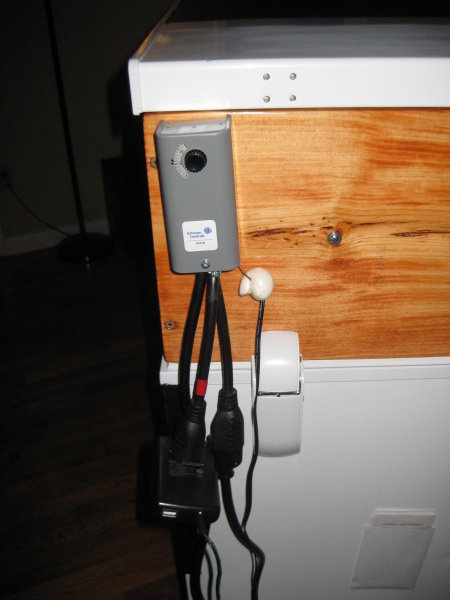
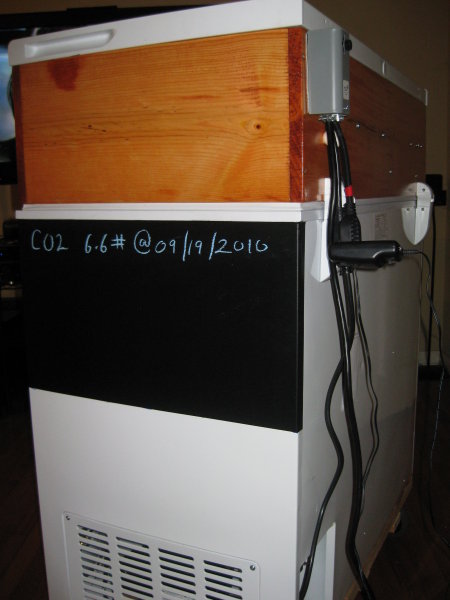
Bought red oak and red oak stain. Finally just ended up screwing it together after an unsuccessful attempt at gluing as well. Took a good hour to get all the holes lined up and exactly 1 3/4" from the edge. Looks great.
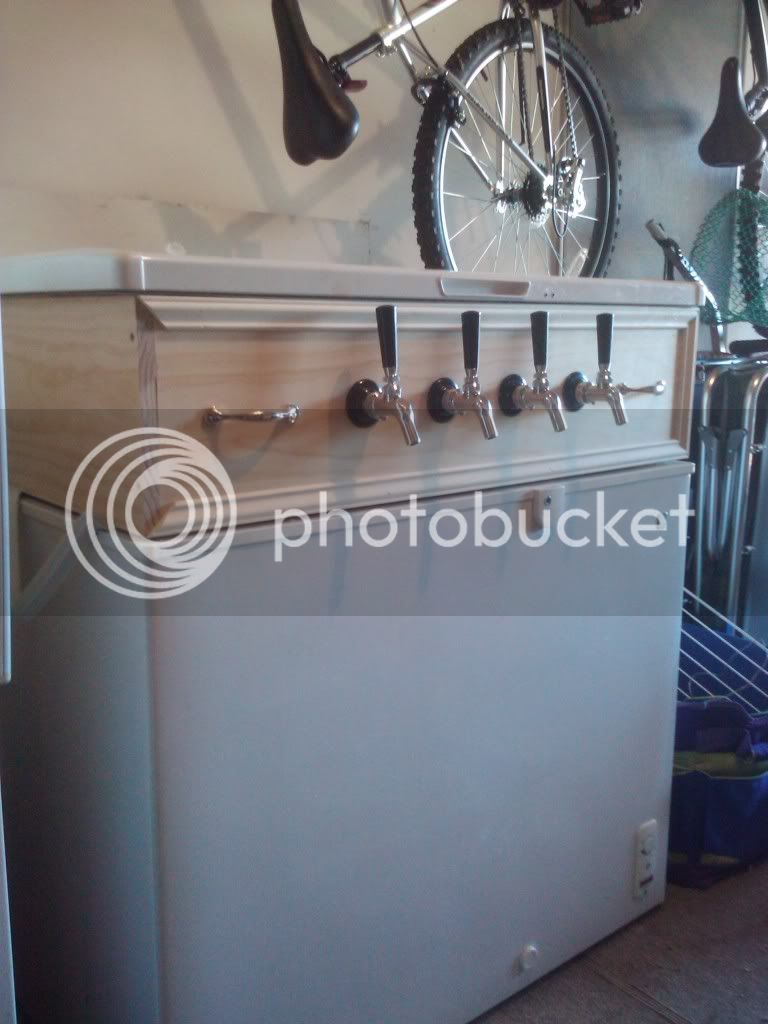
BUT I decided to take the lid off the freezer and line it up and see how it looked... for some reason it didn't sit on top of the lid right. So I measured it... well the obviously frustrated guy at HD who had to cut my $41 dollars worth of red oak had only cut it 36" after telling him repeatedly what I needed. I'm pretty pissed right now, drinking a home brew to get myself together before my GF takes me back so I can get my money back and go to lowes.....
 
I just read this and the same thing happened to me at Home Depot. I told the guy the measurements didn't need to be exact but each pair of boards had to be the same length. I didn't bank of the cuts not being even close to square. I'm just gonna square it up myself and make the collar a little smaller than planned, it shouldn't effect anything. Got all my shanks and faucets from a user on here, kegconnection. Now the time....

By the way, why even offer to make cuts?? Just so they fit in a car. I wish I could've just made the cuts.
 
What did you use to attach your controller to the back of your collar? I tried to figure out from the photo, but I guess I need new contacts.
 
Tom,

What is the length of your beer hose? I built this exact setup (well... except only the lid opens not the whole collar). I've got 5 ft 3/16 for my 2 lines but I've been getting mostly foam at 10 psi with a serving temp of 38F. I've installed a computer fan, but that didn't seem to solve it. One commerical keg and one homebrew both with Perlick faucets. I can't figure it out. My next step is just to get 10ft and start cutting a foot at a time.

Setting up my lines has been more frustrating then building the keezer. A missing washer here; a missing washer there. 2 CO2 fills later and I'm now I have the foaming issue.
 
Tom-
I just wanna double check that you only used silicon to glue the collar to the lid. Hate that I'm paranoid. I'm getting ready to do my collar with a 1x4 piece of cedar and just want to be double sure. Great post. Thanks for your effort.
 
Yes a bead of silicon all the way around the collar then dropped the lid on it, squished it around to line it up and left it closed with some stuff on top to weigh it down over night.

Only way I can see that being a problem is if you get in the habit of grabbing the sides of the lid instead of the collar when opening your keezer. That is one of the reasons I put the big handle/towel rack on the front of mine. :p
 
Oh and I love these BYO Tap Handles...

LoveTheBYOHandles.JPG


I keep making more labels for it and have an envelope going already with new ones added as I tap different beers.
 
Pretty much done now. I have the system plumbed and the fan mounted along with the power and sensor running through the collar. The only thing I'm missing is one ten foot length of tubing for tap #4. Once I pick that up though it'll be easy enough to run.

FinalPlumbing.JPG


I switched back to the Johnson controller and ran everything through the collar then foamed the hole in. I ended up rewiring the Johnson controller to make my life easier. One plug is always on for my fan and the other is on the relay for the freezer. Saved me running three cords back to the wall.

JohnsonA19AAT.JPG


Only real items I have left are the drip pan, which I have everything for just need to come up with a good way to do it, and dealing with air flow inside.

AllButTheDripPan.JPG


The chalk board wraps around the sides so plenty of room for notes and stuff I don't need out front.

SideView.JPG


In my testing I'm noticing that since the kegs are so tightly packed and sit so snuggly on the bottom of the freezer the pockets between them will be much cooler than the rest of the space and will ice up given half a chance.

I have plenty of head room though so plan to make a grid of wood or metal to raise them up a couple inches to improve air flow. With the fan pointing straight down at the hump this should increase circulation greatly. If needed I have ducting that I originally planned to run but didn't need. I might run it down so the fan blows directly into the void I create under the kegs.

Either way the bulk of the work is done and I'm sitting here drinking my first draft from it right now so... whoppie!

Men, I wonder why did you attach your collar to the lid instead of attaching it to the surface edges of the freezer? That way you woudn't have to dislocate the taps and hoses at all when you open the door and the result is basically the same!?!?!
 
Huh? Don't understand your point.

With the collar attached to the lid the taps, hoses and hardware are all moved out of the way when I am in the keezer. If it was the other way I would have to be careful not to hit the shanks or other hardware when switching out kegs. For that matter if the lid lifted instead I couldn't get access to the kegs at all since the secondary regulator would be in the way.

Also, it is about ten inches less distance I have to lift the kegs to get them into the keezer and if I bounce the keg off of something it is only the keezer lip and not the taps or wooden collar.

It comes down to personal choice but I just can't see doing it any other way than I did. Hope that helped clear it up.


Well, I guess it's really a personal choice like you said, but I can't help it but find your set up very odd, sorry ;). I mean, I just think it is very nice to open the lid only without having to drag the weight of any hardware with it when opening. Besides, with the collar stable attached to the freezer surface, you don run into the risk of loosen up its attachment to the freezer over time because it just seats there quiet and nice! I think the risk of hitting the shanks when switching kegs is the only real disadvantage I can think of but what are the chances, really? :D

Anyway, about setting the fan, you said you are going to put yours in the bottom? Wouldn't it make more sense to set it in the top of the freezer so it can force that lighter hot air away and allow the cold air to recirculate? Just a thought... I think most of the keezer projects I saw here tend to set the fan in the top.:confused:
 
Well Tom, I actually had the day off of work yesterday so put some time into the keezer. Here is a pic of where I'm at to show you how it looks with the trim, which is missing one piece. I ended up using radiata pine for the wood, it hasn't gotten any poly yet but I wanted to put the taps and the handles on to get an idea of how it would look.

keezer.jpg

Love it! I like the trim idea.
 
Great thread, three things if I may ask:

Do you have a template for your tap handle inserts?

Can you link the amazon store for the blower and hose per chance?

Have you tried rare earth magnets for your drip tray? I have some neodymium magnets i was going to just super glue to a drip tray, but if you have already tried that, I will keep looking.. I don't plan on chalkboard paint, so I need to find something that won't slip on the metal sides.

Thanks.
 
Well Tom, I actually had the day off of work yesterday so put some time into the keezer. Here is a pic of where I'm at to show you how it looks with the trim, which is missing one piece. I ended up using radiata pine for the wood, it hasn't gotten any poly yet but I wanted to put the taps and the handles on to get an idea of how it would look.

keezer.jpg


The handles and the trim make me thinking this should have been a "coffin" style keezer :)
 
Great thread, three things if I may ask:

Do you have a template for your tap handle inserts?

Can you link the amazon store for the blower and hose per chance?

Have you tried rare earth magnets for your drip tray? I have some neodymium magnets i was going to just super glue to a drip tray, but if you have already tried that, I will keep looking.. I don't plan on chalkboard paint, so I need to find something that won't slip on the metal sides.

Thanks.

I downloaded the default one and it didn't fit, lol. I ended up making a multilayer one in GIMP (free graphics program similar to Photoshop) and do it in there. If you use GIMP I would be glad to load it somewhere for you. I attached a sample of the end result though. I have trim lines and edge lines that show me what is in front and how big it needs to be. I put in a picture and text or whatever and print it then cut it out. Works really well.

Here is the blower I used...
http://www.amazon.com/gp/product/B000O8AZ8K/?tag=skimlinks_replacement-20
and the hose...
http://www.amazon.com/gp/product/B00280CXAA/?tag=skimlinks_replacement-20
and the transformer...
http://www.amazon.com/gp/product/B000QFLWAG/?tag=skimlinks_replacement-20

If you have an old cell phone charger or similar that would work but I wanted to play with the speed so got the variable output one. I ended up settling on 3.5v which is trivial power wise and does a great job.

Yeah I actually have four of the rare earth disc magnets (9.5mm) glued to the tray. As mentioned there is a slip factor on the smooth surface of the freezer but it stays put on the chalkboard. I would bet if you put a piece of tape or even painted the magnets it would solve that problem though. You just need something to give the slick metal magnets some traction on that surface.

Hope that helped. Anymore questions fire away. Before I started researching everything here and asking questions I had no hope of mine turning out like it did, lol. This place is a great source of info.

EDIT: And I just realized I took a picture of my tap with the same sheet I attached here, lol. Guess you can see how it turned out too. :p

LoveTheBYOHandles.JPG


EuropeanAmericanFrankenAle.jpg
 
Last edited by a moderator:
Are you still happy with the GE 7 Cu Ft freezer? The local Home Depot has it on sale right now for $168 and I was going to try to talk SWMBO into letting me get myself an early Christmas present...while also suggesting that maybe she'd like to get me a kegging setup for under the tree.
 
The handles and the trim make me thinking this should have been a "coffin" style keezer :)

Not sure what a coffin style is, but I guess it kinda looks like a casket if that's what you mean. I was just going for a "finished" look without really looking like a piece of furniture, so to say. To be honest, all credit is due to TomSD as I basically just copied what he did as it looks good, is functional, and he put the thought into the functionality and appearance while maintaining a good balance between the two. That's my opinion, and I am pleased so far. :rockin:
 
I'm back with another question. So the collar is built and glued onto the lid. Now I'm trying the figure the holes i need to drill in the back of the collar. Basically my question is do you think a rubber grommet would work to insulate the holes opposed to filling them with foam? My tank is outside. Love controller on front face wired to a junction box on back of collar. And i need to hook up a fan and some kind of heat source. Foam seems a little to permanent to me. Thanks for any help.
 
Tom quick question, how much of a PITA would this be if I were to move? I'm not sure how long I'm going to remain in my current living situation, and I wouldn't want to build this thing just for it to be a bitch to move. Granted I do have a pick-up truck, and I'm a fairly strapping young lad. The thing is probably what, around 100 pounds with casters? I just want to make sure that if I move, I can take this with me without much of a hassle.
 
Back
Top