• Please visit and share your knowledge at our sister communities:
  • If you have not, please join our official Homebrewing Facebook Group!

    Homebrewing Facebook Group

Gas Burners with Love TS and Pilot Light Demo

Homebrew Talk

Help Support Homebrew Talk:

This site may earn a commission from merchant affiliate links, including eBay, Amazon, and others.
corndog; back at reply #23 by kladue "1st, light burners with electric ignition nodules, first method would be to use a pilot burner and flame sensor assembly". "2nd, 24 volt ignition module and ignition and flame sensor rods".

What I added was a different ignition process by a glowing carbide element for ignition to this thead as it was not mentioned by kladue or anyone else on this thread. The "24 volt ignition module" posted above is a spark ignition system. The carbide element I mentioned is powered by 120 volts AC with no relation to any of those two systems kladue mentioned in reply #23. I just wanted to add a different type of system that is available for others looking for a burner ignition system that still has all the flame detection safety and shut down features. Not a pissing war just another ignition method idea.

Sounds like a good setup.
 
I've finally gotten most of the parts and am staring assembly. I've got the STC Gas Valve (picture in previous post).

Can someone help me figure out how to wire this thing? I'm not sure where/how to access the leads.

Thanks...BrewVegas
 
I've finally gotten most of the parts and am staring assembly. I've got the STC Gas Valve (picture in previous post).

Can someone help me figure out how to wire this thing? I'm not sure where/how to access the leads.

Thanks...BrewVegas


There is a single screw in the plastic housing. Unscrew and pull off. Pop the terminal block out of the housing and you will see three terminals. #1 is hot, #2 neutral, #3 is ground if you need it.

KD
 
Thanks...KD. That's what I needed.

It looks like the last thing I need to figure out is how to wire this and the love controllers. I'm sure there is plenty of documentation here, I just need to find it.

Thanks...
 
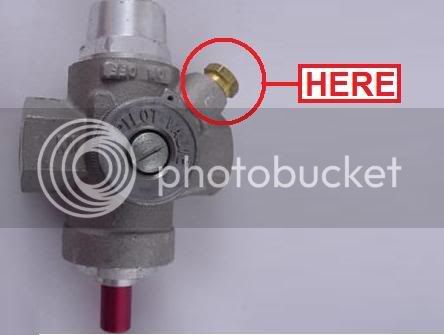
I've got the correct OD tubing going into the Pilot Valve and Pilot Assembly but it's leaking on both ends.

PilotValve-Here.jpg


I've got copper tubing slid into the brass lock nut and it's screwed down tight, but gas still leaks out of it.

Also, the flame on the pilot light assembly is pretty low. And I do have the LP oriface installed.

I thought about soldering it on both ends, but then I wouldn't be able to screw them into the housing.

Thanks for any suggestions.

Those nuts have compression ferrules on them. They need to be torqued down pretty tight to compress them. They are made for aluminum pilot tubing but I suppose if you have the precise copper o.d. it would work.
 
I'm thinking about doing a similar setup -- Does anyone have the part numbers that MNBugeater used for his solenoid valve and safety pilot?
 
Yeah... I got both my pilot valves from eBay for like $40 each and the Solenoid valves from STC.
 
Lots of great info on this thread and it's helped me plan out my single tier sculpture very well. I wanted to make sure I understood things correctly, though, in that the parts previously mentioned here with the pilot valve and STC valves, will work with a propane setup and not natural gas. I think I have all the parts mentioned and should be able to put things together. I have 3/8" black piping for the gas plumbing so I have purchased everything in 3/8" npt parts. If someone could verify that the propane would be fine with this setup I would greatly appreciate it. Thanks for all the great input here!
 
Lots of great info on this thread and it's helped me plan out my single tier sculpture very well. I wanted to make sure I understood things correctly, though, in that the parts previously mentioned here with the pilot valve and STC valves, will work with a propane setup and not natural gas. I think I have all the parts mentioned and should be able to put things together. I have 3/8" black piping for the gas plumbing so I have purchased everything in 3/8" npt parts. If someone could verify that the propane would be fine with this setup I would greatly appreciate it. Thanks for all the great input here!

You are using low pressure propane; right? Your pilot light will need an LP orifice.
 
Sorry I lost track of this thread there were a lot of questions asked. I think kladue and korndog answered most of them.

The exact parts numbers I used were the STC 2W160-10 (3/8" - the 1/2" is a different part number. I think the "-10" is different) and the BASO H19AL-1.

I have all the exact part numbers with costs and sources (most eBay) in a spreadsheet of my entire build. PM me if you want it and what format you want it in. (i.e. MAC - Pages, Excel - PC, PDF -this wont do you much good if you changing numbers and want to keep a running total)
 

Those would do what you are looking for them to do. Open a valve upon active pilot and close if no pilot, which is all you are looking for. However, those are SERIOUSLY expensive. I paid $12.50 for mine. I bought them on eBay, but the seller name doesnt even exist anymore. I would keep looking. They shouldn't be that expensive.
 
Thanks for the info. I'll keep my eyes out for a good deal and then get the safety valves. I am ordering my solenoids now so should be pretty close to having everything together. Any idea the best way to try and mount the honeywell pilot burner to a burner like this:

https://www.pelicansky.com/productdetail.aspx?id=230&cat=85


Or is there a different pilot light burner that might work better?

If you need to mount it at all I would look at mounting it to your frame. But in reality, between the copper thermocouple wire and the aluminum gas tubing, you wont need to 'mount' this to anything. You should be able to position this where you want it and it will stay in place with the strength of the tubing. If you wanted to attach it someone, I used flexible metal strapping like is used to strap pipes. You can attach one end your stand and bend in position and then attach your pilot to the other end. But it isnt really necessary.
 
Hold on a moment, looks like you want to use a 4" high presure burner, the pressure needed to get full output is too high for the Baso pilot safety valves. You could change to a low pressure regulator and use a low pressure orifice for the burner like this one HurricaneProducts.net - Control Valve. As to mounting a pilot to the burner I added a piece of 14Ga metal to the side of the burner to attach the pilot assembly, here is a picturePicasa Web Albums - Kevin - Pilot lights.
 
So it looks like I would need to buy two of those to hook up to my burners for the MLT and HLT. I assume that they just screw into the burner and then can be hooked up to a new low pressure hose since currently I have a high pressure hose with a 0-30psi regulator. Does that sound correct? Will it affect the length of time it would take to bring the water to a boil or should I keep the high pressure burner hooked up to the BK?

Also, the pilot burner assembly you have is different than the ones that I've seen in this thread. Is there somewhere I can look that you got those?

Thanks,
 
The pilot burner is for electric ignition with dual elements, the hard way to get there, the thermocouple pilot burner is much more compact but burner tip is similar. Main thing to placement is the pilot flame should just reach over but not touch lip of burner or be mounted high enough to get hit by main flame during operation. As to burner output on low pressure LP, the burner output is lower as the low pressure gas cannot move as much air through the venturi and the flame will be lower. You might consider the low pressure and automatic method with safety for the mash where brute force is not wise, and use high pressure method with boil where you will be there to monitor things for a boil over flameout.
 
I understand what you're saying kladue and thanks for the input. I've included a link to pics of my stand as it is now. If I keep the BK as high pressure would I have to disconnect all the hard plumbing I have and put 2 different hoses on - one for the high pressure and one for the low pressure or can I get the orifice you mentioned and still use the regulator I already have for the high pressure burners I have connected? Hope that makes sense. I want to simplify as much as possible and am not sure how to change my setup to make it work as easy as possible.

Here's the link: Picasa Web Albums - Doug - New Folder

Thanks again for any help.
 
Save the manifold and just plumb in the low pressure regulator ahead of safety valve and solenoid valve for MLT burner, installation layout depends on total length of assembly.
 
Okay - so I can keep the current setup and basically use the 0-30 regulator from the tank to the iron piping and then on the HLT and MT spots have the main line connect to the safety valve, then connect to the solenoid, and then proceed to the burner which will have the low pressure regulator that you mentioned earlier (http://www.northernbrewer.com/pics/fullsize/hurricane-brass-valve.jpg) attached to the burner. Then keep the current setup going to the BK so it will remain high pressure. That sound right? I think I'm starting to get it. Sorry for sounding like an idiot but this is very helpful in my quest.
 
You need the system parts in this order;

30 psi regulator to iron pipe manifold.

For the branch to MLT: shut off valve--low pressure regulator-- pilot safety valve--solenoid valve--MLT burner.

For the branch to HLT:shut off valve--low pressure regulator-- pilot safety valve--solenoid valve--HLT burner.

For the branch to BK: shut off valve--BK burner.

Hope this helps you understand order of component assembly for your system
 
After shopping around and understanding this configuration I will be putting the following together:

Main hard plumbing line to valve which will connect to this:
http://www.northernbrewer.com/pics/fullsize/hurricane-brass-valve.jpg

which will connect to a low pressure regulator like this in the middle of the page (RSL-1):
http://www.flameengineering.com/Regulators.html

which will connect to my safety valve:
Baso H19 Series Pilot Gas Valve Control 3/8" Gas Pipe Inlet 3/8" Oulet.: American HVAC Parts

then connecting to my STC solenoid valve:
STC 2 way N.C. 1/2" solenoid valve air and water - eBay (item 300261249207 end time Feb-20-09 18:01:12 PST)

and finally connecting at the burner:
Bayou Classic High Pressure Cast Iron Propane Gas Burner BG10 : ShoppersChoice.com

Hopefully that looks okay and things will be smooth sailing from here.
 
Looks like you just about got it, item one is meant for burner inlet not main manifold as it has the low pressure orifice, other than that looks like your good to go. Would recommend permatex #2 for joint compound (yes teflon paste is an alternate), use rubbing alcohol to remove it from everything it was not supposed to get on and the residue on outside of the joint. Teflon tape is not always a good idea with regulators and valves as lost bits of tape in pipe can cause a lot of grief if they end up in valves or orifices. With the brass fittings a touch of oil on the compression nut threads will help when you tighten them.
 
Back
Top