• Please visit and share your knowledge at our sister communities:
  • If you have not, please join our official Homebrewing Facebook Group!

    Homebrewing Facebook Group

Flash boiler

Homebrew Talk

Help Support Homebrew Talk:

This site may earn a commission from merchant affiliate links, including eBay, Amazon, and others.
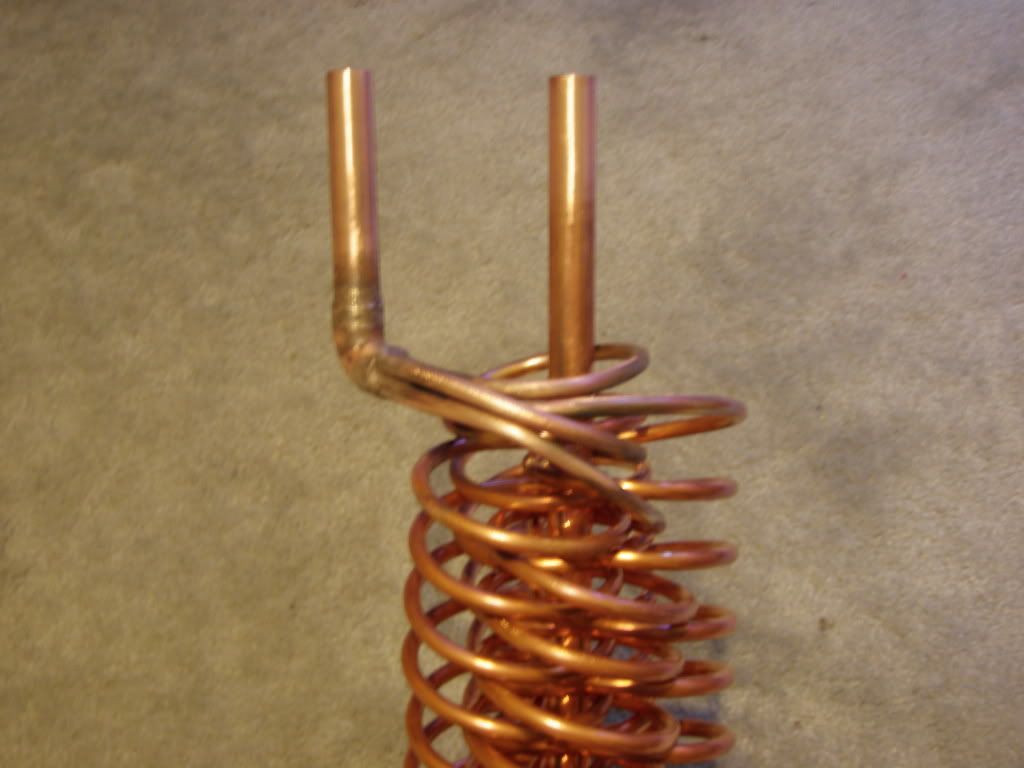
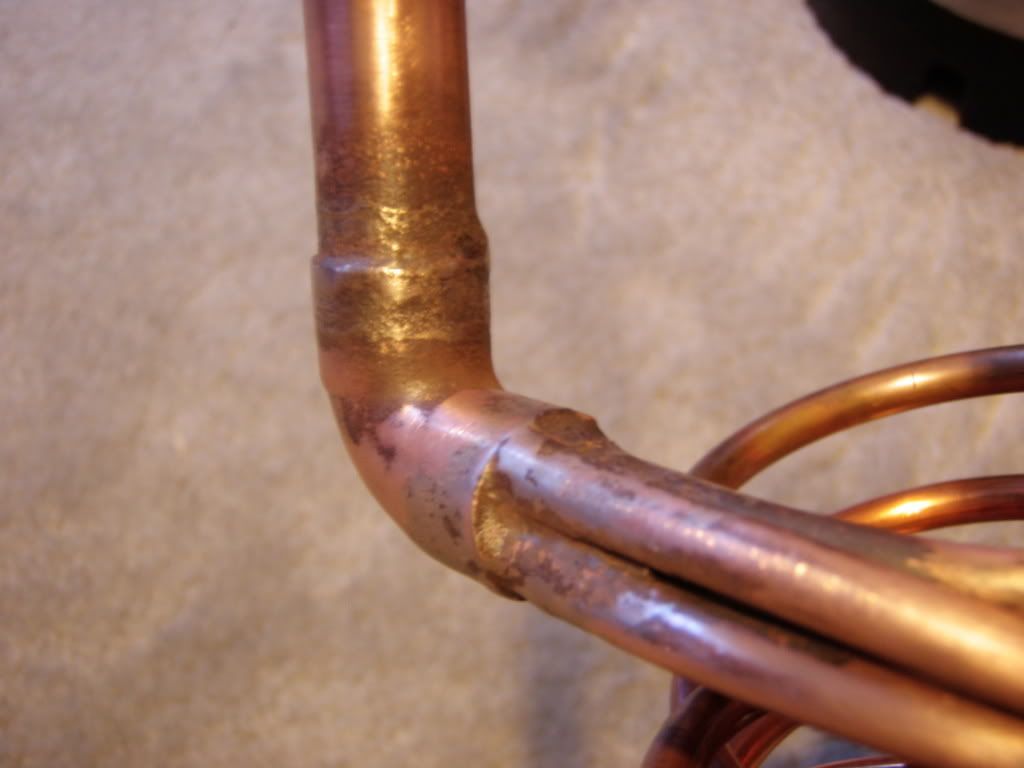
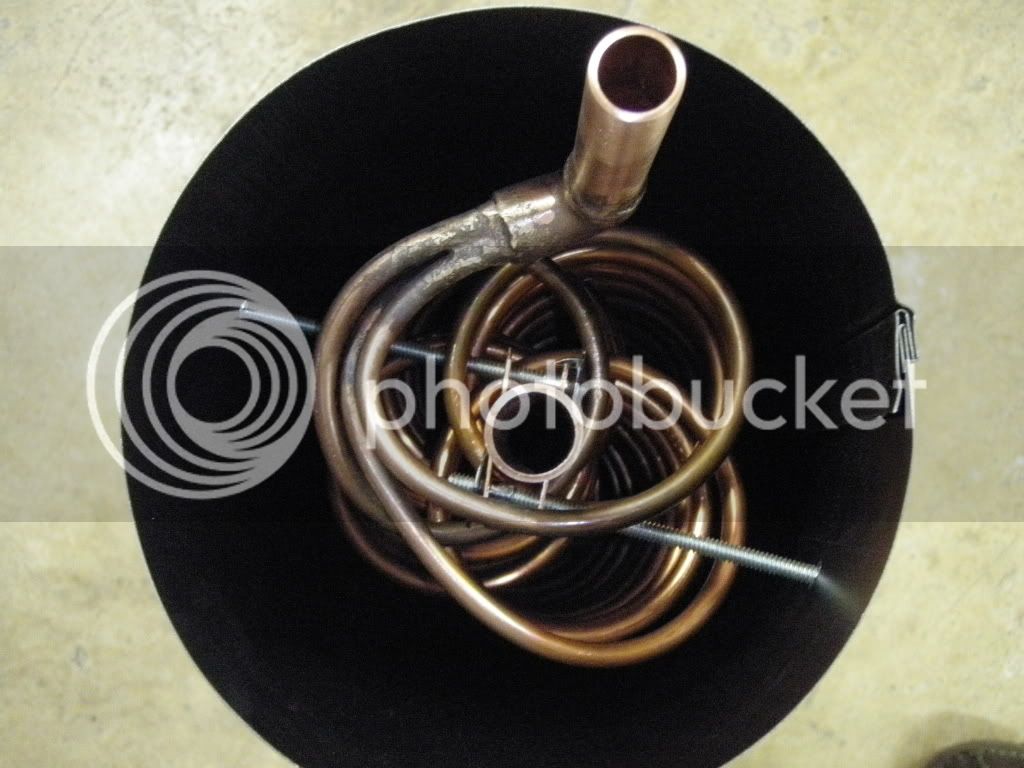
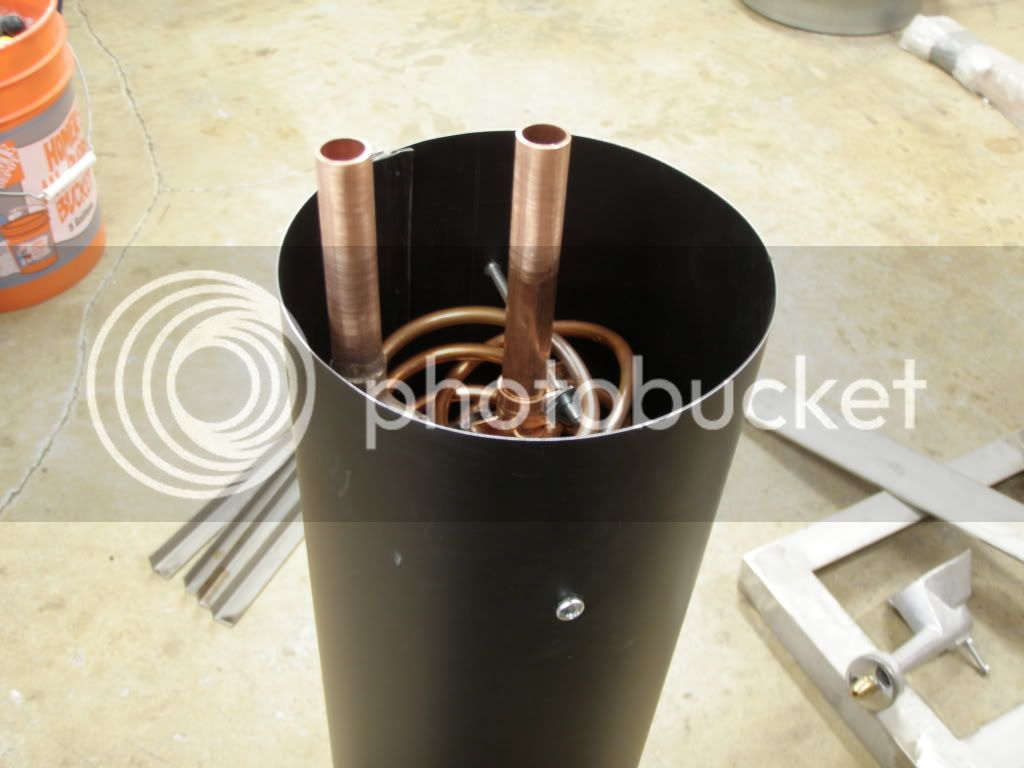
Pull the tubes out of the fitting and apply flux and solder to coat tube ends with solder, then do the same for the inside of the 90. When all the parts have been "Tinned" reassemble and fill gaps with solder, if there is a problem with filling the larger openings use a bit of copper wire to take up the space. The solder will flow by capillary action when the parts are heated so the gap on the inside should fill as solder is fed in.

Don't know but you might have already tried it. But I have used sil-floss in the past great for gaps. This group of alloys facilitates the joining of copper to copper without a flux and copper-based alloys.


Dominus Vobiscum

Swagman:cool:
 
I have never seen copper welded before! I do not have access to TIG but will endeavour to have a go at welding copper as soon as I can.

You commented a while back on a lack of comments so far, so to add my 2 cents worth, your copper coils would sit nicer in a group if two of the coils had been wound the opposite hand to the other two! The intertwined copper coils never seem to photograph well as they always look a mess from just about any angle except end on, (as seen on my "monster 96 ft wort cooler" build in the diy section.. My coils won't see any real heat, so I could soft solder my construction, but now I've seen copper welding I'm jealous!

P.S. Have you seen any of the flash boiler driven steam outboard motors? Now there are some seriously mad peeps...
 
You said it work well. That water looks nice and steamy. It either worked a little better then well, or it was a cold day.
What was it about it you didn't like?
I also noticed you placed a T fitting right after the inlet water. Why? Were you recirculating mash or sparge water through it?

Thanks for sharing.

It was hella cold! I live in Chicago, and I think it was 15F that day. It was one of those days where your gear is put to the test, if you know what I mean. That being said, it would probably work well enough on a 70F day. I used a tee because I wanted to be able to hook up my 1/2" wort lines, or my 3/4" hose connection and not be messing with a dangerously hot and unstable copper coil. I think if I were to really put my best foot forward and do a build like you and Kladue have done, I might be very happy. Unfortunately, I'm exploring electric brewing right now, so this project will have to wait. I guess I'll just have to live vicariously through this thread :D
 
I have used 3/8" tubing to speed up the transition from water to steam flow as the smaller diameter helps carry the water in the saturated steam to the mixer before you reach superheated steam stage. you will need to get to 1/4" for the mixer screen in the tee fitting which can be right at the tee fitting.


Would it hurt the preformance any if I used 1/2" to carry the steam? Would it make it better? I can get that and run it for less cost then buying 3/8" soft copper rolls.
 
I have never seen copper welded before! I do not have access to TIG but will endeavour to have a go at welding copper as soon as I can.

You commented a while back on a lack of comments so far, so to add my 2 cents worth, your copper coils would sit nicer in a group if two of the coils had been wound the opposite hand to the other two! The intertwined copper coils never seem to photograph well as they always look a mess from just about any angle except end on, (as seen on my "monster 96 ft wort cooler" build in the diy section.. My coils won't see any real heat, so I could soft solder my construction, but now I've seen copper welding I'm jealous!

P.S. Have you seen any of the flash boiler driven steam outboard motors? Now there are some seriously mad peeps...

No, I have never seen steam driven outboard motors.

I will check out your build, sounds interesting.

Good luck playing around with welding the copper. Take your time and make sure the purge is setup well. It doesn't take long to get the black nasy scale built up. Then you have to stop and clean it. That's why I put mine in the chamber at work. I don't even want to know how much gas I used that day. You can use the ground wire out of some house wire. (Romex) That's what I used for filler. Have fun when you get to it.

It was hella cold! I live in Chicago, and I think it was 15F that day. It was one of those days where your gear is put to the test, if you know what I mean. That being said, it would probably work well enough on a 70F day. I used a tee because I wanted to be able to hook up my 1/2" wort lines, or my 3/4" hose connection and not be messing with a dangerously hot and unstable copper coil. I think if I were to really put my best foot forward and do a build like you and Kladue have done, I might be very happy. Unfortunately, I'm exploring electric brewing right now, so this project will have to wait. I guess I'll just have to live vicariously through this thread :D


That's cold. I don't think I would get old herbie up to operating temp in that cold of weather. Air cooled VWs run cold enough.

Have you started building your system yet?
 
Would it hurt the preformance any if I used 1/2" to carry the steam? Would it make it better? I can get that and run it for less cost then buying 3/8" soft copper rolls.


Any ideas on the 1/2"?

It seems to me it would help the steam.
 
The 1/2" tube will work for both the steam and water sides, just need to reduce at mixer, try to avoid trapping water in steam side by grading tubing uphill into the mixer so water will run back to the boiler. The mixer works by turbulent flow over the screen or slotted diffuser tube so the steam can mix without making steam bubbles which give the popping snapping noise when they collapse.
 
The 1/2" tube will work for both the steam and water sides, just need to reduce at mixer, try to avoid trapping water in steam side by grading tubing uphill into the mixer so water will run back to the boiler. The mixer works by turbulent flow over the screen or slotted diffuser tube so the steam can mix without making steam bubbles which give the popping snapping noise when they collapse.

Thank you.

Any plans to test this one out or are you rebuilding out of 1/2"?

I am not rebuilding the boiler. I am talking about the outlet pipe that carries the steam to the mash tun. The elbow that all the 1/4" tubes terminate into is a 1/2" 90. So it makes life simple just to run 1/2" pipe from there. As Kladue has mentioned, I will reduce it to 1/4" right at the junction where the steam will be injected.
 
Nice build bro. You are going to wonder how you ever brewed without it.

Thank you,
You must own one yourself. Got any pics?:D How did you build yours?


I got some Silvaloy 15 today. Lets see if I can screw up the build now. The Silvaloy 15 should be the same thing as the Sil-fos that Swagman mentioned. Unless he was thinking of the Fos Flo 7.

This stuff is spendy. I know it isn't needed but I bought flux anayway. I figured since I am stuck with so much of this stuff I may as well have the flux so I can use it for other things to recoupe some cost.


That's one of them 15 slow flow 7 is a fast flow. Used both but with 15 you can do pretty work and it bridges great.


Dominus Vobiscum

Swagman:cool:
 
That's one of them 15 slow flow 7 is a fast flow. Used both but with 15 you can do pretty work and it bridges great.


Dominus Vobiscum

Swagman:cool:


So I have done a couple of test peices and I wonder if I am doing this wrong. I am getting a lot of scale built up. Is this normal for silver braze? I have not used this stuff before.
 
Well, for those of you who are HVAC techs and anyone who has mastered the art of brazing.......need not to worrie. I will not be taking your jobs any time soon. It just goes to show that everyone has thier nitch at what they like to do. Here are a couple pics of the newly brazed joint. Best I can tell so far there is no pin holes. I will do a more positive check of that once I get the connections put on so the unit can be removed for servicing should the need ever arise. I have bent the junction in some to be more of a tighter fit and follow the boiler curves after I took the photo.

I wish I could say I was driniking when I did this. I am not sure how you HVAC techs and plumbers keep things so clean.
P1010064.jpg


P1010063.jpg
 
Looks ok on this end man. No leaks and it won't break good job done


Swagman:cool:

Thanks Swagman,

I just don't have any real brazing experience not to mention with silver. I did some test pieces and then just for fun I twisted it into a pretzelish mess. The braze joints never opened up.


I didn't put any names to the back threads I read while I was deciding on building the boiler. I read your thread before I got started and it was a big help to me. Nice build, and glad to see you use it.

Do you have any other pics of the boiler? You did some mods to it but never put up any more pics. I am interested in how it goes up and down as well as the coil inside of a coil.

How are the compression fittings holding up? If I read it right, they are the simple brass ones from the depot right?

I never took new pics after changing the coils. It's really simple though. The water goes in on the bottom, coils to the top, then loops from top to bottom like 4 times then coils back down and out the bottom.

The compression fittings I silver soldered after it was all put together to make sure they never come apart until I want them too.

I think it takes me about 20 minutes to get 15 gallons up to around 160*. I try to go in a little low and then adjust the temp as needed.
I have also used this as a mashout. I pump the wort out of the tun and thru the FB then back into the tun to raise the temp. I have also done this but not back into the tun but into the kettle. Bringing it into the kettle at 200-210* making it very little time to get 47 gallons to a boil.


You must not be using a diffuser?? You just use it heat up whatever you need to but don't inject steam, right?
 
You must not be using a diffuser?? You just use it heat up whatever you need to but don't inject steam, right?

Right, I don't do steam. I can make steam with this but I don't. I have no need to make steam. The water goes from the FB into my HLT where I can adjust the temp as needed.
When doing a 35 gallon batch It not only goes to the HLT to be adjusted but also to a holding take until it's needed (I have no other way to hold 30+ gallons of sparge water).


As you know mine is built as a copy of Kladue's design. I don't think I will pump wort through mine due to the size tubing I used. So I will be making the steam mixer for mine. That's nice that you can bump the wort temp going into your kettle like that.

Big batches on a small system done in no time. Very nice.
 
I got a little more work done. I made some mounting brackets for the boiler and got it hung inside the chimney by the top of the boiler. I will mount the bottom section once I get the burner mounted and I figure out how high things need to be. I can then cut the chimney to length ect...

Here are the brackets I moded.
P1010066.jpg


I flattened out 2 of the ears on the T-nut so it would sit nicely.
P1010067.jpg


Here is the boiler in the chimney.
P1010068.jpg

P1010069.jpg


Now, it is back to work out how I am going to do the burner setup.
 
That thing is pretty impressive! I can't wait to see it in action and your report on the results. Great job man.
 
OK, I have a base made. This is made from some scrap pieces I had around the garage. It is all together and I just need some small supplies to get it finished up. At least to a test stage. I will test it by heating up water and work out what I can before I build my diffuser for the steam injection. If all goes well I will put the mixing pieces together and give a mash a run. I can't wait.

On a side note, my TIG welder is acting up...... DAM# IT!!!!. It is a dinosour anyway I guess. I am just not ready for it to go out.


Here is a couple more shots.
All together, I got it a little off. It lists toward the back some.
P1010070.jpg


A closer shot of the base,
P1010071.jpg
 
exuse my stupidity but what the point/use for a flash boiler? what does it do?


Think of an on demand hot water heater. This is just more powerfull. I will use it to inject steam into my mash vorlauf to do step mashing or to hold temp. I will also use it to fill the mash tun with water that is already at temp. No waiting. In my new system once it is done, there will not ba a HLT. I wont have a need for one. I am hoping this will give me superheated steam at about 300 degrees. Not that I need steam that hot, but I want it to make steam that hot. Kinda a Tim Allen thing.
 
so you just run water through one side and it comes out boiling hot on the other? thats bad ass. ive been wanting to make a pressure vessel like the one yuri made out of the sanke keg. i would eleminate my hlt like he did. i dont know if it would work as good as the flash boiler.
 
so you just run water through one side and it comes out boiling hot on the other? thats bad ass. ive been wanting to make a pressure vessel like the one yuri made out of the sanke keg. i would eleminate my hlt like he did. i dont know if it would work as good as the flash boiler.

Right. The out put temp is based on flow rate and the amount of fire. This is a bit more safe then Yuri's, due to the fact that there is no pressure built up. All the regulation is done on the inlet side and the outlet is not restricted. This is one of the things that drew me to this idea. Kladue is the brains behind it all as far as I know. His builds used SS tubing and I believe mine it the first for 1/4" copper. The others have used larger diameter copper for thiers. This thing should get pretty toasty.
 
Back
Top