Fixing the Anvil Fermentor Lid

Homebrew Talk - Beer, Wine, Mead, & Cider Brewing Discussion Forum

Help Support Homebrew Talk - Beer, Wine, Mead, & Cider Brewing Discussion Forum:

This site may earn a commission from merchant affiliate links, including eBay, Amazon, and others.

ryanj

Supporting Member
HBT Supporter
Joined
Nov 19, 2017
Messages
250
Reaction score
93
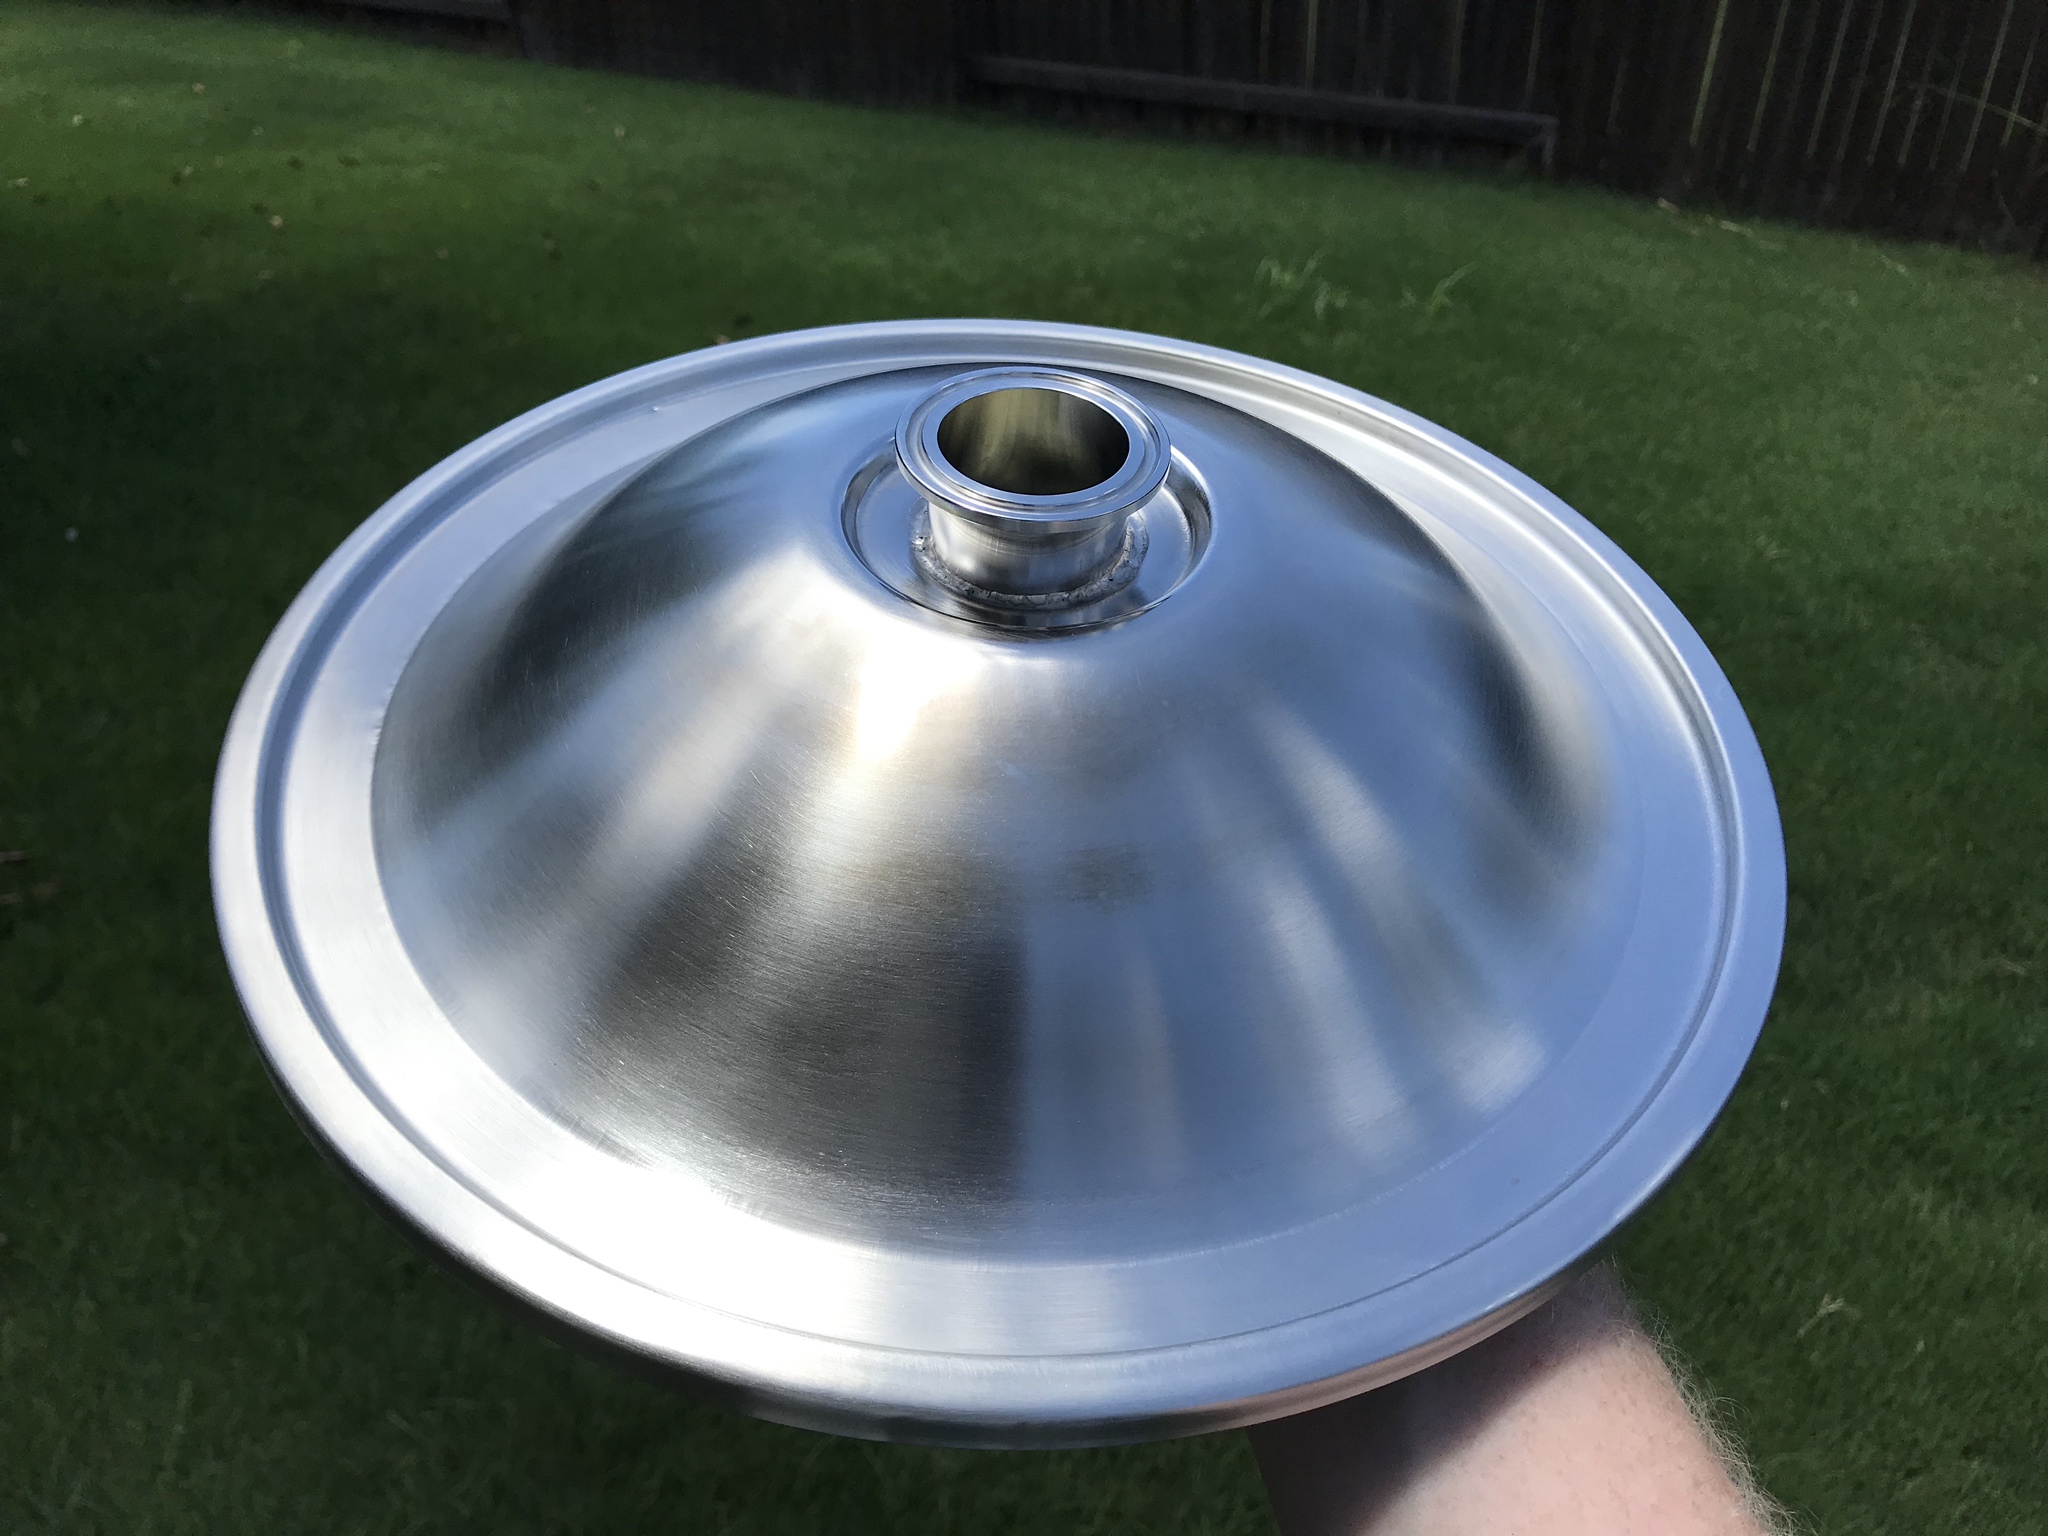
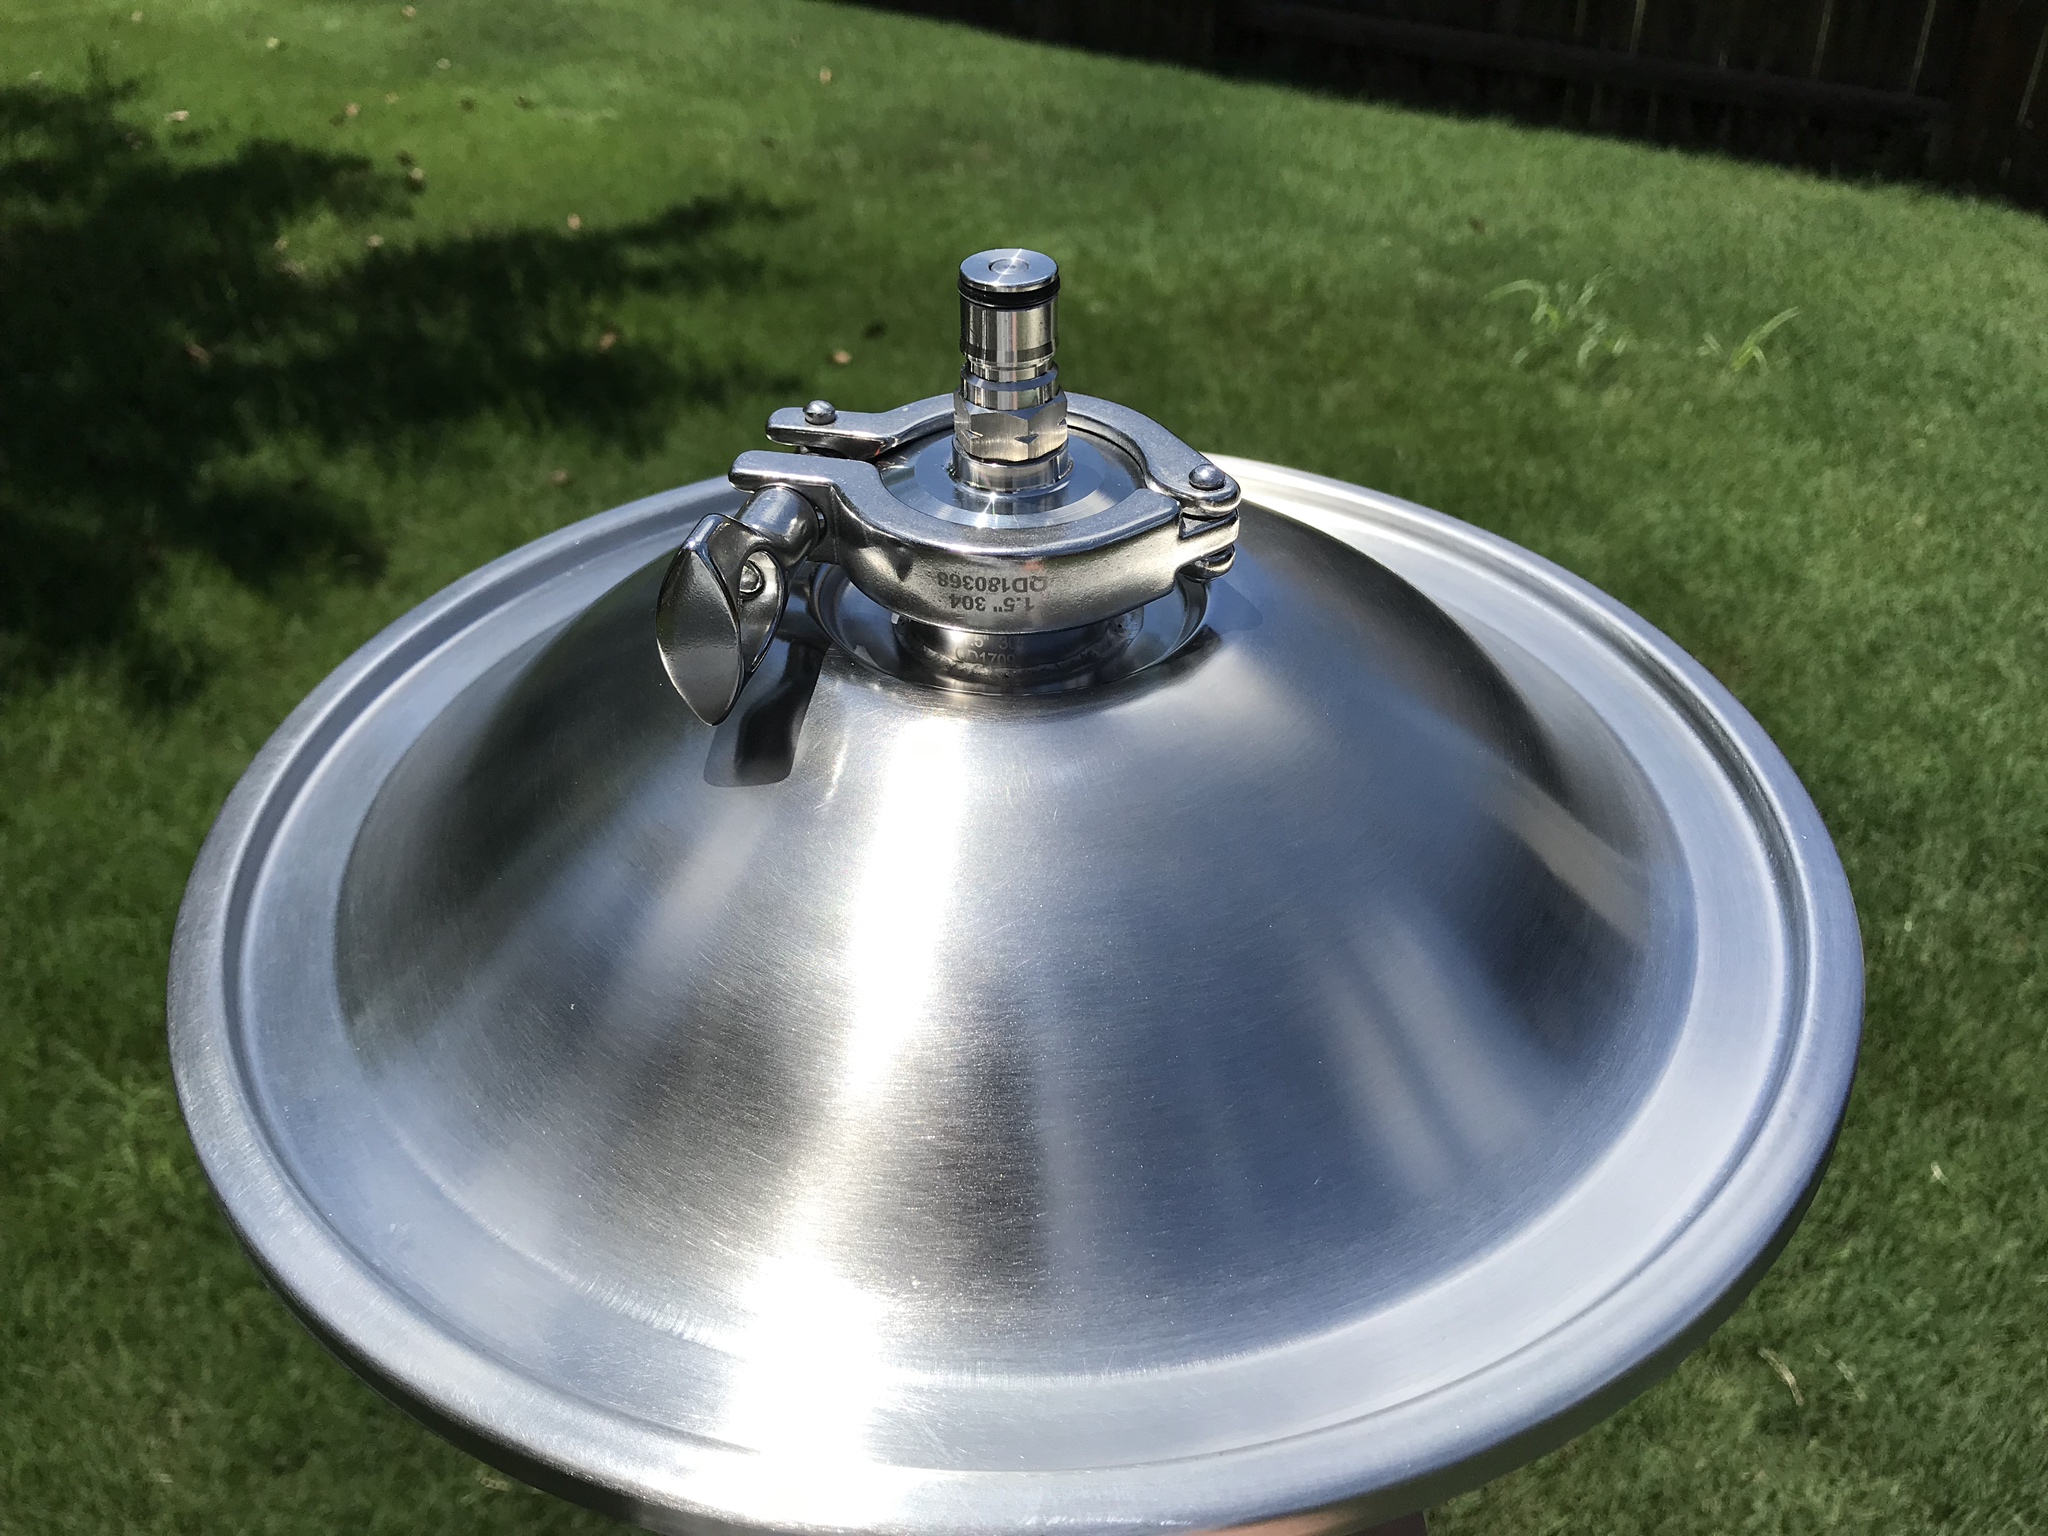
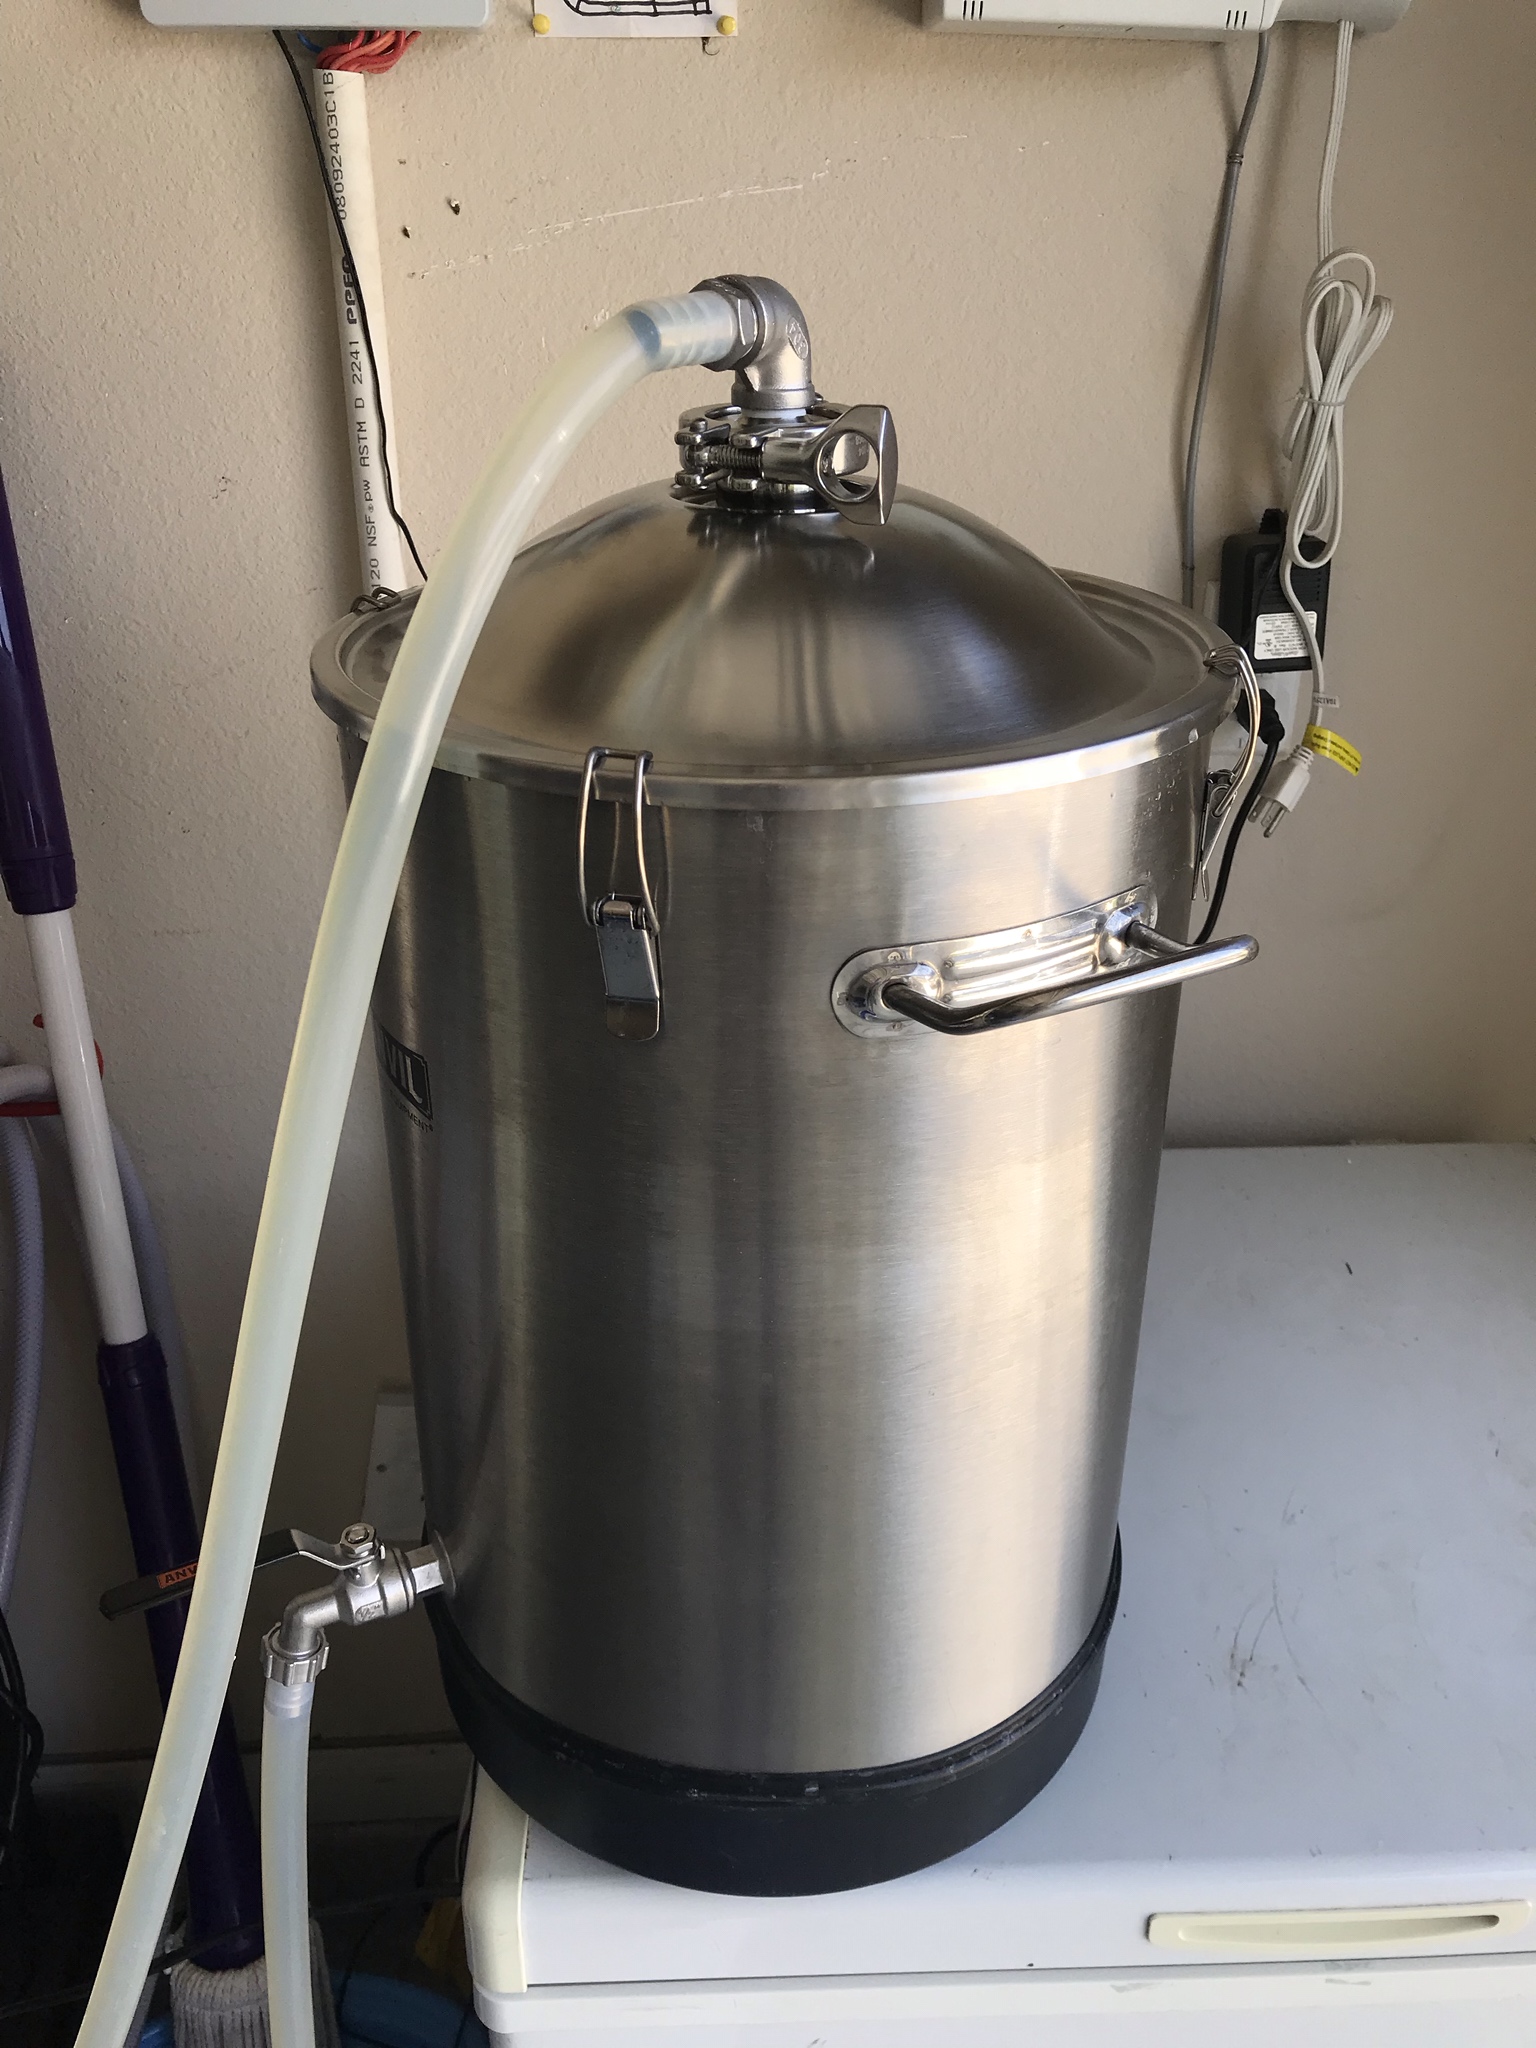
About a month ago I picked up a 7 gallon Anvil Fermentor. I really love this thing -- except for the lid. Why they didn't just go ahead and put a 1.5" TC ferrule on it?! The good news is that installing one seems pretty straight forward. I've soldered plenty of bulkheads before, so I'm not afraid.

It appears the opening in the lid is 1-1/8", so just stick a step bit in there, and expand it to 1-1/4"

https://www.brewhardware.com/product_p/tc15lwf.htm
$4.60 1.5" TC Ferrule

https://www.brewhardware.com/product_p/ptbulkhead_tool15tc.htm
$29.99 pull through tool to dimple the lid (I already have the flux and solder from building my HLT)

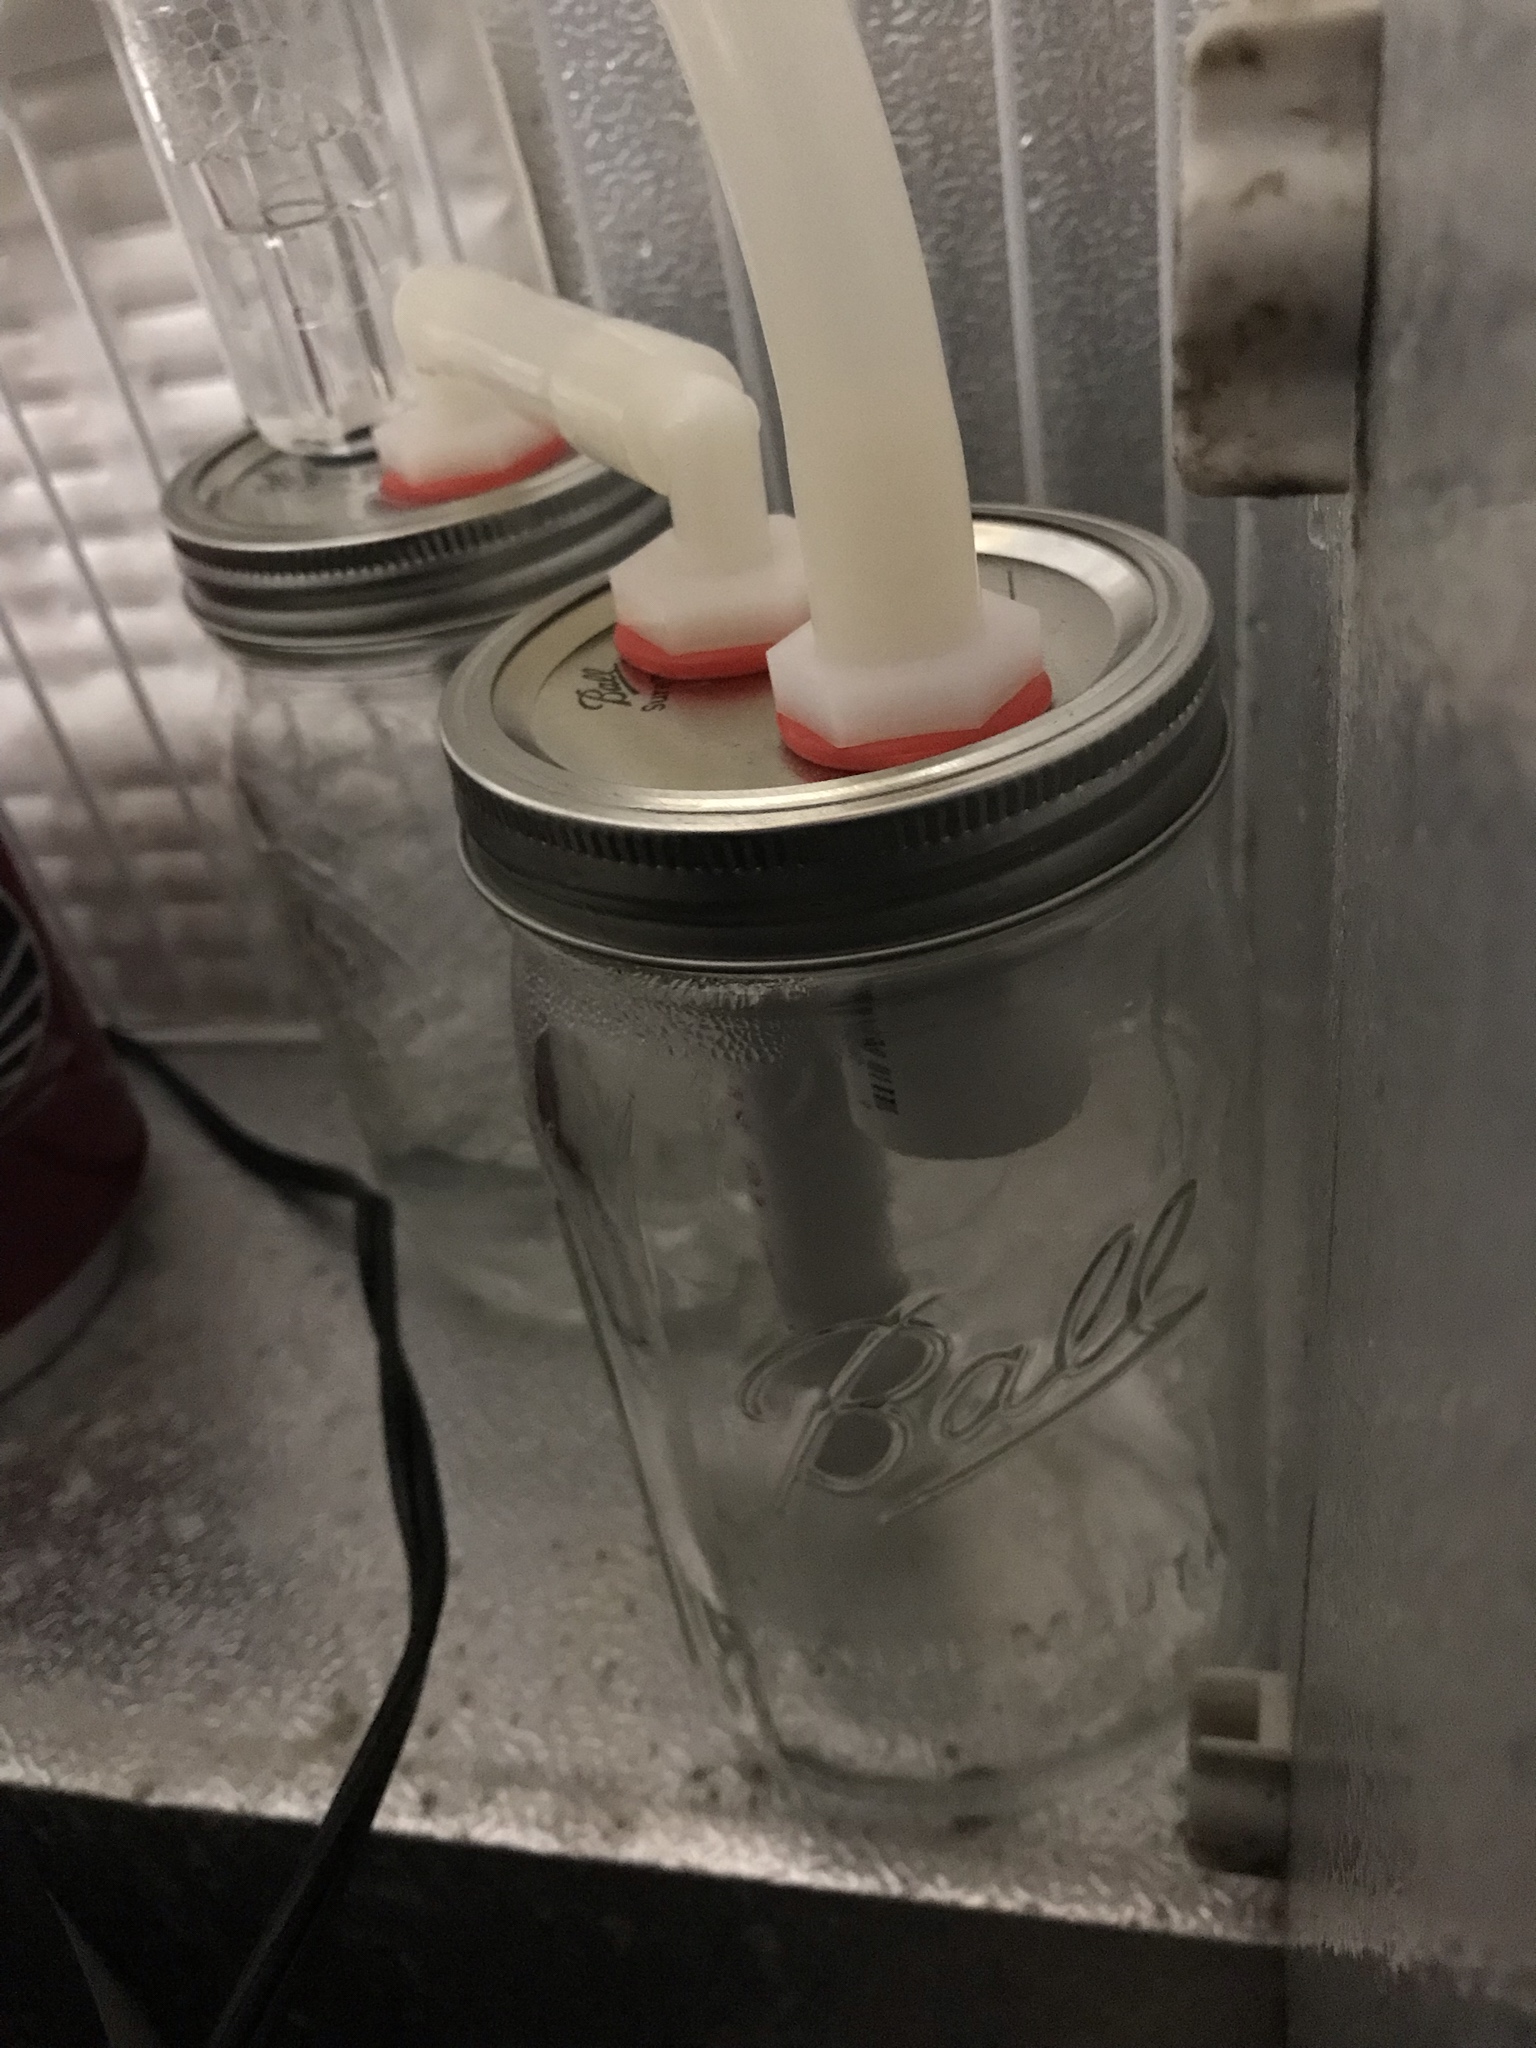
For primary fermentation, I could use a simple 90 degree 1/2" barb blow off fitting:
https://www.ssbrewtech.com/collecti...-5-tri-clover-to-1-2-hose-barb-with-90-d-bend
$14.95

Cleaning would be a snap with a micro spray ball:
https://www.ssbrewtech.com/collections/accessories/products/mini-cip-spray-ball-1-5-tc-assembly
$42.50

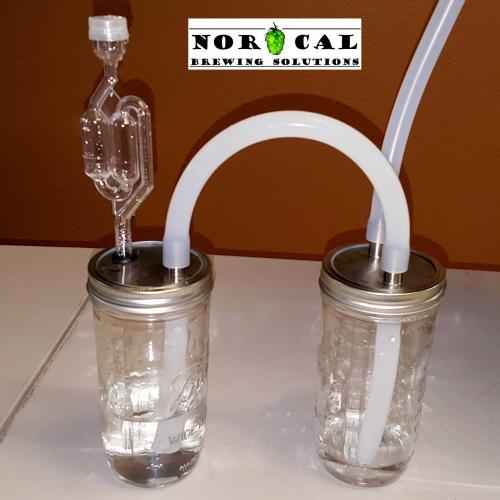
...but the one thing that's holding me up is that I usually switch to a 3 piece air lock when cold crashing, because I don't want to suction a pitcher of StarSan into the fermentor when I drop the temp (I learned this lesson the hard way about a year ago). This is where I'm stuck -- does anyone have any recommendations on what to do before cold crashing? Is there another TC fitting I could use with an air lock, or maybe a better solution?
 
I used to use S-locks exclusively as they won't suck back like a 3 piece.
Then I switched to using light (~0.4psi) CO2 top pressure and have stuck with that.
You could likely come up with a TC fitting that would let you stick a ball lock gas post on it, then you just need a reliable low pressure regulator (I use a Marshall dual-stage fixed 11" WC that is popular for natural gas fired rigs)...

Cheers!
https://www.brewhardware.com/product_p/tc15blg.htm

Something like that?

So you’re saying before cold crashing, swap this on, and set the regulator to 1psi or so, and then crash?
 
I have 7 gallon brew buckets that I have added the domed 1.5" TC Chronical lid to. I also use the brew hardware gas post to TC fitting you mentioned above. This is all connected to a CO2 harvester setup that I made using simple hose barb fittings and mason jar lids. It is pattered after the NorCal Brewing Solutions setup and looks similar to the pic below. The S airlock in the setup below is completely pointless and should be omitted.
3210-Wide-Mouth-Canning-Jar-CO2-Harvester-Kit-Logo.jpg
 
What happens when the pressure at the fermentor end drops below the atmosphere?
Is the premise that will hold enough CO2 to backfill the head space during a cold crash?

Cheers!
 
Last edited:
Lol - that was easy (thanks, Bobby!)
Yes, that's exactly what I'm saying.

Cheers!
I like this is idea because it also sets me up for a pressure transfer right away without having to swap anything else on. I'm just a little nervous to do this without some sort of pressure relief valve if for any reason the pressure rises too high. I guess that's where something like this could come into play? https://www.ssbrewtech.com/collections/accessories/products/1-5-tc-pressurized-transfer-fitting

I really want a solution where I can set my temp, walk away, and no that I'm not going to blow my fermentor up. I like "set it and forget it" solutions.
 
I have 7 gallon brew buckets that I have added the domed 1.5" TC Chronical lid to. I also use the brew hardware gas post to TC fitting you mentioned above. This is all connected to a CO2 harvester setup that I made using simple hose barb fittings and mason jar lids. It is pattered after the NorCal Brewing Solutions setup and looks similar to the pic below. The S airlock in the setup below is completely pointless and should be omitted.
3210-Wide-Mouth-Canning-Jar-CO2-Harvester-Kit-Logo.jpg
I *really* like this setup. I have a ton of extra mason jars as well that I could easily modify. Can you snap a pic of the barbs you added? I'm trying to envision what that would look like when adding to an existing mason jar lid.

Just to be clear, you're using the ball lock gas post for the co2 harvester setup during fermentation and cold crashing and then attaching co2 for a pressure transfer? ....all using the ball lock gas post? I really like this because you never have to swap TC lids...brilliant.
 
That SS Brewtech fitting looks like the answer you're looking for, as long as the 2-2.5psi rated PRV valve doesn't get in the way of your push transfers...

Cheers!
 
Ryan,

Did you get this project completed? I am curious as I am in the same situation and looking for solutions but don't have much experience is soldering stainless so I wanted to get an idea of how the task went before I look into something similar.

Cheers
 
@BrionLax I just ordered the parts to do this. I was a little delayed with a few batches of beer that were finishing up and dialing in my new HERMS system.

If I'm thinking about this correctly, having the gas post (https://www.brewhardware.com/product_p/tc15blg.htm) on the top of the fermenter will allow me to have a TRUE oxygen free environment since I can use the gas post for blow off AND for pressurized transfer while not having to change TC fittings.
 
Thanks Ryan. Let us know when you get it finished how it works out.

Cheers
 
UPDATE: I successfully soldered the TC ferrule to the lid. Take a look:
https://imgur.com/gallery/hSkVfDo

9Rtfp4w.jpg

u5J94Js.jpg


I'm 95% happy with the result. I've soldered a bunch of pullthrough bulkheads before, so this wasn't my first rodeo; however, I feel like I got a couple of "pits" in the solder bead. The bead is on the outside of the lid, so I guess I'm not too worried about it. If this bugs me, I'll just heat up the lid and add more flux to smooth it out. ...but I'll probably be fine.
 
@ryanj that is exactly what my lid looks like with the gas post to 1.5 TC fitting installed. Now just hook it up to the DIY CO2 harvester you made and you're all set! This is a pic of my harvester. The barbs are just 1/2" x 1/2" that I hot glued to the stock lids after drilling with a stepped bit. You could use smaller hose and barbs if you like. I can't really speak to the strength or longevity of the hot glue method yet. It works so far. There is a second hole in the jar on the right that you can't see. I see no reason to add an airlock to this like the NorCal system did. just a hole to vent to atmosphere. These are 1/2 gallon wide-mouth Ball jars btw. With the ball valve attached and water in the jar on the right you have captured CO2 and don't have to worry too much about oxygen getting into the harvester if you disconnect it during fermentation. Prost!

IMG_2197.JPG
 
Thanks Ryan,

Looking through your album, it doesn't show that you expanded the original hole size that was in your original plan. Did you not have to do that step?

@tgodsill - thanks for the pic of your CO2 harvester. I think that is the way that I am headed.

Cheers
 
Looking through your album, it doesn't show that you expanded the original hole size that was in your original plan. Did you not have to do that step?


Correct. I thought the original diameter was 1-1/8" but it was already 1-1/4" which was exactly what the pull-through tool called for.

I actually wound up reheating the solder after I took these pics because I had a few pits in the bead and didn't like the looks of it.
 
@ryanj that is exactly what my lid looks like with the gas post to 1.5 TC fitting installed. Now just hook it up to the DIY CO2 harvester you made and you're all set! This is a pic of my harvester. The barbs are just 1/2" x 1/2" that I hot glued to the stock lids after drilling with a stepped bit. You could use smaller hose and barbs if you like. I can't really speak to the strength or longevity of the hot glue method yet. It works so far. There is a second hole in the jar on the right that you can't see. I see no reason to add an airlock to this like the NorCal system did. just a hole to vent to atmosphere. These are 1/2 gallon wide-mouth Ball jars btw. With the ball valve attached and water in the jar on the right you have captured CO2 and don't have to worry too much about oxygen getting into the harvester if you disconnect it during fermentation. Prost!

View attachment 579286

Here's a picture of the harvester I built:
SiboMi8.jpg


It just uses 1/2 NPT to 3/8" barb fittings and then on the inside I'm using 1/2" NPT PVC components. Instead of hot glue, you can just use high temp silicone o-rings. This little setup worked like a charm on my last batch.

I decided to keep the airlock on the secondary chamber for a few reasons:
  1. Any CO2 that gets pushed through the first chamber and into the second will now safely be stored in both chambers since the air lock is "locking it in". This doubles the capacity of your CO2 that can be safely "sucked" back into the fermenter when you crash.
  2. The airlock helps keep dust/dirt/debris out of the chamber.
It worked remarkably well.
 
That is a pretty snazzy harvester!

One last question for you before I get to ordering parts, what is the measurement to the top of the ball lock post? I'm going to be re-purposing my current kegerator into a ferm chamber and I want to make sure this will fit before I take the plunge.

Cheers
 
One last question for you before I get to ordering parts, what is the measurement to the top of the ball lock post? I'm going to be re-purposing my current kegerator into a ferm chamber and I want to make sure this will fit before I take the plunge.

Cheers

With the QD on the post and the barb sticking up, it looks like it would need a total minimum height of 25" to fit. It fits into my fermentation freezer no problem.
 
siXVjER.jpg
Testing out my new 1.5” TC CIP micro sprayer from SS Brewtech.

As soon as I turned this thing on, I knew my days of scrubbing this vessel were long gone.
 
UPDATE: I successfully soldered the TC ferrule to the lid. Take a look:
https://imgur.com/gallery/hSkVfDo

9Rtfp4w.jpg

u5J94Js.jpg


I'm 95% happy with the result. I've soldered a bunch of pullthrough bulkheads before, so this wasn't my first rodeo; however, I feel like I got a couple of "pits" in the solder bead. The bead is on the outside of the lid, so I guess I'm not too worried about it. If this bugs me, I'll just heat up the lid and add more flux to smooth it out. ...but I'll probably be fine.
Have you tried spunding with a presure relief valve? Would it hold say 10 psi?
 
Have you tried spunding with a presure relief valve? Would it hold say 10 psi?
I haven't tried a spunding valve. There's absolutely no way in the world this vessel would hold anything over 2-3psi.

To be honest, I think I warped my lid when I soldered the TC ferule, because my lid has to be placed on exactly right for it to even seal. With only 4 clamps and a thin silicone gasket, any sort of tweak to the lid will cause it to not seal.

I like my anvil fermentor but I just wish the lid sealed better.
 
Last edited:
@ryanj Still having sealing issues? I just got one in and picked up a full set of seals just to get on hand and ride free with the shipping. Gave it a test for you and at least in mine you can fit 2 lid gaskets. It's pretty dang tight closing the clamps, but not scary tight. And they both fit in the groove and won't fall out readily. Seems a workable solution. It seems likely to allow more pressure too, though I'm not sure that's a great idea unless you sorted a PRV? A leaky gasket makes a de facto PRV, though I guess the wire clamps would bend and give before shrapnel levels of pressure built, right?

I do wonder if it was the heat or the dimpling that warped yours? I was thinking I'd just surface solder a short flange on if I have a spare kicking around, or go with BH's flat face solder flange.
https://www.brewhardware.com/product_p/tc15fsf.htm
I have dimpled stuff before, just don't see the need for this application.

One last question, what pump are you using for CIP? I wonder if the anvil pump would suffice or is something like a pond or sump pump needed?

Yeah, it's still a little leaky if you don't have the lid on in a certain orientation with the clamps. I definitely think a slightly thicker seal (or even stacking two seals) would solve my problem. I didn't know you could pick up replacement -- might need to consider that.

I've soldered flat flanges before and I find the dimpled soldering to be much easier to work with (although, it technically can alter the shape of what you're soldering to). I might have to just pick up another seal and call it good.

As for the pump, I'm using what I like to call a "China Chugger" -- the typical Chinese pumps that everyones slapping their labels on an reselling in the states.
https://www.bargainfittings.com/index.php?route=product/product&path=68&product_id=282
 
Interesting... I've surface soldered the radius cut flanges on kegs and pots and thought it was super simple. You do need a toggle bolt or something to hold it tight, but no big deal. But I've dimpled too, and that's simple too as long as you have the tooling.

Also somewhat encouraging on the pump. Your pump is rated at 5gpm while SSBT suggests at least 7 for that CIP ball. I guess the only way to see if it'll work with the anvil pump (only 3gpm) is to try it. I do have other pumps I can dedicate to cleaning, but it would be nice to have a single part swap in to CIP the foundry, or use it as a heater / sprayer / reservoir for cleaning fermenters and kegs.

Cheers
 
Back
Top