• Please visit and share your knowledge at our sister communities:
  • If you have not, please join our official Homebrewing Facebook Group!

    Homebrewing Facebook Group

Fixing a keggle hole: so...I screwed this one up

Homebrew Talk

Help Support Homebrew Talk:

This site may earn a commission from merchant affiliate links, including eBay, Amazon, and others.

jodell

Welltown Brewery
Joined
Aug 18, 2016
Messages
495
Reaction score
175
Location
Tulsa
while attempting to install a whirlpool port in my keggle,I screwed up. So I attempted to use a hole saw with a pilot hole that was to big for my pilot drill bit...I new how stupid it was but decided I should still try it..

Anyways, does anybody have any advice on how to fix this?? right now I am thinking about drilling it out to as small as i can but is an actual hole and putting a plug in
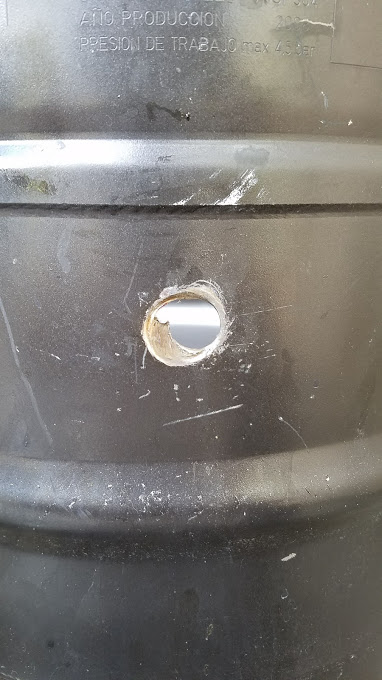
20161103_155708.jpg
 
It was suppose to be 7/8", however, the hole saw caught hard and now it is a tear drop shape..
I got frustrated and called it a day, plus I am going to pick up a stepped drill bit at lowes tomorrow
 
Something like that happened to me where the hole wasn't quite the shape I wanted, and I had leaks. the weldless valve kit I got only included one of those red gaskets, I just ordered a couple more gaskets and put them on both sides and it worked ever since. Don't know if that will help, but where there is a will there is a way!
 
if I were to solder a plug in, would I just need to drill the hole out, find a plug that will fit in that hole, and just solder around it till it is leak free?? obviously with lead-free solder but is that pretty much it?
 
I'd try to get it sealed with a nut, bolt gaskets and some washers. It is a big hole so I would guess solder would be difficult but I've never used solder to fill a hole. There is food safe silicone that is rated up to 400+ degrees so that could be used as a fail safe around whatever you try also.
 
if I were to solder a plug in, would I just need to drill the hole out, find a plug that will fit in that hole, and just solder around it till it is leak free?? obviously with lead-free solder but is that pretty much it?

You'll need a torch, silver solder and the special flux. The plug should fit rather closely, no huge gaps. A big bolt head could work too. Then grind it down to almost flush once it's soldered in.
 
Yeaup - using a hole saw on a round kettle is just tough. period.
I make a small hole then follow up with a step bit.

This is a great video on what you need and basically how you do it.
[ame]https://www.youtube.com/watch?v=LIkvP55UbxM[/ame]

There have been many videos on this subject online but most are missing aspects - if you dimple it you will be able drop more solder in the cup and make it stronger. This is the video which taught me:
[ame]https://www.youtube.com/watch?v=OpMFQFi6Hh4[/ame]

and you can also use a piece from BrewHardware.com which is designed to dimple too - just not sure that they have it in a 7/8" version.
 
To the OP: Need to ream that mess into a circle using a step bit. First, find a weldless triclamp, camlock, or other fitting, then find stepbit to satisfy.

Might consider scrapping and starting over. That's what I'd do. It's called cutting your losses.
 
Hi. You can always use a knock-out punch to give you a really clean hole. The benefit is that you already have a pilot hole for the center drawbolt. Just be careful to make sure of the actual hole size of the punch. A panel/chassis punch has the hole diameter true to size. If you get a conduit type punch, the diameter of the hole is for the OD of that size conduit. In other words, if you get 1/2" conduit punch, the actual hole size will be 7/8". They are expensive, but if you look around on Ebay or CL, or sometimes even here on HBT For Sale forum, you can get them much cheaper than new, then turn around and sell it after you use it. If you're lucky, you might even find one to rent. Ed
:mug:
 
Just make the hole bigger and use a reducer to get your original planned size. No need to panic!
 
If it were me I would finish drilling it out and/ or use a dremel to clean up the hole. the punches are very expensive and not needed for a one time/limited use. I used cheap harbor freight step bits for all my holes in the 5 kettles and kegs Ive done and found you need a drill with good speed control and want to go slow.
 
If it were me I would finish drilling it out and/ or use a dremel to clean up the hole. the punches are very expensive and not needed for a one time/limited use. I used cheap harbor freight step bits for all my holes in the 5 kettles and kegs Ive done and found you need a drill with good speed control and want to go slow.

I belive this is the route I am going, this is definitely salvageable, considering the hole is at the top of my keggle (about the 11 gallon mark), I am also realizing I should have put this lower anyways so really other than an ugly spot this probably works out better in the end. Plus now I get to learn how to silver solder.
 
Plus now I get to learn how to silver solder.

Take the advice already given to heart: it is difficult to fill significant gaps with solder because it thins so much when flowing, so the tighter your plug/patch fits, the easier this is going to go...

Cheers!
 
Plus now I get to learn how to silver solder.

That is what I love about this hobby - always learning something new!
Just make sure you do your homework first and read as many forum posts that you can to make sure.
Truncated tips:
Set the kettle up on something to stop it moving - it must be level and low.
When drilling the hole make sure it is at a level where you can put your weight on it to add the correct amount of pressure.
Drill slowly... and take pauses if you need to, make sure the drill bit doesn't heat up too much.
Grind or sand the piece and the hole area you are putting into the kettle to give it something to grip when soldered.
Put paper towels or cloth inside the kettle to catch the flux if it leaks through.
Careful with the flux - don't add too much. I use a dropper.
Usually two or three wraps of solder material are good - depending on the size wire you have. Too much and it will run...
Wait a few minutes after the actual solder - then take a damp/ wet (not dripping) cloth or paper towel and wipe the blackened flux off the top of the solder area. You should hear it sizzle just a little as you start cleaning...
BKF the whole thing inside and out

Thanks for the advice! my flux is coming in tomorrow so I'll let you all know how it goes.
 
I forgot to mention that you need to use acetone to remove the oils and excess material on the piece and hole before you solder. Follow bobbyj's video (first one) as he lays it out step by step...
 
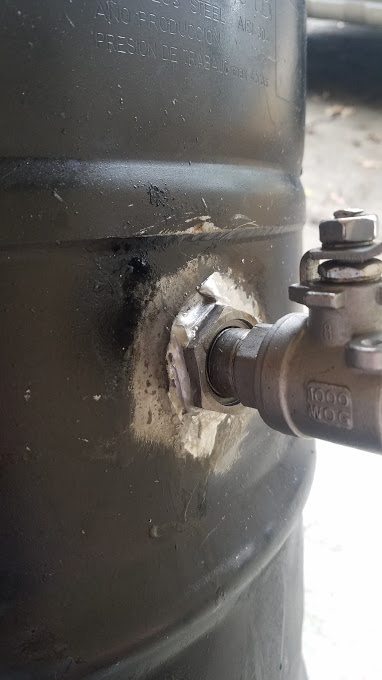
ok so i took a breather and went back out for it, I'll admit it is ugly as hell, but it is water tight and it is good!

The reason I am trying to salvage this is I am saving to buy some brew pots in the next year or so, so there is no point to buy a new keggle then turn around and buy a new pot.

20161108_142027.jpg
 
Your first try and you succeeded - say no more it worked! That means you did your homework.
Who cares what it looks like.
BTW it is not a horrible mess
 
Your first try and you succeeded - say no more it worked! That means you did your homework.
Who cares what it looks like.
BTW it is not a horrible mess

In all honesty, if I had gotten a slightly tighter it I think it would have gone really well

Again that ks for all your help, I owe you a brew!
 
Back
Top