I'm starting this thread to determine and track either what I did wrong or what is wrong. Hopefully helping others in the future to not do what I did or find a solution.
Can reference this post for context.
I was installing endless soda water through a mini nukatap and issues arose where it leaked, a lot. Woke up to floating kegs and a mess throughout the house. I'm attempting to remain high spirited but there is water everywhere.
I believe the issue is the locking collar on the mini faucet mount. When installed the collar sits flush with the mount. However, flush is the pushed in or released position of the collar causing the tubing to just remove itself overtime.
The solution I came up with was drilling a larger clearance hole than is instructed that would not only accept the 8mm tubing but also the larger diameter of the locking collar. I drilled a 7/8" hole just to be sure and pulled the absolute piss on it to make sure it was seated.
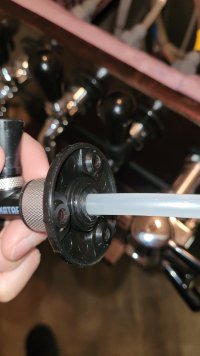
You can sort of see how the collar sits flush with the mount while in it's relaxed/released position. It must extend beyond the mount to actually engage, but the small size of the hole keeps it from doing so.

Am I just missing something obvious here? If you've any experience with these please chime in.
Can reference this post for context.
I was installing endless soda water through a mini nukatap and issues arose where it leaked, a lot. Woke up to floating kegs and a mess throughout the house. I'm attempting to remain high spirited but there is water everywhere.
I believe the issue is the locking collar on the mini faucet mount. When installed the collar sits flush with the mount. However, flush is the pushed in or released position of the collar causing the tubing to just remove itself overtime.
The solution I came up with was drilling a larger clearance hole than is instructed that would not only accept the 8mm tubing but also the larger diameter of the locking collar. I drilled a 7/8" hole just to be sure and pulled the absolute piss on it to make sure it was seated.
You can sort of see how the collar sits flush with the mount while in it's relaxed/released position. It must extend beyond the mount to actually engage, but the small size of the hole keeps it from doing so.

Am I just missing something obvious here? If you've any experience with these please chime in.


