First Brew Day in the Books!

Homebrew Talk - Beer, Wine, Mead, & Cider Brewing Discussion Forum

Help Support Homebrew Talk - Beer, Wine, Mead, & Cider Brewing Discussion Forum:

This site may earn a commission from merchant affiliate links, including eBay, Amazon, and others.

Noob_Brewer

Well-Known Member
Joined
Mar 4, 2019
Messages
1,548
Reaction score
3,965
Location
Eastern, NC
Been planning my brewery for over 2 years, started putting it together this past summer with the keezer build, bought the anvil foundry 10.5g this fall, and completed fermentation system building less than a month ago. Until yesterday, I've only helped another long time homebrewer on his brew day and helped a friend with an extract brew years ago. So Im a total noob for sure. :)

First brew day yesterday went as well as expected. Had some friends helping and a couple who were long time home brewers so that was super nice. The beer is a NEIPA - Electric Hop Candy clone (Kal's Electric Brewery) but using A24 instead of 1318 yeast. Made a couple of gaffs totally my fault and not associated with drinking during brew day as I cracked my first beer after wort was in the fermenter. :) But collected lots of data so that I can adjust and dial in my equipment profile in beersmith3. Biggest blunder was underestimating my grain absorption rate in beer smith which made me fall short on estimated pre-boil volume, so as a noob, I simply sparged more to make pre-boil level but that diluted my wort. post-boil gravity was 1.062, predicted was 1.065. So instead of an estimated 6.7% ABV, depending on how this yeast attenuates (A24 which has a range of 74-78%), my beer will be ~6.2-6.5%. Also underestimated my trub/chiller losses (estimated in default anvil beer smith profile was 0.33gallon, and I measured 0.5gallon. So have adjusted that as well. I also forgot to add my mash salts AND yeast nutrient despite having them sitting on the table ready to go. But I oxygenated the wort well and pitched a nice healthy starter of A24 that started nicely about 6-7 hours after pitching.

But honestly, I'm pumped because in the end, I made wort that is now beer in the fermenter! :) So living and learning and making changes for next brew day to improve.

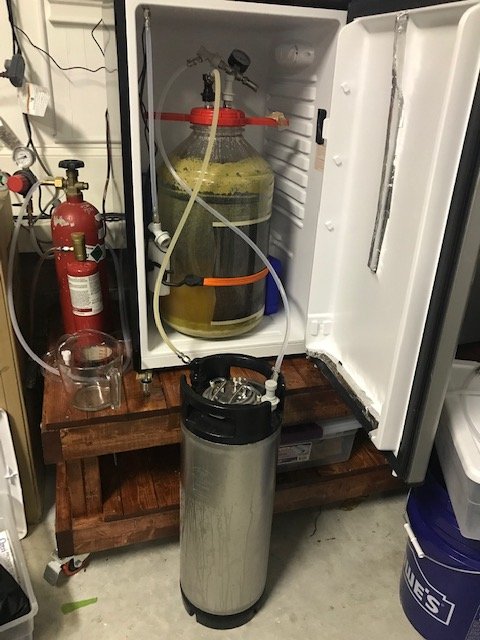
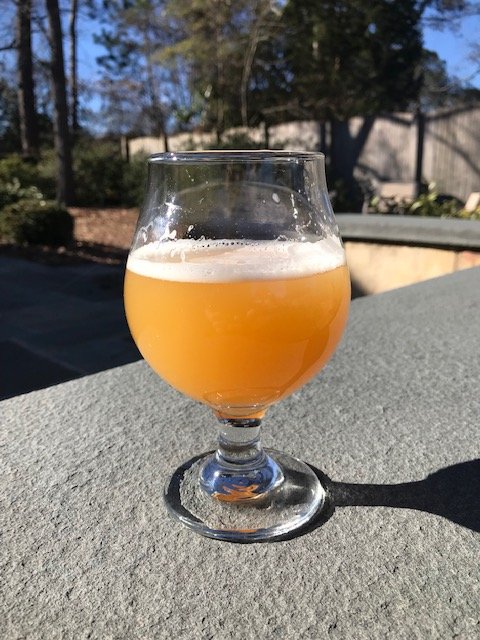
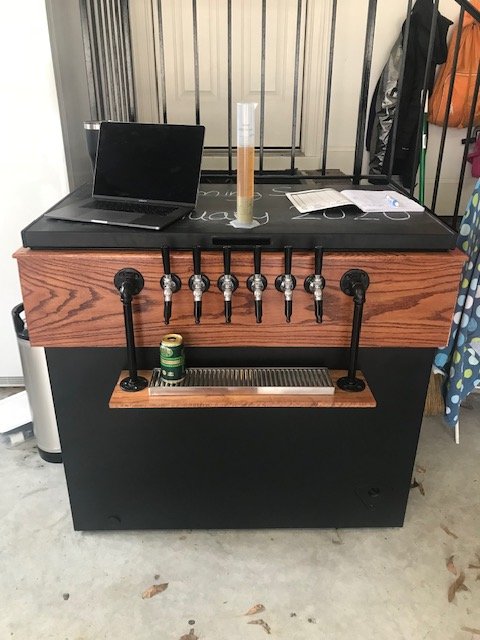
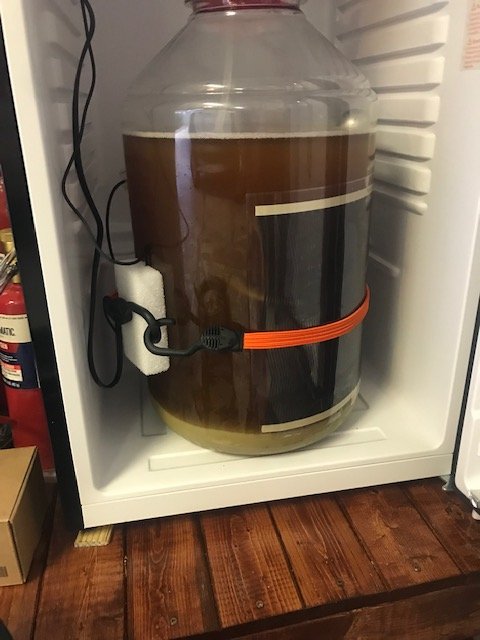
Pics show the last hydro sample that I was tasting after measuring as well as the oskar blues can :) on top of my keezer, wort in the fermenter at about 2pm yesterday and then again today with nice yeast action. Also now have an oxygen purged keg from the fermentation CO2 which already pushed out 5 gallons of sani-solution from the keg.

Shout outs to @Dgallo @Loud Brewing @Oginme @mongoose33 @flintoid @Nosnum08 (keezer collar inspiration) @celging (drip tray idea) and Im sure Ive missed someone. Thanks all of you for your help, ideas, constructive criticism, and inspiration. @Bobby_M thanks to you as well. whenever I was making purchases, you were especially helpful and insightful.

Looking forward to my next brew day already! :)
 

Attachments

  • IMG_6023.jpg
    IMG_6023.jpg
    63.5 KB · Views: 128
  • IMG_6031.jpg
    IMG_6031.jpg
    53.9 KB · Views: 128
  • IMG_6053.jpg
    IMG_6053.jpg
    70.1 KB · Views: 127
Last edited:
Congratulations on the first of many brews to come! There is absolutely nothing like taking a sip of that first HB off the tap or out of the bottle!

I've been lucky as I've had two firsts HB...my first extract back in college and then my first all grain many years later!

savor the moment, learn from the mistakes and most importantly enjoy! It is a hobby after all!

:mug:
:ban:
 
Holy cow. You have been planning your brew day for 2 years! You’ve got nicer gear then I do and I’ve been going at it about 20 years now. My fist Brew Day was a trip to the LBSH and a $100 equipment kit and some extract.
 
Congratulations on the first of many brews to come! There is absolutely nothing like taking a sip of that first HB off the tap or out of the bottle!

I've been lucky as I've had two firsts HB...my first extract back in college and then my first all grain many years later!

savor the moment, learn from the mistakes and most importantly enjoy! It is a hobby after all!

:mug:
:ban:
Thanks! The hydro sample of the beer that went into the fermenter was pretty good to boot! I agree, it IS a hobby. Had a ton of fun with the keezer as my summer project. But after all the planning, was finally stoked to actually make something too.
 
Holy cow. You have been planning your brew day for 2 years! You’ve got nicer gear then I do and I’ve been going at it about 20 years now. My fist Brew Day was a trip to the LBSH and a $100 equipment kit and some extract.
LOL. Unfortunately, I don't have a LHBS around me anymore. But yes, Im a planner for sure. Avid reader trying to learn as much as possible, learning a ton from local friends who home brew and from peeps online here. The running joke I now have with my friends who have been watching me progress with this process/obsession is that even if my beer sucks, peeps who don't know any better will still think I must know what I'm doing because the serving vessel, the keezer, looks nice :)
 
Congrats on your first brew! :mug:

I agree with @Special Hops... I cannot believe you planned for 2 years! Far more patient than me


Edit: Beautiful keezer by the way!

I'm stealing that drip tray idea!
 
I mean... can you really tell the difference between 6.7 and 6.5/6.2% ABV?? Welcome to the club!
 
Wow that keeper though [emoji7] what exactly do you have going on with the blowoff going into the keg then into the bucket? I’ve never seen something like that before and I’m interested in starting to use a fridge/chest freezer for a fermentation chamber.
 
Totally agree and thanks! All errors were 100% mine and looking to improve on them though so I can be consistent too.
Good about your planning. I planned my basement brewery very well and got good beer from the get go. Yes I made some mistakes that I thought were huge but at the end were minor. You will be fine and probably much better than the average brewer ;-)
 
Wow that keeper though [emoji7] what exactly do you have going on with the blowoff going into the keg then into the bucket? I’ve never seen something like that before and I’m interested in starting to use a fridge/chest freezer for a fermentation chamber.

My approach to putting together the fermentation system is temperature control and minimizing oxygen into the beer. Those two things in my mind were super important. Once I had those two goals in mind, putting the system together was rather easy because LOTS on this forum are already doing it. The blow-off into the keg then the bucket utilizes fermentation produced CO2 to purge a keg that is (was) full of star san solution. The end result is to have a future serving keg completely purged of O2 as much as possible. This is really easy to do once you have the setup done. Is it necessary to make good beer? I don't think so at all, but my thought process of just getting into home brewing is to learn as much of these types of processes now from the get go while everything is already new to me. I'm an avid reader on this forum and have seen plenty of posts on oxygen degrading IPAs VERY quickly, especially NEIPAs. So I'd like to think Im learning from others experiences NOW to try to minimize oxygen to preserve the beer's original expression as much as possible.

I'll add once again, that none of my ideas were mine originally. I took others (I named them above in the original post) ideas and adapted them to my environment (garage brewery in north carolina) and situation. If you are interested more in the closed-type fermentation systems they are all over this forum. The Northeast IPA thread has tons in it. These Closed-system concepts are explained by @LittleRiver @Dgallo and MANY others.
 
@Noob_Brewer kudos to you for your thorough research and preparation before your first brew. Quite impressive! I've got a feeling you are going to be making some excellent beers.

...The blow-off into the keg then the bucket utilizes fermentation produced CO2 to purge a keg that is (was) full of star san solution. ... These Closed-system concepts are explained by @LittleRiver @Dgallo and MANY others.

I don't use fermentation gas to push starsan out of the keg. I sanitize the keg with only a small amount of starsan, then drain it out of the keg before hooking it up to my fermentation vessel (hose from fermenter is connected to the beer post of keg, an airlock is connected to the gas post).

So rather than relying on pressure to force out starsan I rely only on the volume of fermentation gas to purge O2 from the keg. Calculations done by @doug293cz show that sufficient volume is produced to reduce O2 concentration to about 5 parts per billion. One benefit of this approach is that it doesn't require pressure rated fermentation vessels or connections. The pressure never goes much above ambient.

My experience is that Doug's calculations are good. When I started purging with fermentation gas the longevity of flavor/aroma in my beers improved dramatically. Enough so that I've not had a need to explore another approach.
 
@Noob_Brewer kudos to you for your thorough research and preparation before your first brew. Quite impressive! I've got a feeling you are going to be making some excellent beers.


I don't use fermentation gas to push starsan out of the keg. I sanitize the keg with only a small amount of starsan, then drain it out of the keg before hooking it up to my fermentation vessel (hose from fermenter is connected to the beer post of keg, an airlock is connected to the gas post).

So rather than relying on pressure to force out starsan I rely only on the volume of fermentation gas to purge O2 from the keg. Calculations done by @doug293cz show that sufficient volume is produced to reduce O2 concentration to about 5 parts per billion. One benefit of this approach is that it doesn't require pressure rated fermentation vessels or connections. The pressure never goes much above ambient.

My experience is that Doug's calculations are good. When I started purging with fermentation gas the longevity of flavor/aroma in my beers improved dramatically. Enough so that I've not had a need to explore another approach.
That will certainly work as well. I usually piggy back multiple kegs to my fermentation and am able to sterilize/purge them all at once. I personally like the full volume approach because you can insure each keg in has been purge of o2 once the bucket hits the 5.15 gallon mark. Also the back pressure is very low, less the 5 psi, which is too low limit ester production. But both methods with certainly work for one keg
 
I'm interested in starting to purge my kegs using the fermentation. Do you have to keep the PRV open on the lid?
 
I'm interested in starting to purge my kegs using the fermentation. Do you have to keep the PRV open on the lid?

No I connect the ferm to the co2 post on the keg and then run 4 ft hose out of the liquid post into a bucket like an air lock
 
My approach to putting together the fermentation system is temperature control and minimizing oxygen into the beer. Those two things in my mind were super important. Once I had those two goals in mind, putting the system together was rather easy because LOTS on this forum are already doing it. The blow-off into the keg then the bucket utilizes fermentation produced CO2 to purge a keg that is (was) full of star san solution. The end result is to have a future serving keg completely purged of O2 as much as possible. This is really easy to do once you have the setup done. Is it necessary to make good beer? I don't think so at all, but my thought process of just getting into home brewing is to learn as much of these types of processes now from the get go while everything is already new to me. I'm an avid reader on this forum and have seen plenty of posts on oxygen degrading IPAs VERY quickly, especially NEIPAs. So I'd like to think Im learning from others experiences NOW to try to minimize oxygen to preserve the beer's original expression as much as possible.

I'll add once again, that none of my ideas were mine originally. I took others (I named them above in the original post) ideas and adapted them to my environment (garage brewery in north carolina) and situation. If you are interested more in the closed-type fermentation systems they are all over this forum. The Northeast IPA thread has tons in it. These Closed-system concepts are explained by @LittleRiver @Dgallo and MANY others.

Sounds like a good idea! So that it basically just a work around for hooking up a co2 tank to an already sanitized keg and purging out O2 before adding the beer then but you’re just using the co2 from byproduct of fermentation?
 
Sounds like a good idea! So that it basically just a work around for hooking up a co2 tank to an already sanitized keg and purging out O2 before adding the beer then but you’re just using the co2 from byproduct of fermentation?

Yup thats exactly it. Also, two processes being done simultaneously (purging keg of oxygen & fermenting your beer) also just seems to be more efficient to me and saves me the step later on of making sure I have a keg ready. Plus, it was also just pretty cool and clever! :)
 
Yup thats exactly it. Also, two processes being done simultaneously (purging keg of oxygen & fermenting your beer) also just seems to be more efficient to me and saves me the step later on of making sure I have a keg ready. Plus, it was also just pretty cool and clever! :)
It also saves quite a bit of money over time using the free co2 from the ferm vs having to use your tank. In addition to that, the blow off co2 has some aroma compounds from the hops and yeast esters in it so it can help preserve some aroma (how much? I have no idea but better than nothing lol)
 
Just posting an update on this...took first hydro reading today as fermentation activity seems to have stopped for almost the past 18hrs. It was 7 days and 6hrs ago when this went into the fermenter. 68degrees from pitch to wednesday (days 0-4), then upped 1 degree each day afterwards and holding at 71 degrees currently. OG was 1.062 (i undershot target 1.065 on brew day). A24 pitched on saturday at a pitch rate of 1.0M cells/ml/P. FG = ~1.010 (where top of meniscus hits the "10" line) but bottom of meniscus seems to be closer to 1.011. Not a pro at reading these but Im seeing a finish hydrometer purchase in my future! :) So according to beersmith, this is 81.5-83.2% attenuation! - depending on which gravity reading I take lol. The imperial A24 packet says attenuation is 74-78% so this over-attenuated? Perhaps this is a function of my pitch rate as well? So the beer is now ~6.8-6.9% ABV. It does taste very good to me and has very nice aroma. Will let it sit at 71 for a couple more days for clean up before soft crashing to 60degrees for a couple days prior to ramping back up to 68 and dry hopping. SRM of this recipe is suppose to be 6.4SRM, so I think the hydro sample looks pretty decent. Lighting on the glass is poor but its a nice light orange-like color.
 

Attachments

  • IMG_6116.jpg
    IMG_6116.jpg
    34 KB · Views: 34
  • IMG_6115.jpg
    IMG_6115.jpg
    37.2 KB · Views: 36
Just posting an update on this...took first hydro reading today as fermentation activity seems to have stopped for almost the past 18hrs. It was 7 days and 6hrs ago when this went into the fermenter. 68degrees from pitch to wednesday (days 0-4), then upped 1 degree each day afterwards and holding at 71 degrees currently. OG was 1.062 (i undershot target 1.065 on brew day). A24 pitched on saturday at a pitch rate of 1.0M cells/ml/P. FG = ~1.010 (where top of meniscus hits the "10" line) but bottom of meniscus seems to be closer to 1.011. Not a pro at reading these but Im seeing a finish hydrometer purchase in my future! :) So according to beersmith, this is 81.5-83.2% attenuation! - depending on which gravity reading I take lol. The imperial A24 packet says attenuation is 74-78% so this over-attenuated? Perhaps this is a function of my pitch rate as well? So the beer is now ~6.8-6.9% ABV. It does taste very good to me and has very nice aroma. Will let it sit at 71 for a couple more days for clean up before soft crashing to 60degrees for a couple days prior to ramping back up to 68 and dry hopping. SRM of this recipe is suppose to be 6.4SRM, so I think the hydro sample looks pretty decent. Lighting on the glass is poor but its a nice light orange-like color.
Looks good brother. I read that as 1.011 since the surface tension will cause the beer to climb up the hydrometer. That’s good attenuation. Mash temp and time was most likely the cause but nothing wrong with a 1.011, many breweries and hbers target around 1.012!

What was the mash temp and duration of the mash?
 
Thanks man! mash temp was 152 which held quite well throughout. Ph was 5.38 after I adjusted slightly down from 5.6 after I mashed in. The mash time was about 85minutes total: mashed in, waited 10minutes, checked Ph - added some lactic acid (~0.5ml), waited another 10minutes to recheck it and it read 5.38 which was when I started the "60min" mash time. Then was about 5-10min tops to reach 168 and raised malt-pipe to drain before sparging. Using anvil foundry and started recirculating after the first 10minutes with the recirc really slow as I was paranoid of getting a stuck spare which I never got.
 
I will add that there might have been a little temp stratification too OR the anvil temp probe is off some which could certainly be the case since. Temps on anvil read 152 whole mash time but my thermapen which came with calibration certification and I checked it prior myself always ready 149.5 at the top of maltpipe with a slow recirculation. So mash temps could have been 150-151 on average. But honestly being a noob there are plenty of other tasks for me to get good at prior to fiddling with the temp differential lol. All in all I’m please so far
 
Looks good! I usually finish 1.011-1.013 as I mash slightly higher and prefer a bit of residual sugar to balance out any hop burn :) (drink em young!) Sorry I didn't get back to you regarding your water volumes but it looks like you had some good help on your brew day. For future reference, when using my single vessel with a grist of 10lbs of grain or more, I always use 8gal of strike h20, and then pull off 1.5gal sparge water. That ensures I get my 5-5.5gal in the keg after boil off/ hop absorption etc. If its a small beer less than 10lbs grist I mash at full volume with 7-7.5 gal h20.
Congrats on your first batch, keep us posted on how it turns out!
 
Last edited:
Looks good! I usually finish 1.011-1.013 as I mash slightly higher and prefer a bit of residual sugar to balance out any hop burn :) (drink em young!) Sorry I didn't get back to you regarding your water volumes but it looks like you had some good help on your brew day. For future reference, when using my single vessel with a grist of 10lbs of grain or more, I always use 8gal of strike h20, and then pull off 1.5gal sparge water. That ensures I get my 5-5.5gal in the keg after boil off/ hop absorption etc. If its a small beer less than 10lbs grist I mash at full volume with 7-7.5 gal h20.
Congrats on your first batch, keep us posted on how it turns out!
@Loud Brewing residual sugar to balance out any hop burn/hop bite? Are you implying that residual sugars can offset the burn possibly due to polyphenols left in suspension? Interesting, as I have not heard the sugars left would/could do this. Appreciate the tip on strike/sparge water ratios. Im still figuring this out trying to dial in my system (anvil foundry). This first brew, I underestimated my grain absorption which is why I fell short on water prior to sparging, but have updated that in equipment profile in beer smith. Don't sweat it on not responding to my previous post question, I certainly appreciate and value your input as always. I will certainly keep ya posted on the finished product too! I'm currently in dry hopping stage of this first brew so with any luck Ill keg this over the weekend for carbing/tasting/and some conditioning. This has been a learning process for sure and it'll continue for a loooong time too :). This is a fun hobby for sure. Lastly - my wife is doing "dry january" so she's told me that she expects a full week of conditioning to take place prior to the "release" of the finished product which would put in Feb 1st/2nd :) I told her I'd have to daily monitor the conditioning/carbing process though next week as quality assurance :).
 
For my taste buds, slight hop bite/burn in a young neipa isn't always a bad thing. My comment was a bit tongue and cheek, but in regards to FG, yes this will affect your overall balance. All things being equal, it is best to let the beer condition a bit. I find that most of my IPAs hit their stride about 10-14 days after kegging. Your target date of Feb 1st seems to be inline with that, however you are correct when you said you have to do some quality testing along the way :)
Once again, congrats on your first brew day and be sure to let us know how it tastes when it hits the glass!
 
So to update: yesterday I kegged my first beer ever and was a closed transfer! was nervous as hell it wouldn't go well as Ive only practiced with water twice to this point. Anyways, decided to give gravity transfer a try rather than just using the CO2 tank to drive out the beer to keg. Set both the fermonster and serving keg to 5psi each, hooked up gas post to gas post, then hooked up to liquid post on fermonster which has a floating dip tube and put a carb cap on other end. Once I attached liquid QD to fermonster, siphon immediately started and once carb cap had liquid coming out and the liquid line was purged of oxygen, I removed carb cap and attached QD to serving keg. Thanks @Loud Brewing brewing for the tip on purging oxygen from liquid lines! This method worked great! It was uneventful, took about 40minutes so it was slower than using CO2 tank (probably because the floating dip tube was stuck to the side of fermonster and sucking liquid slowly), and I was able to get the keg nearly full (about 4.8gallons due to my falling a little short on brew day AND taking too much of hydrometer samples lol). But who cares, it worked! Other pic is first pull from my keezer EVER after force carbing at 30psi for last 24 hours. Beer has pronounced aroma and is smooth as hell despite being somewhat young/green. It is VERY drinkable with zero hop burn/hop bite at all! Wife is happy too which is always a plus when you are starting a new hobby - besides she loves IPAs. Was amazed at how much more yellow this beer is now after dry hopping and compared to my hydrometer sample (without any dry hop additions) above in an earlier post in this thread. Right now the aroma dissipates slightly as the early carbonation level dissipates but all in all Im please with my first attempt and MANY more beers to come and will continue to improves processes and the beer. For what its worth - that first pull from tap on keezer was most nerve racking because Ive been petrified about introducing oxygen throughout the process and was hoping the serving keg was fully purged. 24hrs later after being in the keg - it looks pretty decent I think.

EDIT: I actually thought it was pretty cool to see the perspiration on keg which showed about where the liquid line is at in keg without opening it. You can see this in the picture clearly. Got the beer down to 40 degrees before transferring nice clean beer with minimal hop particulates.
 

Attachments

  • IMG_6208.jpg
    IMG_6208.jpg
    69.8 KB · Views: 32
  • IMG_6224.jpg
    IMG_6224.jpg
    71.9 KB · Views: 28
Last edited:
As long as the wife is happy that's all that matters :)

Glad to hear everything went so smoothly. I close transfer 90% of all my beers and every time you do it you will become more comfortable with the process. One thing I might recommend is cutting some slits or drilling some holes in to the aluminum pickup tube to prevent it from sticking to the side of your FV.

Your beer looks great especially being served from that sexy ass keezer! And yes, it is very surprising to see how much color dryhopping can impart onto the final product. If you want to reduce the quantity of beer used on the hydro samples pickup a cheap refractometer off amazon, they can be especially useful on the hotside as they require just a drop of liquid (without cooling) to observe gravity.
Enjoy the fruits of your labor, it looks like you're on your way to many more epic brew days! Maybe we can setup a trade sometime?
CHEERS
 
Thanks! Yes, I do plan on drilling two slits in the pickup tube for sure for next batch (which will be my third batch as I have the second in fermenter now without those slits in it lol). Yes, the sexy keezer is a running joke with my friends now because it gives the impression that I know what the hell Im doing lol. Truthfully, it was a fun summer project. :) I do have a refractometer but thought that with alcohol they are off. Can a correction factor be applied on the cold side when alcohol is present? Finally, even though Im just starting, I certainly would be game for a trade. Only problem presently is that Im just kegging and have no bottling capabilities or canning capabilities. However, Ive joined the local home-brew club and many peeps do. So once I get a few brews under my belt, I'll PM ya. Thanks for all your help again!
 
...I do have a refractometer but thought that with alcohol they are off. Can a correction factor be applied on the cold side when alcohol is present?...

Yes, you can use a refractometer calculator to correct the reading for the presence of alcohol. In my experience the calculator works quite well when compared to a hydrometer reading.

That said, my standard practice when preparing to transfer to keg is to first fill up a hydrometer sample flask and take my FG reading with a hydrometer. I do a gravity powered closed transfer, draining from a spigot on the bottom of the fermenter. Pulling the hydrometer sample helps clear out the sediment that can exist at the start of the transfer, and drinking it afterwards gives me a reading on how the taste is progressing.
 
So this first brew of mine had been kegged a week ago yesterday. Spent a lot of "research" and "quality testing/sampling" each day along the way to see how this changes. On friday there was a noticeable "turn" in the flavor in that the beer was noticeably more "rounder" and less sharp. Flavor is well defined as tropical/citrus. Most importantly, wife approved too. :) For my first beer ever, Im very happy how it turned out despite my mistakes on brew day that I posted in the OP. So for the past year or so Ive been on this forum, Ive seen lots post their pints in all their glory, so Ive followed suit. Attached is my "centerfold-esque" pic of the beer bathing in the sun in all its glory! Came out very well! Need to start working on head retention though for upcoming brews. Thanks again for all those who've helped me out on this forum! Still got a ton to learn, but looking forward to the journey.

Many thanks again!
 

Attachments

  • IMG_6271.jpg
    IMG_6271.jpg
    84.8 KB · Views: 20
Back
Top