First batch with new electric system.

Homebrew Talk - Beer, Wine, Mead, & Cider Brewing Discussion Forum

Help Support Homebrew Talk - Beer, Wine, Mead, & Cider Brewing Discussion Forum:

This site may earn a commission from merchant affiliate links, including eBay, Amazon, and others.

Golddiggie

Well-Known Member
Joined
Dec 14, 2010
Messages
13,768
Reaction score
1,914
Location
Living free in the 603
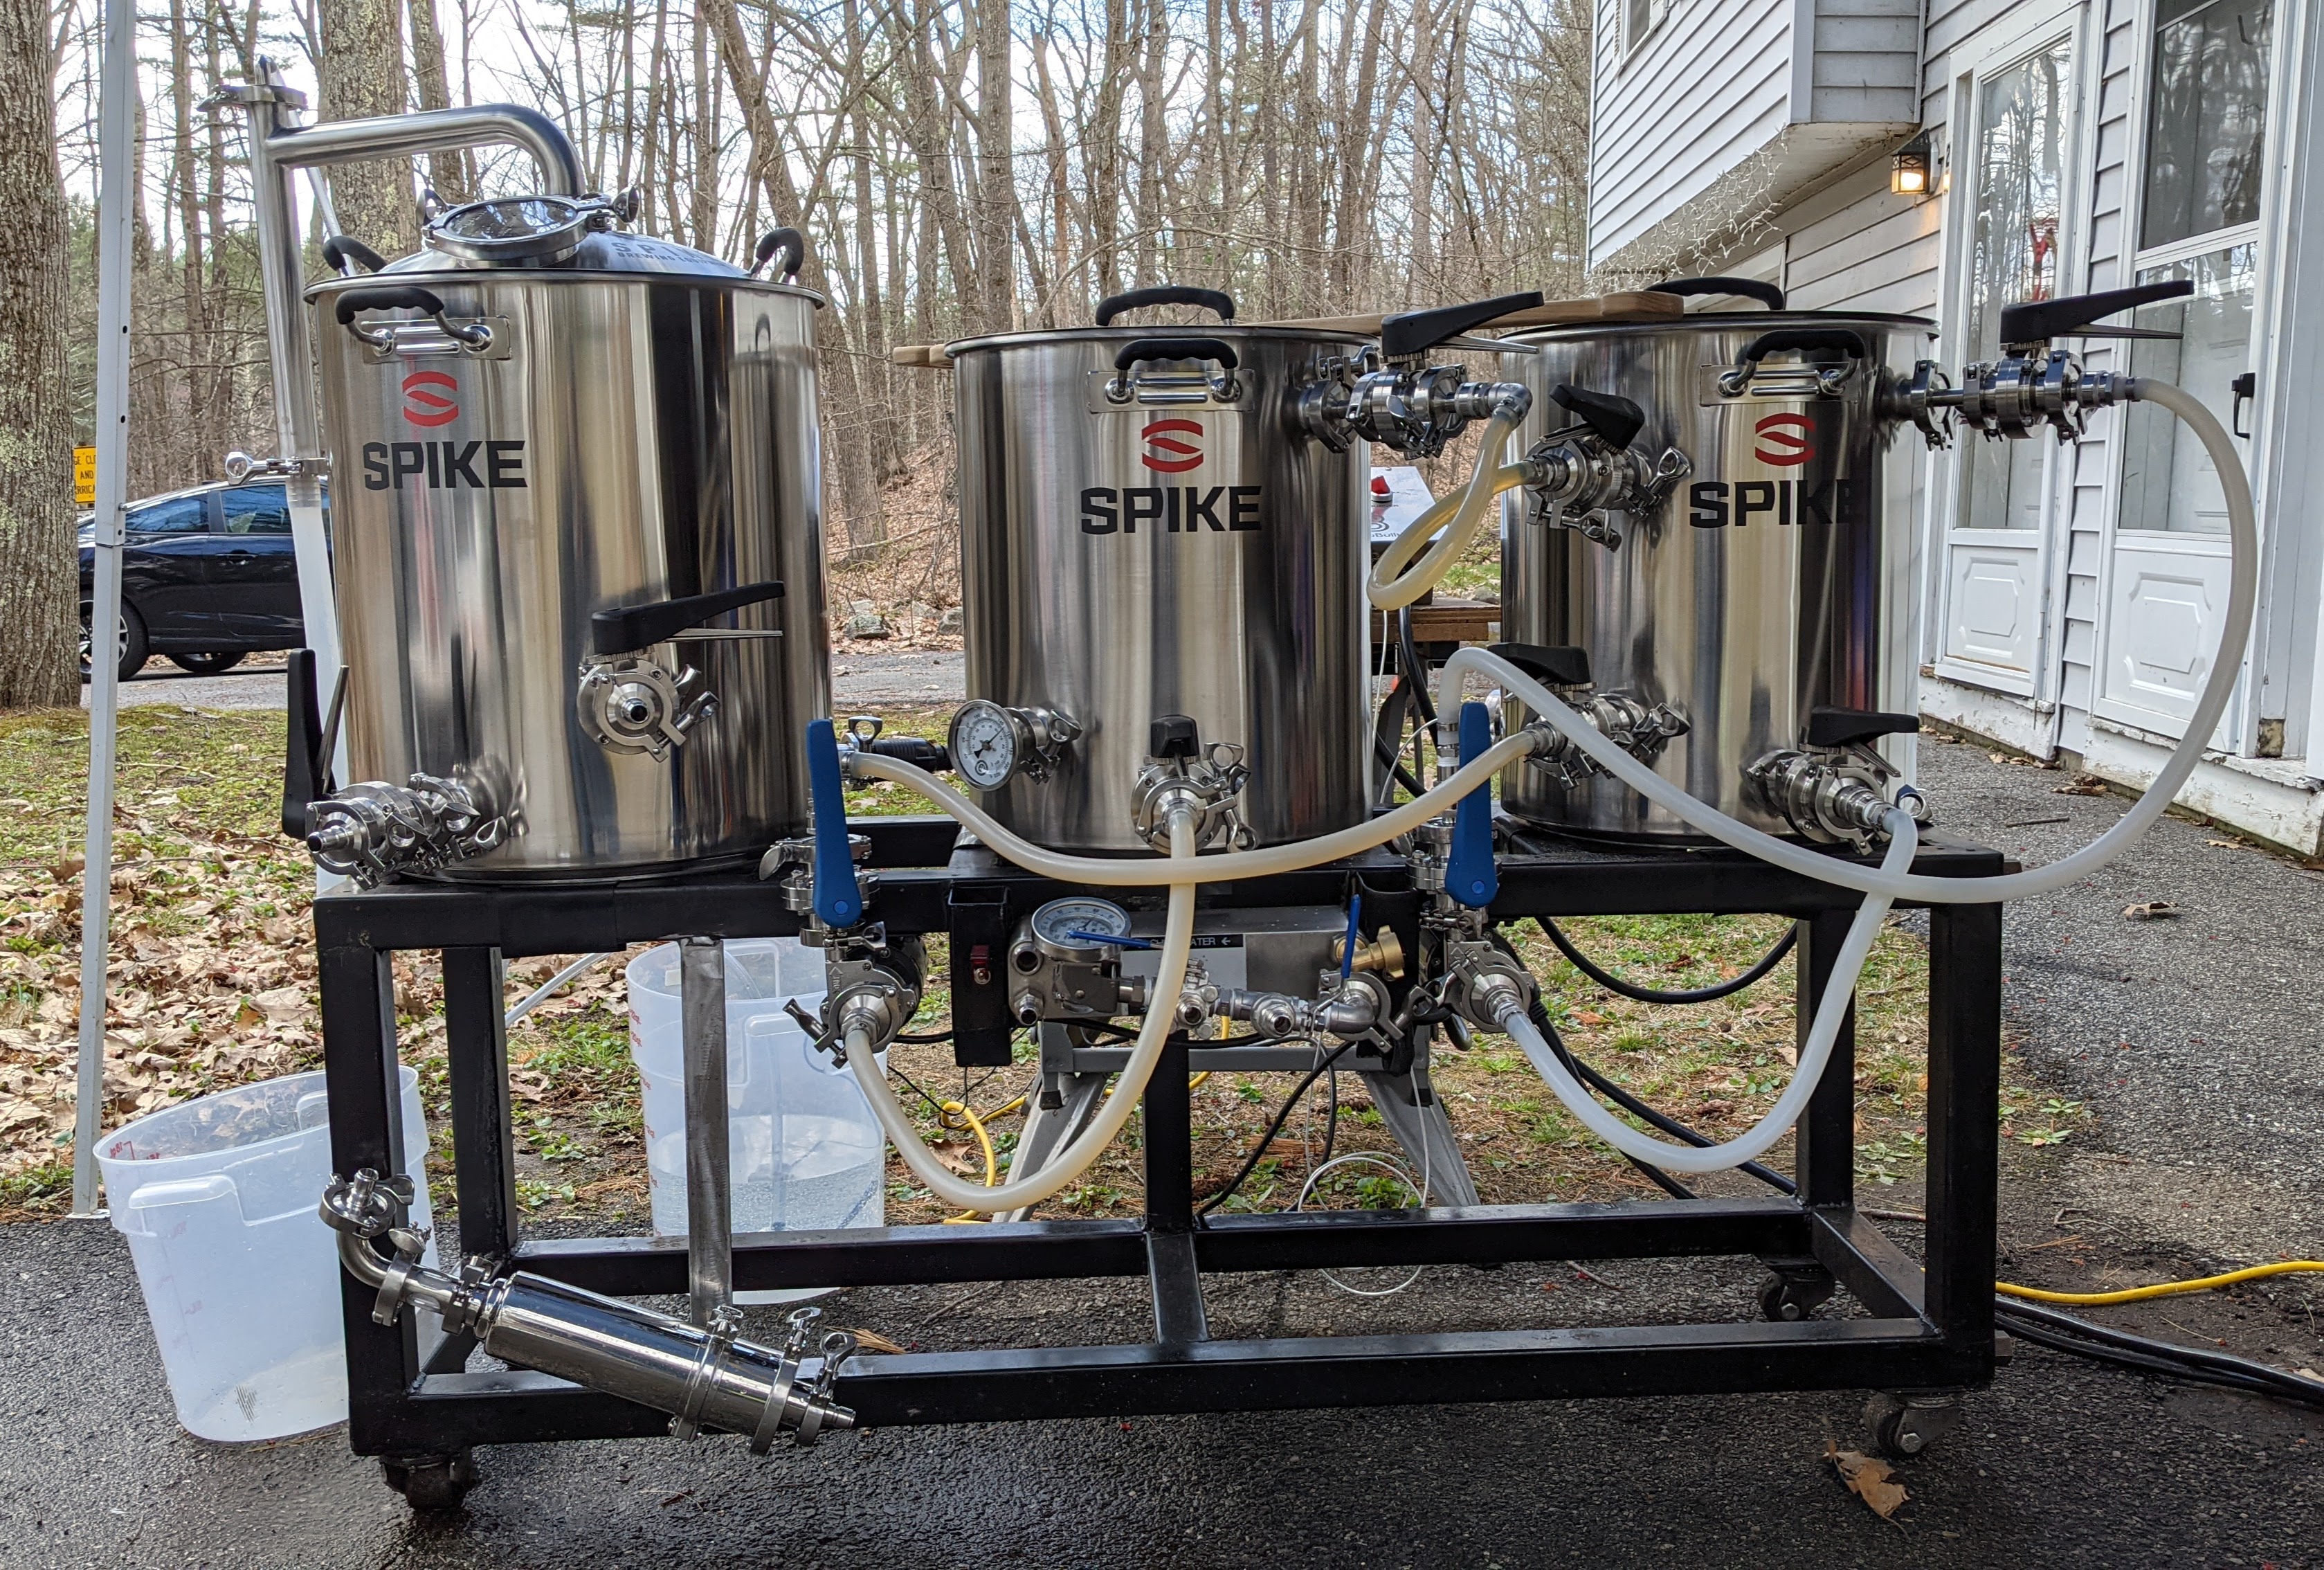
This past Sunday we brewed the initial batch in my new Spike Brewing setup. I've always been brewing with propane burners but decided it was time to upgrade and be prepared for brewing inside (plan for when I move to my next place).

New system:
PXL_20210418_184030639.jpg

View attachment 726620
From the left: 20 gallon BK, 15 gallon HLT and MT. The wort filter (lower left) was from Brewers Hardware and it prevented the plate chiller getting clogged up with hop matter. That's with 12oz of hop pellets roaming free in the BK for the batch. Whirlpooling helped, filter caught about 3oz (post brewing weight, the weighed after sitting in a bag in the sink overnight). I ended up not getting the system complete from Spike with control panel and such mostly due to wiring limitations here. I have two 30 amp 240 outlets in the garage to provide power. These are three wire, not four wire. Which means it would either be a PITA or not viable to use one of their panels. Or one from eBrewSupply. Another item I plan to change once I move into my own house.

Before next brew day, the chiller will be relocated to above the filter and I plan to have new pumps. The old (from around 2011) March 809's just are not performing. Could be several reasons. Instead of attempting to get them working, they're getting replaced. I also received the oxygenation setup from SSBrewTech that will go at the chiller out port for the next batch. Just need to adapt the regulator on my O2 bottle to work with it. Nothing major, and I believe I already have the fitting I'll need. If not, I'll get one in time.

I used to use a hop spider (latest one is all stainless, connected to the ring I used to use with the nylon mesh bags). Cleaning it after the IPA was a pain. Whirlpooling is becoming a fast favorite, even after just one batch. Also liking how with the whirlpool aspect I'm not using as many ounces of hops to get the desired flavor/effect.

With the steam condenser lid, I'm pretty much ready to also brew indoors without any worry about condensation covering walls/ceiling as well as wort residue.

With whirlpooling, I didn't want to do my normal method of recirculating the wort back into BK until it hit a certain level, then send it to the fermenter. I did a bit of research last week and applied information found to great effect. Basically, I played with the valve at the pump to reduce wort flow going into the chiller, while having the chill water going full blast. I also played with the valve at the wort out side of the chiller to let it linger a bit more. I had to watch the thermometer there in order to keep it in the 60's. Total chill time of between 13 and 13-1/2 gallons of wort was about 9 minutes.

Efficiency on the first batch was higher than I've hit on the old setup. I'll need to take a better measure of the post boil volume with the next batch to check the parameters better. We actually hit a slightly higher OG than expected. I think the post boil volume was also a bit on the high side, which makes it even better.

Next upgrade I'm planning is to jump to conical fermenters. My primary choice is going to be Spike. I'll also pick up a glycol chiller for the times where I either want to cold crash, or need to fight higher temperatures in the room where things ferment. Probably going to end up with a pair of the CF10 models while still here. MoreBeer has the chiller that can provide for two fermenters at a time. I'm on the fence between that one (Max 2) and the one that will handle four fermenters (Max 4). The small difference ($200) between them is making it a tough choice. I'll also have to decide if I want to get one of the CF15 models.

More important is the batch that we brewed was going completely ape in less than 10 hours. I pitched the yeast around 8:30pm that night. By the next morning it was cruising. Spunding valve is set to 15psi and additional CO2 is pouring out. Temperature increased by almost 5F as well. Still within the yeast happy range.
 
FINALLY got an electrician to come out and take a look at the current outlet setup in the garage and give me a price on changing one of the 30amp 240 outlets to the 50amp 14-50 outlet needed for the eBrewSupply panel I ordered. Depending on where he can get the breaker from, he's expecting to be able to do the work this weekend. The two other yackoffs stopped communicating. One was supposed to come out last weekend. No show, no message, nothing. The other didn't even get that far. So, screw those two. I'll give my money to the guy that actually came out as he said he would. Helped that we have a friend in common.

Now I just need to wait for the new panel to arrive before we can brew. I also need to make a arm that it will mount to, that will secure to the brew stand. My design will pivot at the brew stand (at one end) and also allow the panel to rotate for better visibility. With the power cord I just ordered, I should be able to place the panel on either end of the brew stand without issue. All depends on how much cord is left after I route it out of the way. I'm thinking I'll still have enough.

Glycol chiller also arrived for use with the two CF10's. Yes, I did order a pair of Spike CF10 fermenters with the chill coil and all the other goodies to make things easier on me. Including a carbonating stone so that I can carbonate in fermenter (after cold crashing the brew).

I'll post another pic when I have everything configured. The plate chiller was going to be in one new location, but I'm going to shift it again due to how the control panel is configured.
 
It might be based on alien tech, since it strains the wort really well before it goes into my plate chiller. Prevented getting the chiller plugged up.

Just for giggles, conical pron:
PXL_20210510_132733631.jpg


Probably going to get a second SSBrewTech spunding valve ordered in the next couple of days.

Need to get a couple of the clear plastic paper sleeves so that I can put the recipes in either fermenter into that. Smallest count I've found (so far) is a 10 pack. Need to see if my sister (a teacher) has any 'spare' ones I could snag. Otherwise I'll just place the order.
 
It might be based on alien tech, since it strains the wort really well before it goes into my plate chiller. Prevented getting the chiller plugged up.

Just for giggles, conical pron:
View attachment 728935

Probably going to get a second SSBrewTech spunding valve ordered in the next couple of days.

Need to get a couple of the clear plastic paper sleeves so that I can put the recipes in either fermenter into that. Smallest count I've found (so far) is a 10 pack. Need to see if my sister (a teacher) has any 'spare' ones I could snag. Otherwise I'll just place the order.
We're Not Worthy.gif
 
Just my first two CF10's.
Got some replacement parts coming from Spike due to issues with what arrived. No arguments about it. Simply sent them the info as to what I saw when setting them up and they're taking care of it. Things like that will keep me as a customer for the long term (or as long as they make things in the sizes I need). With any luck, in a year or two I'll be getting one of their nano systems. :D

With the conicals, I can have more beer fermenting in less floor space than with the fermentation chamber I had.

Glycol chiller almost looks like K9 got messed up a bit. ;)
 
Considering they have a capacity of 14 gallons, listing 5-10 gallon batches, it would be an issue. The chamber I had, it wouldn't have been horrible since I placed a door at one end, and had the top hinged with gas springs. Another HBT member has it now.

I got the wheels for the conicals so that I can simply fill them up at the brew system and roll them into the back room (basement, garage is also part of the basement, going right outside) for fermenting. I might be able to get more than 10 gallons out of one of these with the methods I use. But since my normal batch sizes are 6 and 9 gallons (giggidy) it's no issue at all.

The main driving force behind all my gear purchases has been to streamline my process and make it easier on me. Especially with my brewbitch (nephew) moving out to Chitcago in a few months for a bit (his fiancee is going to grad school out there). He'll be back fairly often, so it won't be like I'll be brewing alone every batch. But I'll be better set to do so.

I actually plan to brew the week of Memorial Day, alone. If the weather is good on the 1st, I'll brew that day (getting another age ring in the stump). I'm also hoping that we can brew on the weekend of the 22nd, or the following (worst case). Schedule will depend on when the new panel arrives.

I'll take a picture when the stand is in it's "final" configuration. After I move (depends on when the housing market isn't insane) who knows what I'll use for a surface/stand. I'll probably use the current one for at least a while. But I expect to get/make something more suited for where I'll be. I already have an electrician that will do what's needed for the power in that area.
 
I put up a canopy to keep most of the sun off and things from falling into the kettles. Plus, if I've shaved that day, it keeps airplanes safe (the glare off my dome can bring them down ;)).

The SCL helps keep things out of the kettle too. I've already come up with an easy way to use that inside during the colder months.

I will say that the brew stand is a LOT lighter without the two Blichmann burners in it.
 
Beautiful set up!
Thanks... Just waiting for the new control panel to arrive (along with a couple of other things) so I can put the first batch into one. Depending on when that shows up, I could be brewing two batches within a few days of each other. Hoping to brew the weekend of the 29th and again on June 1 (weather permitting).

Electrical work (outlet change in the garage) is penciled in for this weekend. Provided he can get the breaker and such. I will need to make the mount for the control panel, but since I got some final info on that, I plan to start that this weekend (or Monday since I'm off that day).
 
I'm also glad I located an adapter cable (1' long) to go from the 14-50 to 6-50 for the outlet getting changed. I have to 6-50 outlets (each on it's own 30amp breaker) in the garage now. One is getting changed over for the control panel. I'll use the adapter cable to connect things like my air compressor and MIG welder as needed (compressor sits on it most of the time).
When I moved in here (late 2015) I hadn't even thought about going to electric brewing. Now I've changed over from propane to electric and swapped from keggles to proper (TC) kettles. Need to list up the fermenters I was using (made kegmenters) so that I can recover some additional floor/storage space.
 
Got the notification earlier that the new 50amp (back to back) panel has shipped from eBrewSupply. Hopefully FedEx hits the posted delivery day (Saturday) because we're planning to brew on Sunday. Got a breakfast stout recipe slated for that day.

I've been working on the assembly that will hold the panel with my stand. I might do some work on that after dinner tonight. Or get it finished up on Saturday. At this point, the hardest parts are already done. Just need to make the part that it will bolt into (with a pivot point) as well as machine the steel that the VESA 200 hole pattern will mate to. I screwed up cutting the metal for the VESA mount the first time, so had to get more. Made sure I got plenty this time (need about 24", ordered 6'). I've already made the notches where that steel will get welded in (part that will rotate on the vertical aspect of the mount. I'll put up some pictures when the mount is made before I install the panel on it. The part that will be able to rotate will slide onto the lower part of the assembly. That way I can leave the panel on that part, and simply lift it off when I need to store the stand (it stands up on one end for storage).

Also need to make the power cords to connect the panel to the elements. Waiting for the panel to arrive before I do that. I'll be sacrificing one of the cords I was using to feed the other panels I had for that. I have the additional ends needed to make that work. Just need to cut the wire, tin the ends, and get it assembled.
 
Made another batch on the system today. This is my first brewing of a breakfast stout recipe (I generated it). Moved the entire setup into the garage so that I have less things to setup. Chill water is now coming out of the furnace room (cold water faucet right by the door makes it easier). I plan to use that faucet come winter so I don't need to deal with the outside host. It also means that I don't need to worry if it's warmer (or hot) outside related to the chill water temperature. Since the water I'm using is closer to the well, plus not running through about 100 feet of hose above ground.

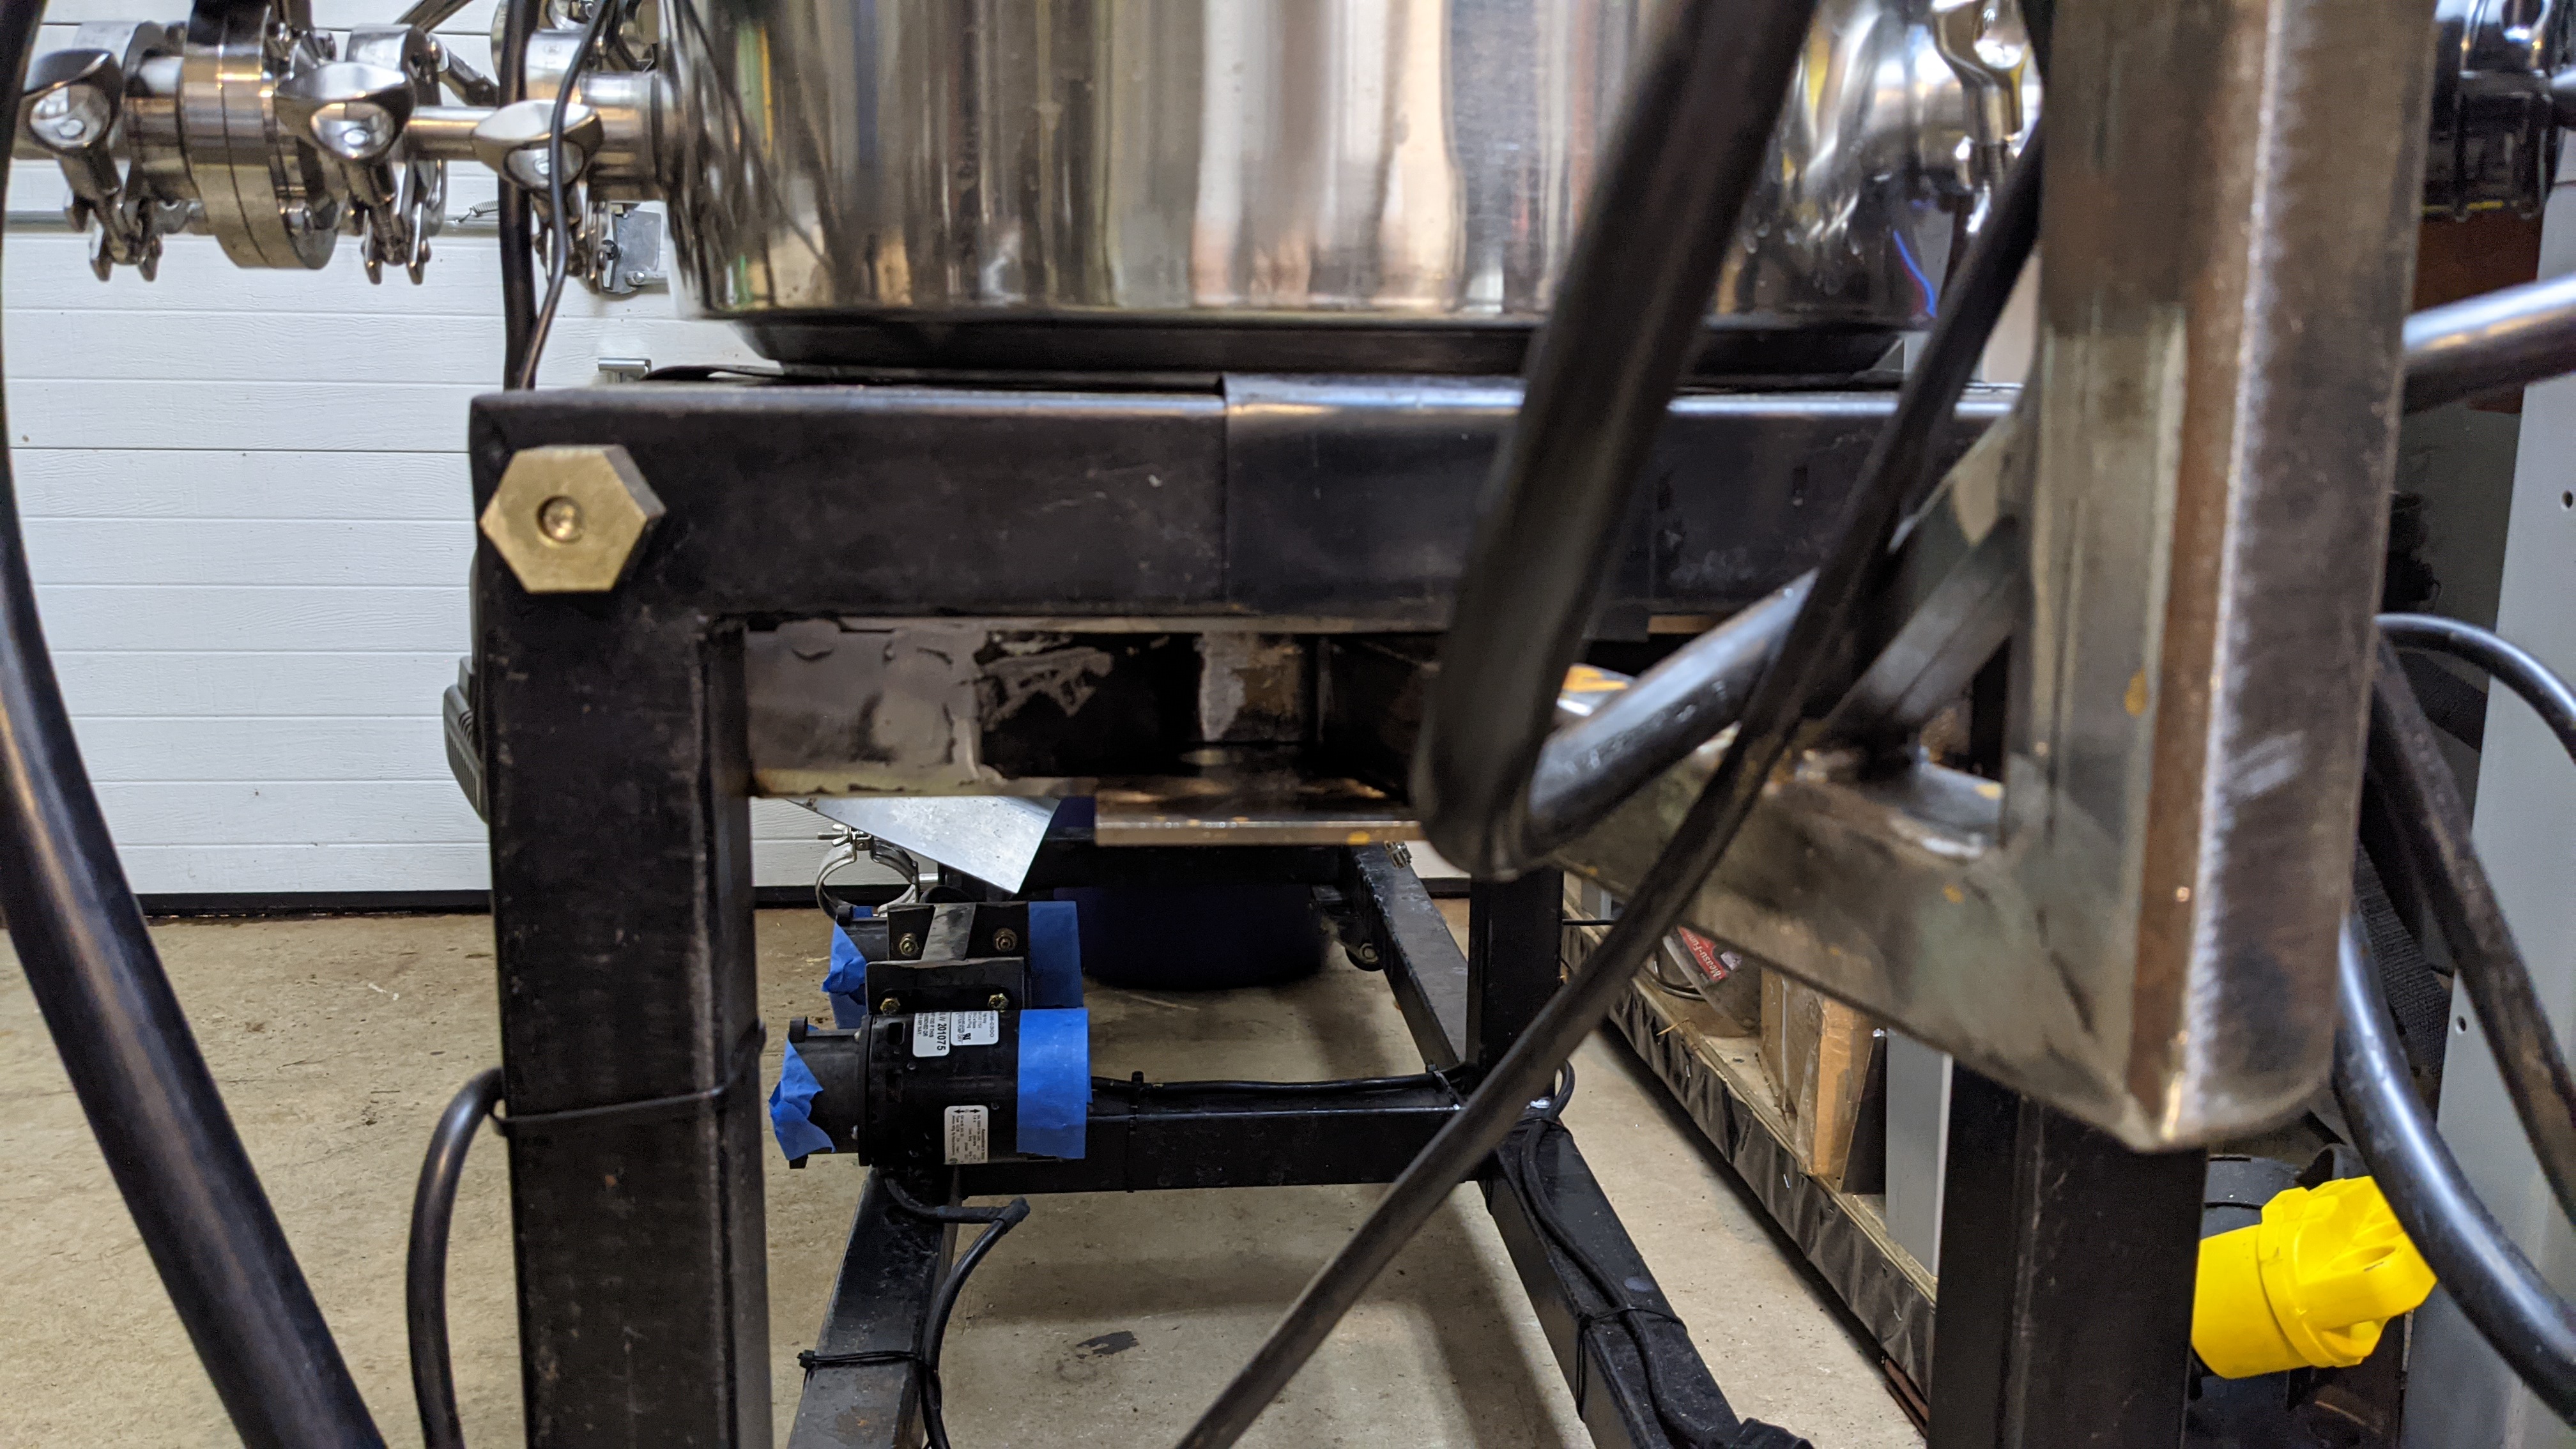
Also added leveling feet to the brew stand since the garage floor isn't even close to a decent grade. It drops at least a couple of inches of the 5 foot span of the brew stand. At least it feels that way. I'll probably measure over the next few days. But, the feet on the right side are mounted 1/2" below the stand. The ones on the left are a full 2" below the stand. The right feet have plenty of adjustment left on them (at least 1-1/2 to 2" of threads above the angle iron). The ones on the left are pretty much at the limit. The 2x4 blocks in the picture were just a 'safety' item I put under the stand after welding things up. Just didn't want something to go sideways. Didn't need them since I did a solid MIG job.

PXL_20210612_150958354.jpg


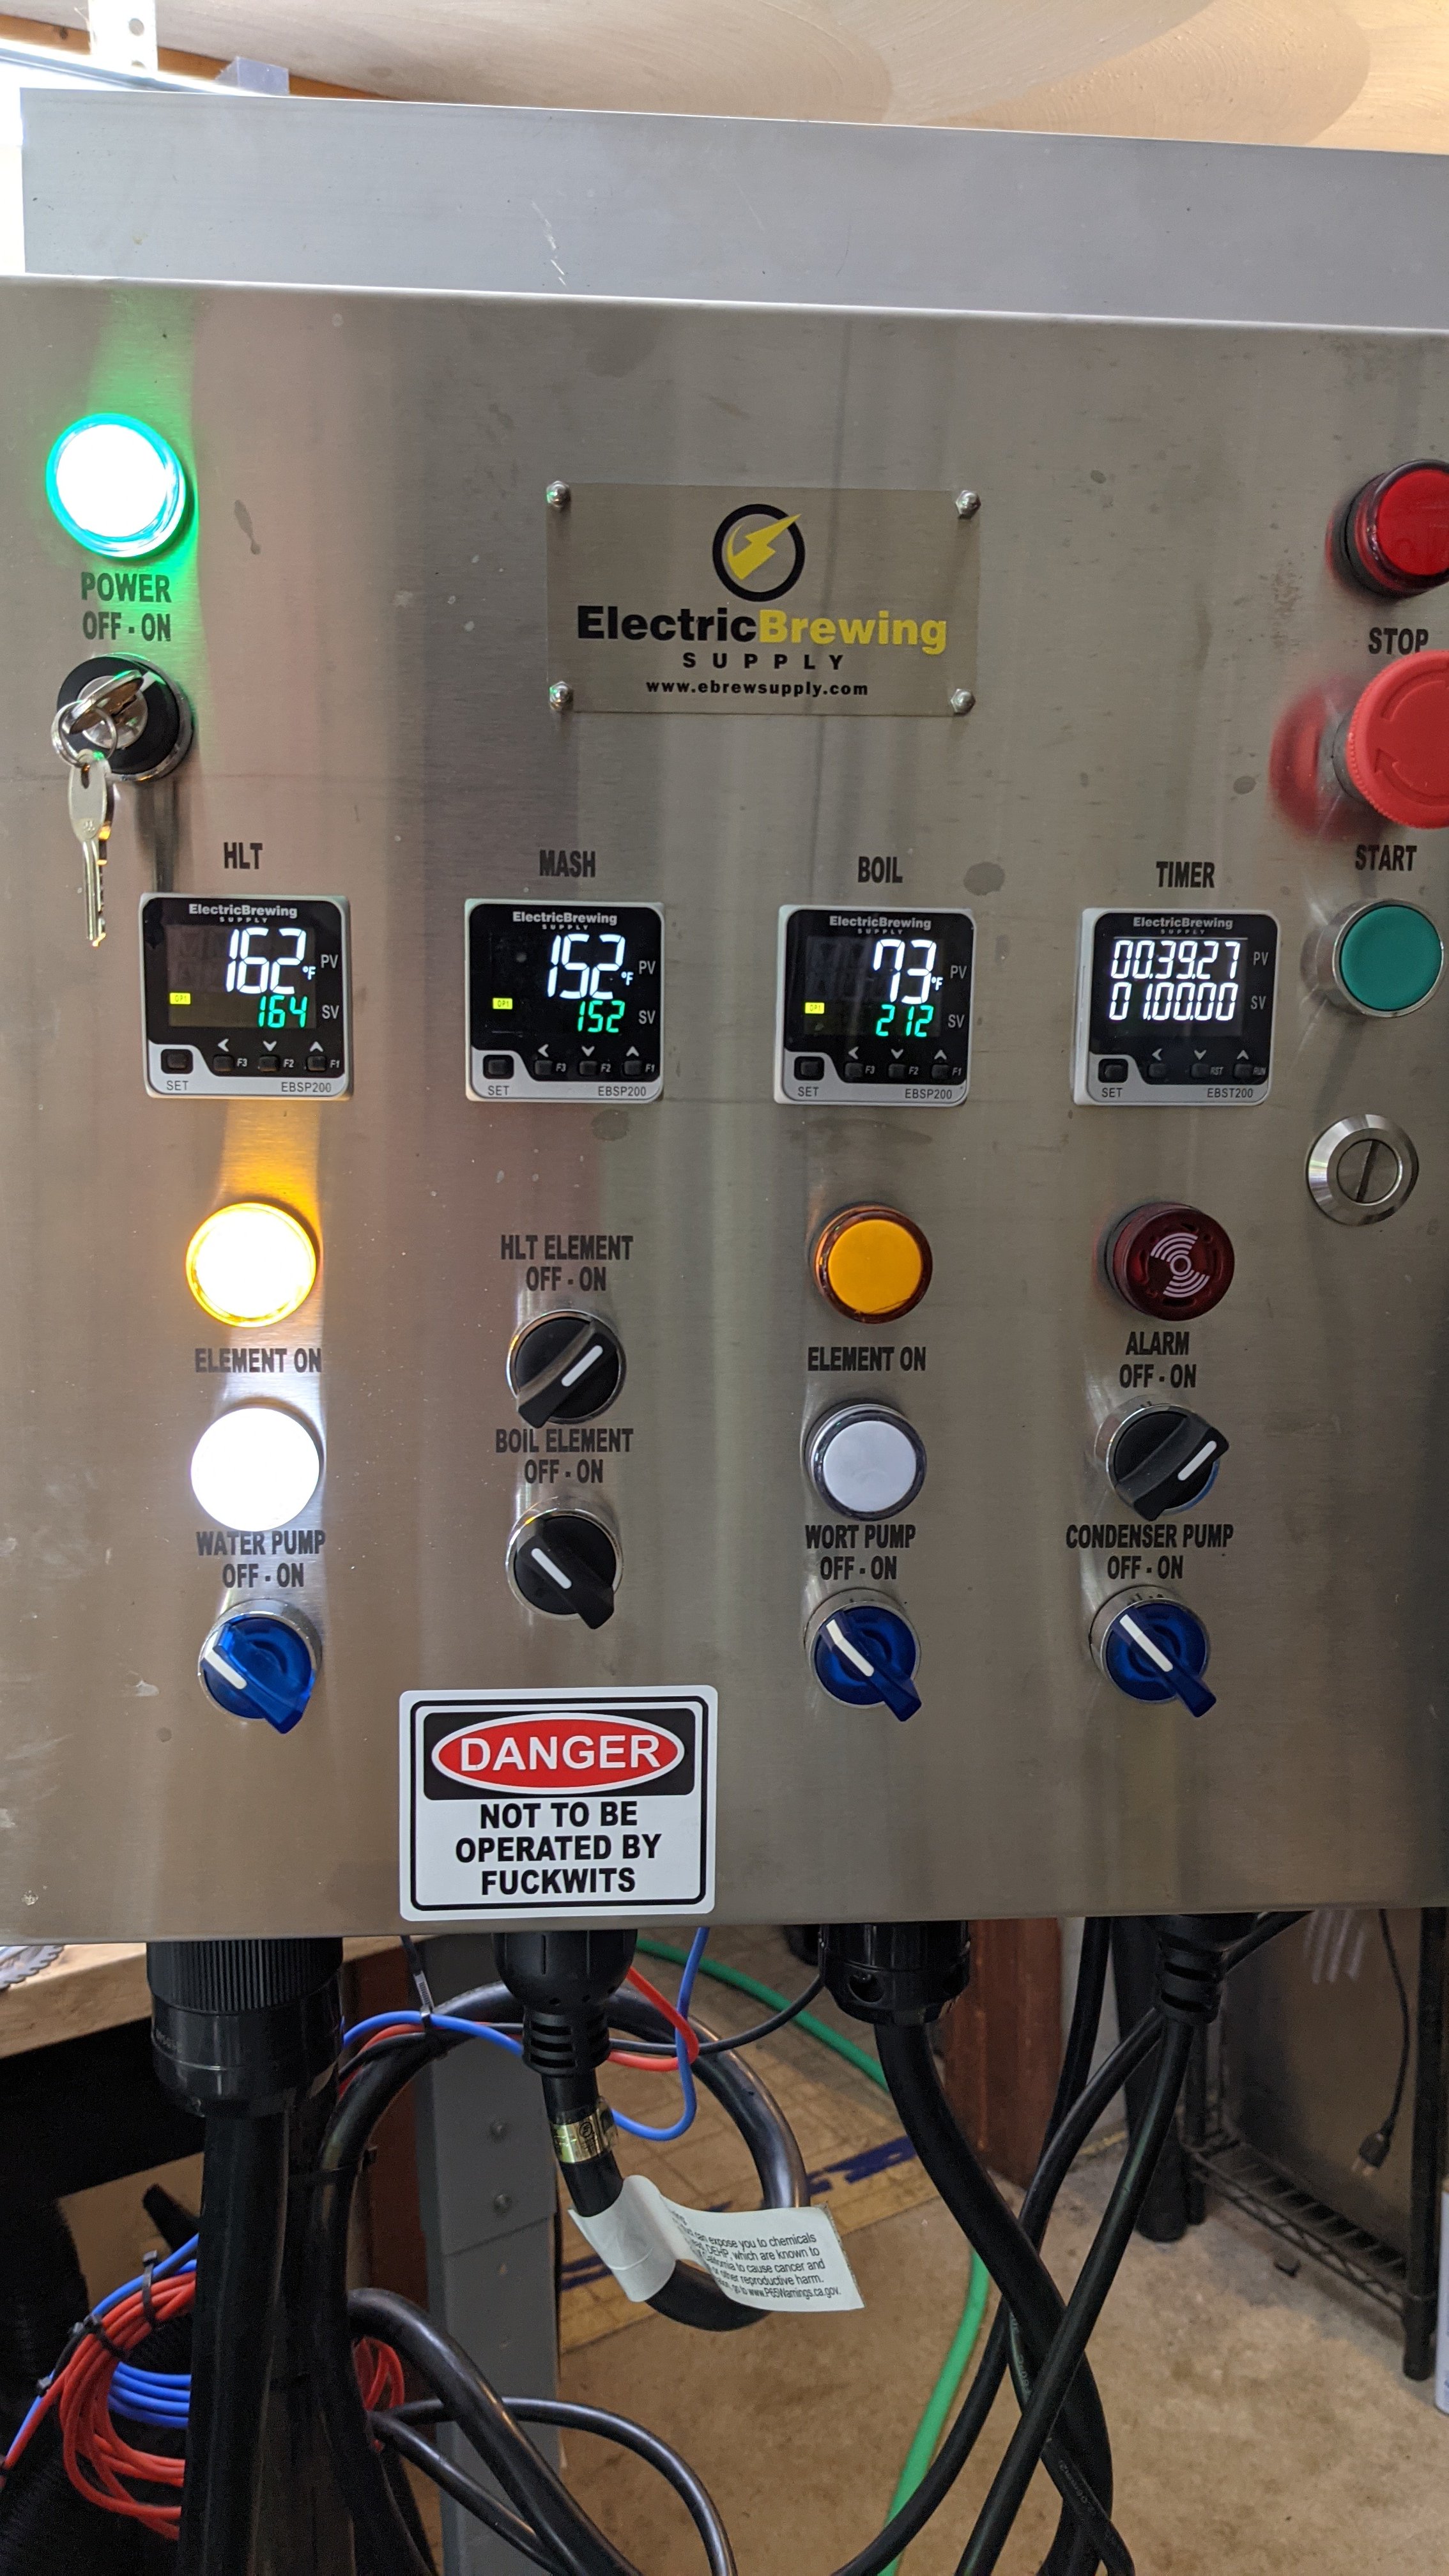
Panel front:
PXL_20210612_184134431.jpg


Panel back:
PXL_20210612_150935080.jpg


I made what the panel is mounted to. Since there wasn't any place that I could wall mount it where I could also easily reach during a brew session. The square tube is 1-1/2" with 3/16" wall. I used 3/4" ID, 1-1/4" OD DOM tube for the pivot (where it mounts to the stand) as well as the rotate point for the panel itself. Used my milling machine to make grooves in the square tube for the 1/4"x3/4" bar stock (cold finished) that makes the VESA 200 pattern.

Before next brew day I might media blast the assembly and paint it. I need to paint where the pumps, wort strainer, and plate chiller mount as well. Since they're unprotected at this time.

BTW, the panel is the latest design from Electric Brewing Supply (50amp/double batching panel). Includes the control for the SCL chill water pump as well.

I hit a higher efficiency than I had factored on in my recipe. Need to get a few more batches done with the setup to determine if this batch is the new norm, or was an oddity.

Also picked up a digital refractometer (brand new, from Amazon) to give a try. Compared with my manual model and it gives the same numbers. Moving forward I plan to use it to see what my pre-boil gravity is.

I was able to maintain the mash temperature with occasional pumping through the HLT HERMS coil. About 10-15 seconds at a time, when the mash dropped below temperature.

Only bad thing that happened today was during cleanup. I had already put the batch into fermenter and was cleaning up the kettles and such. Then we lost power. Pulled the generator out and at least I was able to do enough to get by. Since I am on a well, which has it's own power feed (not on my panel and there's no generator for that) I had to watch how much water I used. Didn't want to deplete the system to the point where things wouldn't work. At least power came back about an hour later.

Connected the glycol chiller lines up to the chill coil in the CF10 after pitching the yeast in. Not sure if I'll check on it tonight or just wait for tomorrow. I DO need to finish cleanup in the morning. Before company comes over for a Brew-n-Q day. Got the brisket on the BGE cooking away and will be putting some short ribs on in the morning. Depending on how things look, I'll either leave the short ribs together, or split them apart so that I can fit them easier. All depends on if the smaller brisket piece is coming off at that point.
 
Also started trading spent grain for eggs with a local person (a few houses down from me). Now I'm not throwing the grain out AND I'm getting fresh eggs to boot. She has chickens and ducks. I requested a couple of duck eggs with the next batch (trade for the grain from today). After tomorrow's breakfast, I'll have two left from the half dozen I got last week. Since these are larger than the eggs I normally buy, I'm only using two instead of three.
 
BBQ was done sooner than I had expected it to be. Which is why I always use temperature probes in things like brisket. Especially when letting them go overnight. Weather was nice here all day on Sunday. Had one of the guys that's not really in our team anymore show up for a little while (about 2-1/2 hours). He brought "cheap beer" which only he had. The rest of us drank what was on tap. I need to brew the chocolate stout again soon since I'm getting low and I need to have more for the next brew-n-Q day (in either August or September). Planning to do two, or three, of these each year moving forward.

My boss's wife has issues with some gluten items. Seems like things that aren't minimally processed give her issues. It's why she can't have commercial beers anymore. My beer gives her zero issues though. Which is another reason she loves them. They both were drinking the chocolate stout through the day. She also had a glass of my English IPA (she didn't remember she had it last brew-n-Q day last year). Which she also really liked. I sent them home with cans of the IPA, stout and cider. The guy that was only here for a little while went home with two cans (each) of the IPA and stout. He did have some of the stout in glass while here.

Planning to drop the yeast from the first CF10 before EOD Wednesday (puts it at two weeks from brewing) and then dry hop it. Plan to give it a couple of days before it gets cold crashed and carbonated. Won't be ready to can it before the weekend is over though. I don't want to drop the yeast too soon.
 
More pictures from today...

Feet more visible:
PXL_20210614_172459122.jpg


Where the arm connects to the stand. Connection assembly (welded to the stand) is made with 3/16"x1-1/2 and 2" bar stock. Pivot point is the same 3/4" ID DOM (1-1/4" thickness) that is the rotation point.
PXL_20210614_172634063.jpg


Two 1/2"x1/2 bar stock pieces make up the gusset in the corner of the arm (where it goes vertical) to add more strength.

Yesterday I also trimmed the shield over the pumps since I didn't install it square/true. I got bit a little when connecting a hose to the right hand pump (water). Now it's at the same point (or as close as I can get it) with the left side.

At some point I plan to secure all the cables connecting things better. Probably after I paint everything again. leaning towards using rattle can truck bed liner for this. That way I won't need to worry about water or anything. Of course, I'll need to remove as many parts as possible. I also know I won't be able to clean up every part of the assembly. It only needs to work for another couple of years. Or until I move and get a stainless table (I'll wall mount the control panel at that time).

Also got the two duck eggs in the dozen (total number of eggs) yesterday. Those suckers are BIG!
 
Did a "test run" on the setup this afternoon. Filled up the MT and HLT with my source water and got them both up to the strike temperature I used for the last batch. Added cold water to the MT to bring it down to mash temperature. Then ran both pumps (ran them both while getting up to strike temp) while playing with the valves at the HLT coil out as well as the MT inlet. Ended up swapping the butterfly valve on the mash tun inlet with a ball valve (also TC connected) that I had ordered the other week. Now I can do a constant recirculation mash and maintain mash temperature. I was within 1F of my mash temp for the entire hour. Once I do either another batch, or test run, I'll notate valve positions in order to make it easier moving forward. At least until I've done enough batches to not need that. Basically, I was feathering the HERMS coil outlet valve between about 1/4 open to almost closed and the MT inlet about the same. This was to maintain a reasonable flow rate in the MT to maintain temperature without going over (or more than 1F over at any time).

Looking forward to seeing what this does for my mash efficiency levels. Since with my previous batch I hit 90% efficiency for the batch. That was for a stout recipe, so I need to see what I get for my pale ale/IPA recipes as well. As long as I have a rating that I can hit time and again (or within a small margin at least) I'll be happy.
 
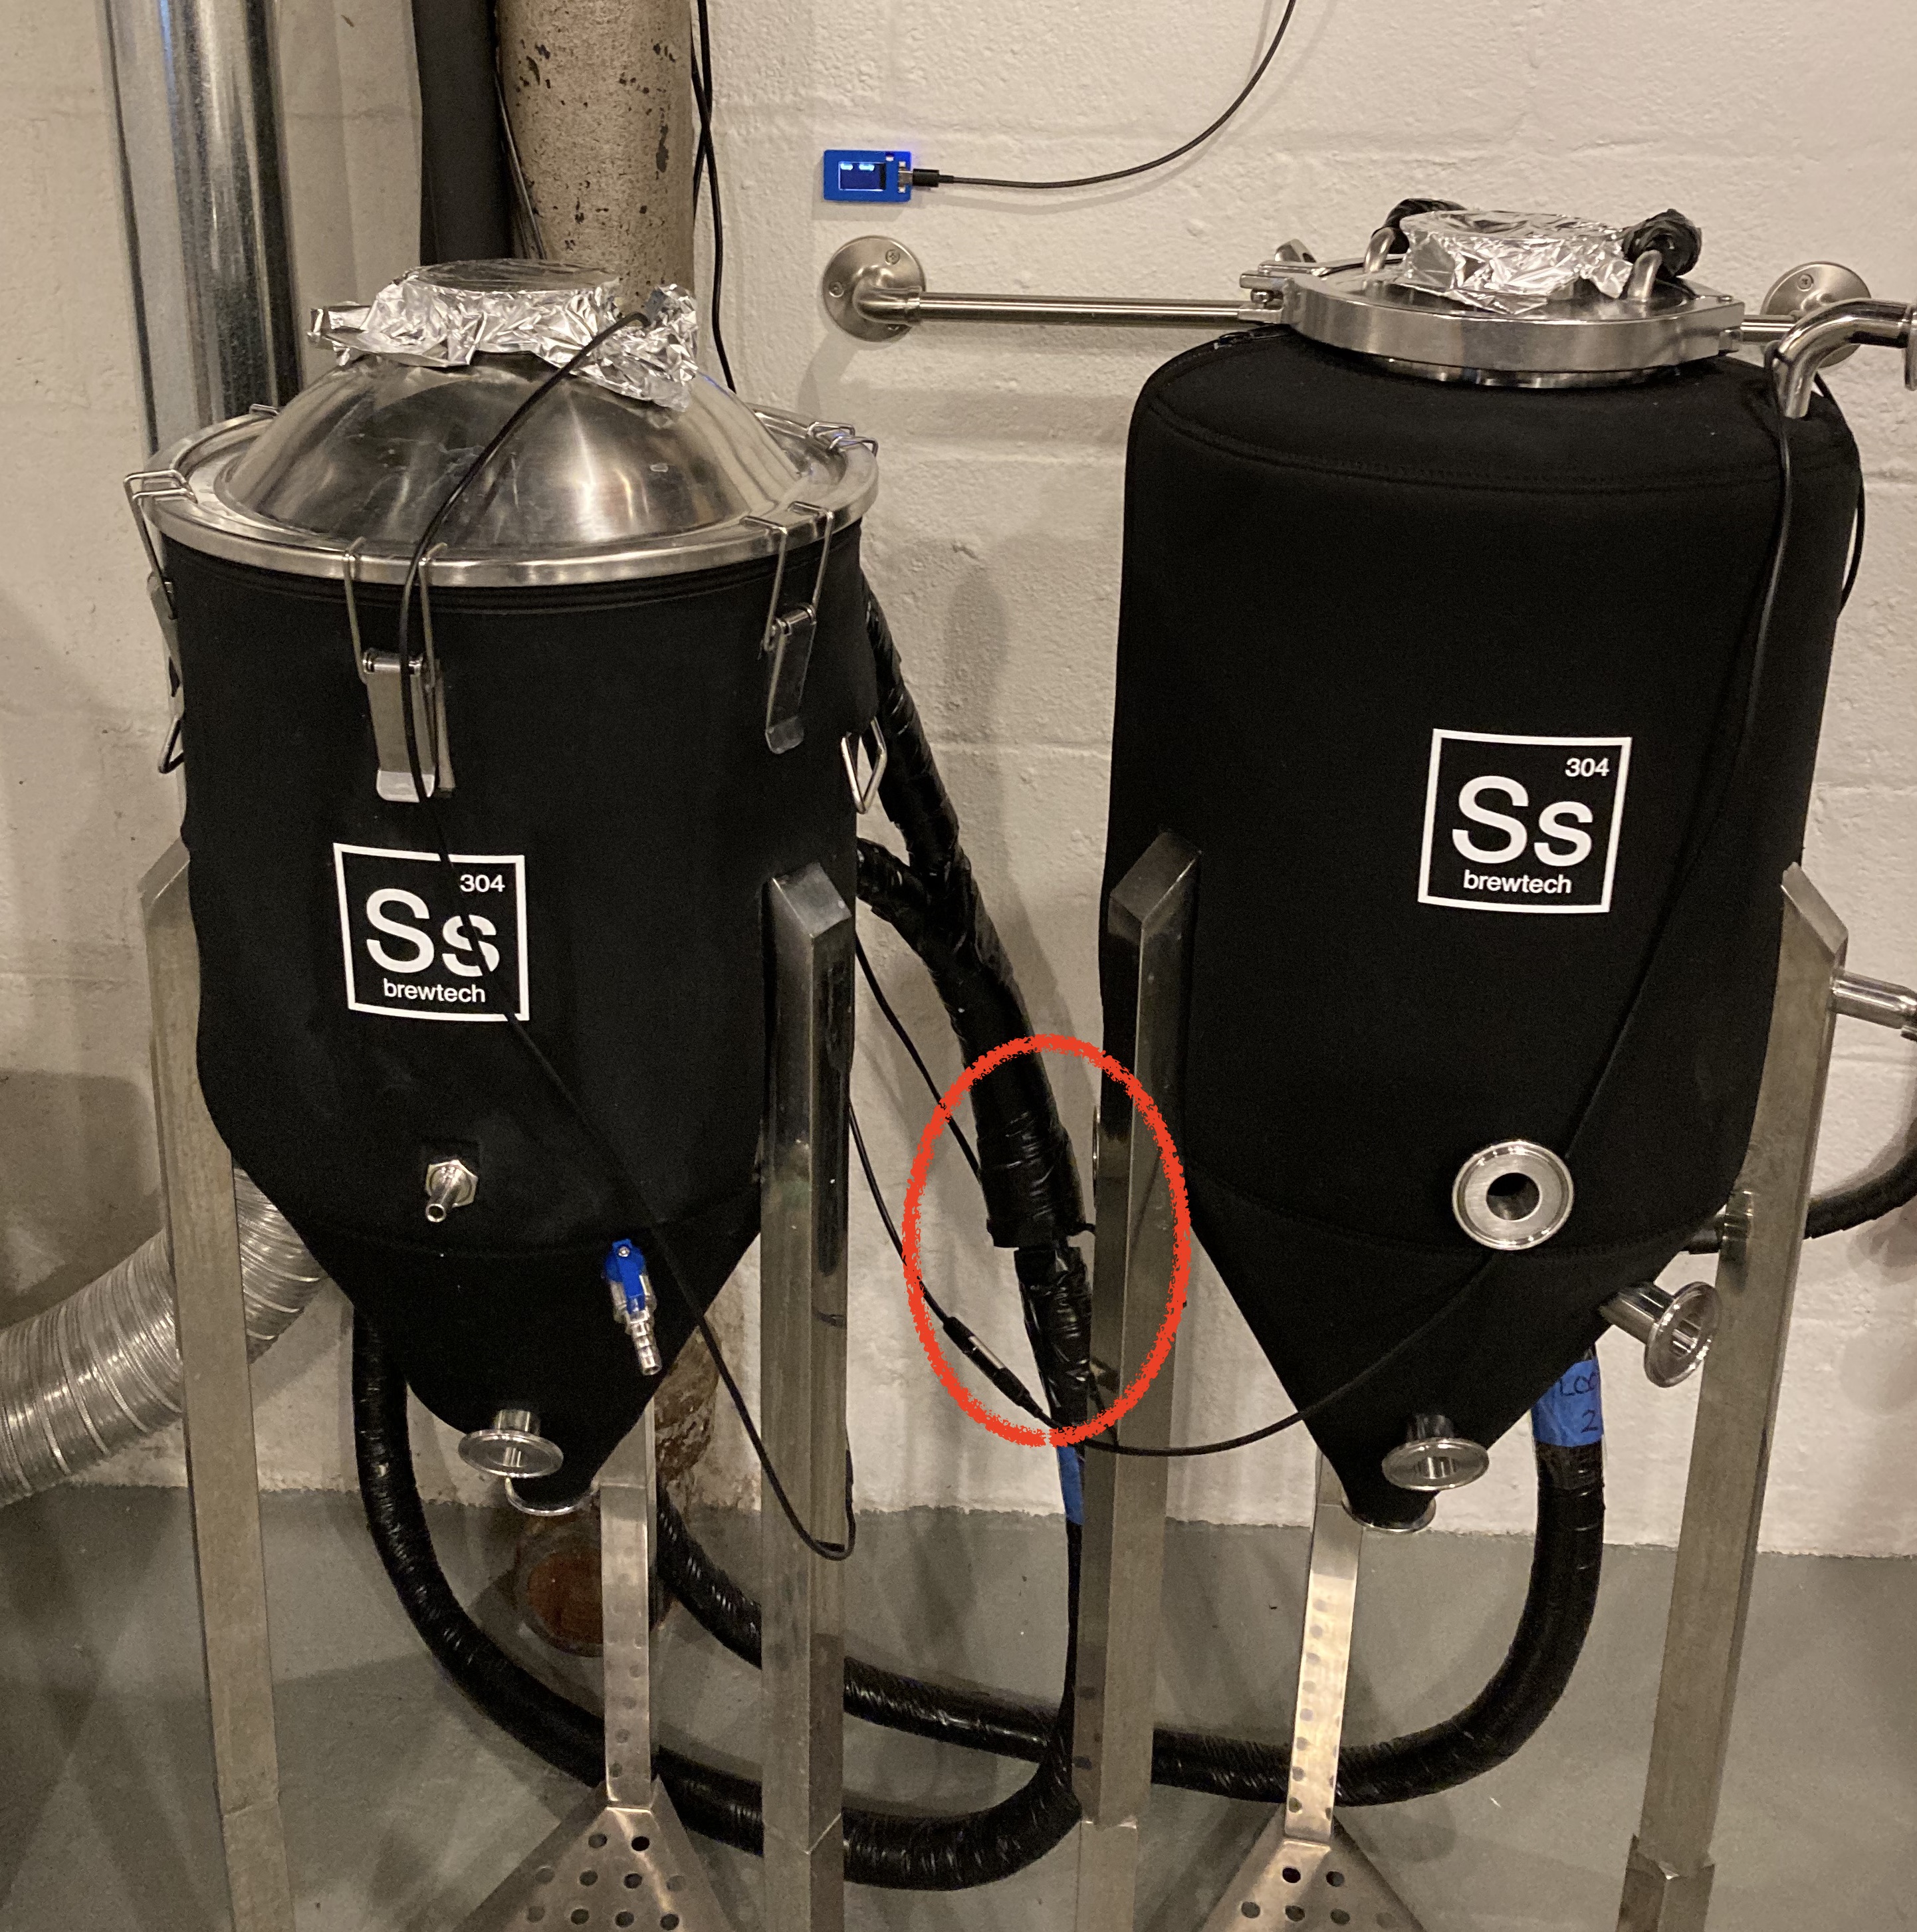
Changed the insulated lines from the glycol chiller to new ones I made up. Basically, went from the 1/8" wall insulation that Spike ships to 1/2" wall insulation. Went with new tubing since it was going to be a PITA to pull the tubing from their insulation. I also added another layer to the ends at the chiller. I have two more pieces like that which I can add to either of the runs. I might get some more of that, if I find the need.

I did this due to the amount of condensation I was getting when I set the chiller to drop a fermenter contents to carbonate temperatures. Hopefully this will either seriously reduce, if not eliminate, the condensation. I also ran the sensor line with the insulation to manage it better.
PXL_20210728_160814312.jpgPXL_20210728_160820955.jpgPXL_20210728_161618317.jpg

I could, also, use the additional layer pieces to hold the lines together without using the zip ties. Which might be of more benefit. I'll see how things work for the coming time I need to chill to carbonate temperatures.

BTW, fermenter in picture has an old ale in it that I brewed on the 17th. I plan to check the SG another time or two before the weekend is done. If it's stable, I'll chill down to yeast harvest temperatures and then add the oak spirals. I'll pull taste samples starting at three weeks to see what I get. I suspect it will be where I want it about then. Which means chill to the final temperature and carbonate. Once that's done, I'll be filling a 2.5 gallon keg and bottle/can the rest.
 
Going to start correcting the PH for the mash with the coming brew. Also got another test kit coming from Ward Labs to see what is in the filtered water I'm using to brew with. Since the old lab results come up as "extremely malty" when plugged into BeerSmith. I'm OK with that state though. Just want to see what's in the water I'm using now.
 
Good idea, I've never managed to get my head around the water correction for a partigyle brew. Only done a couple but not sure you can have any realistic idea of where you start from with a re sparge and or further reiteration.
pH is good to worry about when you check it or aim to correct it and best not to fret about it if you aren't going to correct or act on it!
See no evil hear no evil.
 
I also ran the sensor line with the insulation to manage it better.

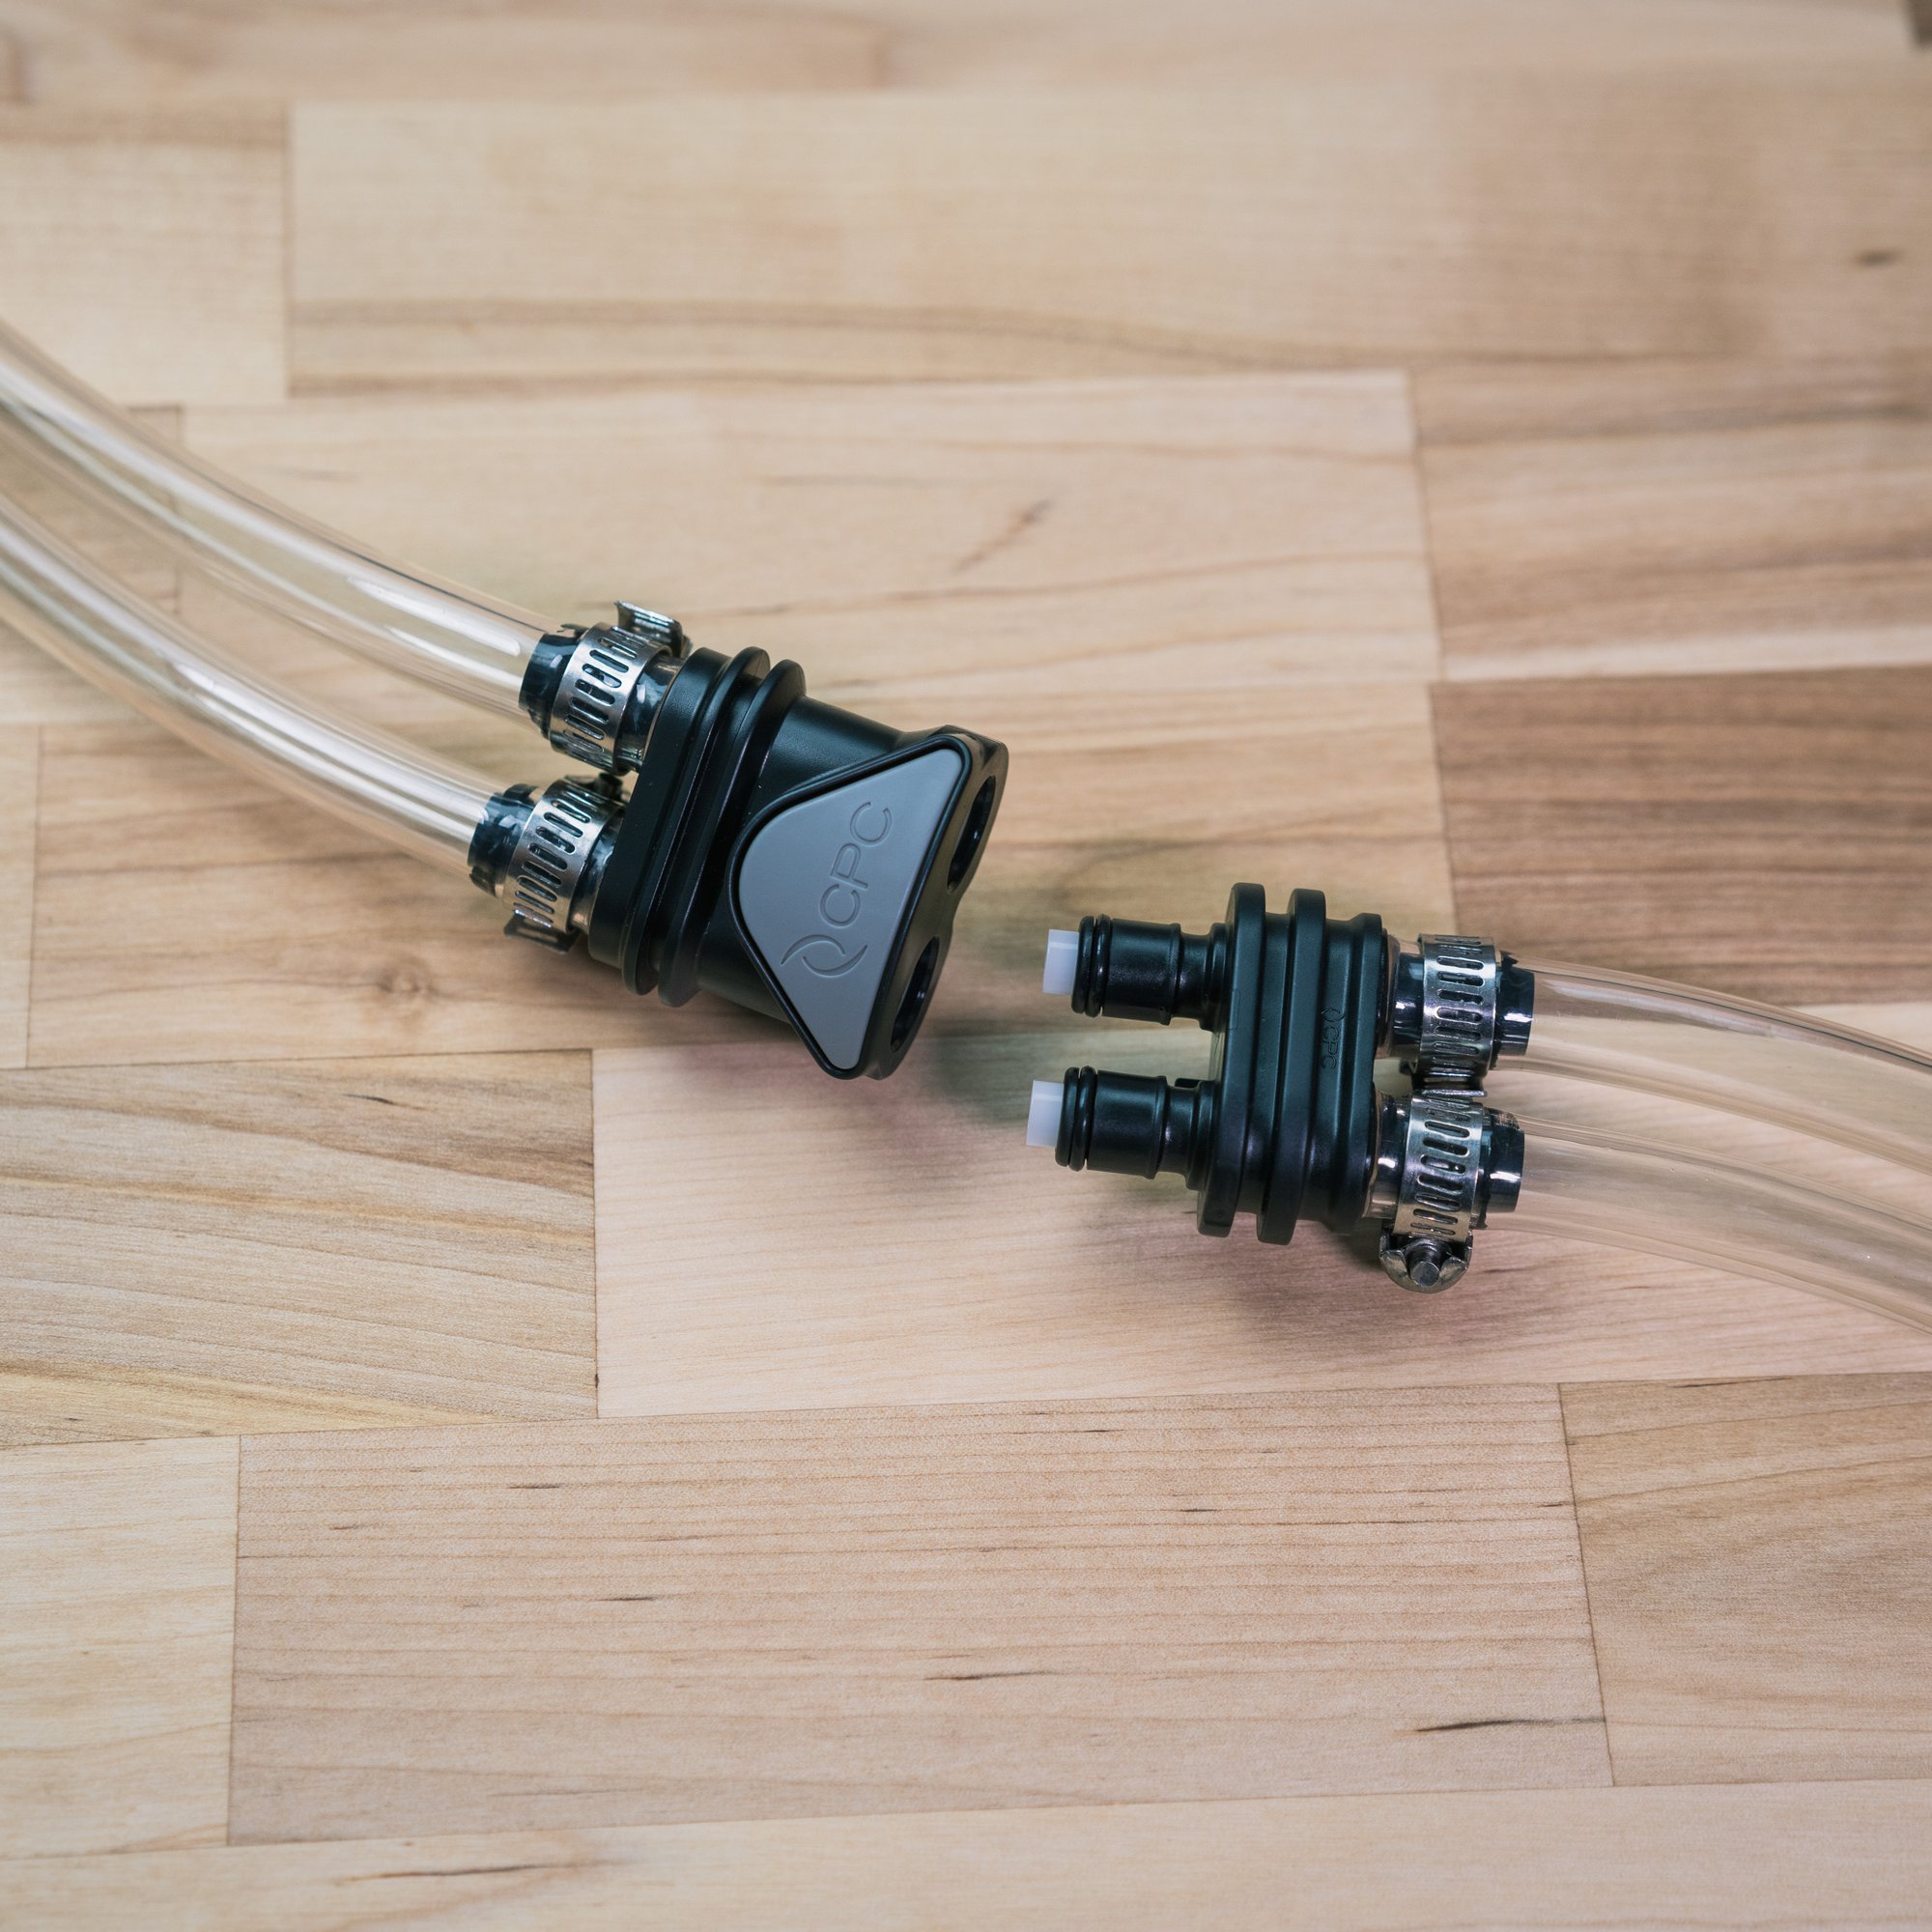
I’d also recommend getting some quick disconnects for your glycol line. That will prevent dripping and is easier than dealing with the push to fit connectors. SS Brewtech sells some that are horribly overpriced, but you can pick up the same thing cheaper if you look around.

1627646777812.jpeg
 
I’d also recommend getting some quick disconnects for your glycol line. That will prevent dripping and is easier than dealing with the push to fit connectors. SS Brewtech sells some that are horribly overpriced, but you can pick up the same thing cheaper if you look around.

View attachment 737314
Zero need for me. My chiller is close enough that the lines could be shorter. The current ~6 foot run is more than enough. I also have zero drips with the PTC fittings at the chill coil and oetiker clamps at the chiller. IME worm clamps SUCK for being leak free. I attempted to use them on the chiller lines when I was setting it up. Nothing but leaks. No matter how much I tried to get them to seal. Since I have a piece of 3/8" OD stainless tubing to bridge the two lines together when not connected, I have zero need to remove the lines when there's no fermenter on that side/feed. I also shut off the side not in use. The bridge is more a case of when I have a power failure (not if) the chiller won't revert to that side being on when power is restored (usually my generator until the grid comes back up).
 
I meant add a QD between the fermenter and the chiller to make it easier to disconnect the glycol line from the fermenter when needed (you can see where I have mine in the image below). I have John Guest fittings or oetiker clamps rather than the worm clamps shown in the SS Brewtech image. I agree that worm clamps are inferior.

This prevents drips when you disconnect the fermenter from the glycol line as those QDs self-seal when you disconnect them. I find that disconnecting a pair of PTCs on the glycol line can lead to glycol on the floor. The QDs eliminate that. Sounds like you're only doing that occasionally, though, use the jumper as a bridge, and have speedier hands than me.

IMG_0016.jpeg
 
It might be based on alien tech, since it strains the wort really well before it goes into my plate chiller. Prevented getting the chiller plugged up.

Just for giggles, conical pron:
View attachment 728935

Probably going to get a second SSBrewTech spunding valve ordered in the next couple of days.

Need to get a couple of the clear plastic paper sleeves so that I can put the recipes in either fermenter into that. Smallest count I've found (so far) is a 10 pack. Need to see if my sister (a teacher) has any 'spare' ones I could snag. Otherwise I'll just place the order.
Why are you choosing the SS BrewTech spunding valve over Spike's spunding valve that is designed for the Spike conical?
 
They don't have a spunding valve. They have a gas manifold with a PRV that is NOT to be used as a spunding valve (says right in the information about it) since it releases at 15psi. IF Spike was to offer an actual spunding valve, I'd consider it for future fermenter purchases.
"Our gas manifold is not designed as a spunding valve/for use during pressure fermentation; don't put this on your fermenter until it has stopped producing CO2. The PRV can clog and cause an extremely dangerous situation."
I have the manifold fitted to both fermenters for both safety AND for when I extract the finished beer. This way it's already in place for if/when I need to add pressure into the fermenter for the move to keg or can. I also use it to do a final CO2 purge post conical fill. Even though I'm doing a closed transfer, I feel better giving it a could of low pressure purge cycles.
For the batch I brewed on Saturday I also did the same gas venting method that I use when filling a corny keg. Basically, gas fitting with a length of tubing into a container of Starsan for it to vent into.
 
Just ordered up the hardware to make a couple of 'manifolds' for the pumps and the HERMS coil inlet. Should have everything by/on Saturday. Needed to get a TC cross fitting for the wort pump outlet since it needs to go on three different paths. Tee fitting for the wort inlet, tee fitting on the water pump outlet and HERMS coil inlet. Also got some 90 degree barb fittings in the order to make shorter tubing lengths.

Just hope I don't run into a weight issue on the pump heads (Chugger stainless TC heads) with what's going onto them. If needed I'll add to the stand and use some mounting pieces to the fittings. Hope I don't need to, but prepared in case I do.

Smallest ID on the fittings is 1/2". TC tee, and cross, are all 1" pipe sized.
 
Will be posting pictures in the next couple of days of the manifold setup I'm putting together to go between the pumps and kettles. Just waiting for the order of tee fittings (Amazon) and then the barbs and such (Brewers Hardware) to arrive. The tees are due Saturday, with the order from BH coming either tomorrow or Saturday (USPS, so it's anyone's guess).

I'm going with a tee fitting on the HLT coil inlet, and water pump outlet. The wort pump gets a tee on the inlet and a cross (arrived today) on the outlet (since the wort out has three potential paths). I already have the pull handle butterfly valves installed. I'll be trimming the current tubing I'm using where able. Pretty much every run will be shorter once this is setup. I plan to do a simple water test to make sure the flow rate still works. If the pump inlets are getting starved, I'll upgrade the hoses (and barbs) feeding them to 3/4" ID tubing. I don't think that will be needed, but I'm ready just in case (just means it will be finished next weekend, not this one).

Hopefully this will make things not only easier on brew day, but keep the outside of the pump heads and valves cleaner (no more spilled wort).
 
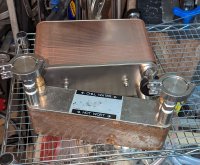
Just pulled the trigger on a new plate chiller to replace the one from Duda Diesel. The main reason I'm doing this is to get the TC native connections. Side bonus is more than double the cooling surface area. Old chiller was in the 9-10 square foot range (no slouch). New is 25 square feet of surface area.
chiller1.jpg


I'll make the item to mount it to the brew stand once it arrives. I'll also take a current picture of the manifold system on the pumps next time I go into the garage (or on the coming brew day). New chiller will be for the following batch.

Looking forward to seeing how fast the new chiller cools the hot wort down. I suspect I won't need to reduce the flow rate all that much with this one, and my current batch sizes. Plus I'll be ready for the next size increase (or at least a few of them) for the system.
 
New chiller in a picture with the old one (new one is much larger ;)):
PXL_20220115_231217446.jpg
Need to make the mounting assembly for the new plate chiller before I can use it. It will go in the same are the old one did on the brew stand. The steel arrived earlier today for that project. Nothing too complicated, just need to put mounting holes in one length of steel, slots for the mounting studs to go into, and then weld it all up. Of course, I expect to need to relocate the wort strainer to make room. But that's not really an issue. Especially since I'd been thinking about doing that anyway.

Also have a new Monster Mill coming up from GA. Ordered the MM-3ProG KEY version. Should mate up 100% with the motor I have (also from Monster) to run it. ETA is Thursday right now (1/20/22).
 
Last edited:
Back
Top