Fermzilla Questions

Homebrew Talk - Beer, Wine, Mead, & Cider Brewing Discussion Forum

Help Support Homebrew Talk - Beer, Wine, Mead, & Cider Brewing Discussion Forum:

This site may earn a commission from merchant affiliate links, including eBay, Amazon, and others.

MrBJones

Well-Known Member
Joined
Jun 11, 2016
Messages
541
Reaction score
81
Location
Dallas
Some questions based on what I've read here and elsewhere about All Rounders.
  1. There's some mention of Fermzilla breaking down over time (or with use). Have you or someone you know experienced that? If so, what was the life expectancy?
  2. Any issues with pressure leaks from the lid, bulkheads, etc?
  3. How is temperature control when using a thermowell and a controller, in a freezer?
  4. In a freezer, with a controller, can the temperature sensor be attached to the outside of the vessel (like with a carboy)?
  5. Any difficulty with attaching things to the lid?
  6. How difficult are pressure transfers?
  7. Is carbonating and serving from the Fermzilla practical?
Thanks
 
I had some stripped threads just a few weeks ago. $10 replacement part fixed it.

the key is really to use some kind of lube on a the gaskets, then it comes apart easy and seals.

I routinely use pressurized ferments, and never had a problem with it losing pressure.

I was really frustrated with pressure transfers until I bought a stainless nut and used it to weigh down the float draw tube. 1000% difference.
 
pretty easy if you’re using keg lube. The first several times it takes some practice. One of the threads goes in reverse direction.

sorry, I just saw you were asking about all rounders.most of what I said applies to the 27L with the harvest container at the bottom. I do have both, the all rounder is rock solid. I would have no qualms about recommending it for the price point. Just buy that stainless nut.
 
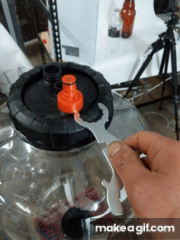
Easy to take apart????????????? What do you use to get the top off. So far for me it's a pot trimmer screw driver( really small) and a butter knife.
 
Easy to take apart????????????? What do you use to get the top off. So far for me it's a pot trimmer screw driver( really small) and a butter knife.

I rotate the collar up by one to two turns, and use a flat screwdriver. Seems to work pretty well. The red plastic ball lock valves they sell, don't last to begin with. I've upgraded to the stainless ones.
 
Easy to take apart????????????? What do you use to get the top off. So far for me it's a pot trimmer screw driver( really small) and a butter knife.
A strap wrench makes easy work of the screw on lid portion if it's stuck. If the lid gets stuck on the fermenter, I just run it under warm water for 10 seconds or so and it pops off pretty easy. Keg lube around the O-ring helps too.
 
I have the all rounder. I like it quite a bit for a few reasons - very easy closed transfers, floating dip tube for clean beer into keg and i pressurize about half my ferments (majority of time I use pressure is very end of fermentation to get a jump on carbonation). I find it does a good job of temperature with the thermowell but the thermowell is a bit of a pain to keep secured and leak free. I have stripped at least one Duotight fitting due to difficulty to install the nut.

I do find it a bit of a pain to get sealed and apart. A strap wrench is a must to me. Getting the lid off can be tricky and I have never tried to pry it off for fear of damaging the plastic.

I don’t know about longevity. Currently at about 6 months regular use with the plastic pressure kit and no issues so far.
Overall it is my go to fermenter. Would be nice to have a better closed/dry hopping method and ability to dump trub (I have the all rounder) but for the price I think it’s a great value.
 
I have two All Rounders and a Fermzilla. I routinely spund to 20 PSI and I haven't had any problems with leaks or stress on the plastic. I've always used a bit of keg lube on every gasket but I've never tried without so I can't say that the lube is necessary.

Pressurized transfers are a piece of cake with the pressure kit. My most important lesson learned is to have the CO2 tank continuously topping up the pressure inside the All Rounder during the transfer so it doesn't drop as liquid leaves. If the pressure drops inside the All Rounder, CO2 bubbles will come out of solution underneath the trub layer and lift yeast, trub, and hop particles into solution and you are no longer able to transfer clear beer. The simplest way to do this is to turn the regulator all the way down, connect the CO2 line to the All Rounder, and then slowly turn up the regulator just until you hear it start to transfer a bit of CO2. Then keep it at this level until the transfer is finished.

When cleaning., the lid can take some effort to remove. First of all, a strap wrench is necessary. If you have a little pressure in the All Rounder when you start unscrewing the collar, you will notice the the pressure is pushing the lid out against the collar as the collar rises. At some point well before the collar is released from the threads, let the rest of the pressure out and take off the collar. It may be trivial to remove the lid at this point. As with anything around pressure, you need to be thinking two or three times about what you are about to do before proceeding. Ask me how I know! I have a nasty gouge in my ceiling to prove it which is way luckier than a gouge in my face.

Or take the safer route as shown in a kegland video: lever a screwdriver between the top of the collar and bottom of one of the carbonation caps.
 
The all-rounders come with a 2-year expiration date printed on them for pressurization (it's printed in small print right on the side). -Will they keep working longer? Who knows (my guess is yes), but for the price, they are really solid, near-great fermenters even if they only last 2 years.

Another interesting facet of the all rounder is that if strapped to the base - they can float in a tub of water (which can allow for good/easy temp control for those not using temp chambers).

I’m guessing those expirations are for liability reasons.
 
I wonder how much $ it would have added to have TC fittings instead of screw threads molded in the plastic. Ya know once the die is made it's made! I'll never buy another one and wish I'd got a stainless TC enabled one!
 
I saw this on MoreBeer's product page for the All Rounder and have used this every time. I have the plastic fittings, and I would be nervous putting stainless fittings onto nylon threads. Too easy to mess up the threads on your lid if you accidentally cross thread, hardness mismatch seems like it will wear down threads sooner with repeated cycles, and lastly temperature coefficient differences between stainless & nylon would make you more prone to leaks.

1630549148972.png


As for dry hopping, I read on Kegland's website (of course they would recommend this....) you can buy a second All Rounder. Put your dry hops in the second one, use fermentation off-gas CO2 to purge air out of it. When ready to dry hop, do closed transfer from first All Rounder into the Second. This of course makes the whole set-up more expensive.

And lastly, the date on the side of fermentor ball is not an "expiration date", but a "re-certification date". On the Kegland.au website they have directions for how to do this by filling with water, then pushing in water from a keg filled with water. Link below. Gives you 2 more years until have to re-test again.

https://www.kegland.com.au/media/pdf/FermZilla Hydro Test Instruction Manual.pdf
 
I saw this on MoreBeer's product page for the All Rounder and have used this every time. I have the plastic fittings, and I would be nervous putting stainless fittings onto nylon threads. Too easy to mess up the threads on your lid if you accidentally cross thread, hardness mismatch seems like it will wear down threads sooner with repeated cycles, and lastly temperature coefficient differences between stainless & nylon would make you more prone to leaks.

View attachment 741078

As for dry hopping, I read on Kegland's website (of course they would recommend this....) you can buy a second All Rounder. Put your dry hops in the second one, use fermentation off-gas CO2 to purge air out of it. When ready to dry hop, do closed transfer from first All Rounder into the Second. This of course makes the whole set-up more expensive.

And lastly, the date on the side of fermentor ball is not an "expiration date", but a "re-certification date". On the Kegland.au website they have directions for how to do this by filling with water, then pushing in water from a keg filled with water. Link below. Gives you 2 more years until have to re-test again.

https://www.kegland.com.au/media/pdf/FermZilla Hydro Test Instruction Manual.pdf

Thank you! That is all very useful info. I was actually looking for excuse to get a second all-rounder, and that may be it.

For what it's worth, I have a set of plastic and metal posts, and I prefer the plastic. The metal ones don't seal as easily, throw off the weight/balance a bit, and are harder to connect & disconnect.

I have a set of the plastic ones where the grip on top for unscrewing has become rounded. SS doesn’t do that.
 
I have a set of the plastic ones where the grip on top for unscrewing has become rounded. SS doesn’t do that.

I started to strip one of plastic posts as well using an adjustable wrench on it. The solution was to wrap a paper towel around the post first to serve as a buffer and increase grip/friction.
 
I've never struggled but I've wished for TC's on the top &bottom every time I've unscrewed them. It would've been simpler than the threads, o-rings, collar and strap wrench... and maybe not much more expensive? A 5" cast clamp on alibaba is ~ $10 US & 6.5" about $15.
 
I am still using the 7 gallon (or thereabouts) FermZilla with the valve and collection jar at the bottom. It's my second FermZilla, a warranty replacement after the complex bottom valve threading system on the first became hopelessly stuck, too loose to use and unable to be tightened. I figure it's only a matter of time before my second meets the same fate. Even someone at KegLand confided in me that a number of them feel the FermZilla is an example of "too many moving parts" for its own good. He said they're all using the All Rounder now for this reason, I when my FermZilla stops working, I think I'll be headed there also.

I typically add a dry hop addition (7-10 oz of pellets usually) on day 3 of primary fermentation. I used to do this through the collection jar at the bottom, being careful to purge it thoroughly before opening the valve, but a couple of batches ago, all of the pellets got "stuck" in the jar as soon as the beer flowed in when I opened the valve. Since then, I dry hop through the lid, then rely on the fermentation's CO2 production to push any O2 out over the next few days. Usually, I like to get the dry hop residue out using the collection jar after three days. With the All Rounder, though, I would not be able to do this. If you're dry hopping with an All Rounder, are you waiting until later in fermentation or just letting your beer sit on the hop residue and trub until transferring to keg (and if so, any hop burn or other taste issues?)?
 
I started with a Fermzilla and then bought two All Rounders and ultimately ended up using the All Rounders most of the time.

I too once found my dry hops stuck in the collection jar and had to cradle the Fermzilla in my arms sideways and shake it back and forth to wash them out of the jar. Wasn't something I wanted to repeat often, especially at 15 PSI!

My process is a bit different than yours but still answers part of your question: After fermentation is complete I crash to drop yeast and then do a pressurized transfer from one All Rounder to the other, leaving behind the yeast and trub. Of course this requires another purged and sanitized All Rounder which is a hassle. I then dry hop in the second All Rounder and which I regularly agitate for two days. After two days I chill and wait a couple of days for any tiny hop particles to settle before I transfer to a keg.

As far as hop burn goes, those final two days of settling are designed to reduce hop burn by letting the hop "dust" settle out which I believe outweighs any issues of sitting on the hops during that time (especially given there is low contact area with those hops stuck at the bottom of the vessel). Further, the dry hop is added at 58F which is said to reduce hop burn.

My biggest worry about sitting on the hops for the extra couple of days would be any grassy or off flavors coming off the hops which is mitigated by the mid-40s temperature, the lack of agitation, and the low contact area of the settled hops. In any event, I have had no complaints about any off flavors coming from the hops during that time.
 
Not to hijack the thread but I was wondering if someone can measure the outside diameter of the Fermzilla opening with the lid off? I’m assuming it is right at 5” but wanted to make sure. I’m building a CIP stand that I want to accommodate for the Fermzilla when I’m able to buy a couple after the pressure kits are back in stock.
 
Assuming you mean the opening at the top of the clear PET vessel, the outside diameter including the threads is 5.38 inches.
 
Has anybody else using the Fermzilla and doing closed transfers had trouble with the floating dip tup not staying submerged in the beer? In attempting a closed transfer just now, the dip tube has repeatedly stopped drawing beer and started drawing gas (presumably CO2). After transferring about 3 gallons, I finally abandoned the closed part, released the pressure (unsettling all of the trub, of course), and opened up the lid. I took the dip tube, float, and filter out, cleaned them up and sanitized them, then added a stainless steel shackle (also sanitized) to try and get the damn filter to stay immersed. I put the whole set up back in, closed the lid, hooked up the CO2 line, and purged thoroughly, leaving the beer under about 4 psi. Now I am waiting for the trub to settle back down so I can transfer the rest.

Has anybody else had this sort of trouble with that floating dip tube? Any suggestions would be welcome.

have not had this issue but I do not use the filter. I believe some of these have 3 mount points and will change the angle and depth of the intake for beer.The furthest one to the end I believe gives the most depth. Maybe check that out?
 
Thanks. Yes, I have used the filter for about 5-6 batches now, and I've experimented with all three of the points where you can attach the float. I've had occasional issues with all three. I've read that some people have slipped a sanitized 7/16" SS nut onto the tube where it attaches to the filter and also where the beer is drawn in, apparently it's a snug enough fit that it stays put and keeps the intake submerged, but still near the surface. For now, I hope the shackle I attached will enable me to get that last two gallons moved into the keg. I'll try the 7/16" nut next time around.
 
I experimted with a lot of different things with floating ball dip tubes in kegs. Never went the stainless washer/but direction but that seems like it would work.

Things I found:
1. Thin wall silicone tubing (1 mm wall thickness) is more flexible, less likely to get jammed up against the side. I bought it from Amazon.

2. Make sure the tubing isn't too long. The standard tubing length is for the big FermZilla. You need to cut it so it hangs down and makes an 'L' shape when it hits trub, not a 'J' shape. If too long, the tube will hit trub first and prop up the end of your tube to stick out.

3. In keg, sometimes ball would stick to the side. I could unstick it by briefly disconnecting the reconnecting ball lock, as this would jar the tubing from the sudden flow stoppage and get things to reposition. Better than shaking the keg and disturbing the sediment.

4. But best solution was when I changed over to FLOTit 2.0. Instead of a ball and loop arrangement, it uses a float with an offset hole in it. This does an awesome job of keeping the tube opening under liquid level. Combined with his double filter screen, you can get super low without leaving anything but a puddle of beer on the trub.
 
Has anybody else using the Fermzilla and doing closed transfers had trouble with the floating dip tup not staying submerged in the beer? In attempting a closed transfer just now, the dip tube has repeatedly stopped drawing beer and started drawing gas (presumably CO2). After transferring about 3 gallons, I finally abandoned the closed part, released the pressure (unsettling all of the trub, of course), and opened up the lid. I took the dip tube, float, and filter out, cleaned them up and sanitized them, then added a stainless steel shackle (also sanitized) to try and get the damn filter to stay immersed. I put the whole set up back in, closed the lid, hooked up the CO2 line, and purged thoroughly, leaving the beer under about 4 psi. Now I am waiting for the trub to settle back down so I can transfer the rest.

Has anybody else had this sort of trouble with that floating dip tube? Any suggestions would be welcome.

my floating dip tube would never stay submerged. I almost gave up on it until I tried the stainless nut. That worked the charm!
 
I experimted with a lot of different things with floating ball dip tubes in kegs. Never went the stainless washer/but direction but that seems like it would work.

Things I found:
1. Thin wall silicone tubing (1 mm wall thickness) is more flexible, less likely to get jammed up against the side. I bought it from Amazon.

2. Make sure the tubing isn't too long. The standard tubing length is for the big FermZilla. You need to cut it so it hangs down and makes an 'L' shape when it hits trub, not a 'J' shape. If too long, the tube will hit trub first and prop up the end of your tube to stick out.

3. In keg, sometimes ball would stick to the side. I could unstick it by briefly disconnecting the reconnecting ball lock, as this would jar the tubing from the sudden flow stoppage and get things to reposition. Better than shaking the keg and disturbing the sediment.

4. But best solution was when I changed over to FLOTit 2.0. Instead of a ball and loop arrangement, it uses a float with an offset hole in it. This does an awesome job of keeping the tube opening under liquid level. Combined with his double filter screen, you can get super low without leaving anything but a puddle of beer on the trub.
Thanks, BeerSnobby, for the suggestions. I took a look at the FLOTit 2.0, and it looks pretty good. While the photos all seem to show it being used in a keg, I'm guessing it would work well in the FermZilla also. Are you using it in a FermZilla?
 
Has anybody else using the Fermzilla and doing closed transfers had trouble with the floating dip tube not staying submerged in the beer? In attempting a closed transfer just now, the dip tube has repeatedly stopped drawing beer and started drawing gas (presumably CO2). After transferring about 3 gallons, I finally abandoned the closed part, released the pressure (unsettling all of the trub, of course), and opened up the lid. I took the dip tube, float, and filter out, cleaned them up and sanitized them, then added a stainless steel shackle (also sanitized) to try and get the damn filter to stay immersed. I put the whole set up back in, closed the lid, hooked up the CO2 line, and purged thoroughly, leaving the beer under about 4 psi. Now I am waiting for the trub to settle back down so I can transfer the rest.

Has anybody else had this sort of trouble with that floating dip tube? Any suggestions would be welcome.
What I started doing for all of my floating dip tubes, whether for kegs or fermenters is: I ordered very good quality stainless steel spiral key rings about an inch diameter and a pack of stainless steel nuts. The nut is looped on the Ring and added to the end of the dip tube looped on the spiral ring that exists. The gives enough weight to keep the tube end under the liquid surface. Of course full sanitation of all items.
 
Thanks, BeerSnobby, for the suggestions. I took a look at the FLOTit 2.0, and it looks pretty good. While the photos all seem to show it being used in a keg, I'm guessing it would work well in the FermZilla also. Are you using it in a FermZilla?

Yes, I am. I cold crash in the FermZilla at end of fermentation, so it makes a good yeast cake at the bottom. You can see from the picture that there's a tiny little pool of beer left on top of the yeast cake.
IMG_20210910_164406513.jpg
 
I really love floating dip tubes but I’ve had this problem as well. My solution is to attach a magnetic stir bar to the end of my tube. Then I hold a neodymium magnet outside the Fermzilla and “steer” the end of the tube to a position right above the yeast bed. This technique has allowed me to leave very little clear beer in the Fermzilla.

I’ve also used this to solve a related problem: when the end of the tube is too far below the surface and starts picking up yeast while clear beer is still in the Fermzilla.

It seems to me that it’s safe for a Teflon coated stir bar to be in prolonged contact with my beer. I’ve used various ways to attach the stir bar to the tubing but they have always involved a plastic tie-wrap snug around the stir bar.
 
I went to get equipment ready for brew day tomorrow and had an unwelcome surprise - mildew build up on one the plastic fermzilla keg posts. (I think a bit of orange peel got jammed in there during my last brew - a wit).

I luckily have a back up set of keg posts (using the orange one from the line cleaning kit). So brew day is still on without need for the mildew post.

But any tips for cleaning the mildewy plastic post? The mildew build up was visible on the bottom tip, but I could see it up in the tube as well. I flushed it with a line cleaning kit using OneStep. Then soaked in hot water with unscented dish soap. I then plan to soak it in hot water with OneStep (which allegedly does not degrade plastic). Any other suggestions? Should I just pitch and buy nee ones?

Thanks
 
Back
Top