• Please visit and share your knowledge at our sister communities:
  • If you have not, please join our official Homebrewing Facebook Group!

    Homebrewing Facebook Group

Fermentation Chamber w/ Refrigeration

Homebrew Talk

Help Support Homebrew Talk:

This site may earn a commission from merchant affiliate links, including eBay, Amazon, and others.
ScubaSteve said:
Yeah, my freezer is a small model, but it's pretty much jacketed in steel. I'll take a look at all the hardware and see if I can get the guts out without having to use a cutoff tool.:D

Just curious. Why would you want to destroy a perfectly good freezer?

You might want to consider using corny kegs as secondaries and for lagering instead.

Just a thought.:mug:
 
MrFebtober said:
Here's how i connected my controller:
82891196.rUTm6xBr.IMG_9207labels.jpg


I think you forgot something!

John
 
I just wanted to add, those of you that are concerned about using the "guts" from a tiny fridge to cool a much larger space, consider the following:

The small fridge is designed to keep things cold despite being opened and closed several times a day, and having warm food and drinks shoved in there periodically as well. If you only open the fermentation chamber maybe once or twice a day, and it is well-insulated, everything should be just fine. :ban:
 
abracadabra said:
Just curious. Why would you want to destroy a perfectly good freezer?

You might want to consider using corny kegs as secondaries and for lagering instead.

Just a thought.:mug:

It's a pretty small freezer. The bottom is about half compressor hump and the other half is probably big enough to keep 2 cornies. I have a larger chest freezer, but use this one to keep beer and soda. I could probably age kegs in there....I'm more concerned with having a separate place to primary so I don't have to raise my kegerator temp to ferment. This causes all my other beers to age too quickly.
 
Thomcat, excellent work. This is an idea I have thought about and it's great to see how it's done. If you could post some follow up information and a cost break-down on the DIY forum when you are done, I'm sure it would benefit alot of us.
 
By the looks of that white freezer section it looks like you would be able to S-L-O-W-L-Y press that out flat which would give you more room in the compartment.

With wooden strips you could form a slot to slide it in to...just a thought. :D
 
08/04/07 - Quick update:

I had a chance to get the last of the inner panels on as well as the compressor. It's mounted up and ready for electrical work. Good times.

The rear:
10254-Compressor1.JPG


And the freezer section on the inside:
10254-Compressor2.JPG


:mug:

- andy
 
thomcat333, that's some good looking work. I have been thinking about doing something similar only using peltier devices. Anyone here tried using them? I've got 2 12VDC thermoelectric coolers preassembled with sinks attached to both sides, 4 120mm dc fans and a 12VDC/5A power supply. I am going to put together a box with 2" hard foam large enough for 4 cornies and experiment a bit.
 
8/6/07 - So I worked the night shift last night, but I am off tomorrow, so I struggled through the day and drank a couple beers while I wired up the compressor.

I used a project box to enclose everything, and fed the thermocouple up under the back pannel to the opening for the evaporator coil. It worked out a bit neater than I expected. :)

Wiring In-Progress:
10254-Wiring1.JPG


Install complete:
10254-Wiring2.JPG


Controller Up-Close:
10254-Wiring3.JPG


On to the caulking and door construction...
 
Looking great, Thomcat. You're quite the skilled carpenter/cabinet maker. Is that another hobby of yours?

BTW, your controller set up looks slightly familiar to me. :D Why did you choose to mount it to the back, though? Won't that make it inconvenient for observing and adjusting temperature.

Also, since this is strictly a fermentation cabinet and you mentioned earlier you don't always brew that often, are you planning on installing a master power switch for when it's not in use?

Oops, i just asked a bunch of questions. sorry for that.
 
MrFebtober... thanks! I do enjoy woodworking, but it's a little bit harder here in the apartment. I'd love to have a table saw (it would save a lot of time and headaches.) As far as mounting the controller on the back, I wanted to leave the top flat so I could stack stuff on top of it, and it was just a bit easier I have to admit. I hadn't thought about a master on/off switch, but that's a good idea. When I get around to building the Sanyo (or other) based keggerator, I'll probably do something very similar to what you did (nice job by the way).

Okay on with the update.... 08/15/07

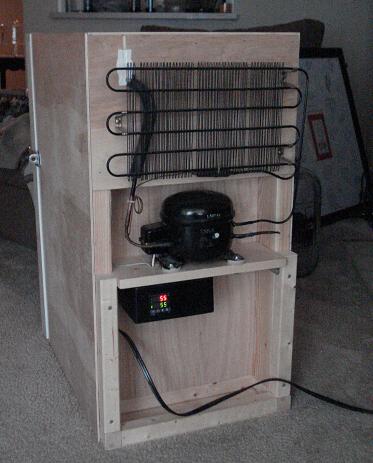
It's fully functional and structurally complete. The caulking is done, the door is hung, and the last bit of hole-plugging is done.

The door (closed):

10254-Door1.JPG


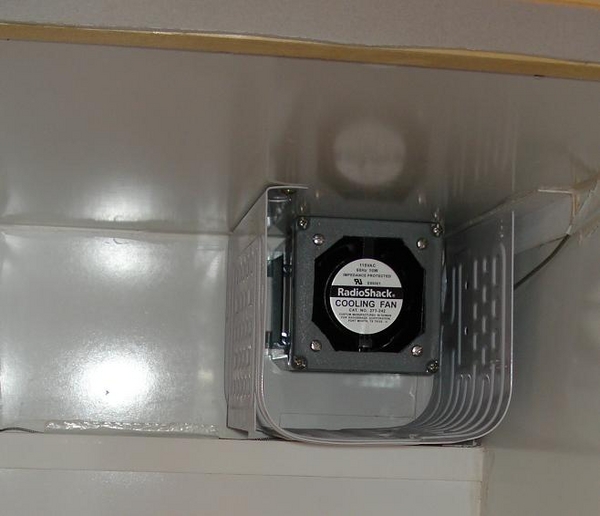
The door again (open showing a bit of foam for a good seal):

10254-Door2.JPG


And finally, here's a pic at temperature. With the unit at ambient temperature (74F), I turned it on, and it reached the 55F setpoint in 26 minutes. Not bad!

10254-AtTemp.JPG


I set the hysteresis at 2F so it continued to cool down to 53F and stopped. It took 24 minutes to warm back up to 57F when the compressor switched back on. Even then, it only took 8 minutes to get back to 53F. So it'll probably cycle ~8 minutes, twice an hour or so. Not too bad?!

So... this project was a blast to build. I have to say it wasn't the most economical project, but then mine never are. Projects like this are usually more for the fun of building for me. Plus, this one helps make good beer:D

I'll figure up the material costs at some point, but thanks for all the comments and suggestions guys! Good luck if you decide to build one. I'd love to see some pics.

Cheers,
Andy
 
That is one SEXXXY unit!!! I have a little fridge out in my garage. When I defrost it I can fit one keg in it, sort of. I have to jam that pig in there. This bums me out. Never thought of tearing a minifridge apart to get the guts inside for a fermentation chamber before. I could brew in the garage in the summer!!! (I think for that to be an option though I might want to use 4" of foam, haha!)What I'm really interested in is how did you get that fridge apart. What to be careful of. What NOT to do. What to do.
 
Nice work! I just gutted my mini fridge and I am going to use it either as a fermentation cooler or turn it into a one corny kegerator :D Of course, mine isnt going to look half as good as yours. Good read!
 
thomcat333,
The original freezer compartment looks like an ideal place to mount a muffin fan. This would undoubtedly up your cooling efficiency. It probably would help with any condensation problems as well.
 
08/25/07

Ok... well since you mentioned it, and because I found a suitable AC powered fan at radioshack the other day, I installed one. I added a switch beside the controller so that in the "ON" position, it comes on whenever the compressor is on. In the "OFF" position it doesn't come on at all. I also added a digital thermometer with the display outside the cabinet. I swear I'm going to stop messing with this and start brewing again soon... I think a buddy of mine and I are going to start and Oktoberfest around Labor Day. Cheers!

The Fan:
10254-Fan.JPG


The Switch:
10254-FanSwitch.JPG


- Andy
 
Yes, finally. I've got an Oktoberfest chugging along inside (my first lager). Just in case anybody didn't believe all of the other posts, it really is advantageous to do a starter with lagers. I didn't do one, and it didn't start working for ~4 days. But, all is well now. Cheers!
 
just for interest Thomcat, you should find that once it gets down to temp with a full carboy inside it will cycle much less than it did empty. The full carboy has alot of thermal mass to keep things cool longer. I found this out by running an empty fridge, it kept cycling and I thot it was a bad thermostat until the repair guy asked me how much food was in it? That quick phone call saved me the cost of a service call and I learned something at same time.
BTW...wicked project, well done
 
I'm really impressed with your home handyman efforts. But I'm too lazy. I'll just use two refrigerators with temperature controllers - one to ferment, one to keg. Looks easier and probably cheaper.
 
Bellybuster said:
just for interest Thomcat, you should find that once it gets down to temp with a full carboy inside it will cycle much less than it did empty. The full carboy has alot of thermal mass to keep things cool longer. I found this out by running an empty fridge, it kept cycling and I thot it was a bad thermostat until the repair guy asked me how much food was in it? That quick phone call saved me the cost of a service call and I learned something at same time.
BTW...wicked project, well done

I just McGyverd a make shift insulated box out of 2" foam sheets on my balcony and I also realized you really have to trust the thermal inertia of the liquid. I use a 200W heater (subzero temperatures are common up here during the winter, so my problem is to keep the FV temperature high enough) and even if the air temperature in the box fluctuates between say 13C and 20C (55F to 68F) every other hour or so the temperature on the surface of (and inside) the fermenter is rock steady.

H
 
I'm not sure if you mentioned it, but where did you get the PID and theromcouple? Looks great. I believe that I am going to try and emulate this project.
 
what kind of cost on the PID? I could use more info on how to use one of those.

Would it work to run a couple of free dorm-fridge guts to a nice furniture grade customized cabinet for making a long thin bar out of? I was thinking having all the cornies in a row, sort of a long unit I could put along a wall with taps on top somewhere, maybe a bookcase over it all...
 

Latest posts

Back
Top