• Please visit and share your knowledge at our sister communities:
  • If you have not, please join our official Homebrewing Facebook Group!

    Homebrewing Facebook Group

Electric System Build Hardware

Homebrew Talk

Help Support Homebrew Talk:

This site may earn a commission from merchant affiliate links, including eBay, Amazon, and others.

Brewer dad

Well-Known Member
Joined
Aug 15, 2020
Messages
245
Reaction score
226
Location
Virginia
I am looking to upgrade from stovetop/cooler batch sparge setup to an electric full volume biab recirculating system. My short term goals for this system are to eliminate moving wort during mash process, reduce brew day time, and gain the ability to more easily execute mash schedules. I do primarily 5 gallon batches but wouldn’t mind the ability to occasionally do 10 gallon sub 1.050 batches. To reduce costs/enjoy learning I am looking to put this system together myself.

I have some questions related to hardware that I’m not seeing previously asked so I figured I’d start a new thread in the hopes it helps someone in the future. I am loosely modeling this system after brew hardware’s premium build, and plan to obtain many components from them.

Kettle will be spike, either 15-20 gallon.
-leaning towards 15 gal, any idea how much head space is beyond the 15 gal mark? Running 10 gal numbers and for total volume sometimes looking right around 15-15.5 gal for batches I’d want
-where are y’all putting thermometers?


Controller will be auber components that I put together. 240v 5500w pid setup.
-I am thinking of not bothering with a plug on the controller for the pump, I have plenty of outlets around and would simplify the setup, any reason this is a bad idea so long as my pump is otherwise well setup?
-for PIDs I’m looking at either ez boil or the ramp/soak with wifi(AW-SYL-23X2P). I see what seems to be good stuff about ez boil but the ramp soak seems similar and I can manipulate it from my phone. Anyone have experience with the ramp/soak?

Thanks in advance for any input. When I am further along in the process I will post a diagram and then final product.
 
I am looking to upgrade from stovetop/cooler batch sparge setup to an electric full volume biab recirculating system. My short term goals for this system are to eliminate moving wort during mash process, reduce brew day time, and gain the ability to more easily execute mash schedules. I do primarily 5 gallon batches but wouldn’t mind the ability to occasionally do 10 gallon sub 1.050 batches. To reduce costs/enjoy learning I am looking to put this system together myself.
You'll need a 18 gallon kettle minimum for any 10 gallon batches. The Brewmaster from Morebeer comes in an 18.5G size but you have to be willing to plug the upper threaded port as it's worthless in this type of build.
Other than that, you'd go up to the 20 for sure in any other brand which is actually a 22 gallon to the top. Most kettles listed as 15 gallon are 15.5 to the last drop.

The flat bottom Spike is one of the only kettles that can't be bottom welded. If you can fit it into the budget at all, bottom draining is the bees knees or cat's pajamas; whichever sounds more advantageous but you'd have to buy the kettle from me or ship it to me to have a TC bottom drain welded.

I've also come to depend on the external sightglass such as what's on the Blichmanns....YMMV
Kettle will be spike, either 15-20 gallon.
-leaning towards 15 gal, any idea how much head space is beyond the 15 gal mark? Running 10 gal numbers and for total volume sometimes looking right around 15-15.5 gal for batches I’d want
Is that calculation based on 10 gallons into the fermenter and leaving nothing behind in the kettle? If you put 11 gallons in the fermenter and leave about 1 gallon of trub in the kettle, I don't think you can make a 15 work. If you're ok with 10 into the fermenter, then maybe.
-where are y’all putting thermometers?
Nowhere. The controller's probe goes in the side of the kettle below the false bottom and that's all you need.
Controller will be auber components that I put together. 240v 5500w pid setup.

-I am thinking of not bothering with a plug on the controller for the pump, I have plenty of outlets around and would simplify the setup, any reason this is a bad idea so long as my pump is otherwise well setup?
It is a little cumbersome to run a 4 wire input to the controller just to grab a low amperage 120v circuit for the pump but on the other hand, you kind of get used to going to the control panel to do "things". Since my pump isn't loud enough to tell me its running, I actually rely on the bright blue lighted on/off switch as a fast visual that it's on.
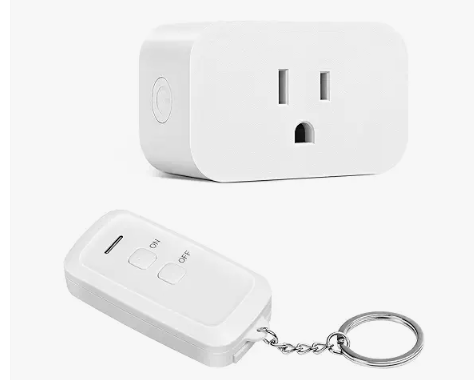
If your pump will be louder, the one compromise I could see working is to use a smart outlet on the pump. You can even just 3M tape the key fob to the controller. These are about $15
1745355893394.png

-for PIDs I’m looking at either ez boil or the ramp/soak with wifi(AW-SYL-23X2P). I see what seems to be good stuff about ez boil but the ramp soak seems similar and I can manipulate it from my phone. Anyone have experience with the ramp/soak?
It seems a little disjointed to be willing to offset the pump switch from the controller but be interested in controlling via a mobile app, but maybe I'm not thinking the same way you are. You will have to decide what you'd do remotely and if it's worth it. The 320 is more programmable than you'd ever really need, though the program is not remotely editable.

I use the Auber WIFI app on my phone to control my electric smoker and it's flaky as hell. A lot of the times when I send a command it fails the first time and needs another push. Maybe this controller is way better as it's several years newer. Admittedly I never played around with the AW-SYL-23X2P yet. It's not clear to me if this unit has any way to throttle the power output during the boil and there's no way I'd give up the KNOB/push button interface for the button press only of the SYL series controller.

Incorporate a big RED "element firing" light.
Thanks in advance for any input. When I am further along in the process I will post a diagram and then final product.
 
Kettle will be spike, either 15-20 gallon.
-leaning towards 15 gal, any idea how much head space is beyond the 15 gal mark? Running 10 gal numbers and for total volume sometimes looking right around 15-15.5 gal for batches I’d want
If you are going to do mostly 5 gal batches, I would go with the 15 gal kettle. For recirculating BIAB, you're going to need a false bottom both for good flow thru the grain bed, and keeping the bag off of the heating element. There is a significant volume under a false bottom, especially when using a water heater style element. With a 20 gal kettle, you might not have enough water volume above the false bottom to get a good mash thickness when doing 5 gal batches.

For 10 gal batches you can do a dunk sparge (more consistent/predictable, but needs a second vessel, which can be a simple plastic bucket) or pour over sparge, so that you don't have to do a full volume mash.
-where are y’all putting thermometers?

The thermometer should be placed somewhere that it is in the recirculation flow stream. This can be under the false bottom, between the element and the wort pick-up for the pump, or in a tee outside the kettle at the wort outlet that feeds the pump. You want to minimize the time delay between when the temp increases, and when the controller detects the temp increase, in order to prevent temperature overshoots and oscillation.

The typical kettle with side mounted thermo probe is not really suitable because of excessive time delay between temp increases under the FB, and detection by the controller. Also, a probe sticking into the kettle where the bag sits is just a PITA for BIAB.

Controller will be auber components that I put together. 240v 5500w pid setup.
-I am thinking of not bothering with a plug on the controller for the pump, I have plenty of outlets around and would simplify the setup, any reason this is a bad idea so long as my pump is otherwise well setup?
-for PIDs I’m looking at either ez boil or the ramp/soak with wifi(AW-SYL-23X2P). I see what seems to be good stuff about ez boil but the ramp soak seems similar and I can manipulate it from my phone. Anyone have experience with the ramp/soak?

I think you might be underestimating the convenience of having the pump control switch collocated with all of the other controls. Adding a pump switch and outlet to the panel is not much extra effort. You also can have an indicator lamp on the front of the panel which tells you the state of the pump at a glance (not such a big deal if you have a noisy pump in a quiet environment.)

The biggest difference between an EZ-Boil and the AW-SYL-2352P from a heating standpoint is the power modulation method. The SYL uses standard PWM with a minimum cycle time of 2 seconds, which means that at 50% power, the element will receive full power continuously for 1 sec during each 2 sec cycle. The EZ-Boils use a different modulation scheme, such that at 50% power the element will only receive full power for 16.7 msec (0.0167 sec), and then off for 16.7 msec. The element surface temperature can get hotter the longer the on portion of the power cycle is, which leads to a greater chance of wort scorching. The SYL is also a real PID, meaning that it requires parameter tuning to get good response time without excessive overshoot/oscillation. The EZ-Boils use a different control algorithm which "just works" without having to tune control parameters. So, you need to weigh the benefits of WiFi capability vs. the better modulation and control algorithm of the EZ-Boils.

For the recirculation loop, you might want to consider a whirlpool return under the FB with a valve to control the flow ratio betwen the top of the grain bed return and whirlpool return. This can allow faster recirulation than if all of the flow has to go thru the grain bed, and this will help with temp stability, and minimizing any chance of scorching.

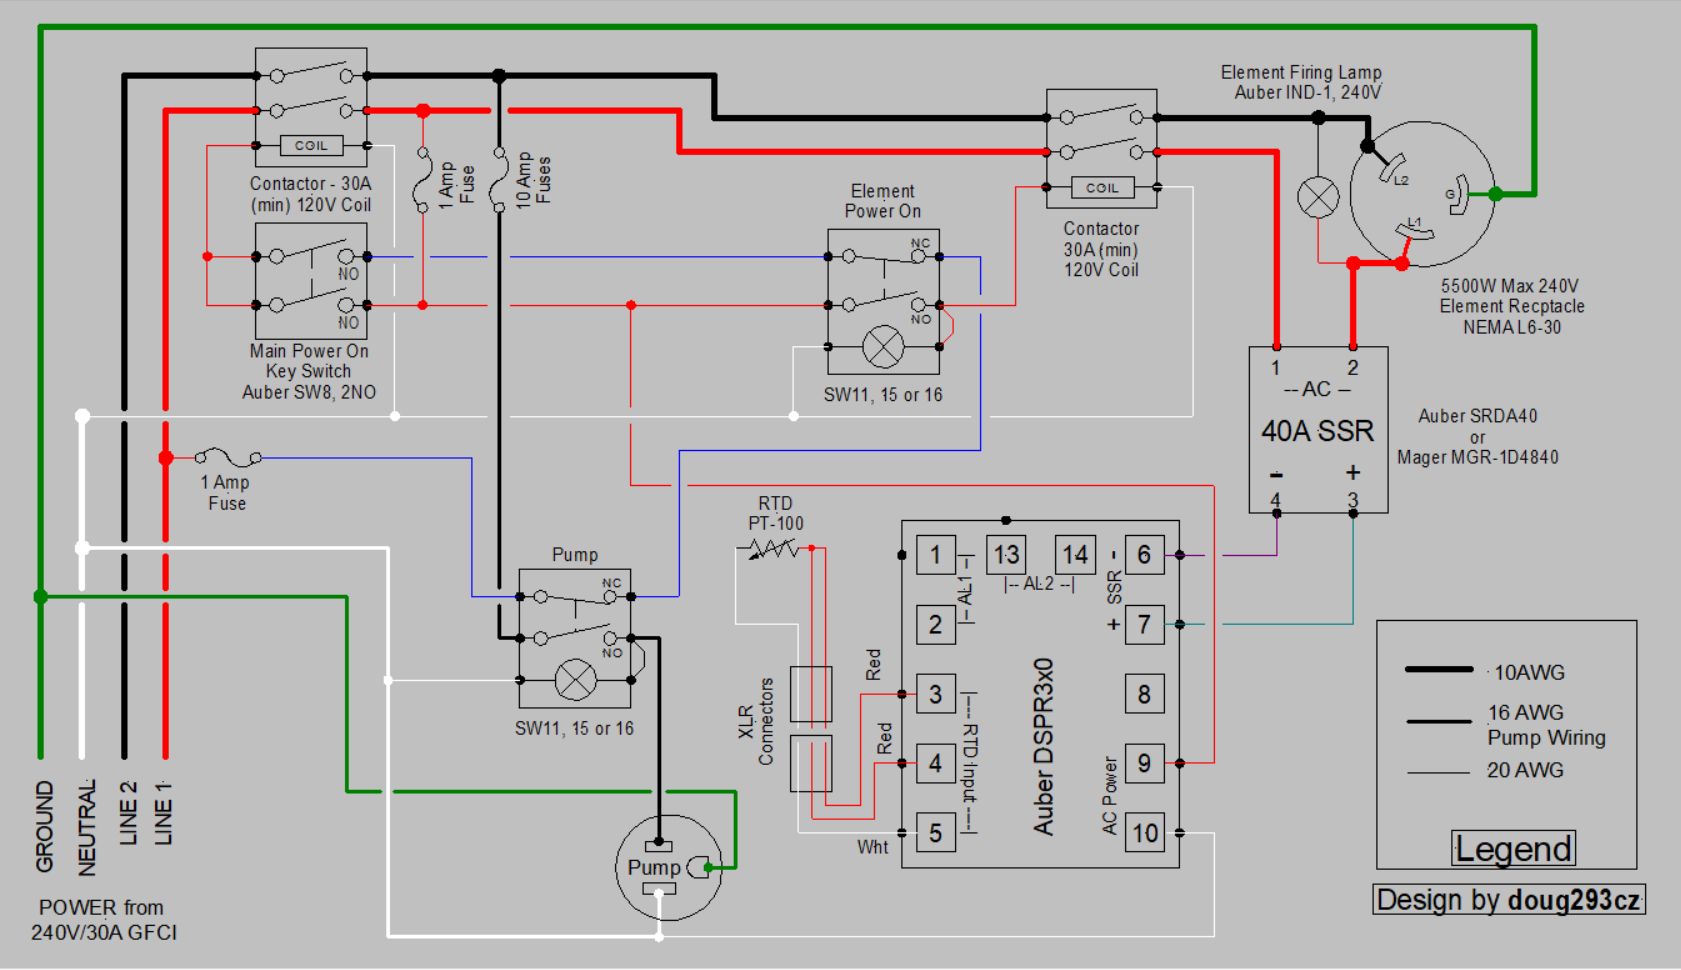
I am attaching my preferred design for a single pump BIAB controller.

Brew on :mug:

DSPR300 1-Pump 1-Element 240V rev-2.PNG
 
Last edited:
Thanks @doug293cz and @Bobby_M you both were ones I was hoping would chime in! I think off the bat I’m going to ditch the 20 gal idea for this kettle. My interest was just in occasionally doubling up on certain batches to build up pipeline/split.
It seems a little disjointed to be willing to offset the pump switch from the controller but be interested in controlling via a mobile app, but maybe I'm not thinking the same way you are. You will have to decide what you'd do remotely and if it's worth it. The 320 is more programmable than you'd ever really need, though the program is not remotely editable.

Your point makes sense. I was looking at these two as being effectively the same just one had wifi but that appears not to be the case. The WiFi seemed appealing because I could have another monitoring ability in case I needed to briefly walk away, or turn on remotely to get things started. I’d rather have consistency and reliability. Ez boil it is.

I think you might be underestimating the convenience of having the pump control switch collocated with all of the other controls. Adding a pump switch and outlet to the panel is not much extra effort. You also can have an indicator lamp on the front of the panel which tells you the state of the pump at a glance (not such a big deal if you have a noisy pump in a quiet environment.)

Makes sense, I can go ahead and add it. I generally have an instinct to keep things as simple as possible hence why I asked this, but like you say it’s no big deal and you were even nice enough to give me a diagram to start with!

For the recirculation loop, you might want to consider a whirlpool return under the FB with a valve to control the flow ratio betwen the top of the grain bed return and whirlpool return. This can allow faster recirulation than if all of the flow has to go thru the grain bed, and this will help with temp stability, and minimizing any chance of scorching.

My intent is to have a port for this and redirect the flow upwards. I’ll probably get the cip lid and work out something for the flow coming top down.

The flat bottom Spike is one of the only kettles that can't be bottom welded. If you can fit it into the budget at all, bottom draining is the bees knees or cat's pajamas; whichever sounds more advantageous but you'd have to buy the kettle from me or ship it to me to have a TC bottom drain welded.
Forgot to ask this one, what is benefit to bottom draining? Maximizing reduction in negative space?

Thank you both again so much for your responses. A follow on question. I plan on implementing LODO techniques incrementally thanks to reading @Bramling Cross awesome panther piss project. Do you see anything that might be advantageous to do with this build to help with that? Things like mash caps I am Planning on addressing once I have this system up and running.
 
For LoDO mashing, you want to make sure the top of mash recirculation return is under the surface of the liquid in the mash. Any kind of spraying thru the air is a big no-no for LoDO.

Brew on :mug:
 
Thanks @doug293cz and @Bobby_M you both were ones I was hoping would chime in! I think off the bat I’m going to ditch the 20 gal idea for this kettle. My interest was just in occasionally doubling up on certain batches to build up pipeline/split.


Your point makes sense. I was looking at these two as being effectively the same just one had wifi but that appears not to be the case. The WiFi seemed appealing because I could have another monitoring ability in case I needed to briefly walk away, or turn on remotely to get things started. I’d rather have consistency and reliability. Ez boil it is.


Makes sense, I can go ahead and add it. I generally have an instinct to keep things as simple as possible hence why I asked this, but like you say it’s no big deal and you were even nice enough to give me a diagram to start with!


My intent is to have a port for this and redirect the flow upwards. I’ll probably get the cip lid and work out something for the flow coming top down.


Forgot to ask this one, what is benefit to bottom draining? Maximizing reduction in negative space?

Thank you both again so much for your responses. A follow on question. I plan on implementing LODO techniques incrementally thanks to reading @Bramling Cross awesome panther piss project. Do you see anything that might be advantageous to do with this build to help with that? Things like mash caps I am Planning on addressing once I have this system up and running.

While I appreciate your very kind words, please also remember that I'm not the guy to learn LODO from and the Panther Piss Project is absolutely not a proper representation of correct LODO techniques. I selectively utilized LODO techniques to accomplish my goal and Panther Piss is not a proper LODO beer.

The LODO boys get enough flak as it is, they don't need the Panther Piss Project adding to their worries.

I sincerely appreciate the kind words, though. :bigmug:
 
For LoDO mashing, you want to make sure the top of mash recirculation return is under the surface of the liquid in the mash.
I plan on running some type of line down just into the liquid, and either aiming the flow horizontally or something. I like the locline idea but from what I’m seeing it’s rated to 170f and I’d prefer to go a little higher than that.

While I appreciate your very kind words, please also remember that I'm not the guy to learn LODO from and the Panther Piss Project is absolutely not a proper representation of correct LODO techniques. I selectively utilized LODO techniques to accomplish my goal and Panther Piss is not a proper LODO beer.
What I meant by incrementally implementing is what you said better with selectively utilized. I try to take things in chunks and this seems like a good start. And then if I can/want to go further in the future I will.
 
Forgot to ask this one, what is benefit to bottom draining? Maximizing reduction in negative space?
The two big ones;
Clean in place, meaning literally never having to move the kettle. If you don't plan to have a dedicated brewing station, this becomes a bit moot but I don't move my kettle even a little bit for any reason. I never even have to tip it over to hose out.

Ease of pump priming. Side mounted drains with a diptube always trap a bubble of air. Getting the pump to prime isn't a problem really, but with a bottom drain, I actually stopped thinking about priming. You hook it up, open the valve and the pump just runs.
 
For LoDO mashing, you want to make sure the top of mash recirculation return is under the surface of the liquid in the mash. Any kind of spraying thru the air is a big no-no for LoDO.

Brew on :mug:
Agree. Worst case is the Clawhammer lid sprayer (wort oxidation gadget 3000).
 
I plan on running some type of line down just into the liquid, and either aiming the flow horizontally or something. I like the locline idea but from what I’m seeing it’s rated to 170f and I’d prefer to go a little higher than that.

Locline continues to be the practical approach. It's rated for 170F but I firmly believe that it is consideration of its cantilever weight ratings; e.g. at 180F the plastic will soften enough that the links will flex easier than sub 170. I have boiled a section of this stuff at 212F for 6 hours straight and it was no more brittle than before and the plastic still looked the same. It also didn't take on or lose any weight. I have the same section of locline on my system for the past 8 years.

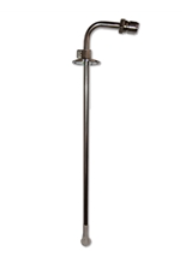
If you really want some alternatives, we have this more expensive height adjustable option that uses a compression fitting to raise and lower the height.
1745445264938.png

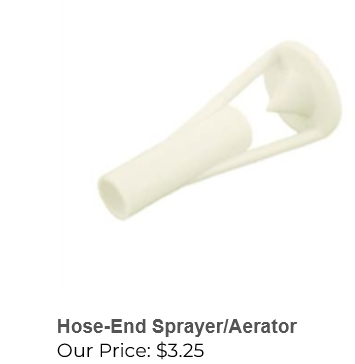
A less fancy version would be to just drill a hole in the lid where the piece of silicone tubing is just slightly larger than the hole so you can friction fit it at whatever height you want with this on the end of the hose to keep it from drilling down. It's called an aerator but not if it's sitting below the liquid level.
1745445379700.png


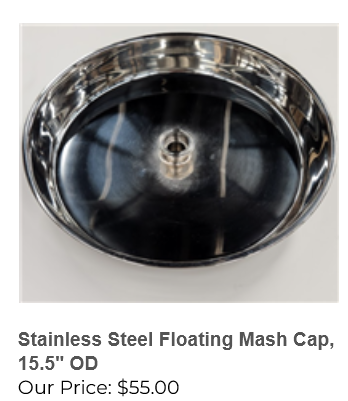
Of course if you want to lean towards LODO at all, you'll want a mash cap instead of or in addition to the kettle lid.

1745445996606.png


Locline continues to be the practical approach. It's rated for 170F but I firmly believe that it is consideration of its cantilever weight ratings; e.g. at 180F the plastic will soften enough that the links will flex easier than sub 170. I have boiled a section of this stuff at 212F for 6 hours straight and it was no more brittle than before and the plastic still looked the same. It also didn't take on or lose any weight. I have the same section of locline on my system for the past 8 years.

If you really want some alternatives, we have this more expensive height adjustable option that uses a compression fitting to raise and lower the height.
View attachment 873991
A less fancy version would be to just drill a hole in the lid where the piece of silicone tubing is just slightly larger than the hole so you can friction fit it at whatever height you want with this on the end of the hose to keep it from drilling down. It's called an aerator but not if it's sitting below the liquid level.
View attachment 873992


Of course if you want to lean towards LODO at all, you'll want a mash cap instead of or in addition to the kettle lid.

View attachment 873995


Does the recirculation/sparge diffusor fit the floating mash cap?

Brew on :mug:
 
Yes, the center of the mash cap is 1.5" TC and the height adjustable (via compression nut) version can work. So many ways to do this. That particular mash cap just got requested from me with the TC but I suppose any kind of fitting could have been put in place.

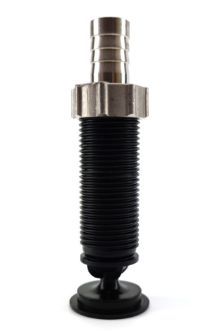
It would be a lot cheaper to just drill a hole in the mash cap and install this. They are like $10 via Morebeer. I just got a few of them in to play around with but didn't add them to the site yet. I'll probably just make a mashcap option that has this much cheaper method. Since it's continuous thread, it could be placed so the diffusion spreader disk is directly under the cap.

1745448801933.png


EDIT: I just wanted to be extra clear for people that just stumble on to this post. The device pictured above would be fine if it's installed in a floating mash cap, a device that is in direct contact with the mash below. It would NOT be a good idea mounted directly into a BIAB kettle lid where in many cases the wort recirculation would be fan-sprayed down through air to meet the mash below.
 
Last edited:
Thanks Bobby for all the info. Thinking about it maybe my concerns about the locline temp don’t matter as much anyway since I’m recirculating vs bringing hot water in to heat. Regardless I think I’ll go ahead and do the mash cap on the front end.

Ok I think I am getting somewhere, thanks everyone! I am going to start finalizing my parts list and work on orders. Hoping to be taking it on a test run within a month or so.
 
For TLDR see second post

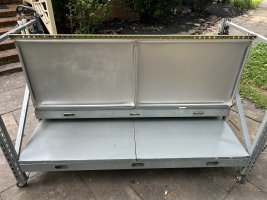
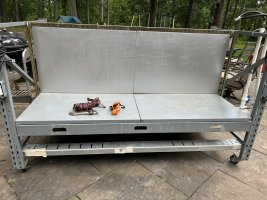
Had some things come up that put this on the back burner, but recently made some great headway. I was able to grab what was essentially a brewery’s pilot system for a great deal. It included two 20 gal kettles(mash tun and boil kettle), chugger pump, wort chiller, brew cart, and a bunch of other odds and ends.

Since I’ve got two kettles and am interested in LODO I am thinking I will go with a 2V instead of AIO build. I would treat/heat water in BK, transfer over to MT and mash in via underletting, recirculate while mashing, and then go back to the BK to finish everything else out.

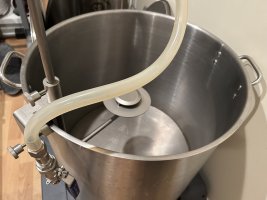
Only thing missing is a heat source, and given I paid less for this than I would’ve for a new kettle I can work with that. The kettles are also simple ball valve and thermometer setups so I’ll need to drill some holes, which I am comfortable with. I’ll remove thermometers and for the MT add these, utilize Bobby’s cool 3way valve, and bring a line back through a mash cap with a fly sparge arm that was included(head will be under liquid, see first pic).

For BK I am thinking I may just pull the dial thermometer out and replace it with one which connects to my yet to be built controller and leave it at that, my new wort chiller has a whirlpool attachment.

Picture of cart also included. I have some questions related to electrical stuff I’ll add in the second post, wanted to share my progress overall though.
 

Attachments

  • IMG_6438.jpeg
    IMG_6438.jpeg
    2.1 MB
  • IMG_6439.jpeg
    IMG_6439.jpeg
    2.5 MB
  • IMG_6424.jpeg
    IMG_6424.jpeg
    3.4 MB
  • IMG_6422.jpeg
    IMG_6422.jpeg
    3.4 MB
I am looking at these elements with these enclosures. My false bottom sits fairly low, I’m trying to figure out the minimum clearance needed to keep it off the element. It says it needs a 1 1/4” hole, and it looks like I can get 1 7/8” out of this bottom. I can always modify but am curious to get an idea.

Since I’ll have two elements to work(plan to use same for each), I’m considering my short vs long term options. I’m not sure that I could build a single element system and just switch between the kettles because of the thermometer.

Assuming that’s correct, if I build a two element 240v controller could I run it off of a single outlet for the entire controller, or would I need separate outlets on separate breakers?

If I am using separate elements for separate purposes is there a less expensive PID that does well for purely boil purposes?
 
I am looking at these elements with these enclosures.

I would only use the straight fold-back element in the HLT of a 3V system. For heating wort (as you will be in the MLT and BK), you want the lowest watt density (W/in^2) that you can get in a particular power rating in order to minimize the potential for wort scorching. Choose a wavy element instead to get lower watt density.

I would recommend against elements and power connections that don't allow the disconnection of the power cable from the element, and simple removal of the element from the kettle. For this reason, I recommend tri-clamp element to kettle attachment as it allows the element to be quickly and easily removed from the kettle. I also recommend the L6-30 power connections to the element as they allow you to disconnect the cord from the kettle/element making moving the kettle around much easier. The screw in elements with fixed power connections will work, but they are much less convenient.

I’m not sure that I could build a single element system and just switch between the kettles

Moving an element between kettles is not practical at all. You need a third vessel to hold the wort while you move the element from one kettle to the other. Moving a power cord between two elements with L6-30 connections is possible, but then you need to provide for switching between two temperature sensors.

Assuming that’s correct, if I build a two element 240v controller could I run it off of a single outlet for the entire controller, or would I need separate outlets on separate breakers?

Yes, most controllers are designed to run from a single outlet (there are some notable exceptions.) If you only want to run one element at a time, you can use a 30A/240V circuit. If you want to run both elements at the same time, you will need a 50A/240V circuit. In the 30A case, you need a selector switch in the control panel that only allows power to one element at a time.

If I am using separate elements for separate purposes is there a less expensive PID that does well for purely boil purposes?

Yes, you can use a DSPR120 for the BK/HLT. It doesn't have the programmable step mashing capability of the higher end DSPRs. You could also use a Mypin or Inkbird PID as long as it has a manual mode as well as PID mode (you cannot properly control boil vigor running in PID mode.)

Brew on :mug:
 
For TLDR see second post

Had some things come up that put this on the back burner, but recently made some great headway. I was able to grab what was essentially a brewery’s pilot system for a great deal. It included two 20 gal kettles(mash tun and boil kettle), chugger pump, wort chiller, brew cart, and a bunch of other odds and ends.

Since I’ve got two kettles and am interested in LODO I am thinking I will go with a 2V instead of AIO build. I would treat/heat water in BK, transfer over to MT and mash in via underletting, recirculate while mashing, and then go back to the BK to finish everything else out.

Only thing missing is a heat source, and given I paid less for this than I would’ve for a new kettle I can work with that. The kettles are also simple ball valve and thermometer setups so I’ll need to drill some holes, which I am comfortable with. I’ll remove thermometers and for the MT add these, utilize Bobby’s cool 3way valve, and bring a line back through a mash cap with a fly sparge arm that was included(head will be under liquid, see first pic).

For BK I am thinking I may just pull the dial thermometer out and replace it with one which connects to my yet to be built controller and leave it at that, my new wort chiller has a whirlpool attachment.

Picture of cart also included. I have some questions related to electrical stuff I’ll add in the second post, wanted to share my progress overall though.
There are really only two practical ways to run a 2 vessel system in my opinion.

1. K-RIMS (Kettle RIMS). See Blichmann BrewEasy for an example. I also describe the process here: https://www.brewhardware.com/category_s/1971.htm

One kettle is a dedicated mash tun and one is the dedicated boil kettle (that temporarily acts as the mash temp adjuster). Mash liquor is pumped in a continuous loop between the vessels but it's very frustrating to do it without a Blichmann auto sparge as your return system (which would replace your Ultimate sparge arm that you already have).

2. Run kettle 1 as the all in one system that heats the strike water, holds the mash via bag. Kettle 2 is a very temporary wort holding tank. At the end of the mash, you direct the recirculating mash/wort to the holding tank to collect pure clean runoff. Then you pull the bag, rinse the kettle and pump the wort back for the boil.

Either of those two systems would run with just one kettle being the heated system, aka one element with one probe and controller. Both of those options are a bit of a pain in the rear to run compared to a single vessel. Be careful that you don't design your system around the fact that you obtained two kettles for a good price. You can sell one.

If you did want to proceed with building out both kettles with dedicated heating, it's not always as simple as raising a standard false bottom. Many times the seal between the FB and kettle is due to resting on a raised perimeter shelf and you lose that when you raise it up. Not only that, but it's unlikely that a FB designed for that kind of use has the structural stability to be raised up on a few legs. So... will it be strong enough to support a couple hundred pounds? Will it seal to the sidewall of the kettle? If not, you'd need a gasket.
 
Moving an element between kettles is not practical at all. You need a third vessel to hold the wort while you move the element from one kettle to the other. Moving a power cord between two elements with L6-30 connections is possible, but then you need to provide for switching between two temperature sensors.

Thanks for your reply, makes sense! This was a typo I meant have an element for each kettle, but unplug the element from the controller and switch which element is getting power. I figured it was probably not the way to go especially with thermometer concern.

But if I can use a simpler PID for BK that will help. I was looking at the inkbird combo on Amazon that includes SSR, the price point does make me wonder about quality/longevity. But if it’ll suffice for simply boiling that will work.
 
Be careful that you don't design your system around the fact that you obtained two kettles for a good price. You can sell one.

You know when I originally looked at/got this that was my plan. Then started thinking well I’ve got it and I can underlet with it. But especially when looking at setting up both kettles and the controller it seems to make more sense to go with the AIO.
 
Since my pump isn't loud enough to tell me its running, I actually rely on the bright blue lighted on/off switch as a fast visual that it's on.

What pump are you using? My cheap Northern Brewer / Midwest pump (my LHBS at the time they still had their stores in town) is wildly noisy even with extra washers in it. I figured they were all that way.
 
You've got a wealth of advice from our most esteemed members that I can't hold a candle to, so I'll just chime in with some possible perspective:
To reduce costs/enjoy learning I am looking to put this system together myself.
You and I are on the same page here, but looking at your long term goals there are a number of areas where you may end up spending more time and money in the long run on bits that end up discarded.
This:
, and gain the ability to more easily execute mash schedules.
and; this;
-for PIDs I’m looking at either ez boil or the ramp/soak with wifi(AW-SYL-23X2P). I see what seems to be good stuff about ez boil but the ramp soak seems similar and I can manipulate it from my phone. Anyone have experience with the ramp/soak?
seem to suggest you'd like to step mash or at least keep your mash heated, so a 2V K-RIMS will get you there but then there's this:
I plan on implementing LODO techniques incrementally
You'd have to use a mash cap in each vessel and I'd be concerned with the O2 present in the plumbing between the 2 vessels...If you really wanna go LoDO, you really want a full 3V system.
But if I can use a simpler PID for BK that will help. I was looking at the inkbird combo on Amazon that includes SSR, the price point does make me wonder about quality/longevity. But if it’ll suffice for simply boiling that will work.
The popular general-purpose Inkbird 106VH/40A SSR/heatsink combo has long been a popular choice for electric homebrewers since before Auber started making dedicated controllers specifically for homebrewers and if you choose to go that route, make sure and buy from Inkbird themselves as there are a number of vendors selling sub-par parts in the guise of this combo. Think it through carefully though; The Auber units cost a bit more but they have a feature set you just can't replicate with the 106 even if you keep your fingers glued to the controls for the whole brew.
You know when I originally looked at/got this that was my plan. Then started thinking well I’ve got it and I can underlet with it. But especially when looking at setting up both kettles and the controller it seems to make more sense to go with the AIO.
Probably the best trade-off is to do just that. Go BIAB with a Wilser bag and one of Bobby's BIAB FB's sized for a kettle you currently have https://www.brewhardware.com/category_s/1966.htm , Build a decent Auber-based controller and slowly put together a mash tun and HLT for your future LoDO.
Just my 2-cents.
:mug:
 
@Broken Crow

I really appreciate your input! You are exactly right in that I plan to utilize step mashing. I think I will build this initially as an AIO, then over time if I feel a need to add vessels I will do so as you suggest. Thankfully I have space and time so I’m not in a rush to move any equipment I picked up.
 
The Brewmaster from Morebeer comes in an 18.5G size but you have to be willing to plug the upper threaded port as it's worthless in this type of build.
Finalizing my cart for an order for kettle hardware. I was looking at this to attach to fitting where thermometer originally was(top port of traditional two port kettle). But remembered what you said here @Bobby_M. Wanted to use this to recirculate and whirlpool. Would I be better served to drill another hole low and put it there?

Another item I think I’ll need to add to this project is a steam condenser. Originally I was going to start in my kitchen with this, but given size of everything just going to go straight to my utility room. There’s a window but it’s small, and I can reuse the water for cleaning.

Though this project has gotten bigger than I originally intended, but I think it’s going to be super cool once complete. Still a bit to go but OT is going to help things along.
 
Finalizing my cart for an order for kettle hardware. I was looking at this to attach to fitting where thermometer originally was(top port of traditional two port kettle). But remembered what you said here @Bobby_M. Wanted to use this to recirculate and whirlpool. Would I be better served to drill another hole low and put it there?
That's IMHO the best recirc fitting on earth, where you put it may be dictated by how high up it is: With BIAB, you want to be able to split your reciculation between the top and bottom...most pre-cut thermometer holes come in well above where the bottom of the bag will be. Are you going BIAB, 3V, or outfitting a BIAB kettle for future expansion to 3V? You may wish to plug that hole: https://www.brewhardware.com/SearchResults.asp?Search=dang&Submit= and make a new one that will mount just below your false-bottom https://www.brewhardware.com/SearchResults.asp?Search=biab+false+bottom&Submit=
As to a steam condeser https://www.brewhardware.com/category_s/1967.htm you'll probably want a TC bulkhead on your list: https://www.brewhardware.com/product_p/tc15wlf.htm and and blank cap and gasket to fit in place if you want to put that off for now: https://www.brewhardware.com/product_p/tc15bc.htm https://www.brewhardware.com/product_p/tc15clamp.htm https://www.brewhardware.com/product_p/tc15gksil.htm . You could mount it in the lid and use it for a handle for now, or side mount it (which is a heck of a lot easier in the long run).. or send your kettle in to Bobby and have him weld the fitting you want on it.
Glad you're keeping us updated! So many folk come on here and hit the 'buy' button before getting feedback and regret lost $'s later.
Though this project has gotten bigger than I originally intended, but I think it’s going to be super cool once complete.
^That is always the case with anything that has long-term reward!
:mug:
 
@Broken Crow this is going to start as an AIO BIAB setup, from there we’ll see. I think I’ll run with it for now and see how it goes. I’m picking up a tungsten hole saw so if I need to poke another hole it’s not a big deal.

regarding port placement I am thinking the element will come in opposite the ball valve, so like at 12 o’clock and 6 o’clock respectively. The pickup tube comes back to the edge of the kettle forming a sort of L. So I’m looking at 8 or so, hoping to place it so it’s as close as it can be between the element and where liquid is being pulled towards.
 
Made some more gear progress, again on the secondary market. I now have the parts to build a controller with two 5500w ripple elements(minus box). One is an inkbird PID and the other is an auber dspr300.

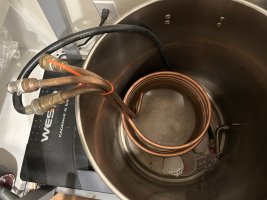
I also picked up a bunch of other stuff as this was someone looking to clear what was really a whole 3v system out. The vessels are drilled kegs, including a herms coil. Additionally I got another pump, a plate chiller, and some misc stuff.

I continue to go internally back and forth a little with my plan since I have these additional items, but for now I think I am going to continue down the AIO path as originally intended. Then if I feel the need to add or change anything I will have options.

For those looking at this saying why’d this guy get all this other stuff, both of these purchases were from people looking to vacate a lot of stuff. And at this point total I’ve invested what a bare new kettle would have cost. Now I just need a couple misc things like bag, condenser stuff, etc. I have some kettle placement questions I’ll ask in another post.
 
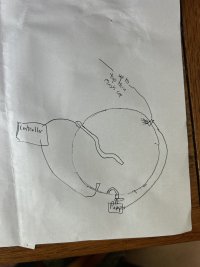
Forgive the chicken scratch. This is what I’m thinking for ports on the kettle. At 10 o’clock, I have the element coming through. Then the thermometer at eight, with the valve at six. Then the recirculation comes back in at around 2 o’clock, and from there goes up to come back down through the mash cap. Any thoughts or critiques?
 

Attachments

  • image.jpg
    image.jpg
    1.5 MB
Forgive the chicken scratch. This is what I’m thinking for ports on the kettle. At 10 o’clock, I have the element coming through. Then the thermometer at eight, with the valve at six. Then the recirculation comes back in at around 2 o’clock, and from there goes up to come back down through the mash cap. Any thoughts or critiques?

If it were my system, I would go with a longer temp probe, in order to put the tip close to the element. The hottest wort in the system will be in contact with the element, and you want to prevent overheating the wort so that you don't prematurely denature the enzymes, or even worse, scorch the wort.

Brew on :mug:
 
I probably should have added that the picture is not to scale. I have thermometers right now that are probably 3 inches or so.
 
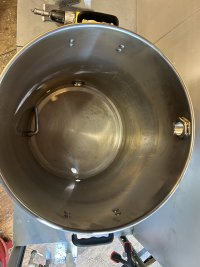
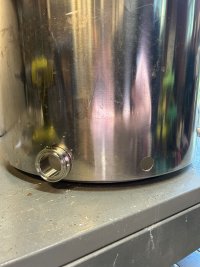
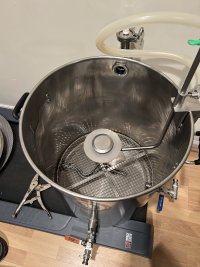
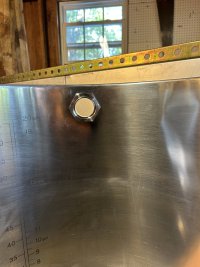
Finally made some more progress, drilled some holes using Bobby’s tungsten bits. Took it easy and got the four holes I needed done without too much trouble.

I had a bulkhead that I thought would work for my thermometer, but it’s too big. Once I get that replaced and give everything a good cleaning, tape up fitting, etc I’ll be ready to go.
 

Attachments

  • IMG_7048.jpeg
    IMG_7048.jpeg
    1.7 MB
  • IMG_7049.jpeg
    IMG_7049.jpeg
    1.9 MB
  • IMG_7050.jpeg
    IMG_7050.jpeg
    1.8 MB
  • IMG_7053.jpeg
    IMG_7053.jpeg
    1.9 MB

Latest posts

Back
Top