• Please visit and share your knowledge at our sister communities:
  • If you have not, please join our official Homebrewing Facebook Group!

    Homebrewing Facebook Group

DIY Steam Mash System by Yuri

Homebrew Talk

Help Support Homebrew Talk:

This site may earn a commission from merchant affiliate links, including eBay, Amazon, and others.
Joined
Jul 24, 2006
Messages
14,260
Reaction score
787
Location
Southwest
After bugging brewman !, kladue, and Jer in their respective threads, I figured I'd just fire up my own thread.

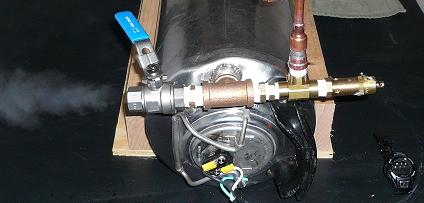
I just plugged this bad boy in for the first time:

4688-steammashsystem.JPG


Everything seals, the pressure relief valve works, and the system will hold over 60 psi (4 times the pressure relief setting). No blown breakers, and it seems to be heating up just fine.

I'm going back outside to make sure I don't blow up the neighborhood...

I'll post more about the system when I don't have a steamy time bomb cooking.
 
Yuri great stuff... Your other thread stated the general parts, but not specific model numbers and locations where one could pick those up. Could you share with us?

Thanks
 
After an hour and a half, it was finally up to temperature. I let it build just over 10 psi, then vented a little. I was surprised at the amount of steam generated. After playing a bit with the valve (it was just too fun!), I opened the valve and let the pressure drop to 9 psi - that took a little over a minute. It recovered back to 10 psi in just a few minutes. I decided to turn the heat off and see how long it would take to vent all of the steam. It took over 10 minutes!!!

4688-steamventing.JPG


Before I post any more about this project:

WORKING WITH STEAM IS EXTREMELY DANGEROUS!
Unless you are completely confident in your understanding of how this system works and your ability to fabricate, weld, and test it, DO NOT ATTEMPT THIS!!!


Ok, now for the particulars:

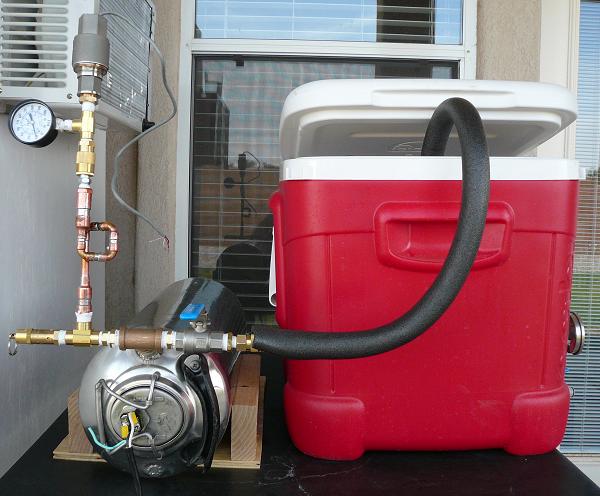
The boiler is a single handle corny keg I got at www.homebrewing.org. I removed both fittings, welded the "IN" side shut, and welded a stainless 1/2" female coupling to the "OUT" side (it didn't matter which side).

I removed the relief valve from the keg lid and welded a patch in place of its fitting. I drilled a 1-1/4" hole in the lid (hole saw) and tack welded a 1-1/4" panel nut (from a local electrical supplier) to the bottom side of that hole to accomodate the heating element. If you look closely, you can see where I modified the lid latch with a piece of the dip tube from the keg. I needed a wider latch handle that would fit around the heating element.

The heating element was an eBay find. It's a 240V 6000W element, which gives me 1500W at 120V with a 12.5A current draw. I replaced the foam o-ring on it with a nitrile o-ring that seals better.

For the plumbing:
1/2" stainless ball valve - www.austinhomebrew.com
Pressure gauge - local Sears department store
1/4" copper fittings/adapters - local Lowes plumbing department
Brass adapters/tees/quick disconnect - Lowes also
Solenoid valve and pressure sensor - eBay
Stainless coupler and 15 psi relief valve - www.mcmaster.com

The plumbing functionality is detailed better in this post.

The idea for the whole project was stolen almost entirely from this thread. Brewman did the legwork and math. He has a system like it - here are his pictures.

I plan on controlling this system digitally. Here is the thread about that.

Still to be done:
3/8" copper tubing to a manifold in my cooler mash tun (insulated with foam pipe insulation)
Finalize digital control software

Also, I don't plan on using it exactly the way I did tonight. I just wanted to see how long it would take to heat cold water to ~240 degrees F. I plan on boiling 4 gallons of water over my big natural gas burner, adding that to the boiler, then heating it the rest of the way electrically. That should take less than half the time.

I plan on using this system to step mash 15 gallon batches. If you're looking for something a little smaller and/or easier and/or potentially safer, try this link.
 
Dang, Man, You are a rocket scientist. You must have worked at Redstone Arsenal.

You need to change your handle to Dr. Yuri. :D
 
Looks good so far but you might want to consider a way to monitor water level in the keg so the water level does not drop below the top of the element during operation. Do you have any plans for a way to refill the keg while making steam?.
 
You shouldn't have to refill anything. Fill it 3/4 full and you are fine to make hours of steam provided liquid water doesn't get forced out with the steam.

Nice work, Yuri.

I was thinking the other night that if we can't get enough steam for big batches (>10 gallons) from a Corny keg that Sanke kegs are rated for 125 PSI too... Thats starting to get pretty extreme though. One would probably need a boiler inspection for that.

One could also use a hot water heater and modify the thermostat to go to 250F. It might rust though.

All sorts of ways to have fun !
 
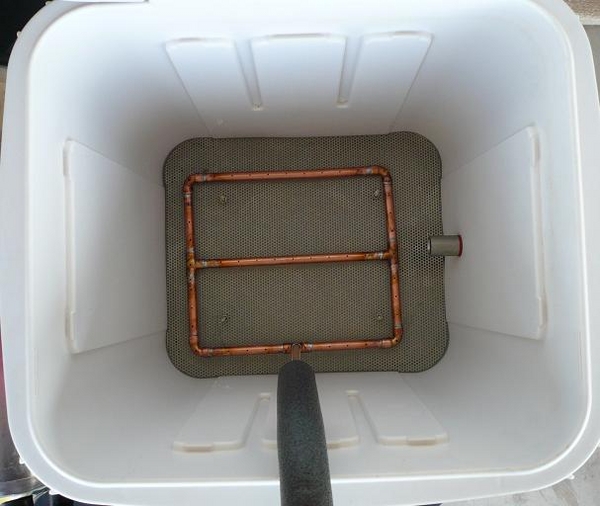
Latest pictures:

4688-steamcomplete.JPG


4688-steammanifold.JPG


I've got 12 gallons of water heating to dough-in temps right now. The boiler is almost up to temperature. I'm about to test it for the first time with water...more to come!
 
Is that a false bottom I see in that vessel ? ' fess up ! Details, man, details !
 
Alright, here are some more "details" (probably more than you wanted):

My mash tun is a 15 gallon Igloo Ice Cube with a perforated stainless false bottom. The false bottom is just above the bulkhead fitting for the outlet valve. The other bulkhead fitting that you can see in the picture is for a Brewmometer (that gets clogged with grain and becomes inaccurate as soon as that happens...don't bother with one). The steam manifold is made of 3/8" copper tubing with a 1/16" hole every inch. It rests on top of the false bottom.

I did a few trials today just heating water. This boiler is AWESOME! For 5 gallon batches, 110VAC would probably work just fine. I heated about 12 gallons of water during my testing, and it was slow going with 110VAC. Here are the first results:

(min:sec on my stopwatch)

00:00 - 124° F - steam turned on (10 psi)
01:24 - 126° F
02:09 - 127° F - steam turned off to recover back to 10 psi
06:40 - steam turned on (12 psi)
07:40 - 131° F - steam turned off
15:27 - steam turned on (14 psi)
16:59 - 135° F
17:00 - I abandoned 110VAC and went to the hardware store​

I came back with a heavy duty extension cord (yes, I did the math for current, circuit length, and wire diameter), wired the system for 220VAC, and proceeded to do another trial. The results were VERY good!

00:00 - 120° F - steam turned on (12 psi)
02:35 - 130° F
04:50 - 140° F
05:50 - steam turned off (down to 8 psi)
06:50 - steam turned on (12 psi)
08:35 - 150° F - began modulating steam valve to maintain 8-10 psi rather than turning it completely off
11:56 - 160° F
16:00 - 170° F
17:20 - heating element turned off
18:20 - 176° F - steam turned off (pressure down to 2 psi)​

16 minutes from protein rest temp to mash out temp! SWEET! This is going to work REALLY well. It was amazing to watch. The manifold and valving made all kinds of noise, but there were few to no bubbles breaking the surface since all of the steam was condensing immediatey upon contact with the water in the mash tun (and giving up all of its heat energy). From time to time the system would actually rock the table a bit. I didn't measure the water level before and after, but it didn't appear to rise appreciably (maybe 1/2").

I can't wait to brew with this thing!
 
If you think it worked well with water, it works twice as well with mash. The steam bubbles break up and the heat transfers better. You can open the valve further and increase the steam flow.

It looks like the lowest your steam pressure got was 8 PSI. There is a ton of BTUs still sitting in the keg at that pressure. Ideally you'd have it blown down to 0 PSI at the end of your heating.

Now how about some pictures and an explanation of that false bottom ! I'm about to buy the same cooler...
 
How did you get it formed so nicely, like right into the corners ?

Are the edges rolled over, or is it "just" cut to fit as a flat piece ? What hole size did you use ?

And what do you mean its held off the bottom ? Are the bolts just spacers, like table legs ?

(What efficiency does that system give and how small of a grain bill can you mash and not get channelling ?)

Sorry for asking 100 questions...
 
I just cut it very carefully to fit with tin snips and a stationary belt sander. The edges are filed smooth, not rolled. The sides of the cooler taper, so it was a bit of a PITA. The material is 0.03" thick T-304 perforated sheet (0.09375" holes - 0.15625" stagger).

The bolts are exactly like table legs (if you look closely, you can see them in my pictures).

I'm at 70% efficiency right now, but I'm expecting 80% with some refinements (better heat control and slower, more even fly sparging).

I haven't mashed a grain bill less than 30 lbs, so I don't know how small I can go. Maybe half that?
 
I've not tried it yet but how fast would a Rims system work? I guess it would be rims, I was planning to use a spare IC in 180* water.


Yuri_Rage said:
Alright, here are some more "details" (probably more than you wanted):

My mash tun is a 15 gallon Igloo Ice Cube with a perforated stainless false bottom. The false bottom is just above the bulkhead fitting for the outlet valve. The other bulkhead fitting that you can see in the picture is for a Brewmometer (that gets clogged with grain and becomes inaccurate as soon as that happens...don't bother with one). The steam manifold is made of 3/8" copper tubing with a 1/16" hole every inch. It rests on top of the false bottom.

I did a few trials today just heating water. This boiler is AWESOME! For 5 gallon batches, 110VAC would probably work just fine. I heated about 12 gallons of water during my testing, and it was slow going with 110VAC. Here are the first results:

(min:sec on my stopwatch)

00:00 - 124° F - steam turned on (10 psi)
01:24 - 126° F
02:09 - 127° F - steam turned off to recover back to 10 psi
06:40 - steam turned on (12 psi)
07:40 - 131° F - steam turned off
15:27 - steam turned on (14 psi)
16:59 - 135° F
17:00 - I abandoned 110VAC and went to the hardware store​

I came back with a heavy duty extension cord (yes, I did the math for current, circuit length, and wire diameter), wired the system for 220VAC, and proceeded to do another trial. The results were VERY good!

00:00 - 120° F - steam turned on (12 psi)
02:35 - 130° F
04:50 - 140° F
05:50 - steam turned off (down to 8 psi)
06:50 - steam turned on (12 psi)
08:35 - 150° F - began modulating steam valve to maintain 8-10 psi rather than turning it completely off
11:56 - 160° F
16:00 - 170° F
17:20 - heating element turned off
18:20 - 176° F - steam turned off (pressure down to 2 psi)​

16 minutes from protein rest temp to mash out temp! SWEET! This is going to work REALLY well. It was amazing to watch. The manifold and valving made all kinds of noise, but there were few to no bubbles breaking the surface since all of the steam was condensing immediatey upon contact with the water in the mash tun (and giving up all of its heat energy). From time to time the system would actually rock the table a bit. I didn't measure the water level before and after, but it didn't appear to rise appreciably (maybe 1/2").

I can't wait to brew with this thing!
 
Great job Yuri, here is a suggestion for the steam injection manifold that may help tame the popping and snapping racket coming from the piping. If you could turn the manifold piping so the outlet holes are on the bottom it will allow the condensed steam to drain out and should reduce the snapping and popping. Also more and smaller holes will help reduce the rumble of the steam entering the water as the steam bubbles will be smaller and their collapsing would be a lot quiter. Would still recomend that you include a sight gauge for monitoring water level as an element failure would not be much fun if you are operating at rated wattage. If you want some 1/2" teflon tube and a couple 1/2" swagelok 90 degree fittings for a sight gauge let me know and i will donate them to your project, and will throw in a couple efector capacitive proximity switches to play with.
 
Todd said:
I've not tried it yet but how fast would a Rims system work? I guess it would be rims, I was planning to use a spare IC in 180* water.
What you describe is a HERMS, and it's pretty slow unless you can make your heat exchanger very efficient. Also, with a HERMS or RIMS, you typically recirculate the heated wort to the top of the mash, where the temperature remains hottest anyway. You have to stir often to get it to work well (not that I plan on skipping the stirring with steam...it's still necessary). My HERMS took about 15-20 minutes to heat the mash 10 degrees using 180 degree water with the heat exchanger. That's why I'm so excited about steam...
 
kladue said:
Great job Yuri, here is a suggestion for the steam injection manifold that may help tame the popping and snapping racket coming from the piping. If you could turn the manifold piping so the outlet holes are on the bottom it will allow the condensed steam to drain out and should reduce the snapping and popping. Also more and smaller holes will help reduce the rumble of the steam entering the water as the steam bubbles will be smaller and their collapsing would be a lot quiter. Would still recomend that you include a sight gauge for monitoring water level as an element failure would not be much fun if you are operating at rated wattage. If you want some 1/2" teflon tube and a couple 1/2" swagelok 90 degree fittings for a sight gauge let me know and i will donate them to your project, and will throw in a couple efector capacitive proximity switches to play with.
Thanks! And thanks for all your help! I may have to try turning the manifold over (and perhaps using a few more holes). I also agree that a sight glass would add some peace of mind. I'll PM you about the hardware.
 
Digging up an old post... couple of questions. Have you ever figured out how long the 3~4 gallons of water lasts? Ever tried boiling with it? I am looking into a steam kettle similar to BrewPastors. I would also like to get rid of using propane and switch to all electric. So it seems all I would need is a boiler...

Any thoughts?
 
4 gallons seems to last forever when mashing. I'm not sure that you could actually accomplish a boil with that amount, but it's worth a try. I'd test it out, but I don't have an extra 220 outlet in the new house (putting one in soon!).

I'm thinking about changing the system up a bit and using an upright 1/2 bbl keg instead of the corny on its side. I'm SURE you could run a boil with a system like that!
 
Thanks for the reply - I was thinking the same thing about a 1/2 bbl keg. This is on the back burner... have to get all my other projects wrapped up first - but the more I think about it, the more I'd like to make this happen.
 
You could work out the water requirements by calculating the BTU's needed and dividing by 970 to get the pounds of water needed to generate the steam used in heating.
 
Thanks for the reply kladue - I am sure I'll be hitting you guys up with a few questions in the coming weeks...

So, exactly how big of bomb would a pressurized sanke keg full of super-heated water really be? heh
 
Some rough math says it will take about 4 gallons of water in the boiler to raise 20 gallons of water in the kettle from a cool 50°F to boiling. I'd have to do some more re-reading to figure how many BTUs are required to sustain the boil.
 

Latest posts

Back
Top