DIY Networked Arduino Dual stage temp. controller w/ logging/graphing

Homebrew Talk - Beer, Wine, Mead, & Cider Brewing Discussion Forum

Help Support Homebrew Talk - Beer, Wine, Mead, & Cider Brewing Discussion Forum:

This site may earn a commission from merchant affiliate links, including eBay, Amazon, and others.

timdsmith72

Well-Known Member
Joined
Aug 1, 2005
Messages
372
Reaction score
20
Location
Carrollton
Apologies up front for my writing style. I sort of bounce all over the place like a gerbil on speed.

Code has been uploaded to GIT.

https://github.com/timdsmith72/tempControl

Parts needed:
Waterproof DS18B20 Digital temperature sensor
Link: http://www.adafruit.com/products/381

RGB LCD Shield Kit w/ 16x2 Character Display
Link: https://www.adafruit.com/products/714

Ethernet Shield with Wiznet W5100 Ethernet Chip
Link: http://dx.com/p/ethernet-shield-with-wiznet-w5100-ethernet-chip-tf-slot-118061?tc=USD&gclid=CKz1-J3J77wCFajm7AodQHAA5Q#.UxDlmdysMpE

SainSmart 2 channel relay module
Link: http://www.amazon.com/SainSmart-2-CH-2-Channel-Relay-Module/dp/B0057OC6D8/ref=sr_1_1?s=electronics&ie=UTF8&qid=1393622113&sr=1-1&keywords=sainsmart+2+channel+relay
Of course, you don't have to use that particular relay module. That's just the one I chose.

Of course the Arduino Uno board
Link: http://www.mcmelectronics.com/product/83-13129
Looks like it's on backorder from MCM. But you can get it from any number of places. Even Radio Shack tends to have them in stock.

Power supply for your arduino
http://www.adafruit.com/products/63

You'll also need some jumper wires and a nice heavy extension cord. 14AWG at least.

I think that's about it for the parts list. I also have an enclosure to mount the whole shebang in. But I reckon that's up to whatever you prefer.

So I have an STC-1000 temperature controller and I love it! It works great! But I can't tell you how many times I've gone to work and remembered just as I pulled into the parking lot, Dangit!! I meant to change the temperature before I left. For...Whatever reason. Step temperature changes, cold crashing, etc...

So I got to thinking, man it sure would be nice if I could change the temperature remotely. That's how this idea was born.

For this project, I'm using a MySQL database for to contain data for the graph. It also contains the desired set temperature which the Arduino queries at a set interval.

The database can be anywhere you want it, really. I have mine on a Raspberry Pi in my office. The Raspberry Pi also serves up the web page that displays the graph and has an entry box for changing the set temperature.
I'm using PHP to update the database. I suppose you could use whatever you're comfortable with.
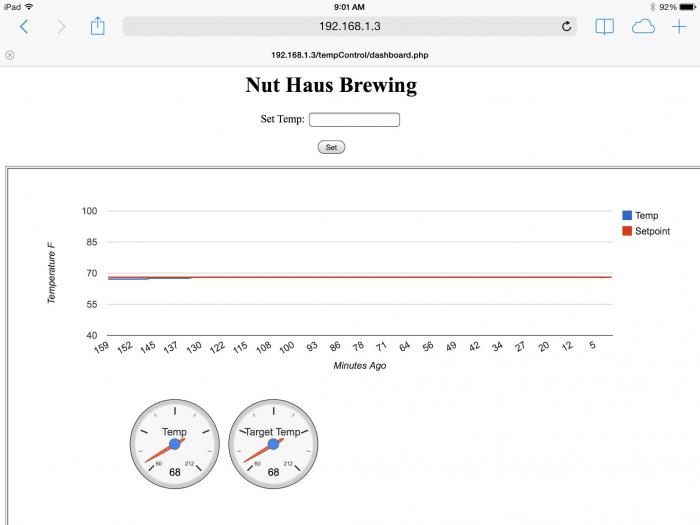
Here's what the graph looks like with the set temp box. This was taken before any code for the relays was written so it was just monitoring room temperature. But you get the idea of what it looks like.

screen-shot-2013-09-17-at.png


Edited to add parts list
More posts to come as I get time to add them.
(Continued....)
 
Last edited by a moderator:
So I got the Arduino connected to its network shield. I also got an RGB LCD to display the Target Temp and the Actual Temp. I wrote some code to change the LCD backlight to Red, Green, or Blue based on whether the controller was Heating, Just right, or Cooling so that I could tell at a glance what the thing was doing. So here it is all wired up to a breadboard for testing. Still just monitoring room temp, so...

9792636936_dc34822950_z.jpeg


More to come as I get time.
(Continued....)
 
HAHA --> "squirrels happened"

Following this, I really want remote viewing and logging more than remote controlling, but trying to grasp this arduino stuff in general.

Like the color changing, that would be great for peaking down into basement from stairs, no need to actually go all the way down. Hmmm.
 
I'm thinking about doing something similar. I'm excited to see what you come up with.

Sent from my HTCONE using Home Brew mobile app
 
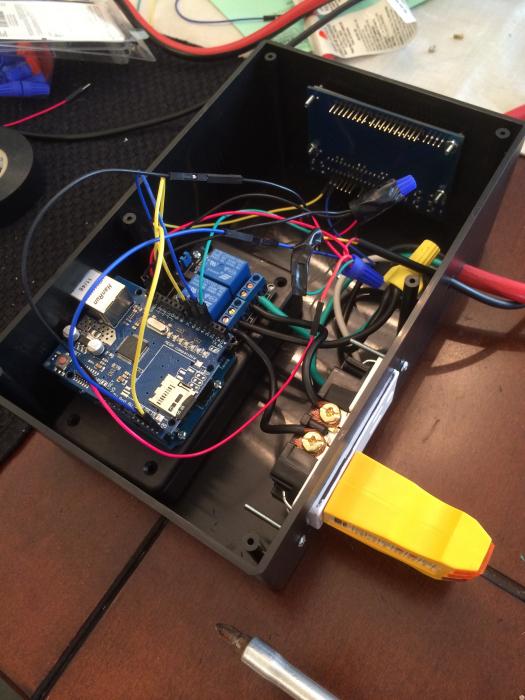
So I finished putting it together. I have it "fermenting" a bucket of water at the moment as a test run. (I'm skeered to try it on a real brew first time through.)
Here it is on top of my chest freezer. Green LCD means it's within +/- 1 degree of the set point.

IMG_3115.jpg


IMG_3116.jpg
 
Here's a screen grab of the web page with the graphing. I currently have it set to show me the last 160 minutes. This is adjustable in the PHP code. The temp and set point will show up to two decimal points. It doesn't show the decimal points if it reads, for example exactly 68.00. I just happened to check when it was exactly on point. hehe. Couldn't do that again if I wanted to...

IMG_0196.jpg
 
I like it!

I, along with others, would like to take a look through your code when your satisfied with the project being completed. I want to do something similar but haven't taken the time to start gathering the resources necessary.

So if you are willing to share it would be a major time saver for me.

Thanks in advance.

Thanks!!

I'm going through my code and cleaning up some of the debugging stuff and also doing a better job of commenting it so that you can see what's going on. I will be posting it all when I get it cleaned up / well commented.

Also, I'm going to post the data sheet for the temperature sensor, along with an article/diagram on how to wire it up. I'll do the same for the LCD. Also, once you get started, feel free to ask me questions. If I know me, I'll completely miss some vital detail. :)
 
Cool man.

My ultimate goal is to have a PHP/SQL based server to log information during fermentation, which also stores the recipe information and notes for any batch of beer that I may be doing. My biggest failing point is keeping my records so going digital with regard to this would be awesome.

Having a controller that you can tweak on your own accord would be a major plus in setting fermentation temp schedules.
 
Yup. That sounds suspiciously like what I have set up. My Arduino sends data to my PHP/SQL server (just a Raspberry Pi sitting on my desk in the office.)
The Arduino also gets the desired set point from the SQL database.
 
Cool man.

My ultimate goal is to have a PHP/SQL based server to log information during fermentation, which also stores the recipe information and notes for any batch of beer that I may be doing. My biggest failing point is keeping my records so going digital with regard to this would be awesome.

Having a controller that you can tweak on your own accord would be a major plus in setting fermentation temp schedules.

I'm also looking forward to being able to log the information. I'm looking forward to the day when I can monitor the brewing process as well as fermentation in order to be able to see exactly what's going on during the entire brew day. Should lead to better consistency (within the limits of my ability) and understanding of exactly what I'm brewing.
 
This is pretty cool. My abilities comes to a severe halt at the programming bit and I wonder if there are some commercial solutions?
 
The fermostat is a commercially available dual stage controller with graphing capabilities. No affiliation, just a happy customer.


Sent from my iPad using Home Brew
 
The fermostat is a commercially available dual stage controller with graphing capabilities. No affiliation, just a happy customer.


Sent from my iPad using Home Brew

Theres a product for every problem, apparently? Thank you!
 
Nice, somewhat similar to what i did with COSM/Xively instead of a local Database, i like the Sainsmart Relay board, i didnt know such a thing existed and im totally buying one to use in my BrewPi setup instead of my rather clumsy Powerswitch Tail II.

Also just FYI you basically just built an entire BrewPi setup. You may want to look into using their software(which is free) on your RaspPi and Arduino, they have a github project and could always use more developers i am sure. They already have a ton of these features for the backend written as well as some pretty advanced PID algorithms that keep my beer +-.2C from setpoint, so could save you a ton of time and give you a bunch more features for free. Your project is damn nice though and im going to steal a few things :) But eventually i got tired (and ran out of time) to do my own thing and it was just easier to use BrewPi because of their great support on mIRC.

If you ever get to that point and are curious, here's an example of one of my graphs BrewPi gives me if your not familiar with it.
hgipa.jpg
 
Hmmm.. BrewPi. I'm going to have to have a look at their code and see if there's anything I'd like to "Borrow." ;)
 
Hmmm.. BrewPi. I'm going to have to have a look at their code and see if there's anything I'd like to "Borrow." ;)

Thats the nice thing about forking off Github ;) It really is a badass bit of software...stealing a few idea's from your build im in the process of documenting how to build a BrewPi for ~100 USD instead of the 200+ it would cost from the BrewPi store which has some annoying shipping costs coming from the the Netherlands.
 
Thats the nice thing about forking off Github ;) It really is a badass bit of software...stealing a few idea's from your build im in the process of documenting how to build a BrewPi for ~100 USD instead of the 200+ it would cost from the BrewPi store which has some annoying shipping costs coming from the the Netherlands.

If you need to monitor/control a few more devices (say, 36), and don't mind using a slightly more powerful controller, take a look at my TeensyNet project, or my TeensyNet website.

The code is also available at my github
 
Hmmm.. BrewPi. I'm going to have to have a look at their code and see if there's anything I'd like to "Borrow." ;)

I would be interested in taking a look at your code as well! I basically pieced together a brewpi, but can't use my 16x2 I2CLCD because their code uses a 20x4 with a shift register. I do not know enough to make those changes..

D
 
I would be interested in taking a look at your code as well! I basically pieced together a brewpi, but can't use my 16x2 I2CLCD because their code uses a 20x4 with a shift register. I do not know enough to make those changes..
D
Hi! As far as the LCD goes. Here's how you wire it up.
Important: Wire +5V and GND to the shield pins shown in the pictures! The GND pin next to the 5v pin is NOT connected. You must use the one next to the VIN pin!
I'm using the UNO, so it's the very first diagram. :)
http://learn.adafruit.com/assets/1439

Then download this library:
https://github.com/adafruit/Adafruit-RGB-LCD-Shield-Library/archive/master.zip

Include the library in your code, then do some setup.
Code:
#include <Adafruit_RGBLCDShield.h>
#define RED 0x1  //These are just setting up the LCD
#define YELLOW 0x3
#define GREEN 0x2
#define TEAL 0x6
#define BLUE 0x4
#define VIOLET 0x5
#define WHITE 0x7

Then here's how you print to it, set the backlight, etc.
Code:
void lcdPrint(float temperature, float setPoint){
  lcd.setCursor(0, 0);  //Set cursor position to first character of first line.
  lcd.print("Target:  ");
  lcd.print(setPoint);
  lcd.setCursor(0, 1);  //Set to first character of second line.
  lcd.print("Temp:  ");
  lcd.print(temperature);
  if(freezerON){
     lcd.setBacklight(BLUE); 
  }
  if(heaterON){
    lcd.setBacklight(RED);
  }
  if(!freezerON && !heaterON){
    lcd.setBacklight(GREEN);
  }
}
 
Sketch purty *squirrel* please! I really like this idea. Oh, squirrel!
HAHAHAHA!!! Yep. I've almost got it cleaned up enough where it's readable. I had planned to do it while at work but this was a busy week and they expected me to... you know... work. LOL!! :smack::p
 
Hi! As far as the LCD goes. Here's how you wire it up.
Important: Wire +5V and GND to the shield pins shown in the pictures! The GND pin next to the 5v pin is NOT connected. You must use the one next to the VIN pin!
I'm using the UNO, so it's the very first diagram. :)
http://learn.adafruit.com/assets/1439

Then download this library:
https://github.com/adafruit/Adafruit-RGB-LCD-Shield-Library/archive/master.zip

Include the library in your code, then do some setup.
Code:
#include <Adafruit_RGBLCDShield.h>
#define RED 0x1  //These are just setting up the LCD
#define YELLOW 0x3
#define GREEN 0x2
#define TEAL 0x6
#define BLUE 0x4
#define VIOLET 0x5
#define WHITE 0x7

Then here's how you print to it, set the backlight, etc.
Code:
void lcdPrint(float temperature, float setPoint){
  lcd.setCursor(0, 0);  //Set cursor position to first character of first line.
  lcd.print("Target:  ");
  lcd.print(setPoint);
  lcd.setCursor(0, 1);  //Set to first character of second line.
  lcd.print("Temp:  ");
  lcd.print(temperature);
  if(freezerON){
     lcd.setBacklight(BLUE); 
  }
  if(heaterON){
    lcd.setBacklight(RED);
  }
  if(!freezerON && !heaterON){
    lcd.setBacklight(GREEN);
  }
}


Thanks!
Can't wait to see the rest of the code for Pi integration, etc! :mug:
 
You're welcome!!
I'm brewing today, so I'll get to clean up/post at least some of the code during the mash and boil. :mug:
 
This is one of the PHP files that lives on your Raspberry Pi.
You'll just need to change the username/password to match your database username/password.

http://www.nuthausbrewing.com/TempControlUploads/data.zip

This is the bit of code that deals with this file.

Code:
void sendData(float temperature ){
    Serial.println("connecting...");
    //if you get a connection, report back via serial:
    if (client.connect(serverName, 80)) {
    Serial.println("connected");
    // Make a HTTP request:  Sends information to "data.php" which lives on the RPi.
    client.print("GET http://192.168.1.3/tempControl/data.php?Temperature="); //place your server address here
    Serial.print("Sent Temp:  ");  //  
    Serial.println(temperature);
    client.print(temperature);  // 
    client.print("&Setpoint=");
    client.print(targetTemp);
    client.println(" HTTP/1.0");
    client.println("Host: http://192.168.1.3");
    client.println();
    client.stop();
    delay(300);
    } else {
      Serial.println("connection failed in SendData()");
      client.stop();
      delay(300);
      Ethernet.begin(mac, ip);  //  Start ethernet again and we'll try it again next time through.
    }
    lastSentDataTime = now();
}
 
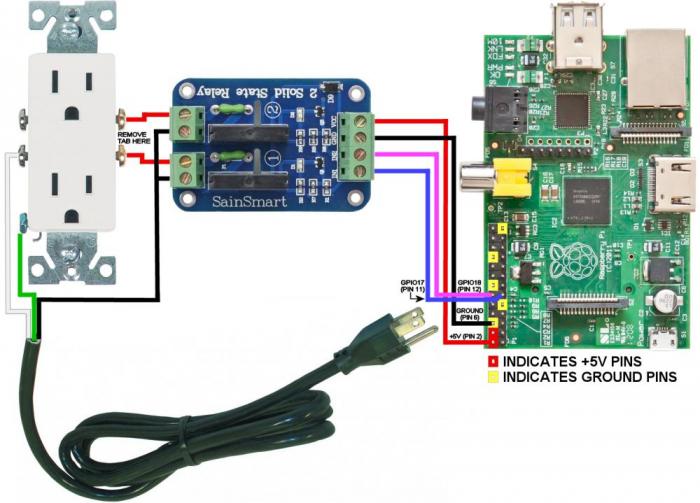
Can you give a quick drawing of your hookup to the Relay board?

It looks like from the picture you take the left most pin and are wiring it to the brass screws on the socket, what about the middle common connection? I see them both being tied together with a 3rd wire...is that HOT or GND? You use both black and green wire for this so i have no idea ;)
 
Ha! Yes. Sorry about that. I just used the wire I took out of the extension cord. I screwed up a nice length of one of the colors and didn't want to cut any more off the extension, so used what I had left.
I am cleaning up after brewing. I'll do that in a bit. :)


Sent from my iPhone using Home Brew
 
This is one of the PHP files that lives on your Raspberry Pi.
You'll just need to change the username/password to match your database username/password.

http://www.nuthausbrewing.com/TempControlUploads/data.zip

This is the bit of code that deals with this file.

Code:
void sendData(float temperature ){
    Serial.println("connecting...");
    //if you get a connection, report back via serial:
    if (client.connect(serverName, 80)) {
    Serial.println("connected");
    // Make a HTTP request:  Sends information to "data.php" which lives on the RPi.
    client.print("GET http://192.168.1.3/tempControl/data.php?Temperature="); //place your server address here
    Serial.print("Sent Temp:  ");  //  
    Serial.println(temperature);
    client.print(temperature);  // 
    client.print("&Setpoint=");
    client.print(targetTemp);
    client.println(" HTTP/1.0");
    client.println("Host: http://192.168.1.3");
    client.println();
    client.stop();
    delay(300);
    } else {
      Serial.println("connection failed in SendData()");
      client.stop();
      delay(300);
      Ethernet.begin(mac, ip);  //  Start ethernet again and we'll try it again next time through.
    }
    lastSentDataTime = now();
}


Is this the same as the graph in your first post?
 
That's the file that inserts the data into your database. The file that draws your chart is called "dashboard.php"

I've created a GIT repository. Link coming.
 
Can you give a quick drawing of your hookup to the Relay board?

It looks like from the picture you take the left most pin and are wiring it to the brass screws on the socket, what about the middle common connection? I see them both being tied together with a 3rd wire...is that HOT or GND? You use both black and green wire for this so i have no idea ;)

Ok. Here's the diagram I used. It's not exactly the same relay board, but it's the one I used to figure out how to hook it up because it's close enough. :mug:
Oh. The ones that are tied together are HOT. The ground is just running to the ground screw.

Pi-Power-Controller-Wiring-Diagram-SainSmart.jpg
 
It occurs to me that it might be helpful to see the database structure so here are screenshots of the tables.
"temp" Table on top.
"SetPoint" table on bottom.
All enclosed in a database called "tempMonitor"
There are a few extra things in "temp" that I'm not using yet. I put them in with an idea in mind and never acted on it.

Screen Shot 2014-03-14 at 6.32.48 PM.jpg


Screen Shot 2014-03-14 at 6.33.32 PM.jpg
 

Latest posts

Back
Top