Well, I also have 3-piece ball valves that I've never serviced so I'm going to take it all apart, apply teflon tape to the NPT connections again and tighten the hell out of the ball valve bolts. I think I'll try testing the leak theory by filling with 3 gallons of water and putting paper towels over the mesh. If the connections are tight, it should collapse the hose but not fill with air.
You are using an out of date browser. It may not display this or other websites correctly.
You should upgrade or use an alternative browser.
You should upgrade or use an alternative browser.
DIY Hop Filter Video
- Thread starter Bobby_M
- Start date

Help Support Homebrew Talk:
This site may earn a commission from merchant affiliate
links, including eBay, Amazon, and others.
McMaster-Carr has window screen. 7 Feet x 24" 304 Stainless for $25 each. 316 Stainless is $30 each. You can also get it in larger rolls...
McMaster-Carr
McMaster-Carr
gmarcek
Member
You could try installing the diptube without the mesh, then plug the diptube with your finger once the pump is primed.
McMaster-Carr has window screen. 7 Feet x 24" 304 Stainless for $25 each. 316 Stainless is $30 each. You can also get it in larger rolls...
McMaster-Carr
You don't even need that much. They sell stainless mesh in 12 x 12" and 12 x 24" pieces for less than $10.
Ryan_PA
Well-Known Member
Hey Bobby, I just got done a 10G batch with recirc. I used teflon tape on the threads and cranked the be-jesus out of the hopstopper. I also added a hop sock to the return port to grab more cold break. That really did the trick. THe flow never stopped or even slowed. I know it could be annoying to add the hopsock to every brew, but at least for bigger batches, I think it is in my new process.
phillc
Well-Known Member
- Joined
- Apr 18, 2008
- Messages
- 143
- Reaction score
- 1
Bobby_M: I would like to say thank you for your very informative video. Following your instructions, I made my own hop filter using 30x30 316SS mesh and stainless wire from McMaster Carr. I put it together some time ago, but have been on a brewing hiatus for some time. Well, last night it got put to the test and I am extremely satisfied with the results.
The brew was an IPA with 5oz. of pellet hops in the kettle.
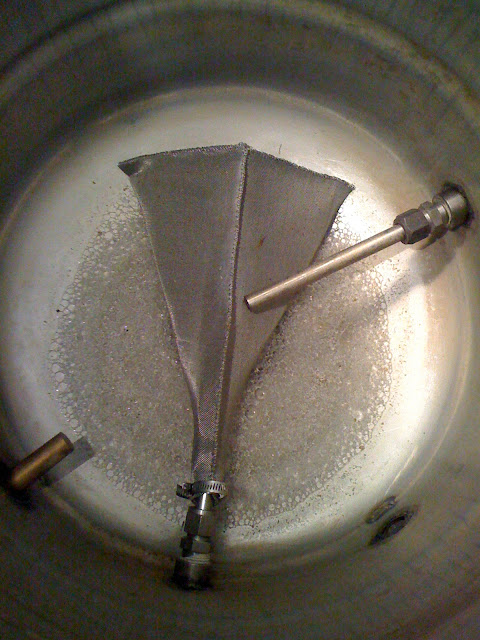
Installed Filter (post-brew. Not completely cleaned up yet):

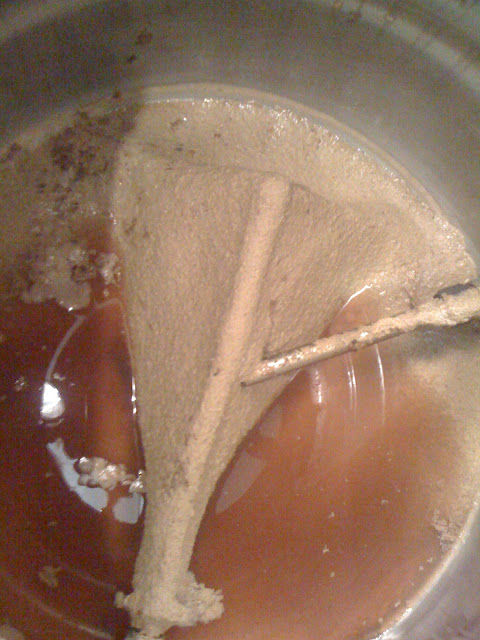
Coated in hops:

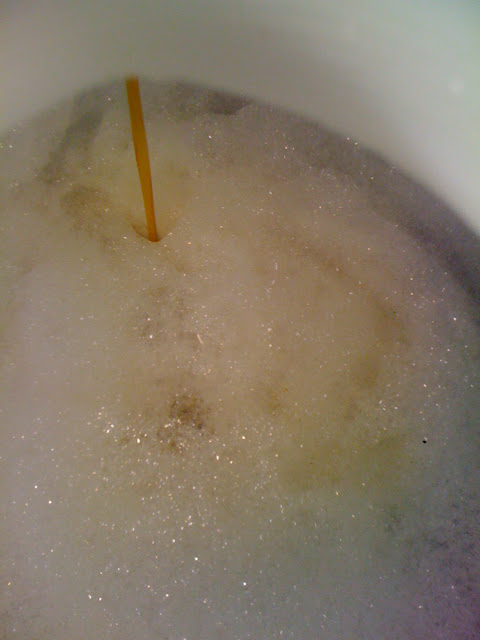
Showing the flow. This was taken seconds after the previous picture:

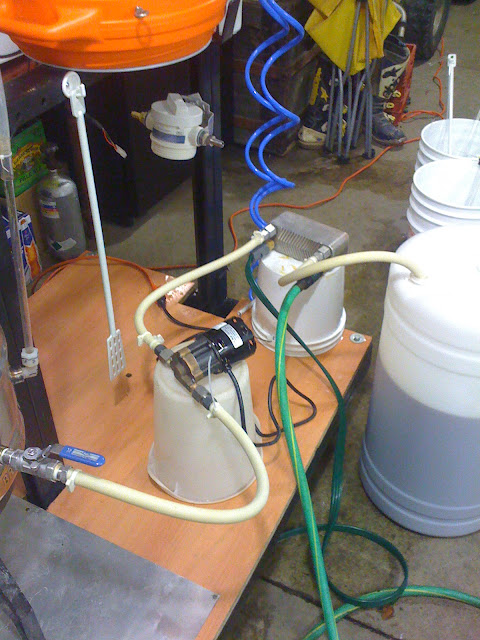
Setup:

I never saw even the slightest little bit of non-liquid material in the flow to the fermenter. My plate chiller had 0 issues. Cleanup was a breeze because all of the solids remained in the kettle!
I need to re-do my dip tube because it left about a half gallon of wort in the kettle, but that shouldn't be an issue.
As I stated before, extremely satisfied.
The brew was an IPA with 5oz. of pellet hops in the kettle.
Installed Filter (post-brew. Not completely cleaned up yet):

Coated in hops:

Showing the flow. This was taken seconds after the previous picture:

Setup:

I never saw even the slightest little bit of non-liquid material in the flow to the fermenter. My plate chiller had 0 issues. Cleanup was a breeze because all of the solids remained in the kettle!
I need to re-do my dip tube because it left about a half gallon of wort in the kettle, but that shouldn't be an issue.
As I stated before, extremely satisfied.

$479.00
$559.00
EdgeStar KC1000SS Craft Brew Kegerator for 1/6 Barrel and Cornelius Kegs
Amazon.com

$159.99 ($26.66 / Count)
3M High Flow Series System BREW120-MS, 5616001, For Brewed Coffee and Hot Tea, Valve-in-Head Design
SpaceCityProviders

$53.24
1pc Hose Barb/MFL 1.5" Tri Clamp to Ball Lock Post Liquid Gas Homebrew Kegging Fermentation Parts Brewer Hardware SUS304(Gas MFL)
Guangshui Weilu You Trading Co., Ltd

$28.98
Five Star - 6022b_ - Star San - 32 Ounce - High Foaming Sanitizer
Great Fermentations of Indiana

$53.24
1pc Hose Barb/MFL 1.5" Tri Clamp to Ball Lock Post Liquid Gas Homebrew Kegging Fermentation Parts Brewer Hardware SUS304(Liquid Hose Barb)
yunchengshiyanhuqucuichendianzishangwuyouxiangongsi

$22.00 ($623.23 / Ounce)
AMZLMPKNTW Ball Lock Sample Faucet 30cm Reinforced Silicone Hose Secondary Fermentation Homebrew Kegging joyful
无为中南商贸有限公司

$76.92 ($2,179.04 / Ounce)
Brewing accessories 1.5" Tri Clamp to Ball Lock Post Liquid Gas Homebrew Kegging Fermentation Parts Brewer Hardware SUS304 Brewing accessories(Gas Hose Barb)
chuhanhandianzishangwu

$58.16
HUIZHUGS Brewing Equipment Keg Ball Lock Faucet 30cm Reinforced Silicone Hose Secondary Fermentation Homebrew Kegging Brewing Equipment
xiangshuizhenzhanglingfengshop

$44.99
$49.95
Craft A Brew - Mead Making Kit – Reusable Make Your Own Mead Kit – Yields 1 Gallon of Mead
Craft a Brew

$176.97
1pc Commercial Keg Manifold 2" Tri Clamp,Ball Lock Tapping Head,Pressure Gauge/Adjustable PRV for Kegging,Fermentation Control
hanhanbaihuoxiaoshoudian

$719.00
$799.00
EdgeStar KC2000TWIN Full Size Dual Tap Kegerator & Draft Beer Dispenser - Black
Amazon.com

$7.79 ($7.79 / Count)
Craft A Brew - LalBrew Voss™ - Kveik Ale Yeast - For Craft Lagers - Ingredients for Home Brewing - Beer Making Supplies - (1 Pack)
Craft a Brew

$20.94
$29.99
The Brew Your Own Big Book of Clone Recipes: Featuring 300 Homebrew Recipes from Your Favorite Breweries
Amazon.com

$33.99 ($17.00 / Count)
$41.99 ($21.00 / Count)
2 Pack 1 Gallon Large Fermentation Jars with 3 Airlocks and 2 SCREW Lids(100% Airtight Heavy Duty Lid w Silicone) - Wide Mouth Glass Jars w Scale Mark - Pickle Jars for Sauerkraut, Sourdough Starter
Qianfenie Direct

$10.99 ($31.16 / Ounce)
Hornindal Kveik Yeast for Homebrewing - Mead, Cider, Wine, Beer - 10g Packet - Saccharomyces Cerevisiae - Sold by Shadowhive.com
Shadowhive
Hey Bobby, I just got done a 10G batch with recirc. I used teflon tape on the threads and cranked the be-jesus out of the hopstopper. I also added a hop sock to the return port to grab more cold break. That really did the trick. THe flow never stopped or even slowed. I know it could be annoying to add the hopsock to every brew, but at least for bigger batches, I think it is in my new process.
Ryan, I totally missed this post. I'm glad you've had success. I still have to figure out where my siphon break is happening. I'm going to teflon tape the heck out of all my threaded connections and maybe replace the stainless ferrule with a silicone ORING since I won't have to tighten down so hard.
Bobby_M: I would like to say thank you for your very informative video. Following your instructions, I made my own hop filter using 30x30 316SS mesh and stainless wire from McMaster Carr. I put it together some time ago, but have been on a brewing hiatus for some time. Well, last night it got put to the test and I am extremely satisfied with the results.
The brew was an IPA with 5oz. of pellet hops in the kettle.
Installed Filter (post-brew. Not completely cleaned up yet):

Coated in hops:

Showing the flow. This was taken seconds after the previous picture:

Setup:

I never saw even the slightest little bit of non-liquid material in the flow to the fermenter. My plate chiller had 0 issues. Cleanup was a breeze because all of the solids remained in the kettle!
I need to re-do my dip tube because it left about a half gallon of wort in the kettle, but that shouldn't be an issue.
As I stated before, extremely satisfied.
Awesome. I thought I was looking at a picture of my own kettle there for a second. That's exactly how I was hoping it performed and was disappointed with mine for a while. It's perfectly clear now that I have an air leak somewhere between my siphon tube and pump that I need to fix. Thanks.
phillc
Well-Known Member
- Joined
- Apr 18, 2008
- Messages
- 143
- Reaction score
- 1
Ryan, I totally missed this post. I'm glad you've had success. I still have to figure out where my siphon break is happening. I'm going to teflon tape the heck out of all my threaded connections and maybe replace the stainless ferrule with a silicone ORING since I won't have to tighten down so hard.
I purchased a jar of food safe paste on thread sealer. I use a bit of tape and this stuff and NEVER have a leak. I can find out the brand if you like...
Whiskey
Well-Known Member
Bobby_M, are you using the McMaster Carr QD's that seem to be popular here? When I was testing my system I found that at least my kettle side QD's will pull air from the connection if a clog is formed. There do not leak under pressure, but as soon as a good vacuum is started I get a steady stream of bubbles in my tubing. I also have a three piece valve on my kettle so we may be having the same issue.
Yeah, that's what I was afraid of finding. I plan to temporarily plug my siphon tube and pressurize my system to 5psi and do a soap bubble test. I might try replacing the gaskets in the QD with a softer piece of silicone tubing if that's the culprit. I also recently found that my bolts on the 3-piece valve were a bit loose but I hadn't brewed since snugging them. In any case, pulling air in on the input side of the pump in all cases is going to be a problem so I need to work on it.
Whiskey
Well-Known Member
Yeah, that's what I was afraid of finding. I plan to temporarily plug my siphon tube and pressurize my system to 5psi and do a soap bubble test. I might try replacing the gaskets in the QD with a softer piece of silicone tubing if that's the culprit. I also recently found that my bolts on the 3-piece valve were a bit loose but I hadn't brewed since snugging them. In any case, pulling air in on the input side of the pump in all cases is going to be a problem so I need to work on it.
It appears to only occur when I pull from the kettle, however, I only use the QD's when circulating for my IC and pumping to the fermentor.
I will put the hose nipple back on my kettle, and put a short piece of tubing in between the kettle and the QD to see if I get bubbles before or after.
I have already lost a bit of faith in the MC QD's when I saw how restrictive the right angle adapters were. Pulled those things off and my flow rate appeared to double when whirlpooling.
Anyway, I will post my findings back here.
Simphoto02
WoodyBlue
Hey all,
I built this sucker and it looks way cool and should work like a champ. I will post the results later, still testing the new brutus 9.5
Anyway I just wanted to post a tip.
Bobby's idea is great. I found one little helpful idea though.
It is something I am sure ALL homebrewers have, simply because we weren't ALWAYS homebrewers....
HEMOSTATS!!!
Use them to hold things together, use the needle to make Several holes and stitch several stitches at a time. Made mine in less time than bobby did on his video.
Great Idea Bobby, can't wait to use it for real.
smatson
Member
- Joined
- Apr 13, 2009
- Messages
- 19
- Reaction score
- 0
Thanks for the great tutorial! So does this mean that you don't whirlpool? It seems to me like you would have a hard time doing so. Or I could be totally wrong. I just put a spigot in my kettle and it seems like I am going to need some sort of filter. Thanks!
SankePankey
Well-Known Member
That's weird, I was just gonna make exactly this. The height is the important part. Thanks for the primer on sewing stainless.
I chose to go a slightly different route since I was given a bazooka screen. Making it about 4" higher than the kettle base and drain. I am also using a piece of 14 X 14 .025" gauge mesh with it. It is similar to the bazooka screen gauge. Stiff and couldn't as be easily bent like what Bobby's using. Just for anyone's reference.... I too spent about an hour trying to find the right piece that had the rigidity and flow I wanted (and price).
Got it at Smallparts.com. Neat source for small quantities of stuff (owned by Amazon).
I'm on my second generation homemade hop stopper. My latest version took me all of 2 minutes to make (I already had the dip tube). I took a rectangular sheet of mesh and cut a small X to insert my dip tube through. Then I folded it not quite half and folded the extra over the other side. The dip tube is inserted and the edges are sealed up with a whole bunch of 1.5" SS split rings. I do loose a little surface area, but in exchange I can take it totally apart for easy cleaning. No residue trapped anywhere.
bendavanza
Well-Known Member
Speaking of Hemostats, I saw a brewer using a large pair to close one end of his silicone tubing to prevent spills and keep the tube full when switching QD's around.
ScubaSteve
Well-Known Member
- Joined
- May 21, 2007
- Messages
- 3,673
- Reaction score
- 91


Any silver soldering I've done was only successful when I remembered to heat indirectly and never burn off the flux. It seems that it would be pretty hard to do that on a mesh. Give it a shot!
I'm really baffled that my pump inlet hose was seeing "air" when the screen started providing a lot of resistance. MAYBE there's a tiny leak that pull air under suction, but it's too small to leak liquid under ambient pressure.
I tried soldering screen with just normal solder (not brazing, so it's alower temp).....any kind of flame will be difficult to keep the screen from overheating. I'd consider trying a soldering iron and maybe just solder at main stress points, etc.
DakotaRules
Well-Known Member
So Bobby, I'm trying to make the decision on either a plate chiller or making a CFC. I have been reading a ton of information regarding cold break and pellet material in there kettles. I'm using a keggle with a pickup tube and also a hop bag. I'm worried that if I buy a plate chiller that it will clog up due to cold break or hop material. I just read on one of your posts, if I use a plate chiller, I wont need a pre-filter or hopstopper on my pick tube. If I don't need a hopstopper I will go with the plate chiller as i think I can get a deal on it and it would be cheaper than building a CFC.
kkohlm
New Member
Not to be a jerk, just a math geek. In a 12" x 12" piece of mesh there is 144 in^2
Great build though! I wonder how it compares in performance to the Blichmann HopBlocker
Great build though! I wonder how it compares in performance to the Blichmann HopBlocker
I guess it's just a little jerky to mention the error @ 7:22 even though the annotated correction text pops up at the exact moment I say 12 in^2.
kkohlm
New Member
Sorry Bobby, didn't see the on screen correction. Guess I wasn't paying attention 
slakwhere
Well-Known Member
has anyone tried this with an IC? i wonder how it handles cold break...
Cold break is evil. Any screen is going to choke on it but then the whole point of this screen is to prefilter wort for external chillers. I wouldn't worry about cold break getting into the fermenter.
slakwhere
Well-Known Member
thanks, bobby.
BrewMoreBeers
Well-Known Member
how much better does this work than the Chore Boy that I use as a filter? I just did a batch last weekend with 4 oz of pellets and the Chore Boy filtered almost everything out. I run a 100% gravity system through a plate chiller.
The Chore Boy was caked with hops when i was done.
The Chore Boy was caked with hops when i was done.
klyph
Well-Known Member
I'll bet you do an amazing Jeff Goldblum impression.
WC87
Well-Known Member
7 oz of pellet hops and 1 oz of leaf hops combined with IC cold break just might tax this screen to the limit. 
However, with a sanitized mash paddle and a lot of care I was able to extract all but a couple of quarts of usable wort. I figured I would have issues so I adjusted my recipe to account for a boil of 12.5 gals to still leave me with at least 10 gals of wort after boil-off and what I figured to leave behind in the kettle.
Thanks Bobby, good idea and excellent video!
Bobby is this your preferred method of dip tube / screen you are currently using on your bk
I am still trying to figure out what method I want to go with for my BK.
I have yet to build anything, but i do have 12" of 1/2" soft copper and a 1/2" brass compression fitting.
I only want to build some one once and be done with it, but I have read and seen several option that are a couple years old and wonder if people are still using them or have upgraded to some thing better.
-=Jason=-
When I had a plate chiller, I wouldn't use it without a filter like this. I've since swapped over to an immersion chiller just to play around with it and I have since sold the hop filter since it's not critical to filter in that case. I'm still on the fence about going back to a plate chiller but if I do, I'd build something very similar only with a more flat profile similar to the real deal hopstopper.
Similar threads
- Replies
- 19
- Views
- 1K


![Craft A Brew - Safale BE-256 Yeast - Fermentis - Belgian Ale Dry Yeast - For Belgian & Strong Ales - Ingredients for Home Brewing - Beer Making Supplies - [3 Pack]](https://m.media-amazon.com/images/I/51bcKEwQmWL._SL500_.jpg)


