• Please visit and share your knowledge at our sister communities:
  • If you have not, please join our official Homebrewing Facebook Group!

    Homebrewing Facebook Group

DIY Fermentation Cabinet

Homebrew Talk

Help Support Homebrew Talk:

This site may earn a commission from merchant affiliate links, including eBay, Amazon, and others.

DeathBrewer

Maniacally Malty
HBT Supporter
Joined
Apr 9, 2007
Messages
21,787
Reaction score
320
Location
Oakland, CA
Winter isn't too bad around here. It rains a lot and the parties are dead, but at least my beer keeps cold. In fact, I'm really looking forward to making some beers with my conical now that the ambient temp in the brewhouse has gone down. Last winter i made some of my best beers ever.

But then summer came and it made a fruity, estery mess of my beers. That got me in a mood, so i bought a bunch of lumber, an AC unit, some casters, a whole mess of styrofoam and some screws.

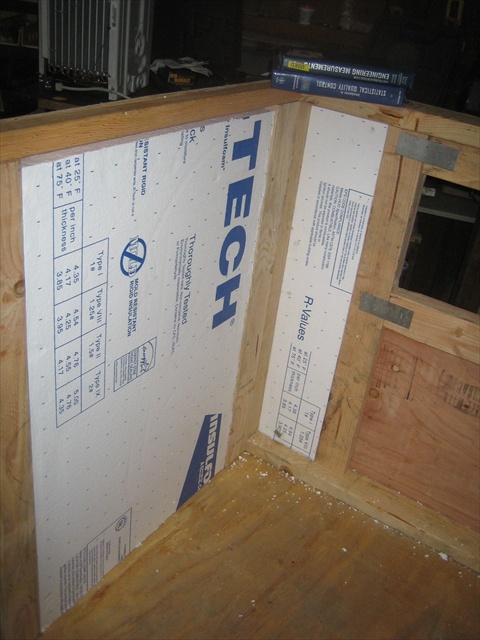
Here's some of that mess which became my fermentation cabinet:

brewcab_002-64367.jpg


brewcab_003-64368.jpg


You wouldn't believe how i got those huge panels of foam home in my scirocco.

We started with the base:

brewcab_007-64369.jpg


Then screwed in the casters:

brewcab_001-64370.jpg
 
beautiful, start isn't it?

brewcab_006-64371.jpg


at this point we realized i had made it too wide (i wanted to fit at least four carboys in there) and it wouldn't roll out the door. whoops!

It's not going to leave the building any time soon, however, so we simply constructed the rest out of their own frames, like you would do with a window. Here's the back being set up:

brewcab_008-64372.jpg


brewcab_009-64373.jpg


Here you can see it sitting on the base. This made it very easy to screw it down:

brewcab_010-64374.jpg
 
Looks good so far, please snap some pictures of the cooling setup and the finished product please. Right now I'm using an old fridge, but I can only fit two carboys in there.
 
A nice thick, flat piece of plywood was screwed into the base before we added the panels. We put the panels together with plywood before we attached the panels to the base. The doors were made of a simple 2x4 and 2x2 frame.

brewcab_015-64375.jpg


Here's a pic of us holding it together. the plywood hangs over the sides enough so that we can screw it into the frame and the sides overlapped the back panel. it also made it look better, as you couldn't see the framework:

brewcab_011-64376.jpg


a pic from the inside after we screwed them all together:

brewcab_015-64375.jpg


and the outside:

brewcab_016-64377.jpg
 
the plywood kept it all solid. We screwed the back panel down into the base, then screwed the sides into the back and the base:

brewcab_018-64378.jpg


Then came adding the foam. The first part was pretty cool, just get 1.5" foam to match the 2x4 frame and cut them perfectly. We added some glue and shoved them right in:

brewcab_020-64379.jpg


brewcab_019-64380.jpg
 
any gaps you see were filled in with liquid foam.

After we added the layers of foam inside the frame, we added a full 1.5" layer of foam on the inside and back, cutting only a hole for the AC unit.

We added the top (unfortunately i don't have pictures) overlapping the same way after we installed the foam and screwed it into the back and the sides. this made everything so solid, i could stand on it confidently.

Here is the cabinet as it is now:

cabinet-64381.jpg


We installed hinges on the door and lined around the doors with stripping. You can see the extra layers of foam here. We also put a thin piece of plywood on top of the bottom foam so it wouldn't get damaged from moving carboys in and out:

hinge-64382.jpg


And here it is full of beer. it fits six carboys, easy. you can see the ac unit in the back and we drilled an additional whole for the cable to come out and attach to the external temperature controller.:

beer-64383.jpg


The foam pieces are all glued only to their individual panels, so it can be taken apart piece by piece (top, sides, and then back) and moved. We added liquid foam to seal them a bit, but nothing a razor blade won't take care of.

In addition, here is some math my friend did for the energy it would take to cool in regards to space, insulation, etc. it works pretty efficiently. it kicks on every few hours for a couple of minutes and maintains a nice ambient 58°F:

brewcab_026-64384.jpg
 
anyway, that's it. all i left to do to it is add some thicker stripping (it doesn't quite get the seal i'd like) and replace the straps with something permanent. They work well but are kind of a PITA.

This was actually easy as hell to build...it only took two weekends and it was usuable immediately after construction. Now the problem is what to do with my beer when this is full! I think i'll do something for my apartment next...

Feel free to ask any questions. It's been a long time since i built this, so i may have left things out. i could also take more pictures if you want to see something specific.
Cheers! :mug:

:rockin:
 
I've tested it down to the mid 40s, but it could probably go in the thirties. it's pretty efficient. i'm sure i could use it for lagers, but this is my ale fermentation cabinet. i hope to get a chest freezer for lagering soon...i have truck payments now, can't throw money around like i used to.
 
Wonder how to adapt this to keep beer warm... For us Northerners. :D

Nice work. Kind of like a rolling walk-in.
 
hey! Gor! i edited that pic for this family environment. :D

with the AC, abt how much did the project cost ? (Can you tell I am not a builder ?)

AC unit was $100.00. i think the total cost was around $450-500.00. i bought everything new, tho. the only stuff i got free was the plywood for the sides, back and front (i bought thick, flat plywood for the base and top.)

Wonder how to adapt this to keep beer warm... For us Northerners. :D

Nice work. Kind of like a rolling walk-in.

hmm...i guess you'd have to add a heating element that wouldn't melt the foam. or just use it for lagering ;)
 
This is great, just want I was looking for. I have a window air unit like that from when we lived in an apartment. This is for sure my next project.
 
That looks great man! Have someone add it to the DIY projects sticky for sure. You earned it.

This looks pretty do-able for most people. :mug:
 
Did you need to use external control? Wouldn't the AC unit's own control work? Obviously you'd have open up to adjust.
 
yes, i chose the external controller instead of opening up all the time. plus, the ac unit just had levels (something like 1, 2, 3, 4, etc) instead of actual temperature control.
 
Haha, I havent heard anyone congradulate the Mech E for remembering his Heat Transfer stuff... That gave me a smile, while I hope to never directly use it again--I had a basic understanding of what he was doing.
 
yes, i chose the external controller instead of opening up all the time. plus, the ac unit just had levels (something like 1, 2, 3, 4, etc) instead of actual temperature control.

Beautiful work, man!

What kind of external temp control did you use? Was it something that came with the AC unit or did you buy something and then wire it in?

-Tripod
 
I have a 5000btu AC that I was considering doing this with. My only concern is the air blowing directly on the fermenters and possible infections.

What sort of controller do you use? The Ranco?
 
Back
Top