DIY cast iron pipe draft tower

Homebrew Talk - Beer, Wine, Mead, & Cider Brewing Discussion Forum

Help Support Homebrew Talk - Beer, Wine, Mead, & Cider Brewing Discussion Forum:

This site may earn a commission from merchant affiliate links, including eBay, Amazon, and others.

m00ps

Well-Known Member
Joined
Oct 16, 2014
Messages
6,908
Reaction score
2,179
Location
Paducah
Hey guys, so a month ago I saw this:
http://because-beer.com/diy-black-iron-pipe-draft-tower/
http://because-beer.com/diy-black-iron-pipe-draft-tower-final-build-list/

and immediately I wanted to try it. I to a pre-assembled keg tower that did not allow enough room behind the shanks to use my john guest quick fittings. This worked perfectly. I added 2 more little sections but I love it so much. just though I'd post it in case anyone else wants to upgrade their draft tower. Ended up paying like 80 bucks for all the parts. Totally worth it

here's mine, easily assembled and the 4 screws for the baseplate line up EXACTLY with a standard draft tower. Didnt even need to drill anything
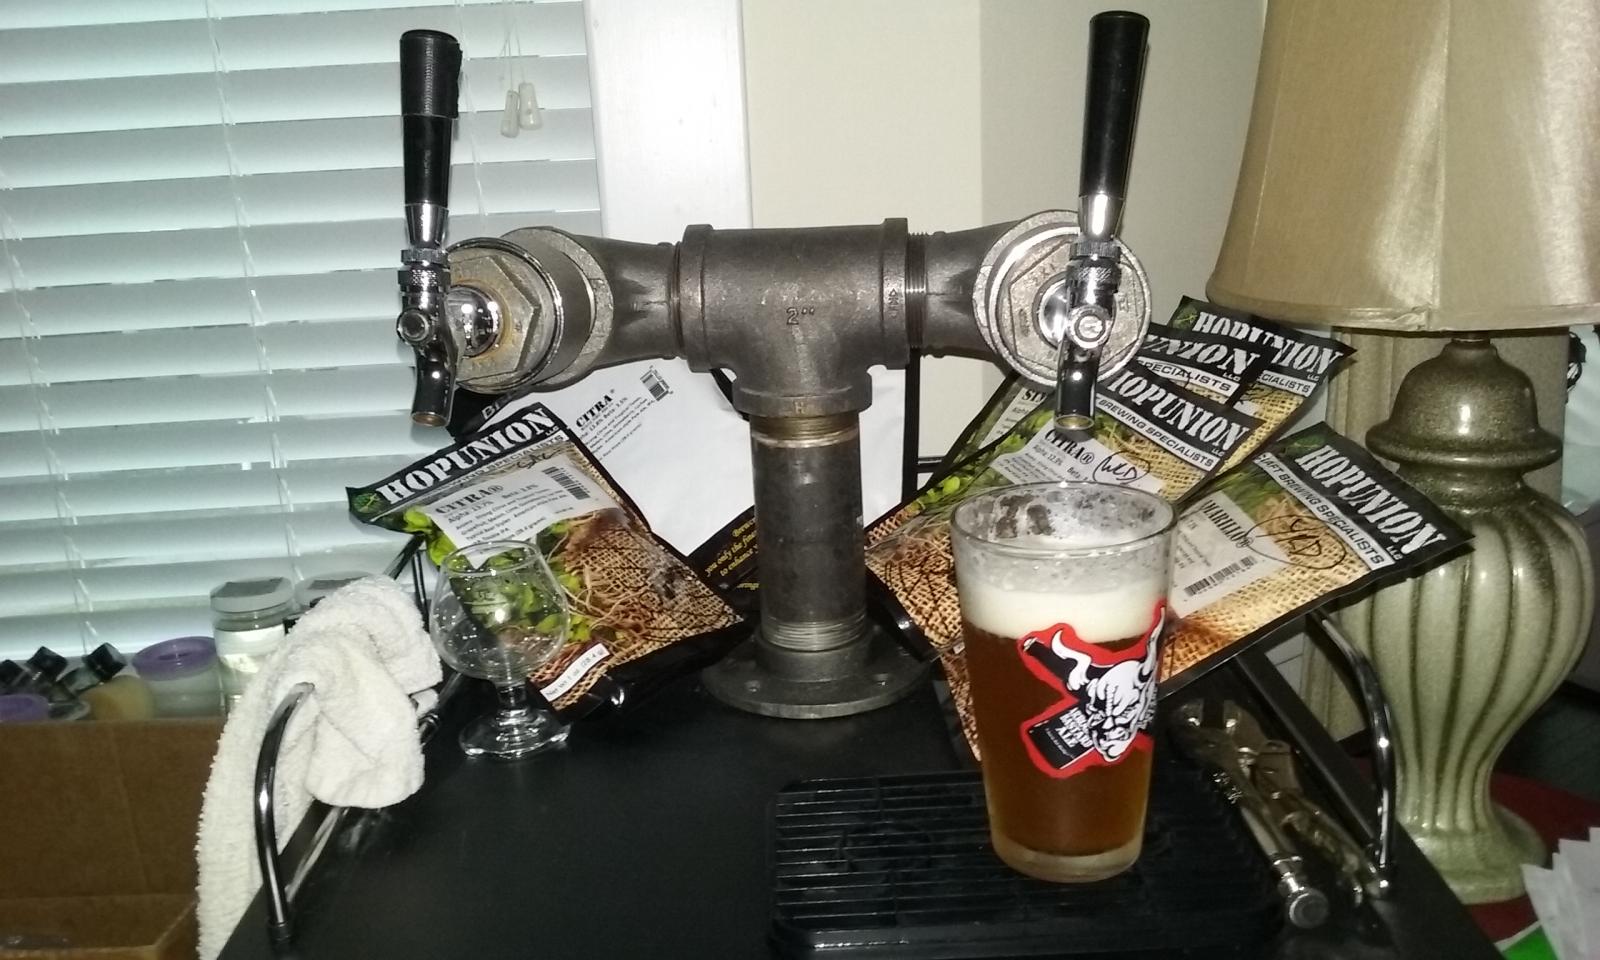
20150828_191948.jpg
 
I just went with the DIY instruction listed and got a 6" one. I can nicely fit a standard pint glass under the tap without needing to tip it. You could do 8" if you wanted a bit more room

I also got 2x2" nipples to give me extra room between the elbow and the beer shank. Needed more room for the john guest push connect fitting for the shank
 
Sorry, one more thing. Did you reuse the original screws on the new flange? I really like the look of the hex heads. Thx
 
I used the original screws that my old tower used. There were 4 holes and it lines up perfectly with the tap tower that came with my kegerator. Im guessing its a standard thing. 4 screws

Here's the john guest fittings I bought. They are push-to-connect and are so nice compared to dealing with hose barbs. One threads onto a beer QD, and the other directly threads onto a beer shank. I used this beverage tubing that you usually see in commercial water coolers. Actually, these fittings were the main reason I upgraded my tower. I can now swap lines in under 10 minutes
http://www.farmhousebrewingsupply.com/1-4-mfl-push-to-connect/
http://www.farmhousebrewingsupply.com/5-16-x-5-8-bspp-shank-connector-push-to-connect/
http://www.farmhousebrewingsupply.com/accuflex-bev-seal-ultra-3-16-50/
 
mOOps, thanks for the info. Did the 2x1 bushings work for ya? It seems a little loose. I might try going with the 2x1 bushing followed up by a 1x.75 bushing. Your thoughts?
 
the 2x1s worked fine. A standard tap cover thingy fits almost perfectly into the 1" hole. I dont have one of them with me, but 3/4" may not fit it.

Oh and plus, you need to screw the back of the shank on the other side. If you added the extra bushing, be sure you have decently long shanks
 
Thanks for the reply! [emoji4] I received many of the parts today. The holes on the flange don't line up. I sent an email tomorrow Mueller about their streamline flange. I will post if it matches up.
 
Getting ready to build this because I bought the John Guest fittings assuming they would fit in my tower. Not even close. My question relates to what equipment I need to connect the faucets to the tower assembly. I have Perlick 525's if that matters. This is what I use to connect the faucets to the towers now:
http://www.beveragefactory.com/draftbeer/faucets/shanks/ESA316_elbow_shank.html

I know I'll need new shanks. How do the new shanks (7/8" right?) attach to the bushing, or do they?
Do I keep using the parts of the original assembly that the faucet connects to? And then just screw the new shank into that?

Should I buy something like this?
http://www.amazon.com/gp/product/B001CE61NI/?tag=skimlinks_replacement-20
 
Last edited by a moderator:
To connect the faucet to the tower, you use the outward facing part of the shank and screw it on with the shank going through that 2" to 1" coupling fitting with the hex face. It fits nicely with the shank going through it. Youll want as short a shank as you can possibly get so that you have room for the guest fitting. I got all the part in the list in my link and then 2x2" long nipples and 2x2" long fittings to give me extra room. So here's the extra parts I needed to assemble exactly what is in that picture. Needed 2 of each:

http://www.amazon.com/gp/product/B00829HM7U?psc=1&redirect=true&ref_=oh_aui_detailpage_o05_s00
http://www.amazon.com/gp/product/B0058PRFPK?psc=1&redirect=true&ref_=oh_aui_detailpage_o03_s00
http://www.amazon.com/gp/product/B0058DQR3S?psc=1&redirect=true&ref_=od_aui_detailpages00
 
Last edited by a moderator:
Its just held in place by having the shank thread go through the 1" hole and then screwing on the back of it on the other side
 
OK, I think I get it now. So you don't need that black piece, right? Just the nut on the back and the piece that the faucet attaches to should hold it in place.

Was that 2-1/8" shank the right length to be long enough get through the bushing but still have enough clearance to use the John Guest fittings from Farmhouse?
 
Yeah the black collar thingy isn't needed

Yeah that length shank was long enough. You could go longer but you'd need a longer nipple in the middle to have the ~2" clearance for the fitting
 
Nice. I saw the same blog posts two weeks ago and made one out of PVC because I'm even more of a cheapo.

How did you attach the PVC to the refrigerator? I love the look of this one, and I think I have literally the same fridge (the new Danby 4.4 cu ft all-fridge).
 
How did you attach the PVC to the refrigerator? I love the look of this one, and I think I have literally the same fridge (the new Danby 4.4 cu ft all-fridge).

I use a shower drain like this:
http://www.homedepot.com/p/Sioux-Chief-2-in-PVC-Shower-Drain-with-Strainer-821-2PPK/202313207

Get rid of the screwed on part with the metal grate, flip it upside down, and you got your self a mount. I had to modify the 'plate' part to fit inside the fridge, and buy longer bolts. The PVC pipe is actually a small pipe within a larger one with spray foam insulation between the two.
 
Anyone use a piece of wood to attach the flange? I think it could add stability, avoiding extra holes in the top of kegerator.
 
Anyone use a piece of wood to attach the flange? I think it could add stability, avoiding extra holes in the top of kegerator.

anything would work I guess. Does your kegerator have a draft tower already? The 4 flange holes lined up perfectly with the previous ones from the standard draft tower
 
anything would work I guess. Does your kegerator have a draft tower already? The 4 flange holes lined up perfectly with the previous ones from the standard draft tower


It does have a single faucet tower. It wasn't close to matching up. I went with 2" black pipe. I just got a few minutes to work on it. I might paint the plaque and black pipe with a hammered black paint. Seems appropriate! I'm using a round routed 7" wood piece for the middle section.
 
@ m00ps...
does the cast iron pipe not sweat or did you insulate it somehow?
I had considered doing something similar but was worried about condensation
 
@ m00ps...
does the cast iron pipe not sweat or did you insulate it somehow?
I had considered doing something similar but was worried about condensation

I used pipe insulation and ran the beer lines through 1/2" copper tubing to reduce foam. I am running the copper inside the kegerator to transfer cooling.
 
What size PVC did you use? and what kind of bushing are the taps screwed into?

I believe it was all the same size components as the cast iron build, just pvc instead.

I think they are 2in pipe. I also slipped another 3/4" pipe inside it and filled the space between the pipes with spray foam insulation.

The reducing bushings aren't threaded, the shank comes with a nut that was used to tighten it to the bushing from the inside.
 
I’m curious if PVC would fit inside the iron pipe? I’m thinkibg of trying this, but I’d want some airflow to the lines....

My thought is PVC run up the center, and then spray foam outside the PVC for insulation?
 
I’m curious if PVC would fit inside the iron pipe? I’m thinkibg of trying this, but I’d want some airflow to the lines....

My thought is PVC run up the center, and then spray foam outside the PVC for insulation?

I did exactly this, though with pvc for inner and outer layer. Yes, pvc will fit inside the iron pipe.

See post #7 and #21.
 
I did exactly this, though with pvc for inner and outer layer. Yes, pvc will fit inside the iron pipe.

See post #7 and #21.

Does the PVC alone provide enough insulation?

I think I may have worded my question incorrectly: basically I want to make sure the beer lines stay chilled enough: but I want to insulate the black iron pipe in a way that I won’t create a giant heat-sink! (Making the fridge work harder)
 
Does the PVC alone provide enough insulation?

I think I may have worded my question incorrectly: basically I want to make sure the beer lines stay chilled enough: but I want to insulate the black iron pipe in a way that I won’t create a giant heat-sink! (Making the fridge work harder)

Now you've confused me :confused:

What I've done from outside to inside is 2(ish)" pvc -> spray foam insulation -> 3/4(ish)" pvc -> beer lines. I don't remember what the exact sizes of the pipe were. You can easily swap the outer pvc for cast iron pipe.

Now you're asking if you could skip the spray foam, if the air gap would be enough insulation? I don't *think* so... You would at least need a way to cap it off, or "insulate" your air gap from the rest of the cold air in the fridge.

All that said I imagine some folks run the fridge with no insulation in the tower at all.

Sorry! I guess I didn’t “subscribe” to this forum: I didn’t catch your response...

what you described is exactly what I was looking to do: I just didn’t think there was enough space in 2” Pipe to really fit another pipe.

I’m considering 2.5” or 3” Iron Pipe too... but 3” may be too bulky...
 
Is there a black iron 2" Male NTP for 7/8" Female NTP shank ?

Planing to do a similar thing but with a cross "tee" so I can have 3 taps.
 
Is there a black iron 2" Male NTP for 7/8" Female NTP shank ?

Planing to do a similar thing but with a cross "tee" so I can have 3 taps.
This guy made something pretty much the same as what the OP posted. The main difference (besides using premium stainless steel pipes...) was that he used a couple 2" X 1/2" 304 Stainless Steel Threaded Bushings and then drilled out the 1/2" hole to 7/8" so it'd be nice and tight. So that's an option if you're worried about your shanks being loose.

On a side note I have a question about pipe diameter. I have 1.5" pipe lying around from some other project. You guys think I could use that instead of 2"? I would be worried about there not being enough room for the tubing plus some sort or air flow to keep things cool.

I used the 1/2 and drilled to 7/8ths. Worked well for me, but it was tough tightening down the nut enough...

Oh I guess I should mention, I was thinking of using copper pipe insulation for my insulator, so that paired with 1-1/2" pipe do you guys think would be enough for air flow?
https://www.lowes.com/pd/Frost-King-1-in-x-6-ft-Foam-Plumbing-Tubular-Pipe-Insulation/3133247

This is more or less what I did. The lines fit, but it’s tight when you need to fish the lines through (mostly because the vinyl has lots of friction)
 
Back
Top