I would love to see a kitchen appliance mill that crushes grain.
You are using an out of date browser. It may not display this or other websites correctly.
You should upgrade or use an alternative browser.
You should upgrade or use an alternative browser.
Dirt cheap, motorized, miniature, roller mill
- Thread starter alphaomega
- Start date

Help Support Homebrew Talk:
This site may earn a commission from merchant affiliate
links, including eBay, Amazon, and others.
Stillraining
Well-Known Member
Agreed .....but it has to be relatively fast! Or it will not get used or bought by the general consumer IMO.
Few are going to want to listen to a kitchen mixer or blender noise level for more then a minute or two at the most. At least not indoors in your kitchen which the OP is targeting.
In one of his earlier statements he wasn't concerned with speed, that it could run for hours if need be....Id like to see a poll taken to see it that sentiment is held by very many other brewers. I'm going to go out on a limb and say not.
I could buy this and attach it to the wife's Kitchen Aid mixer..but for all of the above listed reasons I would never do it. https://www.amazon.com/dp/B003DVP1V6/?tag=skimlinks_replacement-20
So for lots of us whom can grind 50lbs free at the LHBS in < 10min I would think criteria would have to be in some order as those listed below in order of importance for purchase consideration.
1) Fast
2) Cheap
3) Noise
4) Size
3 and 4 are sort of exchangeable...if its really small and FAST I can put up with the noise. If its slow it better be whisper silent no mater the size. There is a finite limitation to crushing corresponding to roller speed vs roller size..I dont see the OP's first mock up going anywhere market share wise at its current rotation speed. In crease that 10 fold and it might be a good start.
Last edited by a moderator:
alphaomega
Well-Known Member
- Joined
- Jul 10, 2013
- Messages
- 1,041
- Reaction score
- 461
@Stillraining: Smaller motor an slower crush, means a lot quieter operation. Personally, I prefer a smaller footprint over faster crushing. But I agree, if someone were to market a thing like this (and I really hope someone does!), it would probably need to be reasonably fast. Like I said before, I used an el cheapo meat grinder (800W stall power) to power my 3 roller moster mill before. No problem. And that ate through 10 pounds of grain in a handful of minutes.
It should be perfectly doable to build an 'appliance' mill, that would do 10 pounds in 10-15 minutes. Longer rollers, equal more torque needed. More torque equal more stress and heavier more rugged parts. So, if one is willing to trade 5 minutes for 15, 2 inch rollers would make the mill part a lot less heavy. The gearbox would only need to handle a third of the torque, so it could be smaller and lighter and the motor only needing to put out a third of the power. It's all in sizing the individual components together and fitting it together nicely.
It should be perfectly doable to build an 'appliance' mill, that would do 10 pounds in 10-15 minutes. Longer rollers, equal more torque needed. More torque equal more stress and heavier more rugged parts. So, if one is willing to trade 5 minutes for 15, 2 inch rollers would make the mill part a lot less heavy. The gearbox would only need to handle a third of the torque, so it could be smaller and lighter and the motor only needing to put out a third of the power. It's all in sizing the individual components together and fitting it together nicely.
Stillraining
Well-Known Member
Agreed. Your on to something for sure. Price point to solve all the restraints will be the bug-a-boo I think.
Carry on.
Carry on.
Mill
+
https://www.amazon.com/gp/product/B00LTM3AT6/?tag=skimlinks_replacement-20
+
power converter
+
http://www.mcmaster.com/#catalog/122/1224/=13dqgec
+
Bend up a bracket
=
motorized about the size of a 5 gallon bucket")

+
https://www.amazon.com/gp/product/B00LTM3AT6/?tag=skimlinks_replacement-20
+
power converter
+
http://www.mcmaster.com/#catalog/122/1224/=13dqgec
+
Bend up a bracket
=
motorized about the size of a 5 gallon bucket
Last edited by a moderator:
alphaomega
Well-Known Member
- Joined
- Jul 10, 2013
- Messages
- 1,041
- Reaction score
- 461
First I thought you were happy to see... something... But I guess that is your knee
There's something else in front of the mill, no? Platechiller? For extra weight?
That is a pretty darn attractive solution! Kudos!
There's something else in front of the mill, no? Platechiller? For extra weight?
That is a pretty darn attractive solution! Kudos!


$39.22 ($39.22 / Count)
Brewer's Best Home Brew Beer Ingredient Kit - 5 Gallon (Mexican Cerveza)
Amazon.com


$33.99 ($17.00 / Count)
$41.99 ($21.00 / Count)
2 Pack 1 Gallon Large Fermentation Jars with 3 Airlocks and 2 SCREW Lids(100% Airtight Heavy Duty Lid w Silicone) - Wide Mouth Glass Jars w Scale Mark - Pickle Jars for Sauerkraut, Sourdough Starter
Qianfenie Direct


$53.24
1pc Hose Barb/MFL 1.5" Tri Clamp to Ball Lock Post Liquid Gas Homebrew Kegging Fermentation Parts Brewer Hardware SUS304(Gas MFL)
Guangshui Weilu You Trading Co., Ltd


$53.24
1pc Hose Barb/MFL 1.5" Tri Clamp to Ball Lock Post Liquid Gas Homebrew Kegging Fermentation Parts Brewer Hardware SUS304(Gas MFL)
yunchengshiyanhuqucuichendianzishangwuyouxiangongsi


$7.79 ($7.79 / Count)
Craft A Brew - LalBrew Voss™ - Kveik Ale Yeast - For Craft Lagers - Ingredients for Home Brewing - Beer Making Supplies - (1 Pack)
Craft a Brew


$22.00 ($623.23 / Ounce)
AMZLMPKNTW Ball Lock Sample Faucet 30cm Reinforced Silicone Hose Secondary Fermentation Homebrew Kegging joyful
无为中南商贸有限公司

$58.16
HUIZHUGS Brewing Equipment Keg Ball Lock Faucet 30cm Reinforced Silicone Hose Secondary Fermentation Homebrew Kegging Brewing Equipment
xiangshuizhenzhanglingfengshop


$176.97
1pc Commercial Keg Manifold 2" Tri Clamp,Ball Lock Tapping Head,Pressure Gauge/Adjustable PRV for Kegging,Fermentation Control
hanhanbaihuoxiaoshoudian


$10.99 ($31.16 / Ounce)
Hornindal Kveik Yeast for Homebrewing - Mead, Cider, Wine, Beer - 10g Packet - Saccharomyces Cerevisiae - Sold by Shadowhive.com
Shadowhive


$20.94
$29.99
The Brew Your Own Big Book of Clone Recipes: Featuring 300 Homebrew Recipes from Your Favorite Breweries
Amazon.com


![Craft A Brew - Safale S-04 Dry Yeast - Fermentis - English Ale Dry Yeast - For English and American Ales and Hard Apple Ciders - Ingredients for Home Brewing - Beer Making Supplies - [1 Pack]](https://m.media-amazon.com/images/I/41fVGNh6JfL._SL500_.jpg)
$6.95 ($17.38 / Ounce)
$7.47 ($18.68 / Ounce)
Craft A Brew - Safale S-04 Dry Yeast - Fermentis - English Ale Dry Yeast - For English and American Ales and Hard Apple Ciders - Ingredients for Home Brewing - Beer Making Supplies - [1 Pack]
Hobby Homebrew

This may be a completely different direction. I used a blender for three years to grind grain. It does result in plenty of flour, that doesn't matter with BIAB. It took 10-15 minutes to grind a batch. Which is fine because that's how long the strike water takes to heat. A blender stores easily, partly because of it's big shortcoming: the grain stays in the jar, requiring it to be crushed in small amounts and judged by eye. Your appliance might benefit from a hopper that separates from the grinder, and in which the other parts fit for storage. I'm okay with a modest hopper, my corona hold about two pounds. If the final product is the size of a toaster, and grinds a batch in ten minutes, I think there would be a market for it.
alphaomega
Well-Known Member
- Joined
- Jul 10, 2013
- Messages
- 1,041
- Reaction score
- 461
@JohnSand: I very much like the idea of a hopper that fits the rest of the parts. I'm ok too with a smaller hopper, since you'll have your hands free to top up.
I've talked about the Matt mill before. I really like the size of that thing. Here's a german brewer that used a similar motor to @jddevinn:
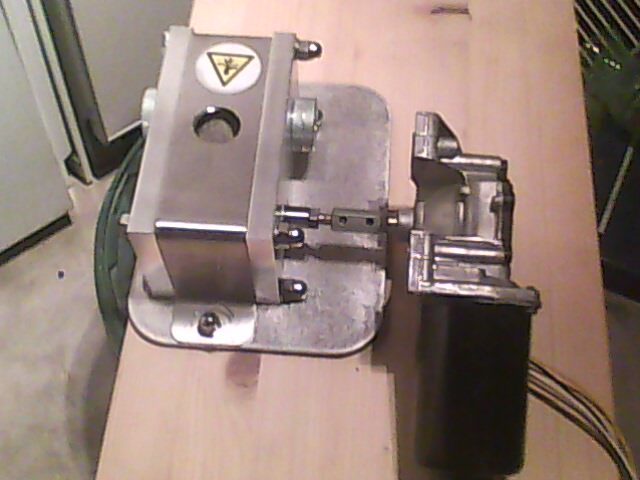
I really like that. That is pretty close. What is missing, is that the drive shaft adds about a third of the width and the motor (and mill) is bolted to a base. I'd like to see the motor turned over, so that the entire thing is more 'square' and a way to mount the motor directly to the mill housing and without the long drive shaft. Add a custom hopper that fits over the thing and done! I'd buy that if it was sold as a unit.
I've talked about the Matt mill before. I really like the size of that thing. Here's a german brewer that used a similar motor to @jddevinn:
I really like that. That is pretty close. What is missing, is that the drive shaft adds about a third of the width and the motor (and mill) is bolted to a base. I'd like to see the motor turned over, so that the entire thing is more 'square' and a way to mount the motor directly to the mill housing and without the long drive shaft. Add a custom hopper that fits over the thing and done! I'd buy that if it was sold as a unit.
First I thought you were happy to see... something... But I guess that is your knee
There's something else in front of the mill, no? Platechiller? For extra weight?
That is a pretty darn attractive solution! Kudos!
I had a spare electrical project box so I threw the power converter in the box, added a switch that I had laying around as extra and mounted it on the board so that I wouldn't have to pick it up each time I moved the mill.
I stole
 the idea and motor listing from someone on here... maybe brewindog
@JohnSand: I very much like the idea of a hopper that fits the rest of the parts. I'm ok too with a smaller hopper, since you'll have your hands free to top up.
I've talked about the Matt mill before. I really like the size of that thing. Here's a german brewer that used a similar motor to @jddevinn:
I really like that. That is pretty close. What is missing, is that the drive shaft adds about a third of the width and the motor (and mill) is bolted to a base. I'd like to see the motor turned over, so that the entire thing is more 'square' and a way to mount the motor directly to the mill housing and without the long drive shaft. Add a custom hopper that fits over the thing and done! I'd buy that if it was sold as a unit.
You could find a shorter coupling on McMaster, cut the shaft down. The motor I bought has bolt holes in the face for mounting, you could make a bracket that connects those bolts to the bolts that are holding the plates and rollers together. I like the base plate on mine as it fits directly on top of a bucket, the motor does overhang about 2".... but I could fix that by cutting down the shaft if I felt like it.
alphaomega
Well-Known Member
- Joined
- Jul 10, 2013
- Messages
- 1,041
- Reaction score
- 461
--- page break ---
alphaomega
Well-Known Member
- Joined
- Jul 10, 2013
- Messages
- 1,041
- Reaction score
- 461
I just finished the third (and probably final) prototype of my miniature motorized roller mill.
I'm happy to say it now works 100% to my satisfaction. I changed to friction drive of the second roller, and it seems to work really well.
A close up video of it milling malt:
The 'tour' video:
If you really pay attention, you can see/hear it having trouble feeding (grabbing on to the grain). In the video I used 0.8mm pitch knurling rollers. After the video, I changed to 1.2mm pitch rollers and that seems to have solved that issue (the first video has 1.2mm pitch rollers).
This is the resulting crush (which I'm pretty happy with):

So far I've only test milled 500g of malt. It took 11 and a half minute. Extrapolating from that, milling a (for me) normal batch of about 5kg malt would take around two hours, which is well within what I was hoping for. The motor and gearbox did not heat up even the slightest.
As I'm pretty happy with the build now, if anyone is interested, here's how I built it (if not, at least I've written it all up for myself if/when I need it).
Tools required:
Drill press (a drill + stand will do)
Metric drill bits (4mm, 10mm + a drill bit slightly smaller than 10mm, like 9.5mm)
Hammer
Saw (to cut the acrylic sheet)
Torch
Plumbers solder
Stainless steel flux
Tape
Abrasive cleaning strips or fine grit sandpaper
Misc tools...
Materials required:
1x Drill template
2x Acrylic sheet 60x65x6mm
4x Bronze bushing 0806, (8mm ID, 10mm OD, 6mm)
4x Knurling roller, 28mm OD, 8mm ID, pitch 1.2mm
2x Dowel pin, 304 stainless, 8mm, 50mm
4x Threaded rod, M4, 100mm
4x Wing nut, M4
4x Spacer, 4mm ID, 50mm
4x Spacer, 4mm ID, 16.5mm
2x GT2 Timing Belt Pulleys 40 Teeth 8mm Bore For 6mm Belt
4x 28mm x 3.1mm Flexible Mechanical PU O Ring
1x Shaft coupling 8mm - 8mm
1x Gear motor, square, high torque, 54RPM
Making the rollers:
Clean out the center of the knurling rollers with fine grit sandpaper. Douse the pins with flux and place the 2 knurlers on top of each other and place that on spacers that give approx 6mm of rod sticking out of the other side of the rollers (M4 nuts standing up works). Make sure NOT to let more than 6mm stick out, as you'll need every bit of length of the shaft on the other side to mate with the shaft coupler.

Cut small pieces of solder and place where the roller and shaft meet. Heat. When the solder flows, add a bit more flux. Let cool and clean thoroughly all the flux. Do this for both the shafts.
Making the sides:
Cut out two pieces of 6mm acrylic approx 60x65mm. Secure them together using tape. Print out an accurate template of the motor screw holes and shafts (see example below). Tape it to the acrylic.
Drill the 4mm mounting holes. Drill the shaft holes, but using 9.5mm drill. Go very slowly and be really, really, *really* careful in starting the hole to get it centered in the template. Then change to 10mm drill and finish the the two holes off. I have found that drilling directly with the 10mm drill bit makes the holes slightly too large to ‘hold on’ to the bushings. Probably due to the drill bit heating up.

Remove the tape (and template). I have then found it useful to remove the two outer layers of protective film, before separating the two pieces of acrylic (they will stick together from the drilling), and marking the the two outmost sides. This way it is easy to tell the correct way to assemble, even after taking apart.
Gently tap in the the bushings in the shaft holes using a hammer.
Template:
Below is the template I used. Copy the text, paste it in a text editor, and save as 'template.svg'. Open the file with an image viewer that supports SVG and print it to scale (that is disable all scaling and stuff). Make sure the box is 65x60mm on the printout. Don't ask me HOW to make it the correct size on the printout. I only know how to do that for my printer and in Linux.
Assembly:
The parts:

Screw in the threaded rods in the mounting holes on the motor (just by hand). Place the 50mm spacers over the rods (I use the housings for discarded pens, cut to size). Place the shaft coupling on the motor axle.

Slip on two O-rings over each of the GT2 timing belt pulleys. Slide the longer parts of the shafts through the bushings of one of the acrylic sheets. Mount the timing belt pulleys. Leave just a little bit of slack, so the rollers can turn freely, then tighten down the allen set screws on the pulleys. (Note, in the picture, I used a drive shaft slightly longer than 50mm, I later changed to use a 50mm shaft for both rollers).

Slide the piece on to the threaded rods (the drive shaft going into the shaft coupling).

Add the 16.5mm spacers and the outer acrylic piece. Add the wing nuts and hand tighten. Tighten down the allen set screws on the shaft coupling.

Done
I'm happy to say it now works 100% to my satisfaction. I changed to friction drive of the second roller, and it seems to work really well.
A close up video of it milling malt:
The 'tour' video:
If you really pay attention, you can see/hear it having trouble feeding (grabbing on to the grain). In the video I used 0.8mm pitch knurling rollers. After the video, I changed to 1.2mm pitch rollers and that seems to have solved that issue (the first video has 1.2mm pitch rollers).
This is the resulting crush (which I'm pretty happy with):
So far I've only test milled 500g of malt. It took 11 and a half minute. Extrapolating from that, milling a (for me) normal batch of about 5kg malt would take around two hours, which is well within what I was hoping for. The motor and gearbox did not heat up even the slightest.
As I'm pretty happy with the build now, if anyone is interested, here's how I built it (if not, at least I've written it all up for myself if/when I need it).
Tools required:
Drill press (a drill + stand will do)
Metric drill bits (4mm, 10mm + a drill bit slightly smaller than 10mm, like 9.5mm)
Hammer
Saw (to cut the acrylic sheet)
Torch
Plumbers solder
Stainless steel flux
Tape
Abrasive cleaning strips or fine grit sandpaper
Misc tools...
Materials required:
1x Drill template
2x Acrylic sheet 60x65x6mm
4x Bronze bushing 0806, (8mm ID, 10mm OD, 6mm)
4x Knurling roller, 28mm OD, 8mm ID, pitch 1.2mm
2x Dowel pin, 304 stainless, 8mm, 50mm
4x Threaded rod, M4, 100mm
4x Wing nut, M4
4x Spacer, 4mm ID, 50mm
4x Spacer, 4mm ID, 16.5mm
2x GT2 Timing Belt Pulleys 40 Teeth 8mm Bore For 6mm Belt
4x 28mm x 3.1mm Flexible Mechanical PU O Ring
1x Shaft coupling 8mm - 8mm
1x Gear motor, square, high torque, 54RPM
Making the rollers:
Clean out the center of the knurling rollers with fine grit sandpaper. Douse the pins with flux and place the 2 knurlers on top of each other and place that on spacers that give approx 6mm of rod sticking out of the other side of the rollers (M4 nuts standing up works). Make sure NOT to let more than 6mm stick out, as you'll need every bit of length of the shaft on the other side to mate with the shaft coupler.
Cut small pieces of solder and place where the roller and shaft meet. Heat. When the solder flows, add a bit more flux. Let cool and clean thoroughly all the flux. Do this for both the shafts.
Making the sides:
Cut out two pieces of 6mm acrylic approx 60x65mm. Secure them together using tape. Print out an accurate template of the motor screw holes and shafts (see example below). Tape it to the acrylic.
Drill the 4mm mounting holes. Drill the shaft holes, but using 9.5mm drill. Go very slowly and be really, really, *really* careful in starting the hole to get it centered in the template. Then change to 10mm drill and finish the the two holes off. I have found that drilling directly with the 10mm drill bit makes the holes slightly too large to ‘hold on’ to the bushings. Probably due to the drill bit heating up.
Remove the tape (and template). I have then found it useful to remove the two outer layers of protective film, before separating the two pieces of acrylic (they will stick together from the drilling), and marking the the two outmost sides. This way it is easy to tell the correct way to assemble, even after taking apart.
Gently tap in the the bushings in the shaft holes using a hammer.
Template:
Below is the template I used. Copy the text, paste it in a text editor, and save as 'template.svg'. Open the file with an image viewer that supports SVG and print it to scale (that is disable all scaling and stuff). Make sure the box is 65x60mm on the printout. Don't ask me HOW to make it the correct size on the printout. I only know how to do that for my printer and in Linux.
Code:
<svg xmlns="http://www.w3.org/2000/svg" xmlns:xlink="http://www.w3.org/1999/xlink"
  width="65mm" height="60mm" viewBox="0 0 65 60">

<g transform="translate(30.0, 30.0)">

  <!-- Box (outer dimensions) -->
  <g transform="translate(0.0, 0.0)">
   <rect x="-30.0" y="-30.0" width="65.0" height="60.0" style="stroke-width:0.1; stroke:#000000; fill: white"/>
  </g>

  <!-- Bushing Cog 2 -->
  <!-- Uncomment ONE of the below to choose gap size-->
  <!-- <g transform="translate(-9.0, 0.0)"> --> <!-- 1.0mm gap -->
  <g transform="translate(-9.2, 0.0)"> <!-- 1.2mm gap -->
  <!-- <g transform="translate(-9.5, 0.0)"> --> <!-- 1.5mm gap -->
    <circle cx="0.0" cy="0.0" r="4.5" style="stroke-width:0.1; stroke:#000000; fill:none;" />
    <circle cx="0.0" cy="0.0" r="1.5" style="stroke-width:0.1; stroke:#000000; fill:none;" />
    <line x1="-1.0" y1="0.0" x2="1.0" y2="0.0" style="stroke-width:0.1; stroke:#000000;"/>
    <line x1="0.0" y1="-1.0" x2="0.0" y2="1.0" style="stroke-width:0.1; stroke:#000000;"/>
  </g>

  <!-- Mount holes -->
  <g transform="translate(-20.0, -20.0)">
    <circle cx="0.0" cy="0.0" r="2.0" style="stroke-width:0.1; stroke:#000000; fill:none;" />
    <line x1="-1.0" y1="0.0" x2="1.0" y2="0.0" style="stroke-width:0.1; stroke:#000000;"/>
    <line x1="0.0" y1="-1.0" x2="0.0" y2="1.0" style="stroke-width:0.1; stroke:#000000;"/>
  </g>
  <g transform="translate(-20.0, 20.0)">
    <circle cx="0.0" cy="0.0" r="2.0" style="stroke-width:0.1; stroke:#000000; fill:none;" />
    <line x1="-1.0" y1="0.0" x2="1.0" y2="0.0" style="stroke-width:0.1; stroke:#000000;"/>
    <line x1="0.0" y1="-1.0" x2="0.0" y2="1.0" style="stroke-width:0.1; stroke:#000000;"/>
  </g>
  <g transform="translate(20.0, -20.0)">
    <circle cx="0.0" cy="0.0" r="2.0" style="stroke-width:0.1; stroke:#000000; fill:none;" />
    <line x1="-1.0" y1="0.0" x2="1.0" y2="0.0" style="stroke-width:0.1; stroke:#000000;"/>
    <line x1="0.0" y1="-1.0" x2="0.0" y2="1.0" style="stroke-width:0.1; stroke:#000000;"/>
  </g>
  <g transform="translate(20.0, 20.0)">
    <circle cx="0.0" cy="0.0" r="2.0" style="stroke-width:0.1; stroke:#000000; fill:none;" />
    <line x1="-1.0" y1="0.0" x2="1.0" y2="0.0" style="stroke-width:0.1; stroke:#000000;"/>
    <line x1="0.0" y1="-1.0" x2="0.0" y2="1.0" style="stroke-width:0.1; stroke:#000000;"/>
  </g>

  <!-- Bushing Cog 1 -->
  <g transform="translate(20.0, 0.0)">
    <circle cx="0.0" cy="0.0" r="4.5" style="stroke-width:0.1; stroke:#000000; fill:none;" />
    <circle cx="0.0" cy="0.0" r="1.5" style="stroke-width:0.1; stroke:#000000; fill:none;" />
    <line x1="-1.0" y1="0.0" x2="1.0" y2="0.0" style="stroke-width:0.1; stroke:#000000;"/>
    <line x1="0.0" y1="-1.0" x2="0.0" y2="1.0" style="stroke-width:0.1; stroke:#000000;"/>
  </g>

</g>

</svg>Assembly:
The parts:
Screw in the threaded rods in the mounting holes on the motor (just by hand). Place the 50mm spacers over the rods (I use the housings for discarded pens, cut to size). Place the shaft coupling on the motor axle.
Slip on two O-rings over each of the GT2 timing belt pulleys. Slide the longer parts of the shafts through the bushings of one of the acrylic sheets. Mount the timing belt pulleys. Leave just a little bit of slack, so the rollers can turn freely, then tighten down the allen set screws on the pulleys. (Note, in the picture, I used a drive shaft slightly longer than 50mm, I later changed to use a 50mm shaft for both rollers).
Slide the piece on to the threaded rods (the drive shaft going into the shaft coupling).
Add the 16.5mm spacers and the outer acrylic piece. Add the wing nuts and hand tighten. Tighten down the allen set screws on the shaft coupling.
Done
Last edited by a moderator:
alphaomega
Well-Known Member
- Joined
- Jul 10, 2013
- Messages
- 1,041
- Reaction score
- 461
I've made a few more improvements to the latest build.
88RPM motor, a bit faster and still seems to have enough oomph to do the job.
Hex standoffs, this was actually quite an improvement. Makes assembly easier, less hassle trying cut spacers equally long and it really made the thing as a whole sturdier.
One 1.6mm pitch roller. Seems like it feeds even better now.
I'm really happy with this setup now, though I finished this latest build last night and haven't really put it to the test yet, but it looks very promising.


Updated Bill of Material
88RPM motor, a bit faster and still seems to have enough oomph to do the job.
Hex standoffs, this was actually quite an improvement. Makes assembly easier, less hassle trying cut spacers equally long and it really made the thing as a whole sturdier.
One 1.6mm pitch roller. Seems like it feeds even better now.
I'm really happy with this setup now, though I finished this latest build last night and haven't really put it to the test yet, but it looks very promising.
Updated Bill of Material
- 1 Drill template
- 2 Acrylic sheet 60x65x6mm
- 4 Bronze bushing 0806 8mm ID, 10mm OD, 6mm
- 2 Knurling roller 28mm OD, 8mm IDm pitch 1.2mm
- 2 Knurling roller 28mm OD, 8mm IDm pitch 1.6mm
- 2 Dowel pin 304 stainless 50 mm long, 8mm diameter
- 4 Brass hex standoff pillar male - female M4, 50mm
- 4 Nylon round spacer M4, 17mm
- 4 Screw M4, 35mm
- 2 GT2 Timing Belt Pulleys 40 Teeth, 8mm Bore For 6mm Belt
- 2 Flexible Mechanical PU O Ring 28mm OD x 3.1mm
- 2 Flexible Mechanical PU O Ring 28mm OD x 4.0mm
- 1 Shaft coupling 8mm x 8mm
- 1 Gear motor, square, high torque 8mm shaft, 88RPM, 24V
- 1 Female DC power barrel jack 2.1 x 5.5mm
- 1 Power supply 24V
alphaomega
Well-Known Member
- Joined
- Jul 10, 2013
- Messages
- 1,041
- Reaction score
- 461
I've now had the chance to test the latest revision a bit more. And this one is a winner.
It is just over 16cm (or about 6.5 inches).

It weighs 950 grams (or about 2 pounds) with the "hopper".

Test milling 500g malt took 8 minutes and 20 seconds, that means normal batch of beer with 5kg (11 pounds) of malt, will be done within 90 minutes. That is good enough (with margin), for me. I can easily mill a malt for a batch of beer while cooking and doing the dishes, as all that is required from me is to top off the hopper every ten minutes or so.
And it is quiet. And light. Once done, I just pick it up, take it outside and blow the dust off.
Sure, it takes ten times longer to mill and that might be an issue for some (not for me obviously). But it is also ten times smaller, ten times lighter and probably ten times cheaper also.
[ame]https://www.youtube.com/watch?v=t6PjZOQR0tE[/ame]
Cheers!
It is just over 16cm (or about 6.5 inches).
It weighs 950 grams (or about 2 pounds) with the "hopper".
Test milling 500g malt took 8 minutes and 20 seconds, that means normal batch of beer with 5kg (11 pounds) of malt, will be done within 90 minutes. That is good enough (with margin), for me. I can easily mill a malt for a batch of beer while cooking and doing the dishes, as all that is required from me is to top off the hopper every ten minutes or so.
And it is quiet. And light. Once done, I just pick it up, take it outside and blow the dust off.
Sure, it takes ten times longer to mill and that might be an issue for some (not for me obviously). But it is also ten times smaller, ten times lighter and probably ten times cheaper also.
[ame]https://www.youtube.com/watch?v=t6PjZOQR0tE[/ame]
Cheers!
You know while you're mill is to small for my personal needs. I really applaud the way you approached the projected and documented how to put it together. It looks like you set out to accomplish a specific goal and met it spectacularly. Nice job, and thanks for sharing!
alphaomega
Well-Known Member
- Joined
- Jul 10, 2013
- Messages
- 1,041
- Reaction score
- 461
@jakwi: Thanks! That's nice to hear! I get that it's not for everyone (or even anyone) else, but at least it is another data point for anyone interested in building their own mill.
I've since brewed with it for real, milling about 6kg of malt. It took 2 hours (as expected) and it did a nice job, not a hitch. No problem lautering and I hit SG. The motor actually got warm, but not hot. Brewed an IPA that I enjoyed tonight. Best IPA I've brewed so far, but that has probably more to do with the liberal amount of dry hopping than the grind
I've since brewed with it for real, milling about 6kg of malt. It took 2 hours (as expected) and it did a nice job, not a hitch. No problem lautering and I hit SG. The motor actually got warm, but not hot. Brewed an IPA that I enjoyed tonight. Best IPA I've brewed so far, but that has probably more to do with the liberal amount of dry hopping than the grind
TasunkaWitko
Well-Known Member
Very impressed with your approach and your problem-solving. Nice job!
alphaomega
Well-Known Member
- Joined
- Jul 10, 2013
- Messages
- 1,041
- Reaction score
- 461
@TasunkaWitko: Thanks a bunch
gophergoat
Active Member
This is fantastic. Living in a small apartment with my wife I understand the need for minimal footprint. I'm thinking of building a similar mill but rather than connecting a motor just attaching our drill whenever I need to mill and packing it all away otherwise. Thoughts other than noise concerns? I think im doing pretty much what you did in the original post except with only one drill. Looks great! LHBS charges a dollar per lb ground so looking for another option!
alphaomega
Well-Known Member
- Joined
- Jul 10, 2013
- Messages
- 1,041
- Reaction score
- 461
@gophergoat: I honestly wouldn't recommend it. This works for me due to it being 'properly' motorized. It doesn't matter that it takes two hours to do a batch, since I don't need to do anything. I can't imagine standing around for that long, holding a drill.
Look up the MattMill line of mills, the 'student' or the 'kompakt'. Those are nice and compact mills.
If you want to build *this*, then I suggest to get the motor... I mean I guess you could jerry-rig a cordless drill using zip ties or something, to hold the speed... If you do build something like this, let me know
Weezy
Well-Known Member
You need to expand this to include a conveyor and a sieve to separate out the husks. Maybe a mister too upstream of the mill to better keep the husk together during the crush.
alphaomega
Well-Known Member
- Joined
- Jul 10, 2013
- Messages
- 1,041
- Reaction score
- 461
Yeah, I totally need to do that, because that will make it simpler, smaller and cheaper
Similar threads
- Replies
- 0
- Views
- 438
- Replies
- 7
- Views
- 950
