Danby DAR125SLDD Kegerator Build

Homebrew Talk - Beer, Wine, Mead, & Cider Brewing Discussion Forum

Help Support Homebrew Talk - Beer, Wine, Mead, & Cider Brewing Discussion Forum:

This site may earn a commission from merchant affiliate links, including eBay, Amazon, and others.

DeNomad

Well-Known Member
Joined
Aug 3, 2010
Messages
310
Reaction score
9
Location
Edmonton
This is the build of my Danby DAR125SLDD 4.4 cu ft kegerator. Here are some highlights for those considering a similar build - details and photos further on:
- No freezer
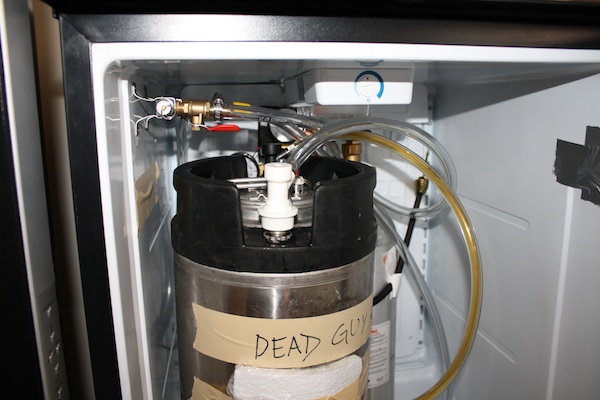
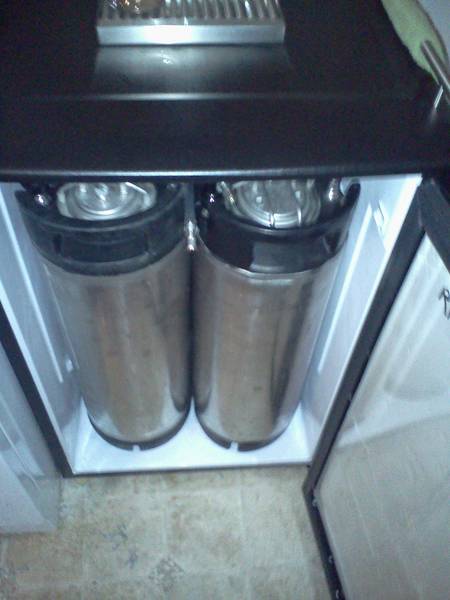
- Fits two ball lock corny kegs perfectly with 5 lb CO2 tank on compressor hump
- May be used as fermentation chamber for a single carboy but only my skinny 6 gallon carboy fit.
- Used 1" copper pipe to aid in tower cooling (it fits snug in 1-1/8" holes)
- Added 1" Tee fitting to pipe and attached a computer fan housed in a small radio shack project box to one side of the tee. This fan blows cool air into the tower.
- Added 1" cap to the tee fitting with two holes 1/64" smaller diameter than that of the two beer lines I squeezed through the holes. This makes sure the air blows up and into the tower.

Parts/Vendors List:
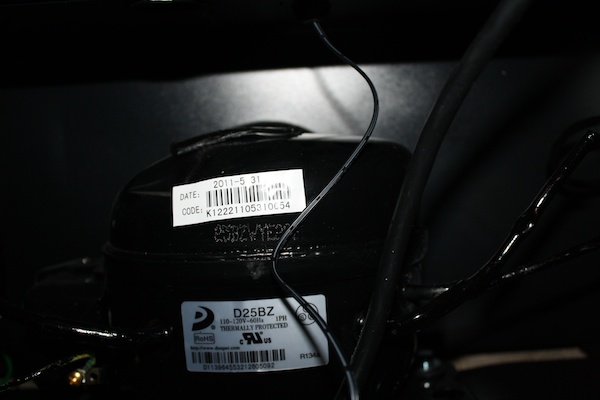
- Danby DAR125SLDD Fridge: $140 from Costco in Canada. Link here to specs.
- Scythe Mini Kaze Ultra 40 mm x 20 mm Fan: $4.99. LINK HERE.
- I would go for a larger fan if I were to do this again, it does not circulate the air fast enough​
- Radio shack project box to house fan. $5
- 12V DC Wall wart (a powersupply which you plug into the wall and outputs 12V DC power to run a computer fan). $12
- 19" x 4" Stainless Drip Tray from hopdawgs.ca. $36.99 LINK HERE.
- STC-1000 Aquarium Temperature Controller from ebay $20
- 4x4 Fence Cap Post (used as project box for temperature controller) from Home Depot $2
- Electrical cord and wall plugin $10
- 1/8" thick puck board to cover insulation on inside of fridge door: Free
- Dual Tower Ball Lock Dispensing Kit from ontariobeerkegs.com: $245.98 LINK HERE.
- Note: I got generic faucets. I regret this, get Perlicks if you are considering this.
- Kit includes:
-Dual Tap Beer tower shell Stainless Steel Chrome plated.
-Clamps (All Stainless)
-Eight feet of Gas line
-Dual Gauge Regulator
-5# empty Aluminum CO2 tank (Certified and new!)
-Two Pairs of Ball lock barbed connects, two Gas two Beer
-Two Chrome Dispense high quality chrome plated faucets
-Mounting hardware
- Inlcuded 2 Way manifold to control carbonation in each keg seperately

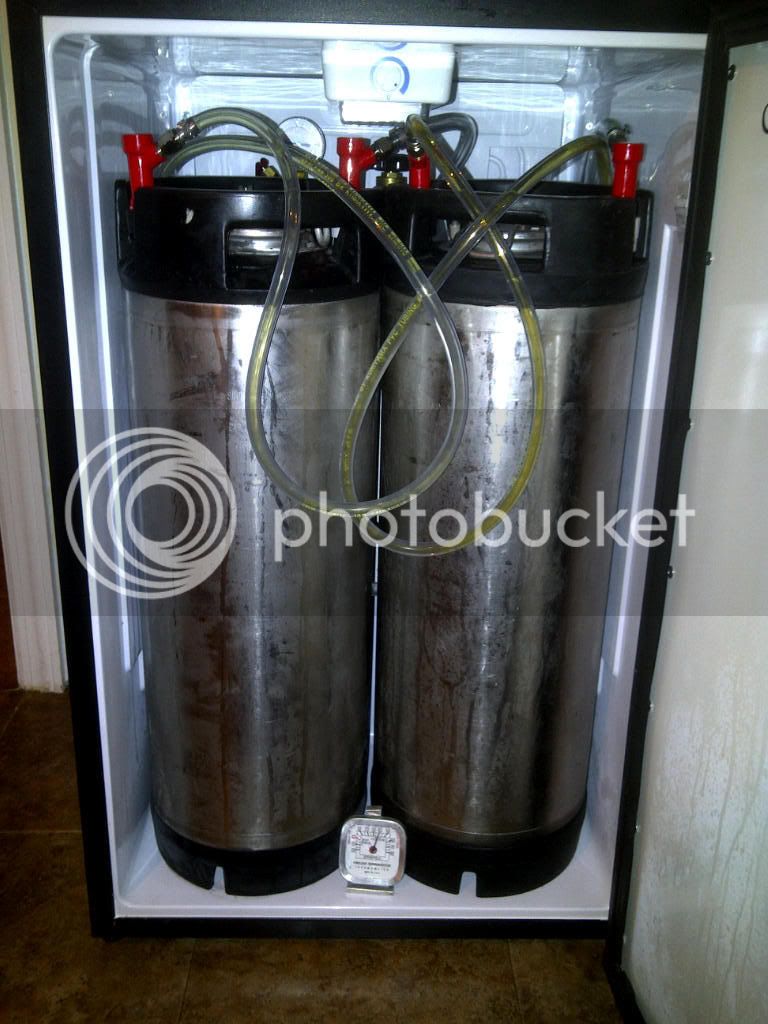
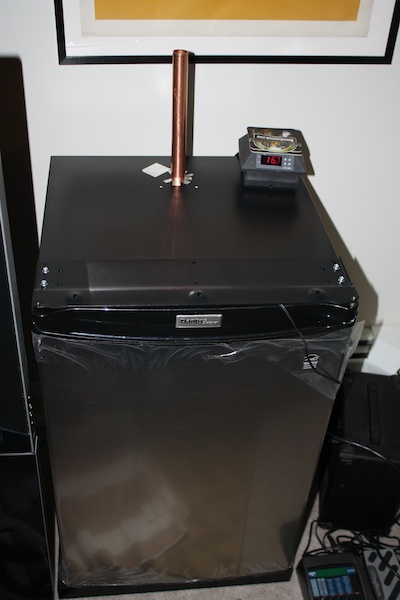
First here is the finished product. Looks good in my living room! I live in a condo so there is not much room for much more.
5135-4624.jpg

Steps:
1. Remove the plastic attached to the inside of the fridge door. There are screws under the door gasket, just peel it back with your hand and unscrew carefully.

5123-4612.jpg

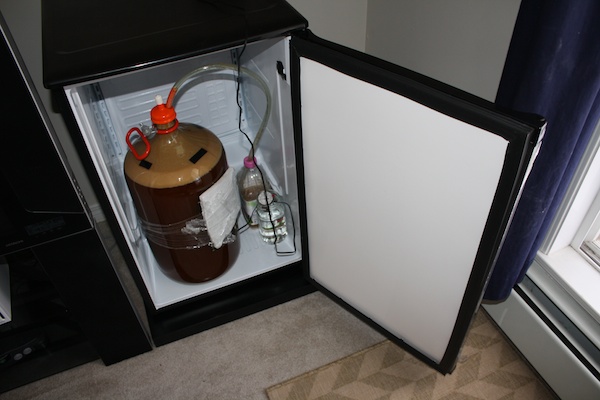
Fridge with garbage from inside of door removed. I am using the fridge here as fermentation chamber for my carboy.

5125-img-4290.jpg

Location of screws under gasket. I drilled holes in 1/8" puck board using the original inner door covering as a template. It worked great!

5124-4613.jpg

Fridge with the puck board covering the insulation.

2. Route temperature probe and 12V DC power supply (aka wall wart) cord through the drain tube.
- I used a STC-1000 aquarium temperature controller housed in a 4x4 fence post cap. See the links at the bottom for the thread or search it on HBT.
- First unscrew the drip tray so you can get at the dip tube. It is just above the compressor on the backside. Any condensation runs out this hole and the heat from the compressor evaporates it so make sure to put the tray back when you are done!
- Both my STC-1000 temperature probe and power supply cord fit through here as long as the probe went in first. Your success may vary with other parts or fridges.

5131-4620.jpg


5130-4619.jpg


5129-4618.jpg


5128-4617.jpg


5133-4622.jpg

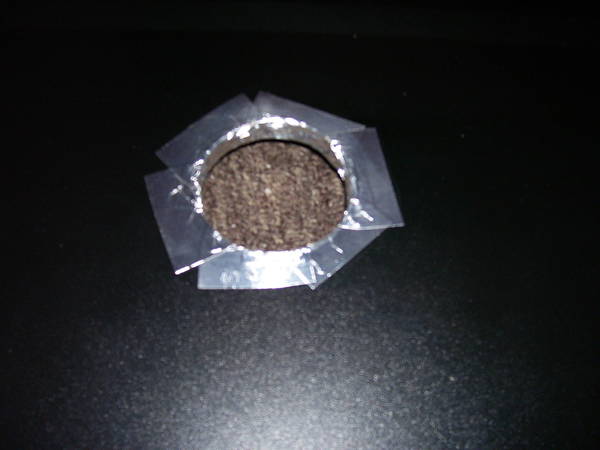
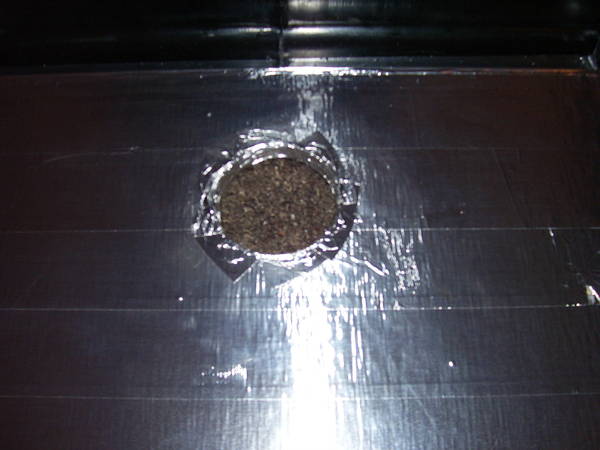
3. Unscrew plastic top from fridge, locate and drill hole. There are refrigerant lines in most dorm fridges on the top of the fridge. It appears in most Danby fridges that the lines are located near the door so you are generally safe putting the hole near the backside.
- Search HBT for "corn starch test" to locate lines yourself. I tested for their general location by turning the fridge on, opening the door and feeling the heat coming on the lines with my hand (that is how the corn starch test works btw).
- Make sure you have enough clearance on the backside to get your fasteners for the tower in without hitting the backplate on the inside. I barely had enough room.
- I used a 1-1/8" hole saw then covered the hole with aluminum duct tape to keep the insulation dry. Try practicing on some scrap wood if you've never used a hole saw before and make sure to use a pilot hole!
- Gently wiggle the 1" copper pipe into the hole. It will fit *really* snug.
- I put some insulation included in my tower kit over the pipe.


5126-4615.jpg

4. See next post!

Useful references for Danby kegerator builds - Thanks to those that posted this information:
https://www.homebrewtalk.com/f51/kegerator-conversion-danby-dar440bl-98779/
http://picasaweb.google.com/114416612335287313960/KegeratorConversion?gsessionid=IFIA2W33GSKDYE1D6vvmsQ
https://www.homebrewtalk.com/f51/my-kegerator-build-176635/
https://www.homebrewtalk.com/f51/my-frigidaire-kegerator-build-150576/
https://www.homebrewtalk.com/f51/ebay-aquarium-temp-controller-build-163849/
 
4. Drill holes to mount your tower. I used large fender washers coupled with regular washers on my mounting hardware. The screws in the kit I ordered were to short so I bought some longer ones at Home Depot.
- Do not over tighten!
- If you like things really tight back up the fridge with a waterproofed piece of wood or a metal plate on the interior of the fridge.
- Do not forget to install tower gasket on top of fridge.

5134-4623.jpg


5. Run tubing. I added a 1" tee to the end of the pipe in the fridge. With my fan mounted in the project box with a 1-1/8" hole it the box fit snugly on the tee and blows air up the tower for cooling. I ran the lines through a 1" cap fitting with holes 1/64" smaller than the OD of the beer line. This made a pretty tight seal and makes sure air goes up the copper pipe.

Sorry no pics!

6. Drill 3-3/8" hole in fridges top plastic cover. You should mark where the cover goes before the pipe goes in.

7. Crazy glue manifold in place after you have decided where to put it. Put the kegs and CO2 bottle and everything in place before you decide to do this.

5137-4626.jpg


5136-4625.jpg

8. Pour pint, relax. I had 5' of 3/16" beer line, it is not long enough but it works at 6-8 psi around 50 F. Go buy 20' of 3/16" beer line and redo plumbing. 10' for each beer line :drunk:

Useful references for Danby kegerator builds - Thanks to those that posted this information:
https://www.homebrewtalk.com/f51/kegerator-conversion-danby-dar440bl-98779/
http://picasaweb.google.com/114416612335287313960/KegeratorConversion?gsessionid=IFIA2W33GSKDYE1D6vvmsQ
https://www.homebrewtalk.com/f51/my-kegerator-build-176635/
https://www.homebrewtalk.com/f51/my-frigidaire-kegerator-build-150576/
https://www.homebrewtalk.com/f51/ebay-aquarium-temp-controller-build-163849/
 
Good build! Looking at doing a conversion on this same model. Any reason why you didn't use the factory temperature controller?
 
Good build! Looking at doing a conversion on this same model. Any reason why you didn't use the factory temperature controller?

Hi Marc, I wanted to use this as a part time fermentation chamber and the factory temp controller did not go warm enough for fermentation. Besides that I think the display on that controller is easier to adjust and looks bada** :ban:
 
I was considering getting this fridge and converting it to a fermenting fridge, but don't know if my fermenter will fit. Would a fermenting bucket that is 12" at the base fit in the space between the compressor and the door?
 
I was considering getting this fridge and converting it to a fermenting fridge, but don't know if my fermenter will fit. Would a fermenting bucket that is 12" at the base fit in the space between the compressor and the door?

I don't think so. You *might* be able to squeeze an 11" diameter bucket. Here are the dimensions I measured when I was choosing between ball lock and pin lock kegs. Since the pin locks wouldn't fit as shown below I chose ball lock.

6091-5460.jpg
 
@ DeNomad author of Danby DAR125SLDD Kegerator Build

Thanks for the instructions and the picutres! I tried the plexi glass/puck board but it was a waste to brittle! I just used silicone caulk to reinforce the rubber door gasket. The other thing i used was a computer fan from my local computer store:)

Wouldn't of been able to make my beer Kegerator without these directions!

BURP here to you!
 
@ HopMisfit your most welcome! Glad you found it useful.
@ Chew78 only 2 ball lock pepsi kegs will fit. Coca Cola pin locks or converted ball locks will not fit in this particular fridge.
 
I'm about to attempt this build. Thanks for the write up and pics!

A question though - is your tower sturdy enough without having reinforced it with some wood or metal for the screws to go into?
 
I'm about to attempt this build. Thanks for the write up and pics!

A question though - is your tower sturdy enough without having reinforced it with some wood or metal for the screws to go into?

Glad you found the thread useful! It's pretty sturdy. I threw in some fender washers stacked with regular washers in there to grab some extra surface area to prevent any wobbling. It is wine as long as you don't smack it with a hammer or jam it into anything if you move house.

Here is a picture of the washers:
5134-img-4299.jpg
 
I think I'll do the same and go with the washers instead of putting in a piece of ply wood. Also - I don't think I'm going to put a fan in mine, but I do plan on using a copper pipe for the tubes to run through. Should I go with a bigger diameter of pipe? My thinking is that the bigger the hole in the top of the fridge and the bigger the pipe, the more cold air will get up in the tower...
 
Regardless of copper pipe size cold fall is gonna flow downwards, it is more dense than warm air - which is why I put a fan in to blow the cold air up. The main purpose of the copper is to chill the beer lines through conduction, so having those beer lines pressed up against the tubing would be best, so smallest copper pipe you can stuff your beer lines into is the way to go.

You could try a separate copper pipe for each line if you wish but I figure that the pair of lines in one large copper pipe has more surface area in contact.
 
Yeah - I'm hoping that the conduction from the copper will be enough to keep that portion of the lines relatively cool.
Thanks again
 
I think I'll do the same and go with the washers instead of putting in a piece of ply wood. Also - I don't think I'm going to put a fan in mine, but I do plan on using a copper pipe for the tubes to run through. Should I go with a bigger diameter of pipe? My thinking is that the bigger the hole in the top of the fridge and the bigger the pipe, the more cold air will get up in the tower...

Here is how I have my copper tubes set up, they run all the way to top of tower.

106_1449.JPG


Thanks for the pics, starrfish. How big did you make the hole in the top of the fridge? Do you have a fan in the fridge or not?
 
Thanks for the pics, starrfish. How big did you make the hole in the top of the fridge? Do you have a fan in the fridge or not?

2" hole and no fan. Copper tubes that long keep the tower plenty cool, cool to touch, but no sweating issues. And that's here in SC where temps can get hot.

I would recommend picking up some cutting oil, I didn't have any to start, and was using wd40, until it started to smoke (which didn't take long, thought it was going to burst into flames) ran out to harbor freight which is close by, and used that to finish hole.

I also picked up the metal duct work tape to seal hole to prevent moisture and condensation from getting into foam and guts of fridge. this tape is covered by flange on tower and cannot be seen once tower is in place. (photo is of plastic trim top on my model fridge but hole through fridge is sealed with same tape. I also cut a piece of plywood to go under plastic top to make plastic more rigid, sealed this as well with tape.

2inchhole.jpg


103_2899.JPG


103_2900.JPG
 
Cool - thanks for the pics.
I ended up doing this on Saturday. Looks great, but one thing has me concerned. I powered the fridge up about 15 hours ago, and it's still buzzing. I don't think it's stopped since I plugged it in. It seems it's not getting cold enough for the compressor to stop working. I put a thermometer in there and the temp is about 48.
I ended up cutting a 2 inch hole like starrfish and I lined it with metal tape to keep the insulation protected. This morning, I shoved a plastic grocery bag around the copper tube to seal off the 2 inch hole, hoping that this would help insulate the fridge so that it can get cold enough to shut itself off.
Anybody know where the factory temp gauge is on this fridge? Maybe something (tubing, co2 tank, etc) is blocking the temp gauge from getting an accurate reading? Or maybe it will just take a few more hours for this thing to get cold enough for the fridge insides to rest?
Gotta leave home now, so hopefully the fridge will be ok for a while...
 
If compressor is buzzing turn dial to off, unplug it, an let it sit for a while. Plug it back in after more than 15min (I usually wait 30min or more). There may be a vapor lock in coils keeping coolant from cycling. Buzz is pretty loud if coolant isn't circulating, normal operation is pretty quiet on these Danbys.

I've had this happen a few times, the first time was right after completion of build, and I could have sworn I screwed something up!. This last time was after a power outage, common issue with these fridges.
 
Hmm. It's not buzzing loudly or any differently than normal. It's just that it hasn't stopped buzzing since I plugged it in yesterday. Normally a fridge will buzz for a little while and shut off intermittently as the desired temperature is reached. Maybe it's just going to take awhile.
Starrfish thanks for the help - good to hear you had the same issue right after the completion of your build.
 
Hi DeNomad - thanks for the great information. I'm looking forward to doing this build. Complete noob at it, but these directions look great. Wanted to ask for a visual on the step below.

My questions are around it's setup using the tee, mounting the fan assembly in the project box, and how you powered it/ where you ran the power...maybe I missed that..

Thanks!


5. Run tubing. I added a 1" tee to the end of the pipe in the fridge. With my fan mounted in the project box with a 1-1/8" hole it the box fit snugly on the tee and blows air up the tower for cooling. I ran the lines through a 1" cap fitting with holes 1/64" smaller than the OD of the beer line. This made a pretty tight seal and makes sure air goes up the copper pipe.
 
Hi DeNomad - thanks for the great information. I'm looking forward to doing this build. Complete noob at it, but these directions look great. Wanted to ask for a visual on the step below.

My questions are around it's setup using the tee, mounting the fan assembly in the project box, and how you powered it/ where you ran the power...maybe I missed that..

Thanks!

5. Run tubing. I added a 1" tee to the end of the pipe in the fridge. With my fan mounted in the project box with a 1-1/8" hole it the box fit snugly on the tee and blows air up the tower for cooling. I ran the lines through a 1" cap fitting with holes 1/64" smaller than the OD of the beer line. This made a pretty tight seal and makes sure air goes up the copper pipe.

Glad your finding it helpful time2trade.

The fan is powered with a 12V DC power supply (aka wall wort) I got from an electronics store. I ran the cord from the power supply through the drain pipe in the back of the fridge. You can see the cord here:
5133-img-4298.jpg


So you have to clip off the end of the cord, run it through the drain pipe, then solder it to the correct wires on the computer fan. I recommend experimenting with the wires to figure out which goes where. The computer fan will only work if wired correctly and the wires on the power supply are unmarked. Make sure not to touch the wires of the power supply together even when it is unplugged. The large capacitor in the power supply holds charge for a long time and if the wires touch and short they can easily ruin the power supply - cover one wire with electrical tape to prevent this.

The fan mounted in a box fits snugly on the tee fitting, the cord dangles off the box. The lines in the step you quoted are beer lines (just to be clear).

Hope that helps.
 
Can anyone confirm if this will also take a 1/6 bbl keg. On occasion I would like to serve some beers on tap from the local breweries. Also would the 1/6bbl fit with a 5gal Ball Lock Corny. Thanks in advance.

Great how to. Great thread. Bout to pick this thing up this week and get started on the build this weekend.
 
Hey guys, has anyone done one of these with the taps through the door instead of using the tower? Id like to make it using the shanks as they are cheaper and I wouldnt have to worry about cooling the tower or anything. Would there be enough room to have the 2 shanks go in just above the cornys? Also, I'd love to use this as my fermentation chamber but I doubt my 6.5gal ale pail will fit...its 12'' in diameter...What exact container could I use to ferment a full 5gal batch in the 4.4 Danby? Thanks!
 
Hey guys, has anyone done one of these with the taps through the door instead of using the tower? Id like to make it using the shanks as they are cheaper and I wouldnt have to worry about cooling the tower or anything. Would there be enough room to have the 2 shanks go in just above the cornys? Also, I'd love to use this as my fermentation chamber but I doubt my 6.5gal ale pail will fit...its 12'' in diameter...What exact container could I use to ferment a full 5gal batch in the 4.4 Danby? Thanks!

I am not sure if you would have room for the shanks. The APPROXIMATE interior height of this fridge is around 85 cm (33.4"). It would depend on if you have pepsi or coke kegs. I would recommend buying the fridge first, then seeing if you have room for shanks and decide whether or not you want the tower. Personally I like the tower so I have somewhere good for the drip tray. Note: the front door of the fridge is curved, might make faucets and drip tray on the front look rather weird.

The largest fermenter you could fit in there would be 10.7" diameter, but I wouldn't push it past 10.5" diameter. Some carboys are small enough, some are not. I fended up getting a chest freezer is the best so I could serve beer and ferment beer at the same time.
 
I see...thanks for the input. Thing is, fermenting a 5gal batch in a 5gal carboy isnt such a great idea right? All Ive heard concerning fermentation is that it should be done in a container thats bigger than your batch size...how far up could I fill a 5gal carboy for it to still have fermenting room? 4.5gal?

For the shank part, IF I were to do the tower taps, is it completely necessary to have a fan pushing cold air into the tower or could I just make the hole, install the tower and leave it as is? Thanks.

I wouldn't fill a 5 gallon carboy past 4 gallons personally. I ferment in corny kegs regularly and they are about perfect at 4 gallons with minimal blow off.

You can do it without the fan no problem.
 
Hey all! First time poster here. Has anyone been successful in converting this fridge into a dual tap tower that fits 2 sixtels and 5lb CO2 tank?

Any help would be appreciated!


:mug:
 
I have 2 5gal ball lock kegs in mine along with a 5lb co2, a hop randall with bypass lever, and a 20oz back up CO2 paintball tank. Don't think I could get much more than a mouse fart in there but it fits!
 
Great info! I'm trying to do basically the same thing, but I'm taking it in stages--I haven't drilled through the top yet; so far I've just removed the door liner to try to get the door to close. I'm having some significant difficulties with the weatherstrip seal, both on the hinge side, and on the non-hinge side.

On the hinge side, when the door is closed the weatherstripping catches inside the fridge, getting twisted around and in some cases preventing the door from staying closed at all. If I fiddle with it by hand I can get the seal to line up somewhat-normally. On the opposite side, at the bottom, the weatherstrip does not touch the fridge at all; there is roughly a 1/4" gap.

Right now I'm using a piece of cardboard in lieu of the puckboard the OP mentioned (I wanted to get a proof of concept before I went with a permanent solution); I'm not sure if the cardboard is the source of the problem or if I'll be in the same boat once I get the puckboard or Lexan. Anyone have any suggestions? Thanks.
 
How necessary is the temp controller if just using this as a kegerator?


Any definitive word on whether two 1/6 draft kegs will fit? I seem to be finding confliction info on this question

thanks
 
The fridge holds the temperature perfectly for 2 kegs if you keep it down close to the bottom of the dial. As for 1/6 size kegs I'm not sure
 
How necessary is the temp controller if just using this as a kegerator?

thanks

It holds temps really well on its own. The range of the dial on mine is from 48 degrees on the warmest setting and 34 degrees on the coldest. This is what I get on my thermometer sitting on the floor of the fridge between the two kegs.
 
Back
Top