Danby DAR125SLDD Kegerator Build

Homebrew Talk - Beer, Wine, Mead, & Cider Brewing Discussion Forum

Help Support Homebrew Talk - Beer, Wine, Mead, & Cider Brewing Discussion Forum:

This site may earn a commission from merchant affiliate links, including eBay, Amazon, and others.
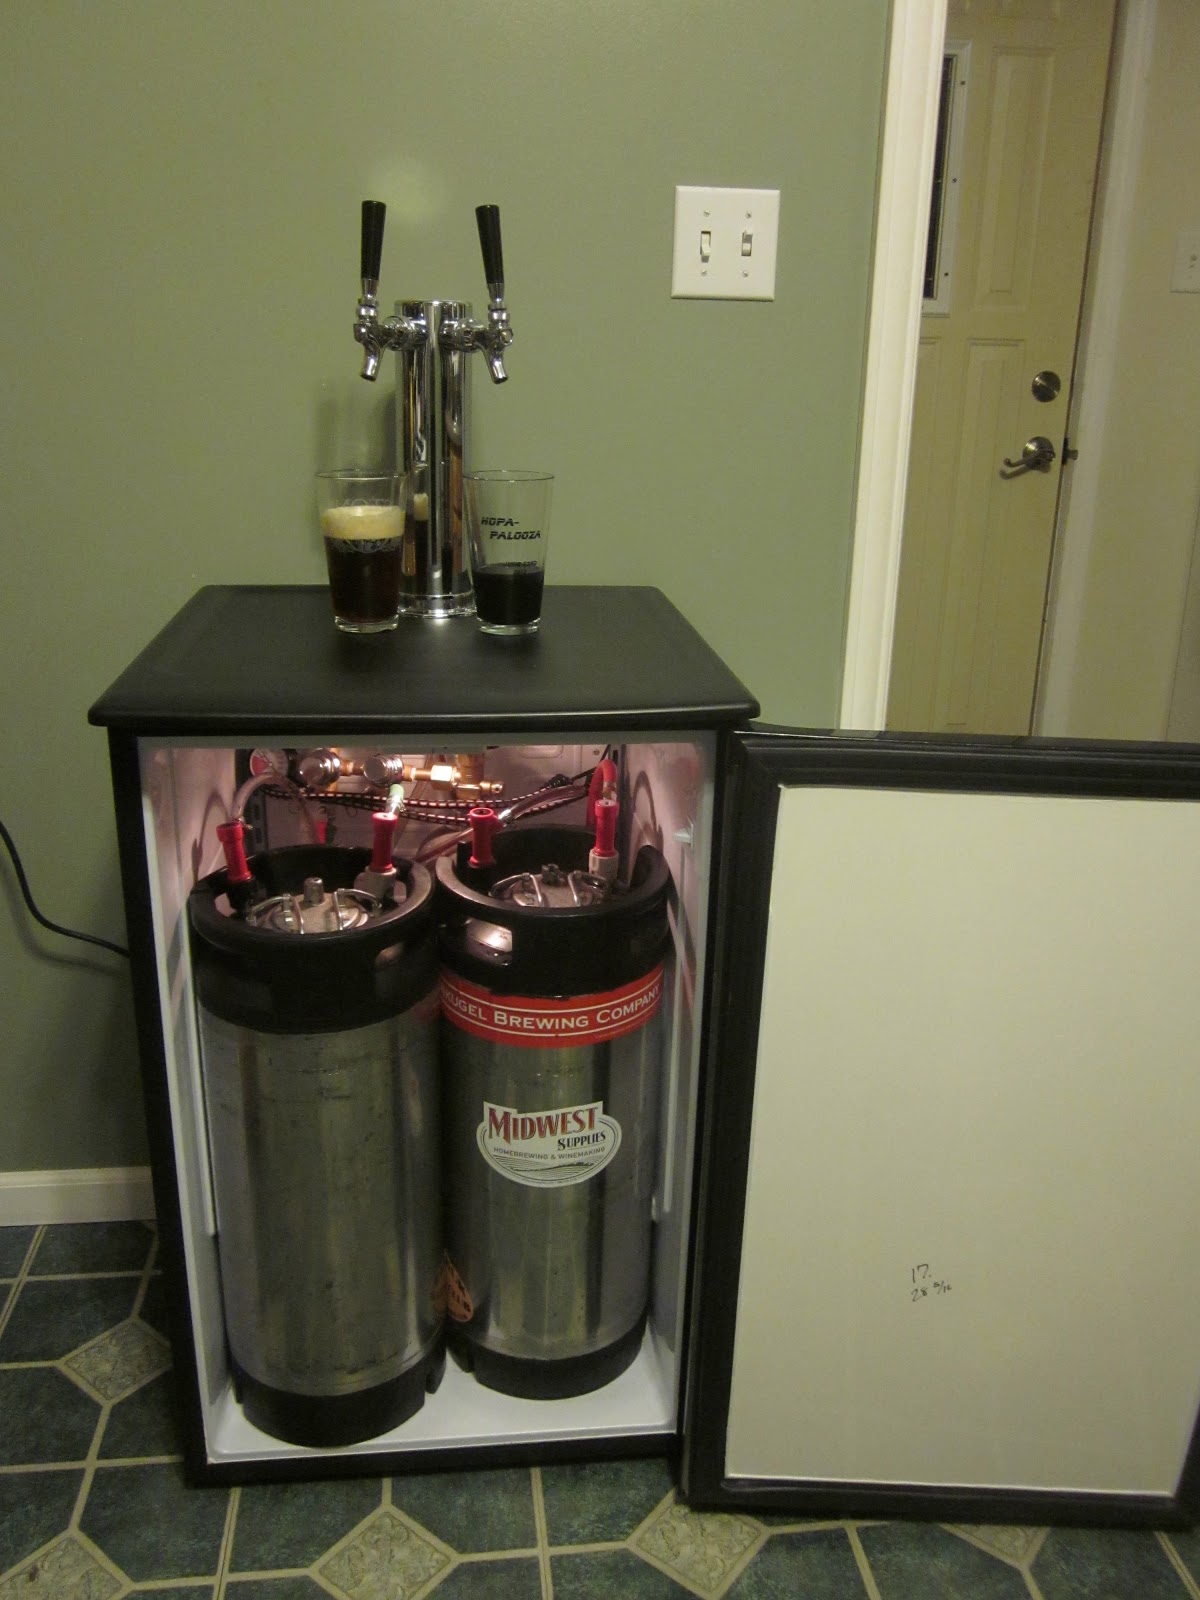
It holds temps really well on its own. The range of the dial on mine is from 48 degrees on the warmest setting and 34 degrees on the coldest. This is what I get on my thermometer sitting on the floor of the fridge between the two kegs.

I'm getting similar range of temps using stock dial.
 
thank you for the answers on temps guys that's very helpful.

Just ordered the Danby and a 2-tap conversion kit last night. If only one 1/6 fits (sounds like that's the case), I guess I'll just have one 1/6 keg to start with the option of going to 2 cornies if I ever get into home brewing.
 
So this is my dilemma. Reading the OP's thread, he spent $400~ total on this kegerator conversion, including the fridge and parts / kit costs. If I dont have much experience with this kind of work should I just purchase a kegerator outright?
 
IT'S A PRETTY EASY BUILD. I just kept stock temp gauge as I'm no electrician! Had it complete in less than 8 hours, and I added trim rails (stainless drawer pulls), cut plywood sheet for extra support under plastic top cover, and made shims to attach rails to under plastic cover.
 
Thanks for the build! After toying with the idea of a kegerator for a couple of years, I finally pulled the trigger when I saw this model of fridge at Costco for a good price.

I'm going to go in stages. I'm going to start with a single line with a picnic dispenser (until I can justify getting a tower for the bar - or someone gets one for me:) ). I'm not sure if I'm going to cut a hole in the top just yet, or wait until I'm ready for the tower, and keep the dispensing line in the fridge itself. Does anyone know why this might be a bad idea?

So the first stage should be relatively easy; ie removing the fridge liner, and then stuffing everything in. I was poking around under the door gasket, I couldn't find any screws. It appears to be a solid piece of plastic. I'm thinking I'll just cut the moulded plastic out as close to the gasket as possible. Any thoughts?

EDIT: Found this out about:
On these new ones, the door panel is glued and molded into place (filled with spray foam). I ended up having to cut it apart rather then simply removing it, in the end it didn't turn out too too bad but I just thought I'd post so someone else doesn't get surprised.
 
I'm going to go in stages. I'm going to start with a single line with a picnic dispenser (until I can justify getting a tower for the bar - or someone gets one for me:) ). I'm not sure if I'm going to cut a hole in the top just yet, or wait until I'm ready for the tower, and keep the dispensing line in the fridge itself. Does anyone know why this might be a bad idea?

Jigawatts, you should not cut a hole in the top until you can cover it with a tower. You will be promoting condensation within the kegerator and it will be running constantly since you will be losing a lot of cold air through that hole.

As for the gaskets being glued in place on new ones, did not know that. I would say cut carefully, use a drywall spatula to remove it then use whatever screws you have lying around to attach the gasket on whatever plastic piece you choose to cover the insulation with (or glue it if you feel like it).
 
Would a single ball lock keg fit in this unit with no modifications to the door? Looking for a unit to take to the office with a single tap on the door and still be able to use the other half (and door) as a regular fridge via a slim wood frame and modified wire racks.

Thanks in advance!
 
Would a single ball lock keg fit in this unit with no modifications to the door? Looking for a unit to take to the office with a single tap on the door and still be able to use the other half (and door) as a regular fridge via a slim wood frame and modified wire racks.

Thanks in advance!

No. If you look at the photos the kegs almost reach the end of the fridge, maybe 1-2" from the edge. The drink holders on the door would bump into the kegs for sure.
 
You have to remove the plastic mold on the inside door to be able to fit any kegs....if you do remove it (which is super easy and doesnt damage the fridge in any way) you will be able to fit up to 2 ball lock kegs, or one ball lock and one pin lock. If you only put one ball lock in there you would still have half of the fridge space for other stuff. Ive had it for some time now and I can honestly say its an awesome fridge.

Cheers!
 
DeNomad, nice to meet you again yesterday, and great thread. I'm going to do my best to explain to my wife why this is a good idea! :)
 
DeNomad, nice to meet you again yesterday, and great thread. I'm going to do my best to explain to my wife why this is a good idea! :)

Thanks man. My method was to invite the better half to live with me AFTER I had built my kegerator. Best of luck using reason in that discussion. I recommend "think how classy it would look next to the TV". In all serious, it looks good.
 
No. If you look at the photos the kegs almost reach the end of the fridge, maybe 1-2" from the edge. The drink holders on the door would bump into the kegs for sure.

Just to clarify on this one for others. I ended up buying the fridge anyways (DAR440BL from Walmart) and with only removing the right hand side door trays having a single ball lock fits with room to spare without having to take off the plastics.

Will post more pics when I finish the build but wanted (and am getting) a sweet single keg fridge for the office with plenty of room to still store food. Going to build a shelf system on the right side and will keep some cans in the door holder. Really wanted it to work this way so pretty stoked to say the least.

image.jpg
 
Picked up one of these on craigslist today for $70, Its an older one with crews holding the door trim on too. It will be a slow process for me to build, but I cant wait to get started... Really appreciate the info on here
 
Alright here's the pics of my completed build. My model was the DAR440BL from Walmart for $170 brand new. Objective of the build was to have a single keg so half of the fridge could still be used for my lunch as this will be going under my desk at work.

Mission accomplished to say the least!
  • Single ball lock with center mounted Perlick 525SS
  • 5lb CO2 tank on the hump
  • Didn't have to remove door plastics, only trays on right side so still get to use the 8x can holders
  • Will fit 6x bombers on the lower part of the right hand side as well leaving two shelves above for food

Great fridge and build totally exceeding my expectations!

DAR440BL_single_keg.jpg
 
Alright here's the pics of my completed build. My model was the DAR440BL from Walmart for $170 brand new. Objective of the build was to have a single keg so half of the fridge could still be used for my lunch as this will be going under my desk at work.

Mission accomplished to say the least!
  • Single ball lock with center mounted Perlick 525SS
  • 5lb CO2 tank on the hump
  • Didn't have to remove door plastics, only trays on right side so still get to use the 8x can holders
  • Will fit 6x bombers on the lower part of the right hand side as well leaving two shelves above for food

Great fridge and build totally exceeding my expectations!


That's a cool build... Which my boss would let me have a kegerator under my desk
 
Hi everyone!

So I'm about to start the irreversible part of the build and I would just like to confirm something. I've got the DAR125SLDD and after the cornstarch test, it would seem like there's no refrigerant lines running along the top except in the front edge of the fridge... Me being the insecure DIY-er, I'd like to confirm that I did the cornstarch test correctly, as there are no undos in drilling :)

Thanks !
 
It went well, though I should have test-driven my work. Turns out I forgot to put back the plastic top before measuring the length of the screws I needed. I'll have to go back to the store to get longer screws.

That being said, I couldn't find 1" copper pipes at my local hardware store, so I bought some plumbing line insulation (black foam tube) for about $1cnd. So far the lines are kept cool since I use the same room to ferment and the temp is low (60F-68F). Once I'm done fermenting my latest batch, I'm willing to bet I'll have to install a fan like most Danby builds have.
 
That's great to hear. I will be picking my DAR125SLDD up ftom Costco this weekend. I'm anxious about the modifications but excited to start kegging my beers. :ban:

Did you have any trouble removing the plastic door panel?

Don
 
The door panel super easy. Just be careful not to tear the rubber door seal and you'll be fine. My only issue with the door was the clear acrylic sheet I used. it's really brittle, so make sure you pre-drill the holes for the screws. Using the removed door panel to line up the holes works well.
 
I just ordered my Darby durring my Black Friday Amazon Binge (oops!)

I have a Dual regulator setup with a 5LB co2 tank along with two ball lock cornies.

Going with the Picnic taps for now, but I'll add a dual tap tower maybe after I get my taxes back or when that money tree in the back yard starts showing some more promise.

Thanks for all the advice! Getting the Dremel ready to cut the door flat next week.

Tim
 
Finally completed my build... this thread was really helpful to me, unfortunately I got so excited about the build that I forgot to take pictures throughout the process.

Here is the result....

IMG_1589.jpg


IMG_1590.jpg


IMG_1591.jpg
 
I just completed my Kegerator build. I've posted a fairly detailed walk-through on my personal blog. This thread helped me a ton, thanks guys!

Walkthrough

IMG_5852.jpg

Two Pin-Lock Kegs hanging out together!
 
I just completed my Kegerator build. I've posted a fairly detailed walk-through on my personal blog. This thread helped me a ton, thanks guys!

Walkthrough

IMG_5852.jpg

Two Pin-Lock Kegs hanging out together!

I just got the same model fridge and descovered the same door pane issue. I read your linked blog. Do you have an other advice about herring the door panel off?

Also how does the copper pipe work for you keeping the lines in the tower cool?
 
I just got the same model fridge and descovered the same door pane issue. I read your linked blog. Do you have an other advice about herring the door panel off?

Also how does the copper pipe work for you keeping the lines in the tower cool?

The only extra advice I can give is to be as gentle and patient as possible, I was only half joking about the machete...the blade would long enough to cut from the edge of the door to the different raised parts of the insulated areas. If you can cut the raised parts off somehow from the front, the areas flush/parallel with the door were the easiest to pull off.

The copper pipe seems to be working, after not having one of the beers for a couple of days I didn't notice any extra amount of head from my pours. For the price/effort I would say its worth a shot.

Good luck with that door!
 
Very neat job. It's not totally clear from the pic. Did you use the dremel to cut the frame the out also?
 
What did you use to cut the white board? Sorry about all the questions. I'm light on tools in my apt.
 
Stephen_mc said:
What did you use to cut the white board? Sorry about all the questions. I'm light on tools in my apt.

He used a dremel tool. You can se all the details on the link he put in his post.
 
IMG_5830_zps59b7d41b.jpg
What did you use to cut the white board? Sorry about all the questions. I'm light on tools in my apt.

I used painters tape and a circle saw. I think any saw would work though just make sure you keep your board from vibrating too much. The excess parts without the painters tape chipped a bit so thats a step I wouldn't recommend skipping.
This pic shows the white board after it was cut.
 
DeNomad, I finally found the fridge at the Winterburn Costco, same model. I picked one up today, but am just going to ensure it works fully before I start destroying it. I think I'm in the same boat as the others though where the door does not have screws. I'll have to see if someone I know has a dremel or something to help get it off.
 
No. If you look at the photos the kegs almost reach the end of the fridge, maybe 1-2" from the edge. The drink holders on the door would bump into the kegs for sure.

I am able to get a single ball lock keg in this fridge without any modifications to the door. the only thing I had to do was remove the removable shelving from the opening side of the door. 1 keg fits in just fine.

On that note, has anyone with this fridge been able to get a ball lock keg + 1 commercial sixth keg in there? would that fit? a ball lock has 8.5" diameter and according to a web resource a sixth keg has a 9.25" diameter.
 
I don't think so. You *might* be able to squeeze an 11" diameter bucket. Here are the dimensions I measured when I was choosing between ball lock and pin lock kegs. Since the pin locks wouldn't fit as shown below I chose ball lock.

6091-5460.jpg

how did you measure the inner dimensions of the fridge with such accuracy?
 
You have to remove the plastic mold on the inside door to be able to fit any kegs....if you do remove it (which is super easy and doesnt damage the fridge in any way) you will be able to fit up to 2 ball lock kegs, or one ball lock and one pin lock. If you only put one ball lock in there you would still have half of the fridge space for other stuff. Ive had it for some time now and I can honestly say its an awesome fridge.

Cheers!

how much wiggle room do you have with one ball lock and one pin lock? I am thinking about putting in a ball lock and a sixth commercial keg. the ball lock is 8.5" diameter and from what I gather online the sixth is 9.25" diameter. just .25 more than a pin lock do you think there is enough room in there for what I am trying to do?
 
how did you measure the inner dimensions of the fridge with such accuracy?

I used a tape measure and a pair of calipers. Measured the width of the outside, then calipers on the wall thickness. Inner width = Outside width - 2*thickness. I forget how I measured the length but I likely did something similar. The gray dimensions are reference dimensions calculated by the CAD program.
 
how much wiggle room do you have with one ball lock and one pin lock? I am thinking about putting in a ball lock and a sixth commercial keg. the ball lock is 8.5" diameter and from what I gather online the sixth is 9.25" diameter. just .25 more than a pin lock do you think there is enough room in there for what I am trying to do?


My recommendation is to cut out circles of cardboard of the correct diameter and toss them in there, see what you think. Be aware of the plastic tabs where the shelves sit since that is the tightest part of the fridge. Mark 3/4" away from the side wall, that is where the plastic tabs extend too.

Off the top of my head...
1 ball lock + 1 pin lock: Probably would need to cut out the bits of plastic the shelves sit on to make this work. 2 ball locks are very tight already.

1 ball lock + 1 commercial keg: Definitely need to cut out the bits of plastic the shelves sit on. No guarantee here. Kinda doubt it.
 
I just purchased this model, but can't seem to find any screws along the door. Pulled the gasket back, but zero screws. Any suggestions?
 
I just purchased this model, but can't seem to find any screws along the door. Pulled the gasket back, but zero screws. Any suggestions?

Danby now glues the shelving to the door and insulating foam. You have to cut around with a dremel or just cut the shelving out.
 
Back
Top