• Please visit and share your knowledge at our sister communities:
  • If you have not, please join our official Homebrewing Facebook Group!

    Homebrewing Facebook Group

Critique my single tier pump plan

Homebrew Talk

Help Support Homebrew Talk:

This site may earn a commission from merchant affiliate links, including eBay, Amazon, and others.
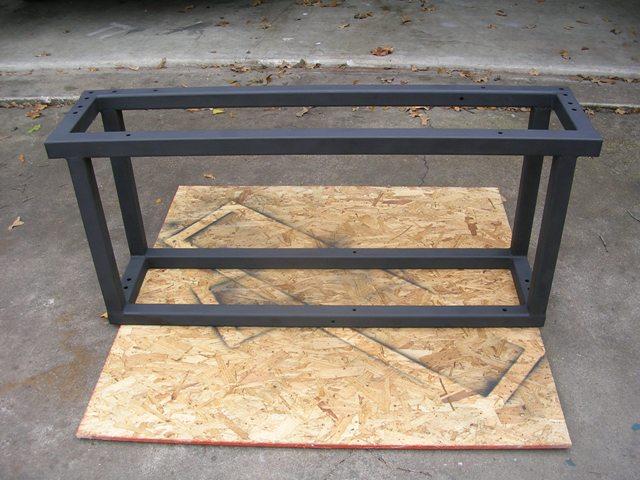
I think what you're looking at so far is at least three queen size frames. The long sides are 53" and the cutoff piece is too short for anything else. The sides and legs are about 16" so I might have gotten 6 pieces out of another frame. I don't remember really. I have about 12 frames in the garage all cut down to raw material. I expect to use just about all of it.
 
I spent about 9 hours over at my parent's house yesterday finishing up the welding. I still have to grind some of the sloppy welds and strip to paint off the top so I can paint it with BBQ paint.

brewstandwelded.jpg


brewstandwelded2.jpg
 
Looks like things are coming along nicely. I think the angle iron around the top to hold the kettles in place is a great idea.
 
That looks really nice, and really low profile; much lower than the one I'm building. What's the height above ground and where will that put the top of your keggles?

Also, what kind of burners are you planning on using?
 
It will be a little higher after the 4" casters go on. The keg platform will be 20" from the floor. I wanted the tops of the kegs to be low enough that I can comfortably stir the mash without a step stool.

I'm using 23 tip natural gas ring burners plugged down to about 15 each.
 
That looks pretty reasonable, Bobby. Glad you're tackling some welding - it's fun, isn't it?

With regard to metal for a project like this - if you can't find spare bedframes on the cheap, angle iron is very inexpensive. 1-1/2" x 1-1/2" x 1/8" hot rolled angle shouldn't cost more than $1 a foot from a steel supplier (look up steel supply, metal supply, pipe supply, or salvage in the Yellow Pages).
 
I've collected so many bedframes over the past months that I actually have about 6 full ones left over now. Yes, welding is freakin addictive. At first, I was just trying to get a good enough bead to make it work as fast as possible. Towards the end I was putting beads where they weren't even necessary just for more practice. I need to upgrade my electrical service so I can buy my own.
 
At this rate of work, I'll be brewing on it in mid 2009 some time. Oh well, wife, kids, biz travel does that.

I spent two hours with the angle grinder with coarse disks to strip to top end of the stand down to bare metal. The high temp BBQ paint can't be put over any other kind of paint that will fail under high heat. I still have to strip the cradles for the two tippy dump end vessels but we'll get there.

brewstandpaint.jpg
 
Looks like we're at about the same stage in this build. Only I plan on brewing on it weekend after next. ;)

I didn't sand my last one good, and you're right, the high temp paint comes right off as the stuff underneath burns up. I took this one down to bare metal where it's going to get hot before I started painting.

 
Limping along... Been working on the burner hanging system and the two end tippy dump cradles. The "safe" citrusy paint strippers the box stores sell suck badly so I've had to grind it all off.

Anyway, I got the castors on. Here's the progress while I give my old standby the last ride (hopefully). I've told myself that many times already.

lastride.jpg
 
Just a bump to show some equipment porn. This is the kettle put back together after the polishing project:

keggledone.jpg


Here's a closeup of the sight glass protector secured to the top of the keg. I drilled and tapped the top skirt for a 10-24 stinless screw. I used some beerline as a spacer. Now I can clumsily bump into this thing all day without breaking my glass.

sightprotectorfinished.jpg
 
Bobby, or anyone, can I see inside the HLT to see what you are using to get the water from the bottom of the keggle to the outlet that has to be drilled above the bottom?

thanks,
 
JnJ said:
Bobby, or anyone, can I see inside the HLT to see what you are using to get the water from the bottom of the keggle to the outlet that has to be drilled above the bottom?

thanks,

You need an internal siphon tube:

https://www.homebrewtalk.com/wiki/index.php/Keggle#Syphon_tube

Along with that, you need to make sure you have some tubing on the outlet that drops down lower than the very bottom of the keg to keep it going.

You can build the syphon or "dip tube" out of an "L" of rigid copper pipe using an elbow or use some left over flexible copper.

Frankly, I'm pissed that I didn't just get my HLT and MLT's drain bulkheads put in the bottom.
 
Bobby_M said:
You need an internal siphon tube:

https://www.homebrewtalk.com/wiki/index.php/Keggle#Syphon_tube

Along with that, you need to make sure you have some tubing on the outlet that drops down lower than the very bottom of the keg to keep it going.

You can build the syphon or "dip tube" out of an "L" of rigid copper pipe using an elbow or use some left over flexible copper.

Frankly, I'm pissed that I didn't just get my HLT and MLT's drain bulkheads put in the bottom.

Thanks, but what exactly did you use? also, wouldn't having the bulkheads in the bottom cause an issue if direct heated?
 
Only because I scored a pile of stainless 5/8" compression fittings did I decide to go with the rigid pipe. If I had the same fittings in 1/2" stainless compression, I would have used a short piece of soft copper instead. There's really no difference and I don't mind sweating an elbow. If you're gonna have the end of the tube come really close to the bottom, you might want to drill a few 1/8" holes around the very bottom so it doesn't close off the flow. Here's a similar one that uses a male adapter instead of a compression fitting. That works too and is as cheap as it gets.

hopfilter1.jpg


You won't have to remove the tube in an HLT as often to clean it like you would with a kettle.

No, I don't forsee any problem running the drain along the bottom where the flame hits (In an HLT). It will heat the water in the pipe and if it boils, it will just come out of the hole inside the keg.

The one I made for my MLT can be seen here: https://www.homebrewtalk.com/showthread.php?t=56183
 
Merrily, I crawl along...

I used some 12" x 1/2" threaded rod mounted into the bottom of the stand with two nuts. Then I used opposing wingnuts on the top to hold a single piece of angle down the center just under the keg locations. I was going to HANG this rail from the top but that would require bringing the whole thing over to my dad's to weld a single nut on each side and didn't feel like it.


The three burners are going to sit on this rail. I'll be drilling up through the bottom and into the center of the burner where I'll tap 1/4-20 threads in. Of course I'll use a thread sealant on the bolts to keep gas from shooting out where it ain't supposed to.
brewstandburnersupport.jpg

Oh, and I put a bottom shelf on the stand using some galvanized sheet. I tacked it down to the frame with a few rivets. I would have gone with stainless diamond plate if I unlimited funds but, no.

I'm actually finished with the plumbing but I didn't snap a pic yet. It is not easy getting all the fittings/burners to line up exactly when you're working with stock nipple lengths and such. Again... I regret selling my pipe threader. Ugh. It's also very annoying how different the tolerances can be on the same type of fittings. I had one close nipple thread in extremely deep while the other two barely grabbed 3 revolutions. Not good when you want all the burners to sit on the same plane.
 
That looks real nice. I cant wait to see the pictures of the plumbing. You will appreciate having it on those casters.
 
I noticed the same thing with the differences in thread tolerances - very frustrating. I got some closed nipples from HD and others from Lowes. There was a substantial difference in how deep they would go. I think I nearly gave myself a hernia on some fittings tightning them down where they were all the same.
 
The worst part is that my issue was with close nipples that threaded into brass valves so the amount of wrenching I could do was limited. Pics of the finished plumbing will go here tonight.
 
The burners are centered under the vessels give or take 1/4".
brewstandgas.jpg

Obviously due to the center support, I had to angle the center burner off the main trunk.
brewstandgas2.jpg


brewstandgas3.jpg


Yeah, I know it looks odd. I've never seen anyone use gate valves on their gas line and I can already hear the cries of the overly cautious letting me know that they're not rated for NG. No worries. These are full flow valves that use a solid brass wedge. I used them because the flow adjustment turned out to be a lot more smooth and gradual giving me more granular control over the flame. I don't intend to leave this system under pressure between brew sessions and will rely on a gas rated ball valve at the source to keep things from getting dangerous.

I may still plumb some 1/4" copper tubing to all the burners to run pilot flames but that's something I can do later. I'll just tap off the end of the main manifold using a needle valve with a compression fitting leading to the copper.
 
Looking good! I have been collecting free bed frames from Craigslist to put together a stand.
 
Back
Top