You are using an out of date browser. It may not display this or other websites correctly.
You should upgrade or use an alternative browser.
You should upgrade or use an alternative browser.
CraftBeerPi - Raspberry Pi Software
- Thread starter chixxi
- Start date

Help Support Homebrew Talk:
This site may earn a commission from merchant affiliate
links, including eBay, Amazon, and others.
Yes, but I already purchased the add on board and want to use the screw terminals for the 1 wire temp probes so that I don't have to set up a bread board with resistor to wire them.
hairybiker
Member
- Joined
- Feb 17, 2017
- Messages
- 8
- Reaction score
- 5
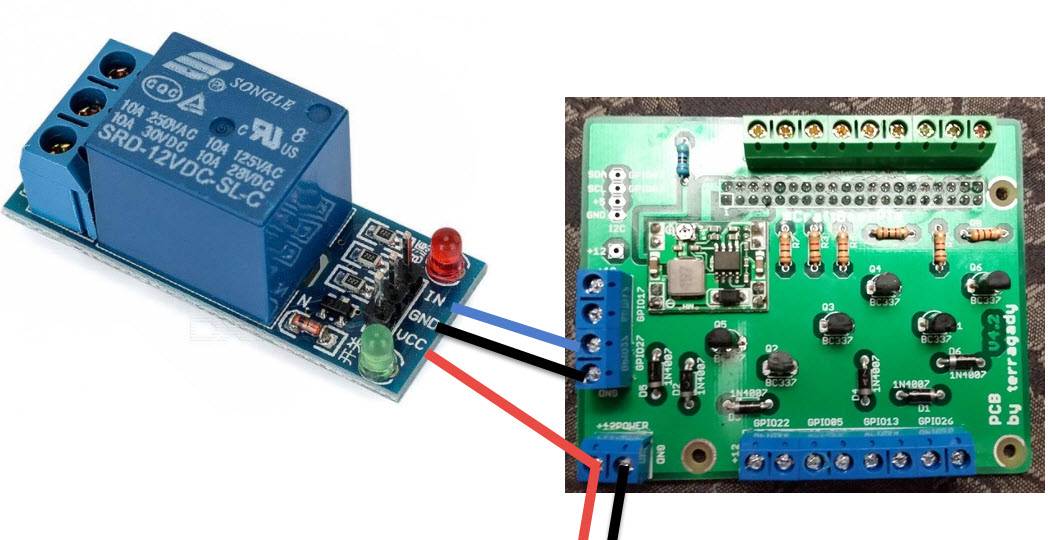
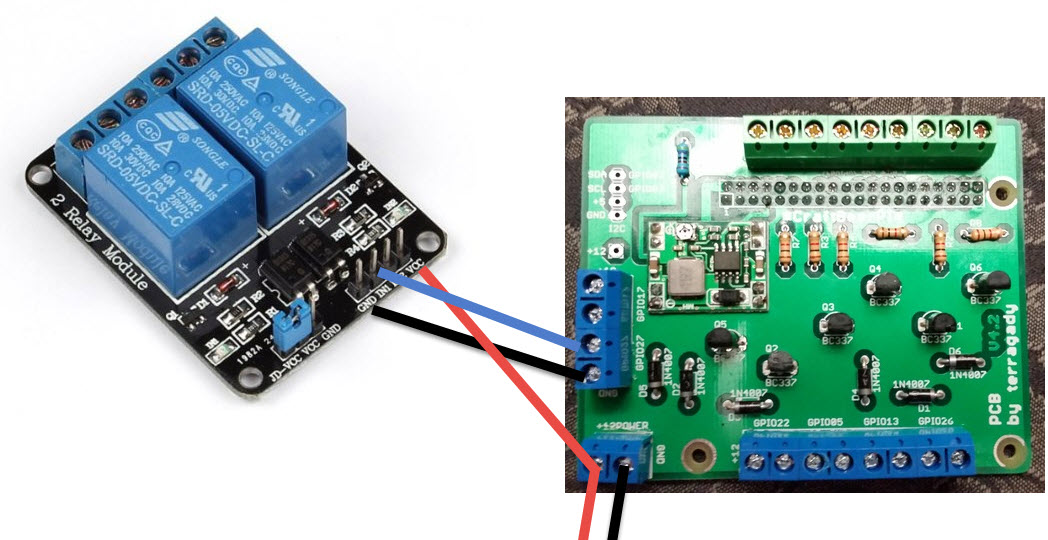
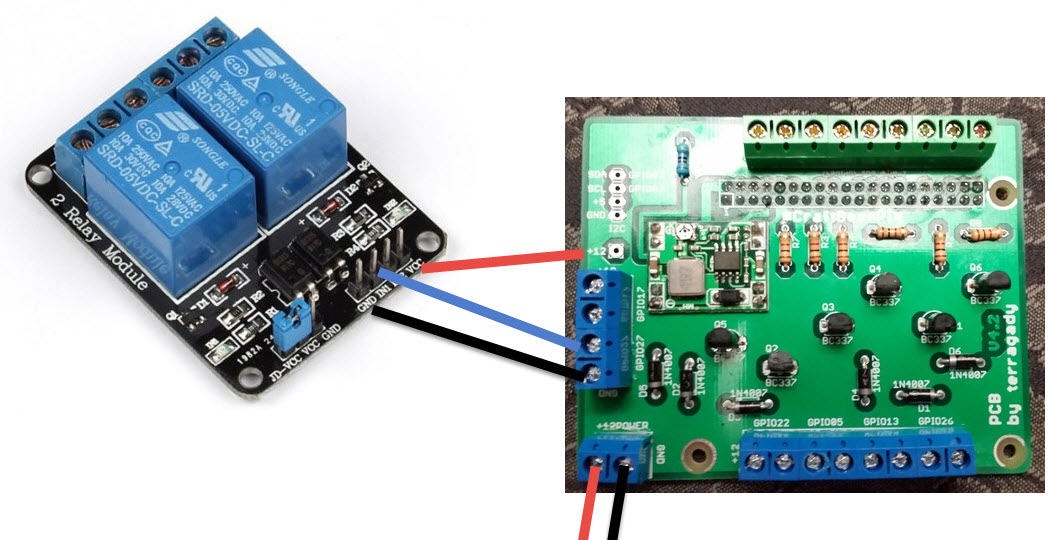
Your relay board has 3 (input) terminals on it:
VCC - connect to the 12V (in) terminal on the pcb with the power - this powers the relay board needs to be on all the time
IN - connect to the 12V (gpio) terminal on the board - this provides the signal
0V - connect to the 0V (gpio) - ground for both
Then set that gpio to active LOW in the software. (assuming active LOW module)
Now when the s/w activates the pump the IN will drop to 0V and the relay will activate.
The EXTRA 12V (Vcc) line is needed to power the extra bits that control the relay, turn on a led etc, it needs to be ON all the time, the IN is just a signal (12V or 0) to tell the electronics what to do.
Maybe what is confusing you is the board has 12V written on it when it is really just a signal (ON/OFF), but it can be 12V or 0V dependant on the s/w setting.
If your board is active HIGH then set the s/w to that. And 12V will appear on the Vin and the relay will activate)
IF however you want to just plug in a relay with no module, set the s/w to ACTIVE HIGH, and the 12V (gpio) to the relay +, 0 to the -.
(The module makes it tidier and provides some feedback.)
Hope that makes sense now.
Thanks HB. So he should be good with the VCC hooked into the 12v line feeding the Terragady board as seen in the image below? Would the second image work as well using the extra 12v pad to power the relay board module instead?

- Joined
- Mar 24, 2016
- Messages
- 558
- Reaction score
- 60
Thanks HB. So he should be good with the VCC hooked into the 12v line feeding the Terragady board as seen in the image below? Would the second image work as well using the extra 12v pad to power the relay board module instead?
Wow! Thank you so much. This exactly what I needed. The picture helped a great deal too.
Wow! Thank you so much. This exactly what I needed. The picture helped a great deal too.
I was asking, swimlan. Don't count it as confirmation please!
")


$49.95 ($0.08 / Fl Oz)
$52.99 ($0.08 / Fl Oz)
Brewer's Best - 1073 - Home Brew Beer Ingredient Kit (5 gallon), (Blueberry Honey Ale) Golden
Amazon.com


$176.97
1pc Commercial Keg Manifold 2" Tri Clamp,Ball Lock Tapping Head,Pressure Gauge/Adjustable PRV for Kegging,Fermentation Control
hanhanbaihuoxiaoshoudian


$33.99 ($17.00 / Count)
$41.99 ($21.00 / Count)
2 Pack 1 Gallon Large Fermentation Jars with 3 Airlocks and 2 SCREW Lids(100% Airtight Heavy Duty Lid w Silicone) - Wide Mouth Glass Jars w Scale Mark - Pickle Jars for Sauerkraut, Sourdough Starter
Qianfenie Direct


$53.24
1pc Hose Barb/MFL 1.5" Tri Clamp to Ball Lock Post Liquid Gas Homebrew Kegging Fermentation Parts Brewer Hardware SUS304(Liquid Hose Barb)
yunchengshiyanhuqucuichendianzishangwuyouxiangongsi


$719.00
$799.00
EdgeStar KC2000TWIN Full Size Dual Tap Kegerator & Draft Beer Dispenser - Black
Amazon.com


$479.00
$559.00
EdgeStar KC1000SS Craft Brew Kegerator for 1/6 Barrel and Cornelius Kegs
Amazon.com


$53.24
1pc Hose Barb/MFL 1.5" Tri Clamp to Ball Lock Post Liquid Gas Homebrew Kegging Fermentation Parts Brewer Hardware SUS304(Gas MFL)
Guangshui Weilu You Trading Co., Ltd


$22.00 ($623.23 / Ounce)
AMZLMPKNTW Ball Lock Sample Faucet 30cm Reinforced Silicone Hose Secondary Fermentation Homebrew Kegging joyful
无为中南商贸有限公司


$58.16
HUIZHUGS Brewing Equipment Keg Ball Lock Faucet 30cm Reinforced Silicone Hose Secondary Fermentation Homebrew Kegging Brewing Equipment
xiangshuizhenzhanglingfengshop


$44.99
$49.95
Craft A Brew - Mead Making Kit – Reusable Make Your Own Mead Kit – Yields 1 Gallon of Mead
Craft a Brew

$20.94
$29.99
The Brew Your Own Big Book of Clone Recipes: Featuring 300 Homebrew Recipes from Your Favorite Breweries
Amazon.com

$76.92 ($2,179.04 / Ounce)
Brewing accessories 1.5" Tri Clamp to Ball Lock Post Liquid Gas Homebrew Kegging Fermentation Parts Brewer Hardware SUS304 Brewing accessories(Gas Hose Barb)
chuhanhandianzishangwu


![Craft A Brew - Safale S-04 Dry Yeast - Fermentis - English Ale Dry Yeast - For English and American Ales and Hard Apple Ciders - Ingredients for Home Brewing - Beer Making Supplies - [1 Pack]](https://m.media-amazon.com/images/I/41fVGNh6JfL._SL500_.jpg)
$6.95 ($17.38 / Ounce)
$7.47 ($18.68 / Ounce)
Craft A Brew - Safale S-04 Dry Yeast - Fermentis - English Ale Dry Yeast - For English and American Ales and Hard Apple Ciders - Ingredients for Home Brewing - Beer Making Supplies - [1 Pack]
Hobby Homebrew


$7.79 ($7.79 / Count)
Craft A Brew - LalBrew Voss™ - Kveik Ale Yeast - For Craft Lagers - Ingredients for Home Brewing - Beer Making Supplies - (1 Pack)
Craft a Brew


Well, the above still didn't work for me. :/ I tried powering the board from the 12v in of the terragady board and also from the +12 pad and both were no go. I know the board works as I can get it to light up with 5v hooking it directly to the pi, but again, I want to use the terragady board and it is 12v. I even tried removing the jumper and powering from the JD-VOC and VOC there but nothing.
This is really frustrating. I guess I just wasted $50 on the terragady board
This is really frustrating. I guess I just wasted $50 on the terragady board
Carlscan26
Well-Known Member
Is CraftBeerPi capable of controlling a gas solenoid? I.e. The Honeywell controller(s) most people are using? I imagine you'd want a slower relay style PID algorithm as you can't flutter the gas valve the same way you can an SSR right?
There's almost no run-on with a gas burner - heat input to the kettle ceases immediately when the burner is shut down - so I'd think a simple on/off thermostat mode would be effective enough.
Don't know if CBP can do that or not...
Cheers!
Don't know if CBP can do that or not...
Cheers!
- Joined
- Mar 24, 2016
- Messages
- 558
- Reaction score
- 60
Well, the above still didn't work for me. :/ I tried powering the board from the 12v in of the terragady board and also from the +12 pad and both were no go. I know the board works as I can get it to light up with 5v hooking it directly to the pi, but again, I want to use the terragady board and it is 12v. I even tried removing the jumper and powering from the JD-VOC and VOC there but nothing.
This is really frustrating. I guess I just wasted $50 on the terragady board
Maybe 5v volt power supply then.
hairybiker
Member
- Joined
- Feb 17, 2017
- Messages
- 8
- Reaction score
- 5
Either should/would work.
NB YOU MUST HAVE A 12V RELAY BOARD.
YOU also need to set the TYPE in the software, re-run the setup and change the gpio pin from Low to Hi or vice versa..
Since the board runs through a transistor, you may need to set it to active HI so it activates the transistor.
IF you have a meter, check the voltage on the gpio terminal when active/off, it should go from 12 to 0 or 0 to 12.
Is CraftBeerPi capable of controlling a gas solenoid? I.e. The Honeywell controller(s) most people are using? I imagine you'd want a slower relay style PID algorithm as you can't flutter the gas valve the same way you can an SSR right?
Yes, I use it to control a Honeywell valve. It does not current support the safety features one should have to control the solenoid in its entirety (i.e. Flame detection, auto-shutoff, etc) which is why many use the Honeywell which have these features built in.
I drive a SSR through gpio (I use the official board) with a 24v transformer on the back of the SSR to power the Honeywell solenoid. The pilot light is started manually to start the brewday.
toadyus
Well-Known Member
Yes, I use it to control a Honeywell valve. It does not current support the safety features one should have to control the solenoid in its entirety (i.e. Flame detection, auto-shutoff, etc) which is why many use the Honeywell which have these features built in.
I drive a SSR through gpio (I use the official board) with a 24v transformer on the back of the SSR to power the Honeywell solenoid. The pilot light is started manually to start the brewday.
Do you have a link to the Honeywell Solenoid that you are using? Thanks
Do you have a link to the Honeywell Solenoid that you are using? Thanks
Transformer: Honeywell AT72D1683 120V/24V Transformer https://www.amazon.com/dp/B000692A58/?tag=skimlinks_replacement-20
Valve: Honeywell International VR8200A2132 Valve https://www.amazon.com/dp/B00ECV2W90/?tag=skimlinks_replacement-20
Thermocouple: Honeywell CQ100A1005 36-Inch Replacement Thermocouple for Gas Furnaces, Boilers and Water Heaters https://www.amazon.com/dp/B002YFGFNK/?tag=skimlinks_replacement-20
Pilot: Honeywell Q314A4586 Pilot Burner - Use with natural gas and propane https://www.amazon.com/dp/B003CW0D1E/?tag=skimlinks_replacement-20
Last edited by a moderator:
Has anyone done this with a gas burner yet? Looking at the Blichmann solenoid to make this happen from the SSR, but the ignition is the thing I'm stumped with right now.
Well I found a way to get it working if it helps anyone. I picked up the Robertshaw 785-001 relighter/auto pilot off of Amazon, and a 1/4 in solenoid off another site that tied right into the burner SSR. Did cost more than $70, and has been working well so far. The Henao Tech Craftbeerpi board once dialed in to 5v has been solid so far. Hope that helps anyone looking around.
Cheers
Carlscan26
Well-Known Member
Thanks Metzen and mlopezaz!
Bigdaddyale
Well-Known Member
helibrewer
Well-Known Member
The new 3.1 board connected to the pi...perfect for the new Pi Zero or Pi Zero W.
Are the MP1584 modules in your DIY kit already set to 5V output?
EDIT: Any tricks/hints for soldering the module onto the board?
Thanks
thestealth
Active Member
- Joined
- Aug 29, 2015
- Messages
- 39
- Reaction score
- 14
Are the MP1584 modules in your DIY kit already set to 5V output?
EDIT: Any tricks/hints for soldering the module onto the board?
Thanks
I used some PCB headers like these:

helibrewer
Well-Known Member
I used some PCB headers like these:
Thanks, I have a bunch of those...it looked like some guys surface mounted it. I'll go with the pins.
toadyus
Well-Known Member
Are the MP1584 modules in your DIY kit already set to 5V output?
EDIT: Any tricks/hints for soldering the module onto the board?
Thanks
Yes, I preset them at 5v as I didn't want to leave this up to the end user and end up having to replace a bunch of raspberry pi's.
I just use the cut offs from the BC337's or Diodes and slide them through the board and solder them 8x on the top and 8x on the bottom and then just cut off the extra bits.
helibrewer
Well-Known Member
Yes, I preset them at 5v as I didn't want to leave this up to the end user and end up having to replace a bunch of raspberry pi's.
I just use the cut offs from the BC337's or Diodes and slide them through the board and solder them 8x on the top and 8x on the bottom and then just cut off the extra bits.
Awesome, thanks
helibrewer
Well-Known Member
Last question....I think. What size standoff's are you guys using between these boards?
Last question....I think. What size standoff's are you guys using between these boards?
11mm for the HENAO board and a RPi 2B v1.1. Presume the same for the toadyus board.
Bigdaddyale
Well-Known Member
What's the difference between terragady 4.2 and toadyus board?
helibrewer
Well-Known Member
What's the difference between terragady 4.2 and toadyus board?
They are one in the same
dyqik
Well-Known Member
So, dumb question after reading most of this thread: I've seen a few comments on using PT100s with the MAX31865 breakouts - has anyone actually done this and written code to do it?
I'm happy to write the code myself for the AdaFruit breakout/interfaces, but I thought I'd ask first.
I'm wanting to be able to switch back to my PID controller for the RIMS tube easily if the Raspberry Pi solution doesn't work for me, so I don't want to start incorporating one-wire sensors (particularly in the kettle) where I've already got PT100s on nice stainless threaded fittings.
So, dumb question after reading most of this thread: I've seen a few comments on using PT100s with the MAX31865 breakouts - has anyone actually done this and written code to do it?
I'm happy to write the code myself for the AdaFruit breakout/interfaces, but I thought I'd ask first.
I'm wanting to be able to switch back to my PID controller for the RIMS tube easily if the Raspberry Pi solution doesn't work for me, so I don't want to start incorporating one-wire sensors (particularly in the kettle) where I've already got PT100s on nice stainless threaded fittings.
Have you seen this? https://github.com/steve71/MAX31865
subscribing
dyqik
Well-Known Member
Have you seen this? https://github.com/steve71/MAX31865
I think so, but I can't remember exactly what I'd browsed through
Anyway, Microcenter in Cambridge had a raspberry pi 3 for $30 and two of the adafruit MAX31865 boards earlier today - they've sold out of the boards now
So, dumb question after reading most of this thread: I've seen a few comments on using PT100s with the MAX31865 breakouts - has anyone actually done this and written code to do it?
I'm happy to write the code myself for the AdaFruit breakout/interfaces, but I thought I'd ask first.
I'm wanting to be able to switch back to my PID controller for the RIMS tube easily if the Raspberry Pi solution doesn't work for me, so I don't want to start incorporating one-wire sensors (particularly in the kettle) where I've already got PT100s on nice stainless threaded fittings.
I use my RIMS tube for souse vide with a PID occasionally in addition to brewing with SBE software, so I had to address this exact issue. All I did was put a Tee fitting on the output of my RIMS tube with both a PT100 and a thermowell for a DS18B20. I connect the PID to the PT100 for souse vide, and put a one wire probe in the thermowell for brewing.
I think so, but I can't remember exactly what I'd browsed through
Anyway, Microcenter in Cambridge had a raspberry pi 3 for $30 and two of the adafruit MAX31865 boards earlier today - they've sold out of the boards now
Bummer.
Bought a Rpi3 at same price and a Zero at that same location when visiting on vacation this past September. Nice store. Wish I had waited for the Zero W.jcmcdowell
Well-Known Member
I'm building a 5bbl electric brew system (upgrading from a 3bbl electric brew system) and I like the CraftbeerPi but the big hurdle I can't overcome is the brew steps won't start the timer automatically.
For the Mash Tun- It's great in a one man brewery to be able to let the controller go from Mash to Mash Out.
For the Boil Kettle- You want the boil to run it's course and having an alarm sound for the hop additions helps with keeping the brews consistent.
So far it looks I would need TWO CraftBeerPi setups to be able to run double batches. I can't see any way to control both the Mash Tun and Boil Kettle at the same time with brew steps. Manual control would seem possible but you lose all the benefit of the automation.
Am I doing something wrong? Anyone figure this out yet?
Regards,
Bigdaddyale
Well-Known Member
I have two terragady 4.2 boards available.These are the last two of a run from DirtyCheap PCB I did last summer.Email me at jamesw@tstonramp dot com if you are interested. $5.00 plus $2.00 shipping.Make sure you mention craftbeerpi board in the subject line of the email.You can leave a comment to this post as well. For some reason, I don't receive PM on this site unless you are on my list.
EDIT: Both boards have been purchased as of 6/19/17
You can find boards at
https://www.terragady.com/
https://www.facebook.com/craftbeerpi
EDIT: Both boards have been purchased as of 6/19/17
You can find boards at
https://www.terragady.com/
https://www.facebook.com/craftbeerpi
dyqik
Well-Known Member
Bummer.
They've sold out because I bought both of them...
The adafruit boards weren't listed on the Microcenter website or on Amazon, so I'm pleased that they actually had them, saving me the shipping from Adafruit.
I have two terragady 4.2 boards available.These are the last two of a run from DirtyCheap PCB I did last summer.Email me at jamesw@tstonramp dot com if you are interested. $5.00 plus $2.00 shipping.Make sure you mention craftbeerpi board in the subject line of the email.You can leave a comment to this post as well. For some reason, I don't receive PM on this site unless you are on my list.
email sent
boomerbrian
Member
- Joined
- Dec 13, 2016
- Messages
- 24
- Reaction score
- 9
I have two terragady 4.2 boards available.These are the last two of a run from DirtyCheap PCB I did last summer.Email me at jamesw@tstonramp dot com if you are interested. $5.00 plus $2.00 shipping.Make sure you mention craftbeerpi board in the subject line of the email.You can leave a comment to this post as well. For some reason, I don't receive PM on this site unless you are on my list.
Email sent
helibrewer
Well-Known Member
I have the Terragaddy board (4 x 12V and 3 sensor) and I really like the layout. With all the plugin's now being provided to v3 I have found accessing all the additional GPIO pins on the Pi to be problematic. Is anyone using an additional shield to provide access to all GPIO's as well as mount the Terragaddy? I suppose I could mount them separately and just run wire between to power the Pi from the Terragady.
EDIT: Found a solution: Pi EzConnect. You will need 1/2"(13mm)xM2.5 standoffs
EDIT: Found a solution: Pi EzConnect. You will need 1/2"(13mm)xM2.5 standoffs
Last edited by a moderator:
- Joined
- Mar 24, 2016
- Messages
- 558
- Reaction score
- 60
Anyone else's craftbeerpi 2.2 or 3.0 server seem to crash ever so often. The menu items can be clicked on but I can't enable/disable any buttons on main page. The Pi itself isn't frozen. On 2.2 it seemed to occur when switching kettles (mash to boil) that used the same gpio (I BIAB). On 3.0 the server freezes most often using Fahrenheit with PIDarduino and less often using Celsius. Any thoughts or suggestions? Does this happen to others?
dyqik
Well-Known Member
I have the Terragaddy board (4 x 12V and 3 sensor) and I really like the layout. With all the plugin's now being provided to v3 I have found accessing all the additional GPIO pins on the Pi to be problematic. Is anyone using an additional shield to provide access to all GPIO's as well as mount the Terragaddy? I suppose I could mount them separately and just run wire between to power the Pi from the Terragady.
EDIT: Found a solution: Pi EzConnect. You will need 1/2"(13mm)xM2.5 standoffs
I've just ordered one of these, so I can hook up the Adafruit PT100 boards at the same time as the Terragady board.
I've got the Adafruit MAX31865 PT100 board working with the code linked above (needed to alter it slightly as the Adafruit board uses a different reference resistor - 430 Ohms instead of 400 Ohms), so now I need to port that code into a CBP temperature sensor module (using the 1-wire sensor code as a model).
Last edited by a moderator:
Similar threads
- Replies
- 7
- Views
- 2K
- Replies
- 6
- Views
- 2K
- Replies
- 15
- Views
- 2K
- Replies
- 9
- Views
- 4K

Latest posts
-
 Barleywine natural conditioning failed, switched to force carb, but now what? 😆
- Latest: BrewnWKopperKat
-

-

-

-

-

-
-